
1. Introduction
This user manual provides essential information for the ROBOTICSSIGN ESP32-S3-DEVKITC-1-N16R8 Development Board. It covers product overview, features, specifications, setup, operation, maintenance, and troubleshooting to help users effectively utilize this high-performance IoT development board.
2. Product Overview
The ESP32-S3-DEVKITC-1-N16R8 is an advanced IoT development board featuring the ESP32-S3 module. It is equipped with a high-performance dual-core LX7 processor, 16MB Flash memory, and 8MB PSRAM, making it suitable for complex IoT applications requiring robust processing and memory capabilities. The board includes built-in IPEX antenna support and dual Type-C ports for versatile connectivity and power options.
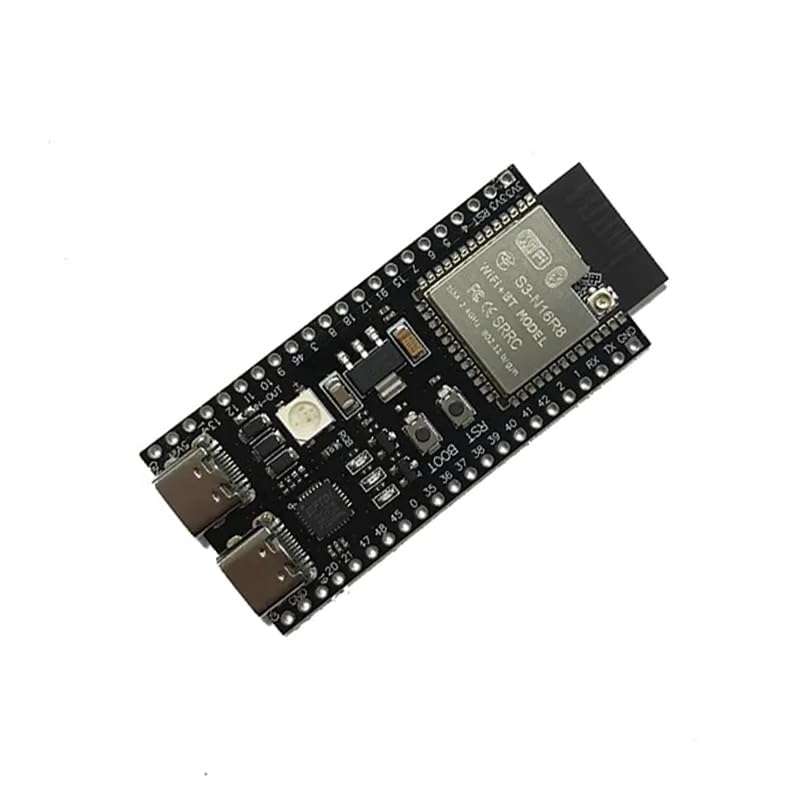
Figure 1: ROBOTICSSIGN ESP32-S3-DEVKITC-1-N16R8 Development Board. This image displays the compact design of the development board, highlighting its various components and ports.
3. Key Features
- ESP32-S3 N16R8 Module: Integrates 16MB Flash and 8MB PSRAM for efficient memory management and storage.
- Dual Type-C Ports: Supports fast data transfer and power delivery, enhancing connectivity options.
- Built-in IPEX Antenna Base: Provides enhanced Wi-Fi and Bluetooth connectivity with 2.4GHz antenna support.
- LX7 Dual-Core Processor: High-performance processing for advanced IoT applications.
- Working Voltage: Operates within a 3.3V to 5V range.
- Wireless Connectivity: Features integrated Wi-Fi and Bluetooth for versatile communication.
4. Technical Specifications
| Specification | Detail |
|---|---|
| Brand | ROBOTICSSIGN |
| Model Number | ESP32-S3-DEVKITC-1-N16R8 |
| Processor | LX7 Dual-Core |
| Flash Memory | 16 MB |
| PSRAM | 8 MB |
| Connectivity Technology | Wi-Fi, Bluetooth, USB (Type-C) |
| Working Voltage | 3.3V ~ 5V |
| Antenna | Built-in IPEX Antenna Base (2.4GHz support) |
| Item Weight | 200 Grams |
| Country of Origin | China |
5. Setup Guide
Follow these steps to set up your ESP32-S3-DEVKITC-1-N16R8 development board:
- Connect to Computer: Use a USB Type-C cable to connect the development board to your computer. Ensure the cable supports data transfer.
- Install USB Drivers: Depending on your operating system, you may need to install specific USB-to-serial drivers (e.g., CP210x or CH340 drivers). These are typically available from the chip manufacturer's website or the ESP-IDF documentation.
- Install Development Environment:
- ESP-IDF: For advanced development, install Espressif IoT Development Framework (ESP-IDF). Refer to the official Espressif documentation for detailed installation instructions.
- Arduino IDE: For simpler projects, install the Arduino IDE and add ESP32 board support. Search for "ESP32 Arduino Core" installation guides online.
- Select Board and Port: In your chosen IDE, select the correct ESP32-S3 board model and the serial port assigned to your connected board.
- Power Supply: The board can be powered via the USB Type-C port. Ensure a stable power supply within the specified voltage range (3.3V-5V).
6. Operating Instructions
Once the development environment is set up, you can begin programming and operating your ESP32-S3 board:
- Write Code: Develop your application code using C/C++ with ESP-IDF or Arduino sketches.
- Compile and Upload: Compile your code within the IDE. Once compiled, upload it to the ESP32-S3 board via the selected serial port. The board will typically enter programming mode automatically.
- Monitor Serial Output: Use the serial monitor feature in your IDE to view debug messages and application output from the ESP32-S3.
- Utilize Wi-Fi and Bluetooth: Implement Wi-Fi and Bluetooth functionalities in your code to connect to networks, other devices, or cloud services.
- GPIO Control: Program the General Purpose Input/Output (GPIO) pins to interface with external sensors, actuators, and other peripherals.
7. Maintenance
- Keep Dry: Protect the board from moisture and liquids to prevent short circuits and damage.
- Handle with Care: Avoid dropping or subjecting the board to physical shock. Handle by the edges to prevent static discharge damage to components.
- Cleanliness: Keep the board free from dust and debris. Use a soft, dry brush or compressed air for cleaning if necessary.
- Proper Storage: When not in use, store the board in an anti-static bag or a protective enclosure.
- Power Off Before Connecting/Disconnecting: Always disconnect power before connecting or disconnecting peripherals to prevent damage.
8. Troubleshooting
- Board not detected by computer:
- Ensure USB Type-C cable is data-capable and properly connected.
- Install or update the correct USB-to-serial drivers (e.g., CP210x, CH340).
- Try a different USB port or computer.
- Failed to upload firmware:
- Verify the correct board and serial port are selected in your IDE.
- Ensure no other application is using the serial port.
- Check if the board is in bootloader mode (sometimes requires holding a "BOOT" button while pressing "RESET" during upload).
- Confirm power supply is stable.
- Wi-Fi/Bluetooth connectivity issues:
- Check your code for correct Wi-Fi/Bluetooth credentials and logic.
- Ensure the IPEX antenna is securely connected if using an external antenna.
- Verify the 2.4GHz frequency band is being used.
9. Warranty and Support
This ROBOTICSSIGN product is typically covered by a standard manufacturer's warranty against defects in materials and workmanship. For specific warranty terms, duration, and support inquiries, please refer to the documentation provided with your purchase or contact ROBOTICSSIGN customer support directly. Keep your proof of purchase for warranty claims.
For technical assistance and further resources, visit the official Espressif Systems website for ESP32-S3 documentation and community forums. You can also search for community support related to ESP32-S3 development boards.


