Introduction
This manual provides detailed instructions for the Generic B85 M-ATX Motherboard (Model LDHHNLEBS). It covers installation, configuration, and troubleshooting for Intel LGA1150 processors, DDR3 memory, M.2 NVME, SATA 3.0, and various expansion slots and ports. This motherboard is designed for reliable performance in gaming, audio/video, and office applications.
Safety Information
Always observe the following safety precautions when installing or handling the motherboard:
- Disconnect the power cord from the wall outlet before touching any components.
- Wear an anti-static wrist strap or frequently touch a grounded object to discharge static electricity.
- Handle the motherboard by its edges to avoid touching sensitive components.
- Keep the motherboard away from moisture and extreme temperatures.
- Ensure proper ventilation within the computer case.
Package Contents
Verify that all items are present in the package:
- Generic B85 M-ATX Motherboard (LDHHNLEBS)
- Power Adapter
- I/O Shield (typically included)
- SATA Cables (typically included)
- User Manual (this document)
Note: Actual contents may vary. Please refer to the product packaging for an exact list.
Motherboard Layout
An overview of the motherboard components and their locations.
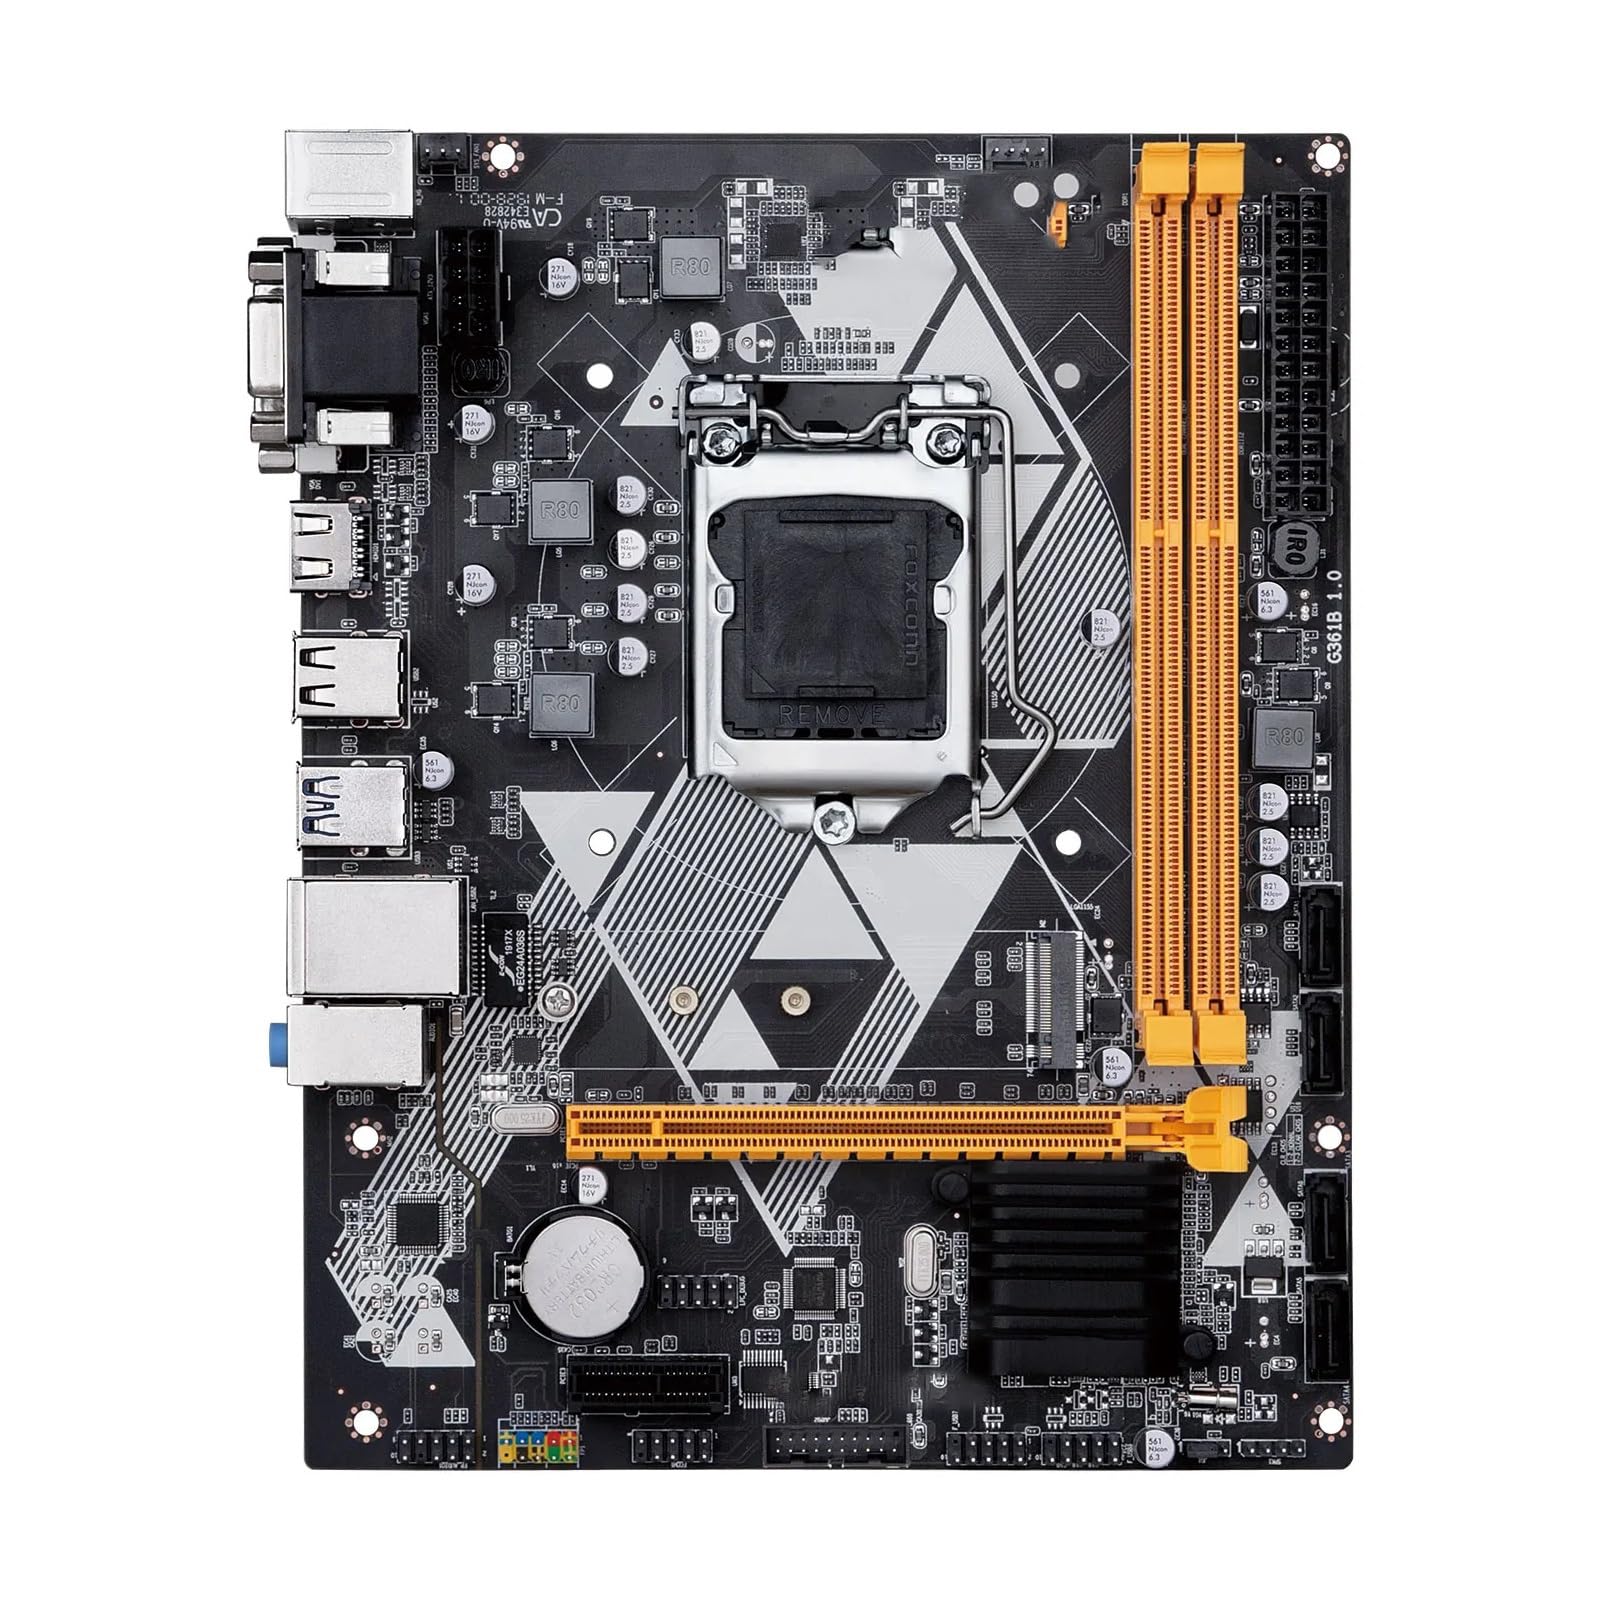
Figure 1: Top-down view of the Generic B85 M-ATX Motherboard. This image shows the CPU socket (LGA1150), DDR3 memory slots, PCI Express slots, SATA ports, and various headers for power and peripherals.
Setup and Installation
1. CPU Installation (LGA1150)
- Locate the LGA1150 socket on the motherboard.
- Open the CPU socket lever and lift the load plate.
- Carefully align the CPU with the socket, ensuring the triangular mark on the CPU matches the mark on the socket. Do not force the CPU into the socket.
- Lower the load plate and secure it with the lever.
- Apply thermal paste to the CPU and install the CPU cooler according to its instructions.
2. Memory (RAM) Installation (DDR3)
This motherboard supports 2 x DDR3 memory slots, with a maximum capacity of 16GB, supporting dual-channel DDR3 1600/1333 MHz.
- Open the clips at both ends of the DIMM slot.
- Align the notch on the DDR3 memory module with the key in the DIMM slot.
- Press down firmly on both ends of the memory module until the clips snap into place.
3. Storage Device Installation (SATA & M.2 NVME)
The motherboard features 4 x SATA 3.0 interfaces and 1 x M.2 NVME slot.
- SATA Drives: Connect one end of a SATA data cable to a SATA port on the motherboard and the other end to your SATA hard drive or SSD. Connect a SATA power cable from your power supply to the drive.
- M.2 NVME SSD: Insert the M.2 NVME SSD into the M.2 slot at an angle, then gently push it down and secure it with the provided screw.
4. Expansion Card Installation (PCI Express)
The motherboard includes 1 x PCI Express 3.0 x16 slot and 1 x PCI Express x1 slot.
- Align your expansion card (e.g., graphics card) with the appropriate PCI Express slot.
- Press down firmly until the card is fully seated in the slot.
- Secure the card to the chassis with a screw.
5. Power Connections
Connect the 24-pin ATX power connector and the 8-pin CPU power connector from your power supply to the corresponding ports on the motherboard.
6. Front Panel and Peripheral Connections
Connect the front panel headers (power button, reset button, HDD LED, power LED, USB ports, audio jacks) to their respective pins on the motherboard. Refer to the motherboard diagram for exact pin locations.
7. Rear I/O Panel
The rear I/O panel provides various ports for connecting external devices.

Figure 2: Rear I/O panel of the Generic B85 M-ATX Motherboard. Ports include PS/2 for keyboard/mouse, VGA, DVI, HDMI, USB 2.0, USB 3.0, RJ45 LAN, and audio jacks.
- PS/2 Ports: For legacy keyboard and mouse.
- Video Outputs: VGA, DVI, HDMI for display connections.
- USB Ports: For connecting USB devices.
- RJ45 LAN Port: For network connection.
- Audio Jacks: For speakers, headphones, and microphones.
Operating the Motherboard
First Boot and BIOS Setup
- After assembling all components, connect your monitor, keyboard, and mouse.
- Power on your system.
- Press the designated key (usually DEL or F2) during startup to enter the BIOS/UEFI setup utility.
- Configure boot order, system time, and other necessary settings. Save changes and exit.
- Proceed with operating system installation.
Maintenance
- Cleaning: Regularly clean dust from the motherboard and components using compressed air. Ensure the system is powered off and unplugged before cleaning.
- BIOS Updates: Check the manufacturer's website for BIOS/UEFI updates. Follow their instructions carefully to avoid system instability.
- Driver Updates: Keep your device drivers (chipset, graphics, audio, LAN) updated for optimal performance and stability.
Troubleshooting
If you encounter issues, refer to the following common troubleshooting steps:
- No Power:
- Check all power connections (24-pin ATX, 8-pin CPU, GPU power).
- Ensure the power supply is switched on.
- Test the power supply with another system if possible.
- No Display:
- Verify monitor cable connections.
- Ensure the graphics card (if dedicated) is properly seated and powered.
- Try using integrated graphics (VGA, DVI, HDMI ports on the motherboard) if available and your CPU supports it.
- Reseat RAM modules.
- System Instability/Crashes:
- Check CPU and GPU temperatures.
- Ensure RAM is compatible and properly installed.
- Run memory diagnostic tools.
- Update drivers and BIOS.
- Peripheral Not Detected:
- Try a different port.
- Install/update drivers for the peripheral.
- Check BIOS settings for port enablement.
Specifications
| Feature | Detail |
|---|---|
| Model Name | LDHHNLEBS |
| Chipset | Intel B85 |
| CPU Socket | LGA1150 |
| Supported CPUs | Intel LGA1150 pin series (i3, i5, i7, E3) |
| Memory Slots | 2 x DDR3 DIMM |
| Max Memory Capacity | 16GB |
| Memory Standard | Dual Channel DDR3 1600/1333 MHz |
| SATA Interfaces | 4 x SATA 3.0 |
| Expansion Slots | 1 x PCI Express 3.0 x16, 1 x PCI Express x1, 1 x M.2 NVME |
| Power Interface | 24-pin + 8-pin |
| Fan Interface | 1 |
| PCB Layers | 4 layers, 3-phase power supply |
| Form Factor | M-ATX (210 x 168 mm) |
| Integrated LAN | 1 x RJ45 (1 Gigabit per second data transfer rate) |
| Rear I/O Ports | VGA, DVI, HDMI, USB 2.0, USB 3.0, RJ45, Audio Jacks, PS/2 |
| RAID Support | No |
| Application | Desktop (Gaming, Audio/Video, Office) |
Warranty and Support
This product is typically covered by a standard return policy. For specific warranty details, please refer to your purchase documentation or contact the seller directly. The Amazon return policy indicates a 30-day refund/replacement period.
For technical support or troubleshooting assistance beyond this manual, please contact the seller or manufacturer through your purchase platform. When contacting support, provide your product model (LDHHNLEBS) and a detailed description of the issue.
Note: The product description mentions a friendly customer service and a promise to resolve issues within 24 hours if contacted via order information or email. This suggests direct seller support.