
Introduction
Thank you for choosing the Decofy Farmhouse Nightstand with Charging Station. This manual provides essential information for the safe assembly, setup, operation, and maintenance of your new nightstand. Please read these instructions carefully before beginning assembly and retain them for future reference.
Safety Information
- Always unplug the charging station before cleaning or handling the unit.
- Do not overload the nightstand with items heavier than the recommended maximum weight of 100 pounds (45.36 kg).
- Ensure the nightstand is properly assembled and stable before use to prevent tipping or injury.
- Keep the charging station away from water and heat sources to prevent electrical hazards.
- Always follow the assembly instructions carefully. Incorrect assembly can lead to instability and potential injury.
- Do not allow children to climb on or play with the nightstand.
Package Contents
Before assembly, verify that all components listed below are present and undamaged. If any parts are missing or damaged, please contact customer support.
- Nightstand components (engineered wood panels, legs, drawer parts)
- Hardware pack (screws, bolts, cam locks, dowels, drawer slides, handles)
- Charging Station unit (pre-installed or separate)
- Assembly Guide
- Tools Recommended For Assembly: Screw Driver (not included)
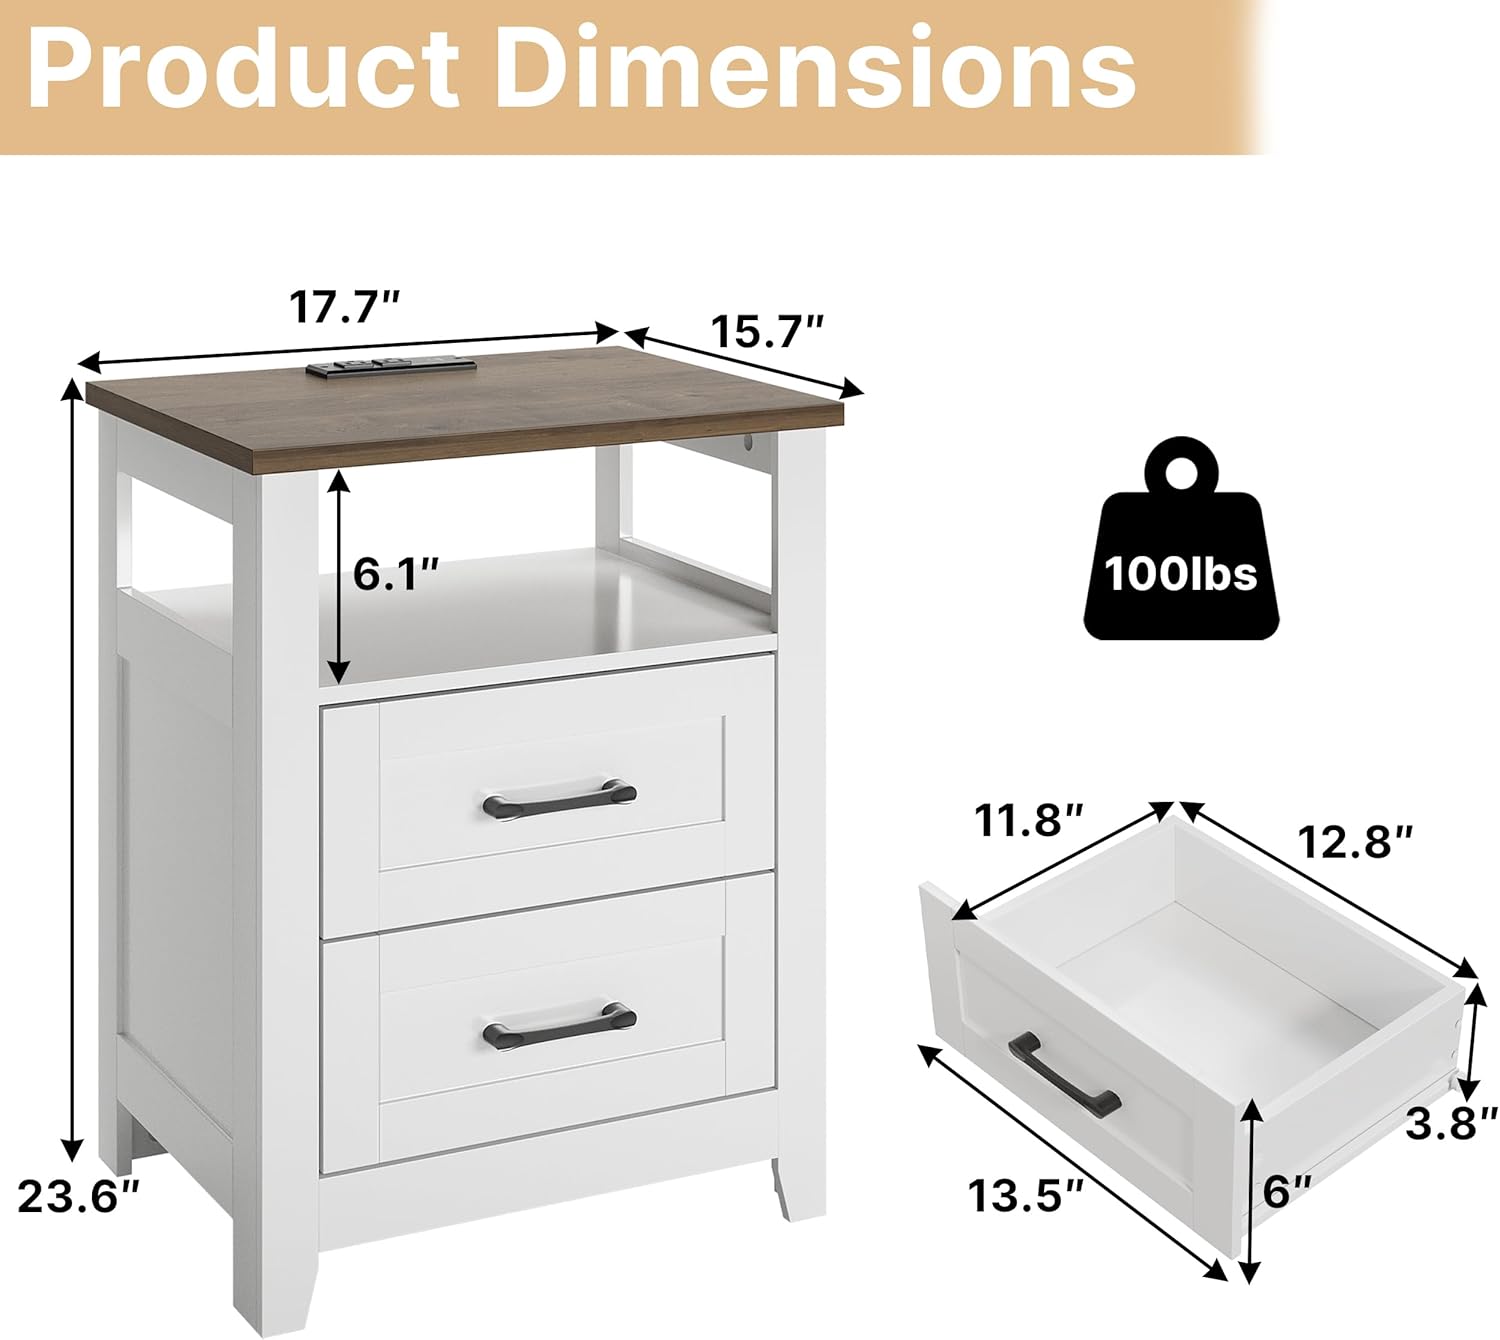
Image: Overview of nightstand components and their dimensions, including the top surface, drawers, and overall height and width.
Assembly Instructions
Assembly is required for this nightstand. Please follow the step-by-step illustrated instructions provided in the included Assembly Guide. All parts are labeled, and pre-drilled holes are present to simplify the process. Do not use power tools for assembly as this may damage the wood.
- Step 1: Attach Legs
Attach the legs to the bottom panel using the provided screws. Tighten securely with a screwdriver. - Step 2: Install Side Panels
Connect the side panels to the leg assembly and bottom panel using cam locks and dowels as indicated in the guide. - Step 3: Insert Tabletop Support Brackets
Insert the tabletop support brackets into the pre-drilled holes on the top edges of the side panels. - Step 4: Secure Top Panel
Place the top panel onto the assembled frame, aligning it with the support brackets. Secure the top panel using the included hex bolts. - Step 5: Assemble Drawers
Assemble the two drawers according to the instructions, ensuring the drawer slides are correctly installed. Attach the handles to the drawer fronts. - Step 6: Install Drawers
Carefully slide the assembled drawers into the nightstand frame. Ensure they operate smoothly. - Step 7: Final Check
Once all connections are secure, carefully flip the table upright. Ensure all screws and bolts are tightened, and the nightstand is stable.

Image: The nightstand with its two drawers and open shelf, illustrating the storage capacity.

Image: Detail of the drawer slide mechanism, ensuring smooth operation.
Setup and Operation
Charging Station Setup
The built-in charging station is designed for convenience. It features 2 standard AC outlets, 1 USB port, and 1 Type-C port.
- Connect Power: Plug the power cord from the charging station into a standard wall outlet.
- Device Charging: Connect your devices (phones, tablets, headphones, etc.) to the available AC outlets, USB port, or Type-C port.
- Cable Management: Utilize the design of the nightstand to keep charging cables organized and prevent clutter.

Image: The integrated charging station on the nightstand's top surface, featuring AC outlets, USB, and Type-C ports in use.
Drawer and Shelf Operation
The nightstand includes two drawers and an open shelf for storage and display.
- Drawers: Pull the handles to open the drawers. Ensure items are placed evenly to maintain smooth operation of the slides.
- Open Shelf: Use the open shelf for easy access items like books, remote controls, or decorative pieces.
Maintenance
- Cleaning: Wipe the nightstand surfaces with a soft, damp cloth. Avoid harsh chemicals or abrasive cleaners that could damage the finish.
- Dusting: Regularly dust the surfaces to prevent buildup.
- Spills: Clean up spills immediately to prevent staining, especially on the wood grain top.
- Charging Station: Ensure the charging station remains dry. If it gets wet, unplug it immediately and allow it to dry completely before re-using.
- Hardware: Periodically check and tighten any loose screws or bolts to maintain stability.
Troubleshooting
| Problem | Possible Cause | Solution |
|---|---|---|
| Nightstand is wobbly | Loose hardware; uneven floor | Tighten all screws and bolts. Adjust leg levelers if applicable, or place shims under legs on uneven surfaces. |
| Drawers do not slide smoothly | Incorrectly installed drawer slides; obstruction in slides; overloaded drawer | Recheck drawer slide installation. Remove any obstructions. Reduce weight in the drawer. |
| Charging station not working | Not plugged in; power outage; faulty device cable | Ensure the power cord is securely plugged into a working wall outlet. Check if the wall outlet has power. Try a different device cable. |
Specifications
| Feature | Detail |
|---|---|
| Brand | Decofy |
| Model Name | DC-BG18 |
| Product Dimensions (D x W x H) | 17.5" x 17.7" x 23.6" (44.45 cm x 44.96 cm x 59.94 cm) |
| Item Weight | 47.96 Pounds (21.75 kg) |
| Maximum Weight Recommendation | 100 Pounds (45.36 kg) |
| Frame Material | Engineered Wood |
| Furniture Finish | Painted/Lacquered (White) + Walnut |
| Top Color | Natural Wood Grain |
| Number of Drawers | 2 |
| Charging Station | 2 AC Outlets (125V-12A), 1 USB Port (5V-2A), 1 Type-C Port (5V-2A) |
| Indoor/Outdoor Usage | Indoor |
| Required Assembly | Yes |
| Special Features | Charging Station, Easy Assembly |
Warranty and Support
Decofy products are manufactured with quality and customer satisfaction in mind. For specific warranty details, please refer to the documentation included with your purchase or contact Decofy customer support directly. If you encounter any issues or have questions regarding your nightstand, please reach out to our support team for assistance.
Contact Information: Please refer to your purchase receipt or the official Decofy website for the most current customer support contact details.