Introduction
This manual provides detailed instructions for the assembly, operation, and maintenance of your DWVO 47 Inch Bathroom Vanity with Double Sink. Please read all instructions carefully before beginning assembly and retain this manual for future reference. This vanity features a retro-inspired design, a sintered stone countertop, and double ceramic sinks, offering both aesthetic appeal and practical functionality for your bathroom.
Safety Information
- Always ensure all parts are securely fastened before use.
- Do not overload drawers or shelves to prevent tipping or damage.
- Keep small parts away from children during assembly.
- Use appropriate tools and follow all steps to avoid injury or damage to the product.
- This product is heavy; assembly may require two people.
Package Contents
Your DWVO 47 Inch Bathroom Vanity is delivered in two separate boxes, which may arrive at different times. Please verify all components are present before beginning assembly.
Included Components:
- Vanity Cabinet
- Sintered Stone Countertop with Double Ceramic Sinks
- Assembly Hardware (screws, dowels, cam locks, hinges, handles)
- Pushdown Drains (2)
Note: Faucets are not included and must be purchased separately.
Setup and Assembly
Follow these steps carefully for proper assembly. It is recommended to have two people for assembly due to the size and weight of the vanity.
Step 1: Prepare the Area
Clear a spacious, clean, and level area for assembly. Lay down a blanket or cardboard to protect the vanity components and your floor.
Step 2: Attach Legs
Attach the solid wood legs to the base of the vanity cabinet using the provided screws. Tighten securely with the included tool.
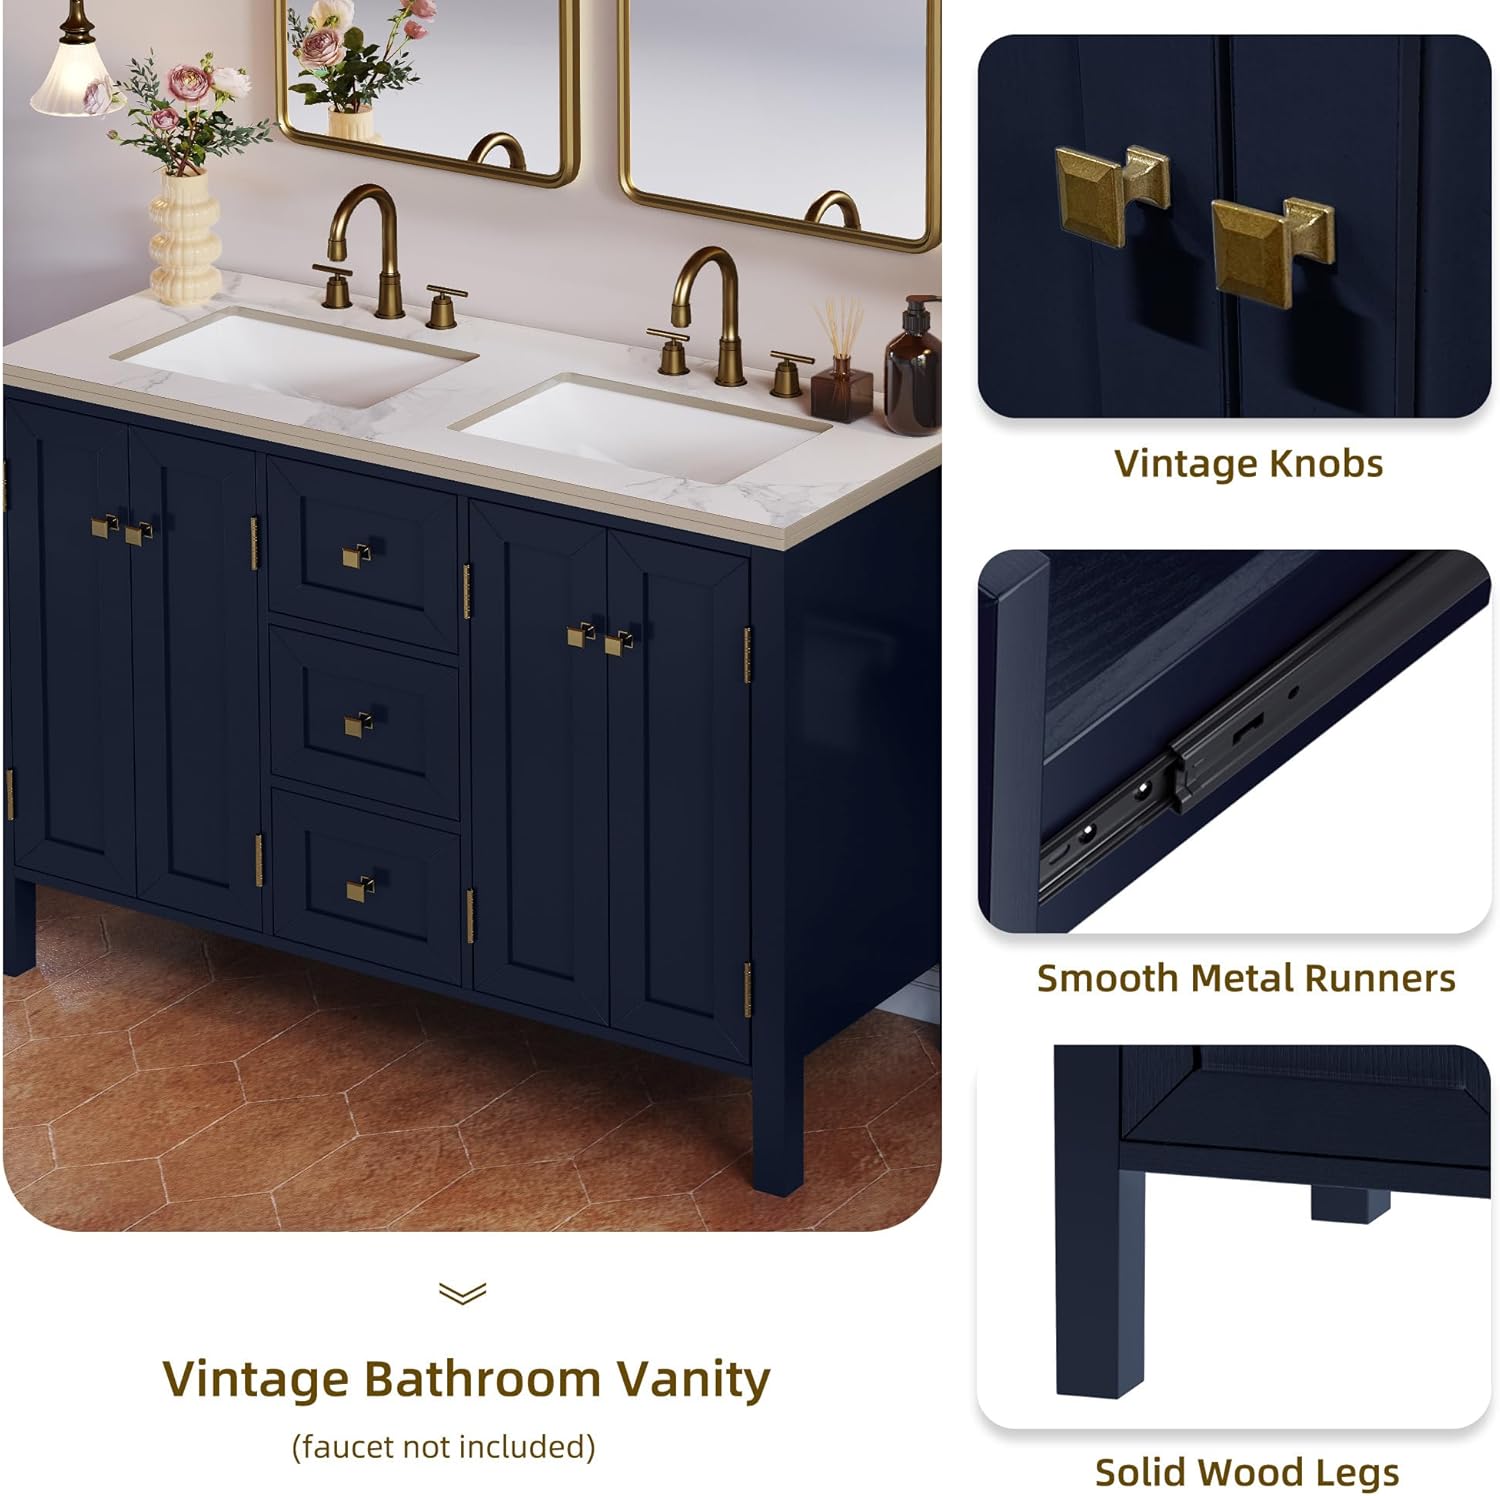
Figure 1: Solid Wood Legs. The vanity features sturdy solid wood legs for stability.
Step 3: Assemble Cabinet Frame
Connect the side panels to the back panel using the provided dowels and cam locks. Ensure all connections are tight and the frame is square.
Step 4: Install Shelves
Insert the internal shelves into the pre-drilled holes within the cabinet sections. Adjust shelf height as desired before securing.
Step 5: Attach Doors and Drawers
Attach the cabinet doors using the soft-close hinges and screws. Install the three pull-out drawers into their respective runners. Ensure smooth operation for both doors and drawers.

Figure 2: Multiple Storage Space. The vanity offers three extension drawers and four extra-large doors for ample storage.
Figure 3: Vintage Knobs and Smooth Metal Runners. Details of the retro-style metal handles and smooth-gliding drawer runners.
Step 6: Place Countertop and Sinks
Carefully place the sintered stone countertop with integrated double ceramic sinks onto the assembled cabinet. Ensure it is properly aligned and level. Apply a silicone sealant around the edges if desired for added water resistance (sealant not included).

Figure 4: Ceramic Basin & Sintered Stone Countertop. The countertop features a waterproof backboard, pre-drilled faucet holes (3 per sink), and pushdown drains.
Step 7: Install Faucets and Drains
Install your chosen faucets into the pre-drilled holes (6 holes total, 3 per sink). Connect the included pushdown drains to the sinks and plumbing according to standard plumbing practices. Ensure all connections are watertight.
Operation
Your DWVO Bathroom Vanity is designed for daily use in a bathroom environment. Its features are intended to provide convenience and organization.
Using the Sinks
The double ceramic sinks are designed for standard bathroom use. The pushdown drains allow for easy opening and closing to retain or release water. Ensure faucets are properly installed and connected to water lines before use.
Storage Cabinets and Drawers
The vanity features two magnetic double-door cabinets with two internal shelves and three smoothly sliding pull-out drawers. The soft-close hinges on the doors ensure quiet operation. Use the drawers for smaller items and the cabinets for larger toiletries, linens, or towels to maintain an organized space.
Care and Maintenance
Proper care will ensure the longevity and appearance of your vanity.
Cleaning the Countertop and Sinks
The ceramic sinks and artificial stone countertop are designed to be easy to clean. Wipe regularly with a soft, damp cloth and a mild, non-abrasive cleaner. Avoid harsh chemicals or abrasive scrubbing pads, which can damage the surface finish.
Cleaning the Cabinet
The engineered wood cabinet with its painted finish can be cleaned with a soft, damp cloth. Avoid excessive moisture and promptly wipe away any spills to prevent water damage. Do not use abrasive cleaners or solvents.

Figure 5: High Quality Engineered Materials. The vanity is constructed from premium MDF board with a painted finish and smooth ceramic basins for durability.
Hardware Maintenance
Periodically check all screws and fasteners to ensure they remain tight. Tighten as necessary to maintain stability. The metal handles can be cleaned with a soft, dry cloth.
Troubleshooting
This section addresses common issues you might encounter.
Issue: Drawers or Doors Do Not Close Smoothly
- Solution: Check that the drawer runners are properly aligned and free of obstructions. For doors, ensure hinges are securely fastened and adjusted correctly. The soft-close mechanism may need minor adjustment if the door is not closing fully.
Issue: Water Leaks from Sink or Faucet Connections
- Solution: Turn off the water supply. Inspect all plumbing connections for tightness. Ensure plumber's tape or sealant was used correctly during faucet and drain installation. If leaks persist, consult a qualified plumber.
Issue: Vanity Feels Unstable
- Solution: Verify that the vanity is placed on a level surface. Check all leg and cabinet frame connections and tighten any loose screws. Ensure the countertop is seated correctly and evenly.
Specifications
| Feature | Detail |
|---|---|
| Model Number | MADWVhr7Fz |
| Brand | DWVO |
| Product Dimensions (D x W x H) | 19.69"D x 47.24"W x 35.04"H |
| Color | Blue |
| Material | Engineered Wood (Cabinet), Sintered Stone (Countertop), Ceramic (Sinks) |
| Mounting Type | Freestanding |
| Number of Doors | 4 |
| Number of Drawers | 3 |
| Number of Shelves | 2 |
| Faucet Holes | 6 pre-drilled (3 per sink) |
| Item Weight | 89.9 Pounds |
| UPC | 197839515147 |

Figure 6: Product Dimensions. Detailed measurements of the vanity, including overall size and internal storage dimensions.
Warranty Information
Specific warranty details for the DWVO 47 Inch Bathroom Vanity are typically provided at the point of purchase or within separate documentation included with the product. Please refer to your purchase receipt or contact DWVO customer service for comprehensive warranty information regarding defects in materials or workmanship.
Protection plans may be available for purchase separately, offering extended coverage beyond the manufacturer's standard warranty. Please check with your retailer for details on available protection plans.
Customer Support
If you have any questions, require assistance with assembly, or need to report missing or damaged parts, please contact DWVO customer support. Have your model number (MADWVhr7Fz) and purchase information ready when contacting support.
For the most up-to-date contact information, please visit the official DWVO website or refer to the contact details provided with your purchase.