1. Important Safety Information
Please read and understand all instructions before assembling and using this bunk bed. Keep this manual for future reference.
- Weight Capacity: The upper bed has a maximum weight capacity of 350 lbs. The bottom bed has a maximum weight capacity of 500 lbs. Do not exceed these limits.
- Mattress Thickness: For the upper bed, a mattress thickness of 6 inches is recommended. For the bottom bed, a mattress thickness of 8 inches is recommended. Mattresses are not included.
- Guardrails: The upper bunk is equipped with full-length guardrails. Ensure they are always securely in place to prevent falls.
- Ladder Safety: Use the provided ladder for access to the upper bunk. Ensure the ladder is stable and securely attached before climbing. Always face the ladder when ascending or descending.
- Age Recommendation: The upper bunk is not suitable for children under 6 years of age.
- Ventilation: Ensure adequate ventilation around the bed, especially near electrical components like USB ports and LED lights.
- Assembly: Assembly should be performed by at least two adults. Ensure all hardware is tightened securely before use.
2. Package Contents
Verify that all components are present before beginning assembly. If any parts are missing or damaged, contact customer support.
- Metal Frame Components (Headboards, Footboards, Side Rails, Slats)
- Ladder
- Storage Shelves
- Under-bed Drawers
- USB Charging Ports and LED Light Strips (pre-installed or separate components)
- All necessary Hardware (bolts, screws, washers, nuts)
- Assembly Tools (Allen wrench, etc.)
- Installation Manual
3. Setup and Assembly Instructions
Follow these general steps for assembly. Refer to the included detailed installation manual for specific diagrams and part numbers.
- Preparation: Clear a spacious area for assembly. Lay out all parts and hardware. Ensure you have the necessary tools.
- Assemble Lower Bed Frame: Begin by connecting the headboard and footboard of the lower bed to the side rails. Secure with bolts and washers as indicated in the manual.
- Install Lower Bed Slats: Attach the bed slats to the lower bed frame. Ensure they are evenly spaced and securely fastened.
- Assemble Upper Bed Frame: Connect the headboard and footboard of the upper bed to its side rails.
- Install Upper Bed Slats: Attach the bed slats to the upper bed frame.
- Attach Guardrails: Securely attach the full-length guardrails to the upper bunk frame.
- Connect Upper and Lower Frames: Carefully lift and align the upper bed frame onto the lower bed frame's support posts. Secure them together using the designated hardware. This step typically requires two people.
- Install Ladder: Attach the ladder to the upper bunk, ensuring it is stable and secure.
- Install Storage Shelves: Mount the storage shelves to the designated areas on the bed frame.
- Assemble and Insert Drawers: Assemble the under-bed drawers according to their specific instructions and slide them into place.
- Connect USB/LED Power: If not pre-installed, connect the power supply for the USB ports and LED lights to a suitable power outlet.
- Final Check: Double-check all bolts and connections to ensure they are tight and secure.

Figure 1: Product Dimensions. This image illustrates the overall dimensions of the bunk bed frame, including length, width, and height, as well as specific measurements for the upper and lower bunks, ladder, and storage areas.
4. Operating Instructions
4.1. USB Charging Ports and LED Lights
This bunk bed is equipped with integrated USB charging ports and LED light strips for convenience.
- USB Ports: Locate the dual USB charging ports on the bed frame. Connect your electronic devices (phones, tablets, etc.) using their respective USB cables to charge them. Ensure the bed's power cord is plugged into a functional wall outlet.
- LED Lights: The LED light strips provide ambient lighting. Locate the switch or control button for the LED lights, typically near the USB ports or on the bed frame itself. Press to turn the lights on or off. Some models may offer adjustable brightness or color settings.
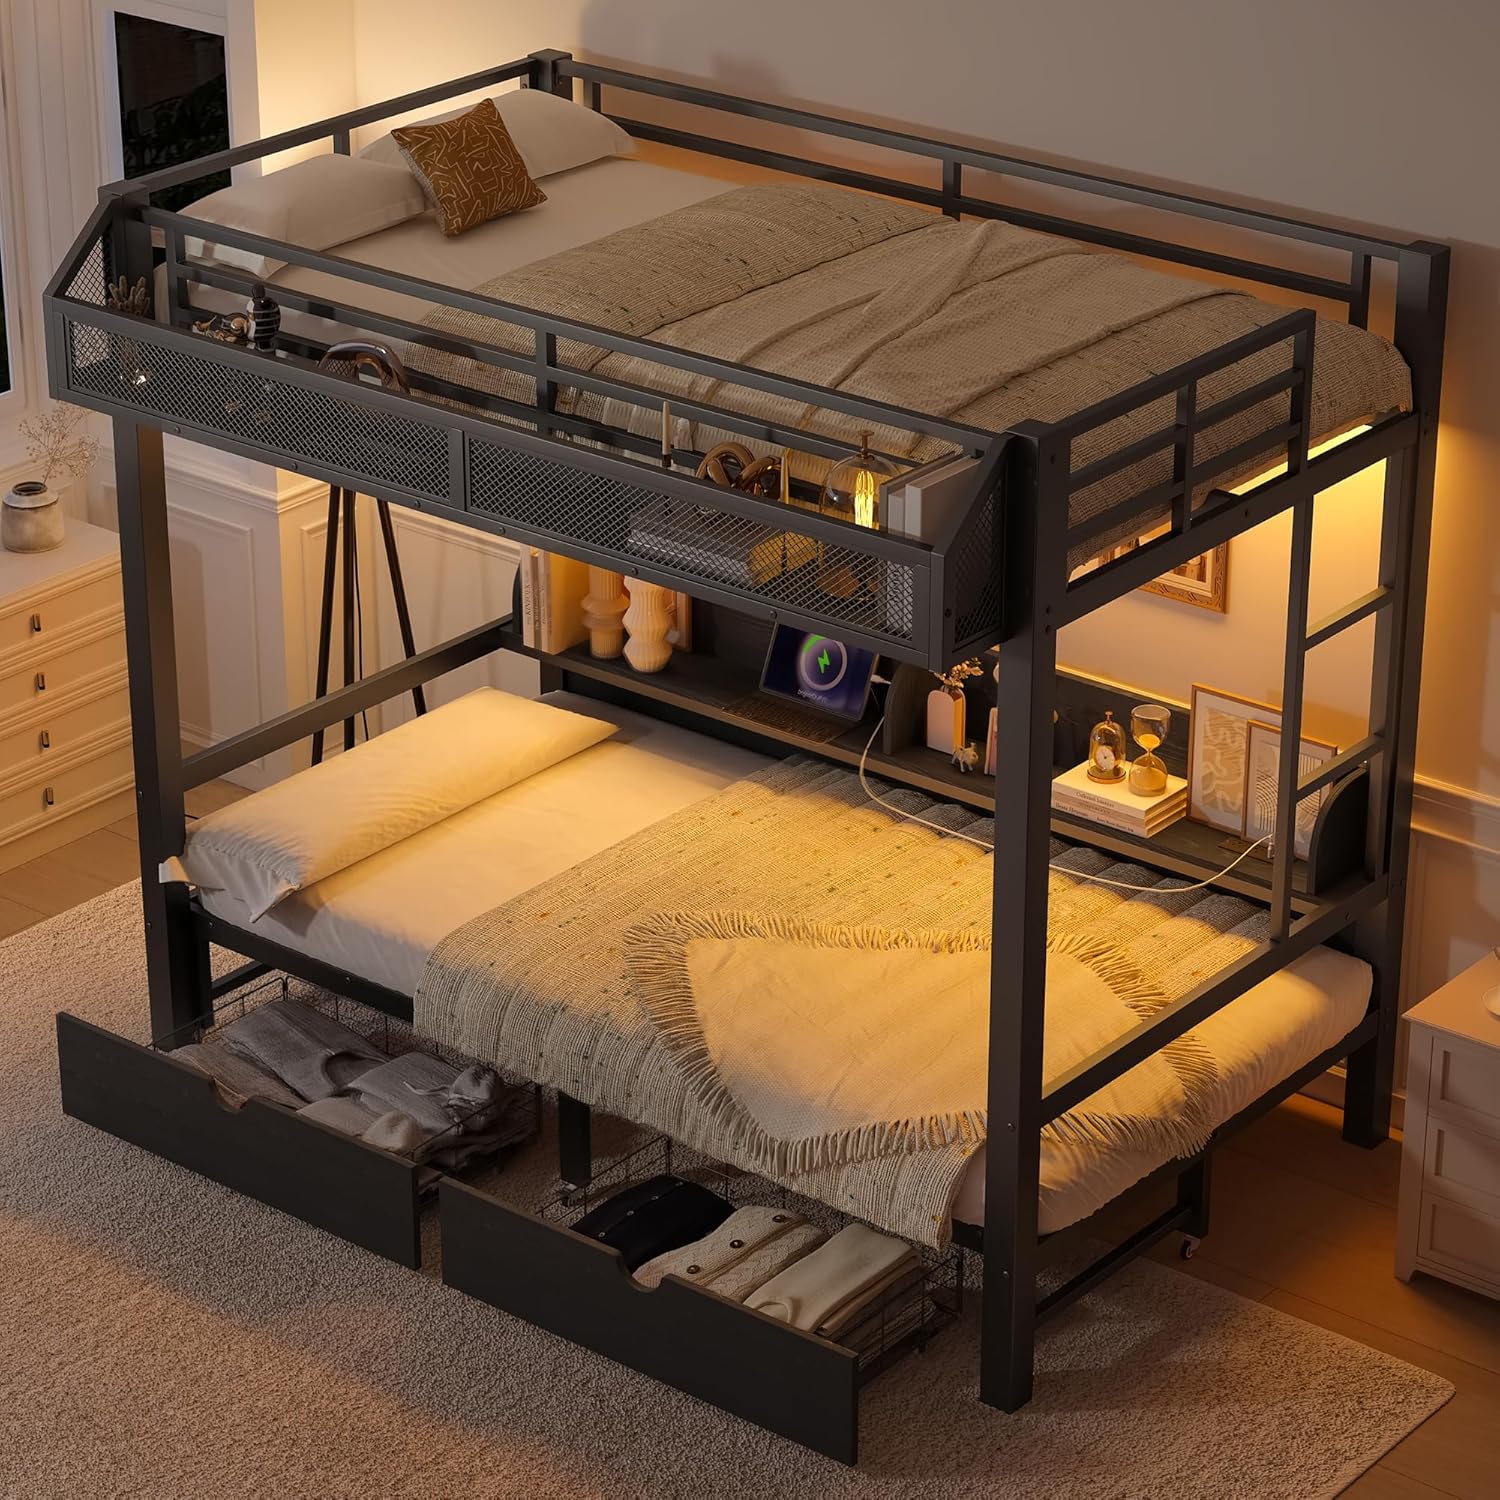
Figure 2: Integrated USB Ports and LED Lighting. This image shows the bunk bed in use, highlighting the illuminated LED strips and devices connected to the USB charging ports, demonstrating their functionality for nighttime reading and device charging.
4.2. Convertible Lower Sofa Bed
The lower Twin XL bed can be converted into a sofa configuration.
- To Convert to Sofa: Gently push the mattress towards the backrest area. The bed frame is designed to allow the mattress to fold or slide into a seated position, creating a sofa. Ensure the mattress is properly aligned and stable in the sofa configuration.
- To Convert to Bed: Pull the mattress forward from the backrest area until it lies flat, forming a bed. Ensure the mattress is fully extended and supported by the bed slats.
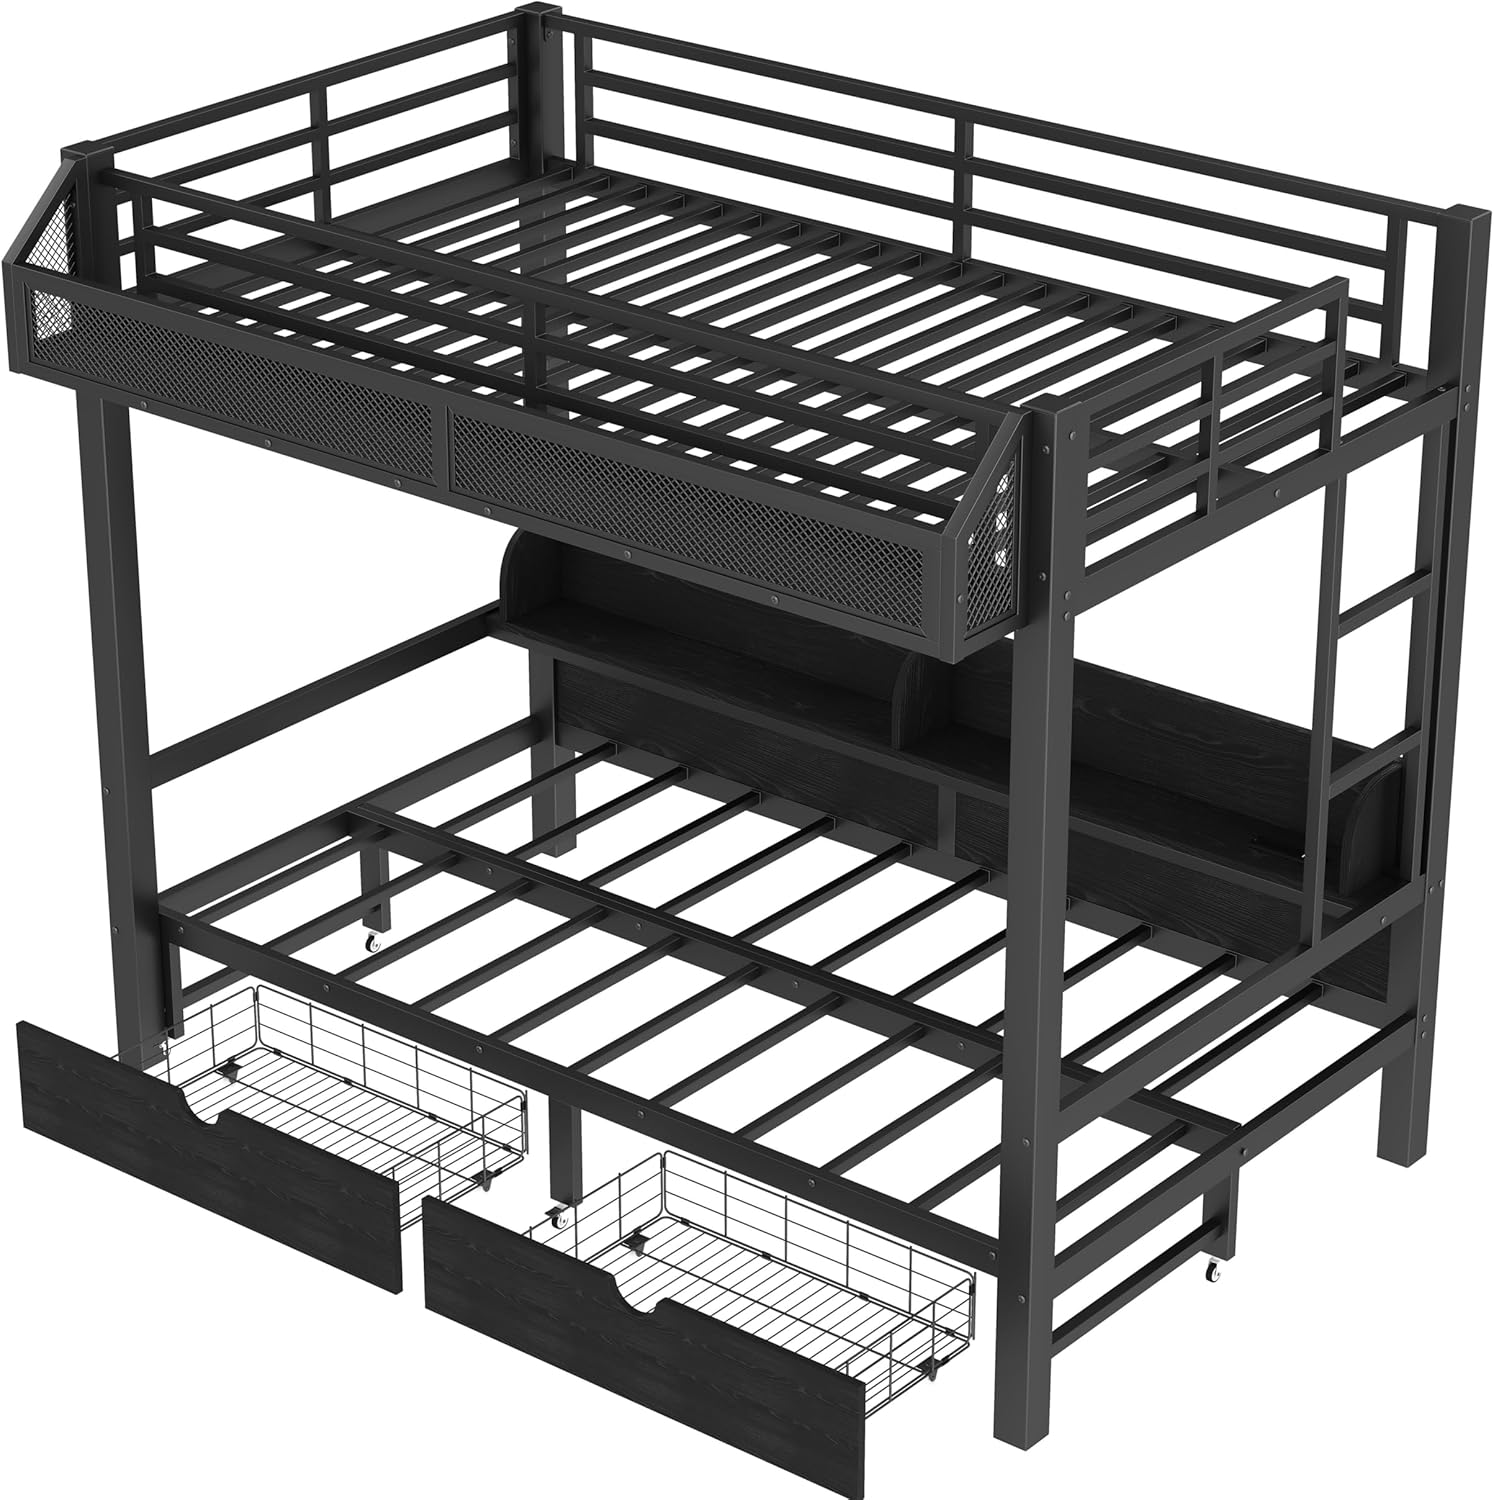
Figure 3: Convertible Lower Sofa Bed. This image displays the bunk bed with its lower section transformed into a sofa, illustrating its versatile functionality for daytime use as seating and nighttime use as a bed.
4.3. Storage Shelves and Drawers
Utilize the built-in storage features to keep your space organized.
- Storage Shelves: Place books, small electronics, decorative items, or personal belongings on the integrated shelves. Ensure items are stable and do not obstruct movement or fall off.
- Under-bed Drawers: Pull out the drawers located beneath the lower bed to store clothing, bedding, toys, or other items. Push them back in completely when not in use to maintain a tidy appearance.

Figure 4: Under-bed Storage Drawers. This image shows the bunk bed with its under-bed drawers extended, revealing the ample storage space available for organizing various items.
5. Maintenance
Proper maintenance will ensure the longevity and safety of your bunk bed.
- Cleaning: Wipe metal surfaces with a soft, damp cloth. For engineered wood components, use a dry or slightly damp cloth. Avoid harsh chemicals or abrasive cleaners that may damage the finish.
- Hardware Check: Periodically check all bolts, screws, and connections to ensure they remain tight. Re-tighten if necessary to prevent squeaking or instability.
- Electrical Components: Ensure the USB ports and LED light connections are free from dust and debris. Do not attempt to repair electrical components yourself; contact qualified personnel if issues arise.
- Moving the Bed: If you need to move the bed, lift it rather than dragging it to prevent damage to the frame or flooring. It is recommended to disassemble the bed for significant moves.
6. Troubleshooting
Refer to this section for common issues and their solutions.
| Problem | Possible Cause | Solution |
|---|---|---|
| Bed is squeaking or wobbly. | Loose hardware. | Check and tighten all bolts and screws. |
| USB ports not charging. | Power cord unplugged; device cable faulty. | Ensure the bed's power cord is securely plugged into a working outlet. Try a different USB cable or device. |
| LED lights not turning on. | Power cord unplugged; light switch off; faulty connection. | Verify power cord connection. Ensure the LED light switch is in the 'on' position. Check for loose wiring connections if accessible. |
| Lower bed difficult to convert to sofa/bed. | Obstruction; misalignment. | Ensure no items are blocking the mechanism. Gently guide the mattress into position, ensuring proper alignment. |
| Drawers not sliding smoothly. | Obstruction; misaligned runners. | Remove any items blocking the drawer. Check if the drawer runners are properly aligned and free of debris. |
7. Specifications
| Feature | Detail |
|---|---|
| Model Number | 430T |
| Size | Twin XL (Upper) / Twin XL (Lower) |
| Material | Engineered Wood, Metal |
| Product Dimensions (L x W x H) | 81.89" x 42.52" x 63.39" |
| Upper Bed Weight Capacity | 350 lbs |
| Bottom Bed Weight Capacity | 500 lbs |
| Item Weight | 139.33 lbs |
| Special Features | Storage Shelves, Drawers, USB Ports, LED Lights, Convertible Lower Sofa Bed |
| Color | Black |
8. Warranty and Support
For warranty information, please refer to the documentation provided at the time of purchase or contact the seller directly. Bellemave is committed to customer satisfaction.
If you encounter any issues not covered in this manual or require further assistance, please contact Bellemave customer support through the retailer where the product was purchased.


