Introduction
Thank you for choosing the Devoko 4x6 FT Resin Outdoor Storage Shed. This manual provides essential information for the safe and efficient assembly, operation, and maintenance of your new storage shed. Please read these instructions carefully before beginning assembly and retain them for future reference.
This outdoor storage shed is designed to provide a durable and organized space for your tools, equipment, and other belongings. Constructed from high-quality, UV-resistant resin, it features a lockable door for security, a sloped roof for efficient water drainage, and integrated vents for airflow.
Safety Information
- Always wear appropriate safety gear, including gloves and eye protection, during assembly.
- Ensure the assembly area is clear of obstructions and hazards.
- This shed requires two people for safe and efficient assembly.
- Do not assemble in high winds or adverse weather conditions.
- Keep children and pets away from the assembly area.
- Do not climb on the shed roof or walls.
- Secure the shed to the ground to prevent tipping in strong winds. Anchoring hardware is not typically included and may need to be purchased separately based on your specific ground conditions.
Package Contents
Before beginning assembly, verify that all parts are present and undamaged. Refer to the detailed parts list in your included instruction manual. The package typically includes:
- Shed Wall Panels (various sizes)
- Roof Panels
- Floor Panels
- Door Panels and Hardware (hinges, latch mechanism)
- Frame Components (supports, beams)
- Fasteners and Connectors
- Corner Protection Caps
- Ventilation Grilles
- Instruction Manual
- Two pairs of gloves (as indicated on packaging)
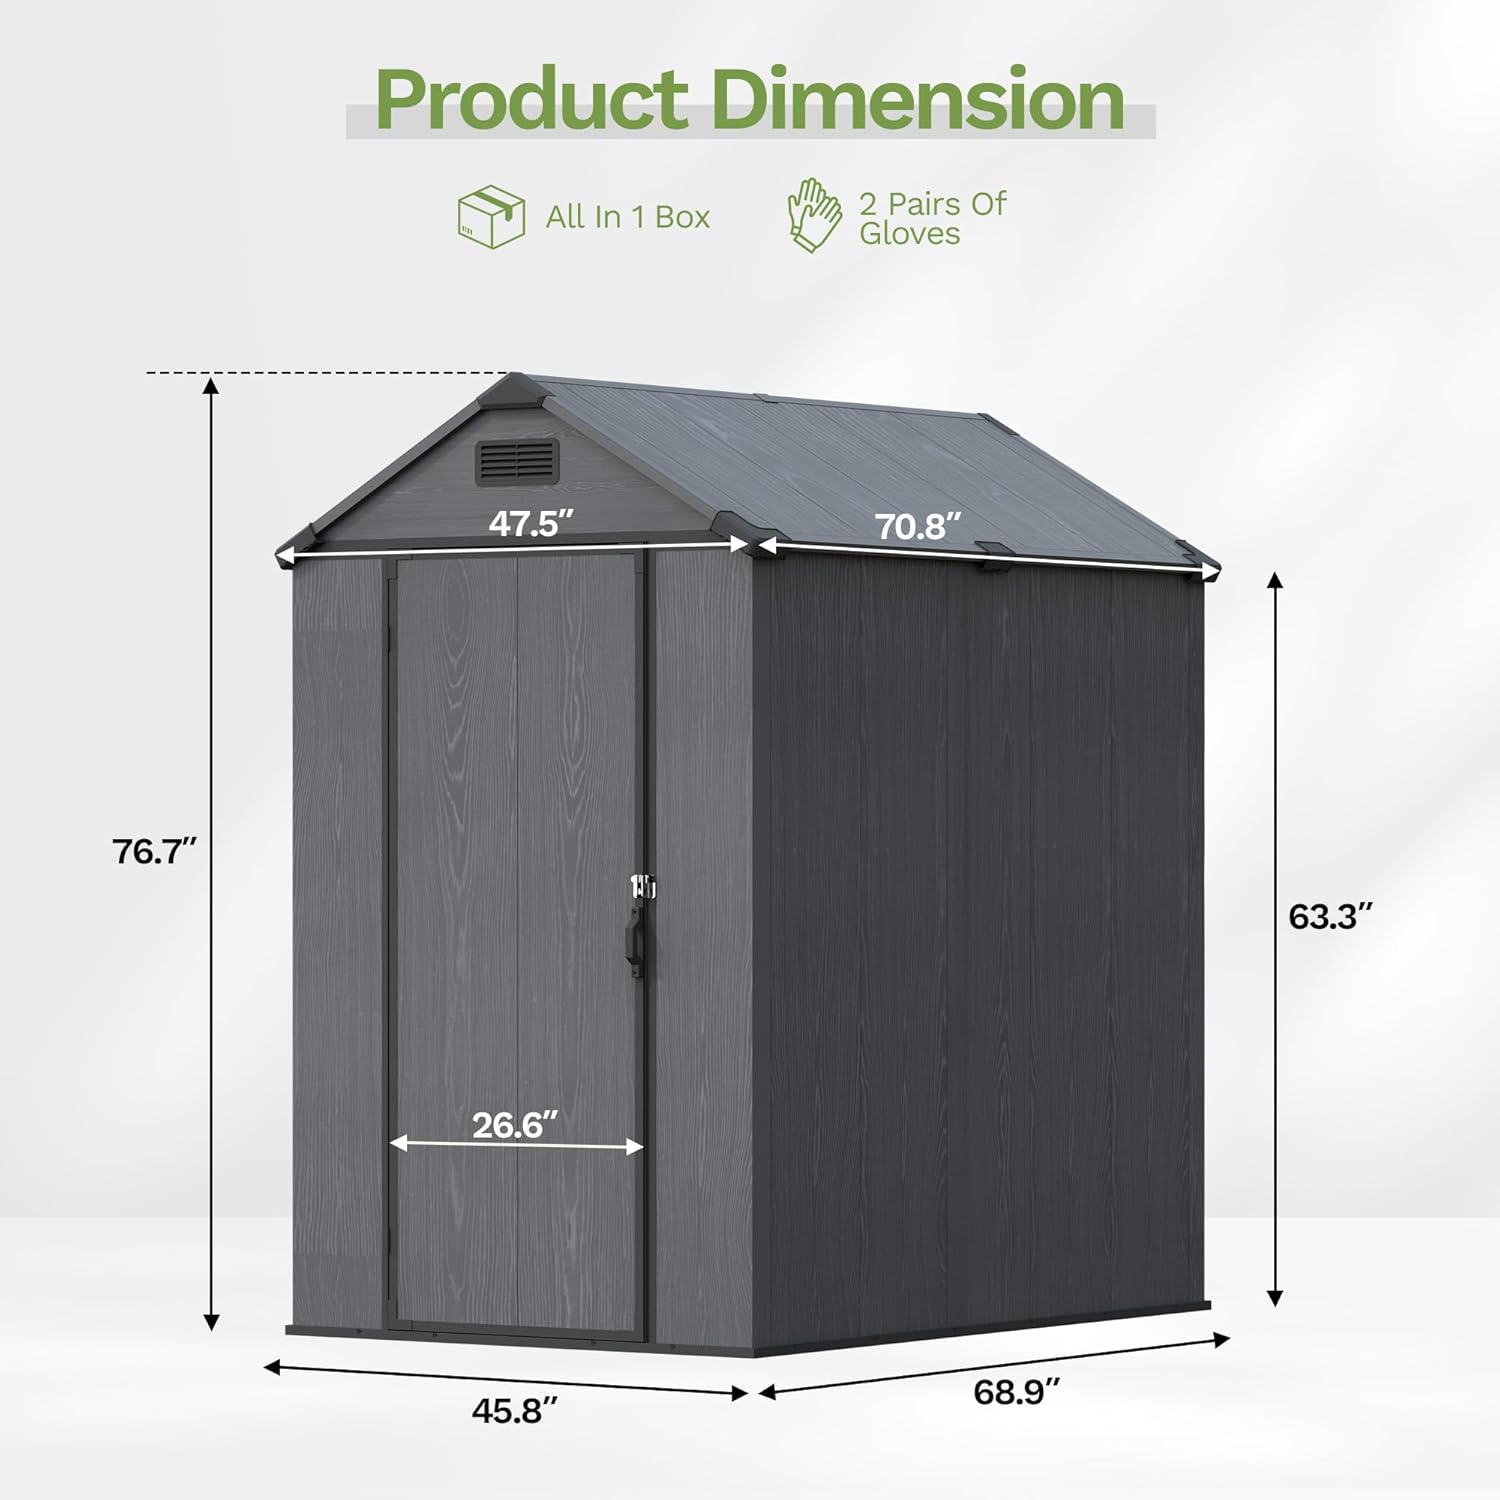
Image: Product Dimension Diagram. This image illustrates the overall dimensions of the Devoko 4x6 FT Resin Outdoor Storage Shed, including height, width, and depth, along with door opening measurements. It also indicates that the product comes in one box and includes two pairs of gloves.
Setup and Assembly
1. Site Preparation
- Location: Choose a level, stable surface for your shed. An uneven surface can lead to assembly difficulties and structural instability.
- Clearance: Ensure adequate space around the shed for assembly and future access, especially for opening doors.
- Drainage: Select a site with good drainage to prevent water accumulation around the shed base.
- Local Regulations: Before installation, consult your community's Homeowners Association (HOA) policies and local building codes to ensure compliance.
2. Assembly Steps (General Overview)
This shed is designed for two-person assembly. Follow the detailed, step-by-step instructions and illustrations provided in the separate instruction manual included in your package. The general sequence of assembly is as follows:
- Base Assembly: Connect the floor panels to form the shed's base. Ensure all connections are secure. The integrated floor elevates contents from ground moisture.
- Wall Panel Installation: Attach the wall panels to the base, following the designated order. Secure panels using the provided fasteners. The triangular structure provides stability.
- Door Frame and Door Installation: Assemble the door frame and attach it to the wall structure. Install the door panels, ensuring they swing freely and the lockable latch mechanism functions correctly.
- Roof Assembly: Install the roof support beams and then attach the roof panels. Ensure the sloped roof design is correctly oriented for water runoff. Install ventilation grilles.
- Finishing Touches: Attach corner protection caps and any remaining trim pieces. Double-check all fasteners for tightness and stability.

Image: Durable Structure Interior. This image shows the interior of the shed, highlighting the triangular roof support structure which contributes to the shed's stability and durability. Various tools and storage shelves are visible, demonstrating potential internal organization.
Operating Instructions
- Storage: Use the shed to store garden tools, lawn equipment, outdoor cushions, and other items. Organize contents to maximize space and accessibility.
- Security: Utilize the integrated lockable door to secure your belongings. A padlock (not included) can be added for enhanced security.
- Ventilation: The built-in vents promote airflow, helping to reduce humidity and keep the interior dry. Ensure vents are not blocked by stored items.
- Door Operation: Open and close the doors gently. Avoid forcing them to prevent damage to hinges or the latch mechanism.

Image: Shed Interior with Tools. This image displays the interior of the Devoko storage shed, showcasing its capacity to hold various garden tools, hoses, and other outdoor equipment. The open doors reveal the organized storage possibilities within the shed.
Maintenance
- Cleaning: Clean the shed periodically with mild soap and water. Avoid abrasive cleaners or harsh chemicals that could damage the resin material.
- Inspection: Regularly inspect the shed for any signs of wear, damage, or loose fasteners. Tighten any loose screws or connections.
- Drainage: Ensure the sloped roof remains clear of debris (leaves, snow) to allow for proper water drainage. Clear any blockages from the ventilation grilles.
- UV Protection: The resin material is UV-resistant, but prolonged exposure to intense sunlight over many years may cause some fading. Regular cleaning can help maintain its appearance.

Image: Weather Resistant Features. This image highlights the weather-resistant properties of the shed, including UV resistance, water resistance, rust protection, and low maintenance. It visually demonstrates how the sloped roof sheds water effectively.
Troubleshooting
| Problem | Possible Cause | Solution |
|---|---|---|
| Shed appears unstable or flimsy. | Uneven ground; loose fasteners; improper assembly of structural components. | Ensure the shed is on a completely level surface. Re-check all fasteners and connections, especially the triangular roof supports and wall-to-base connections. Consider anchoring the shed to the ground for added stability. |
| Water leakage inside the shed. | Improperly installed roof panels; blocked roof drainage; gaps in wall connections. | Verify that roof panels are correctly overlapped and sealed. Clear any debris from the roof. Inspect wall connections for tight fit and proper sealing. |
| Door does not close or latch properly. | Misaligned door frame; warped door panel; obstruction in the door path. | Check if the shed base is level, as an uneven base can cause door misalignment. Inspect hinges and latch for damage or obstruction. Ensure door panels are correctly installed. |
| Excessive humidity or condensation inside. | Blocked ventilation vents; lack of air circulation. | Ensure the ventilation grilles are clear of debris and not blocked by stored items. Consider periodically opening the doors on dry days to air out the shed. |
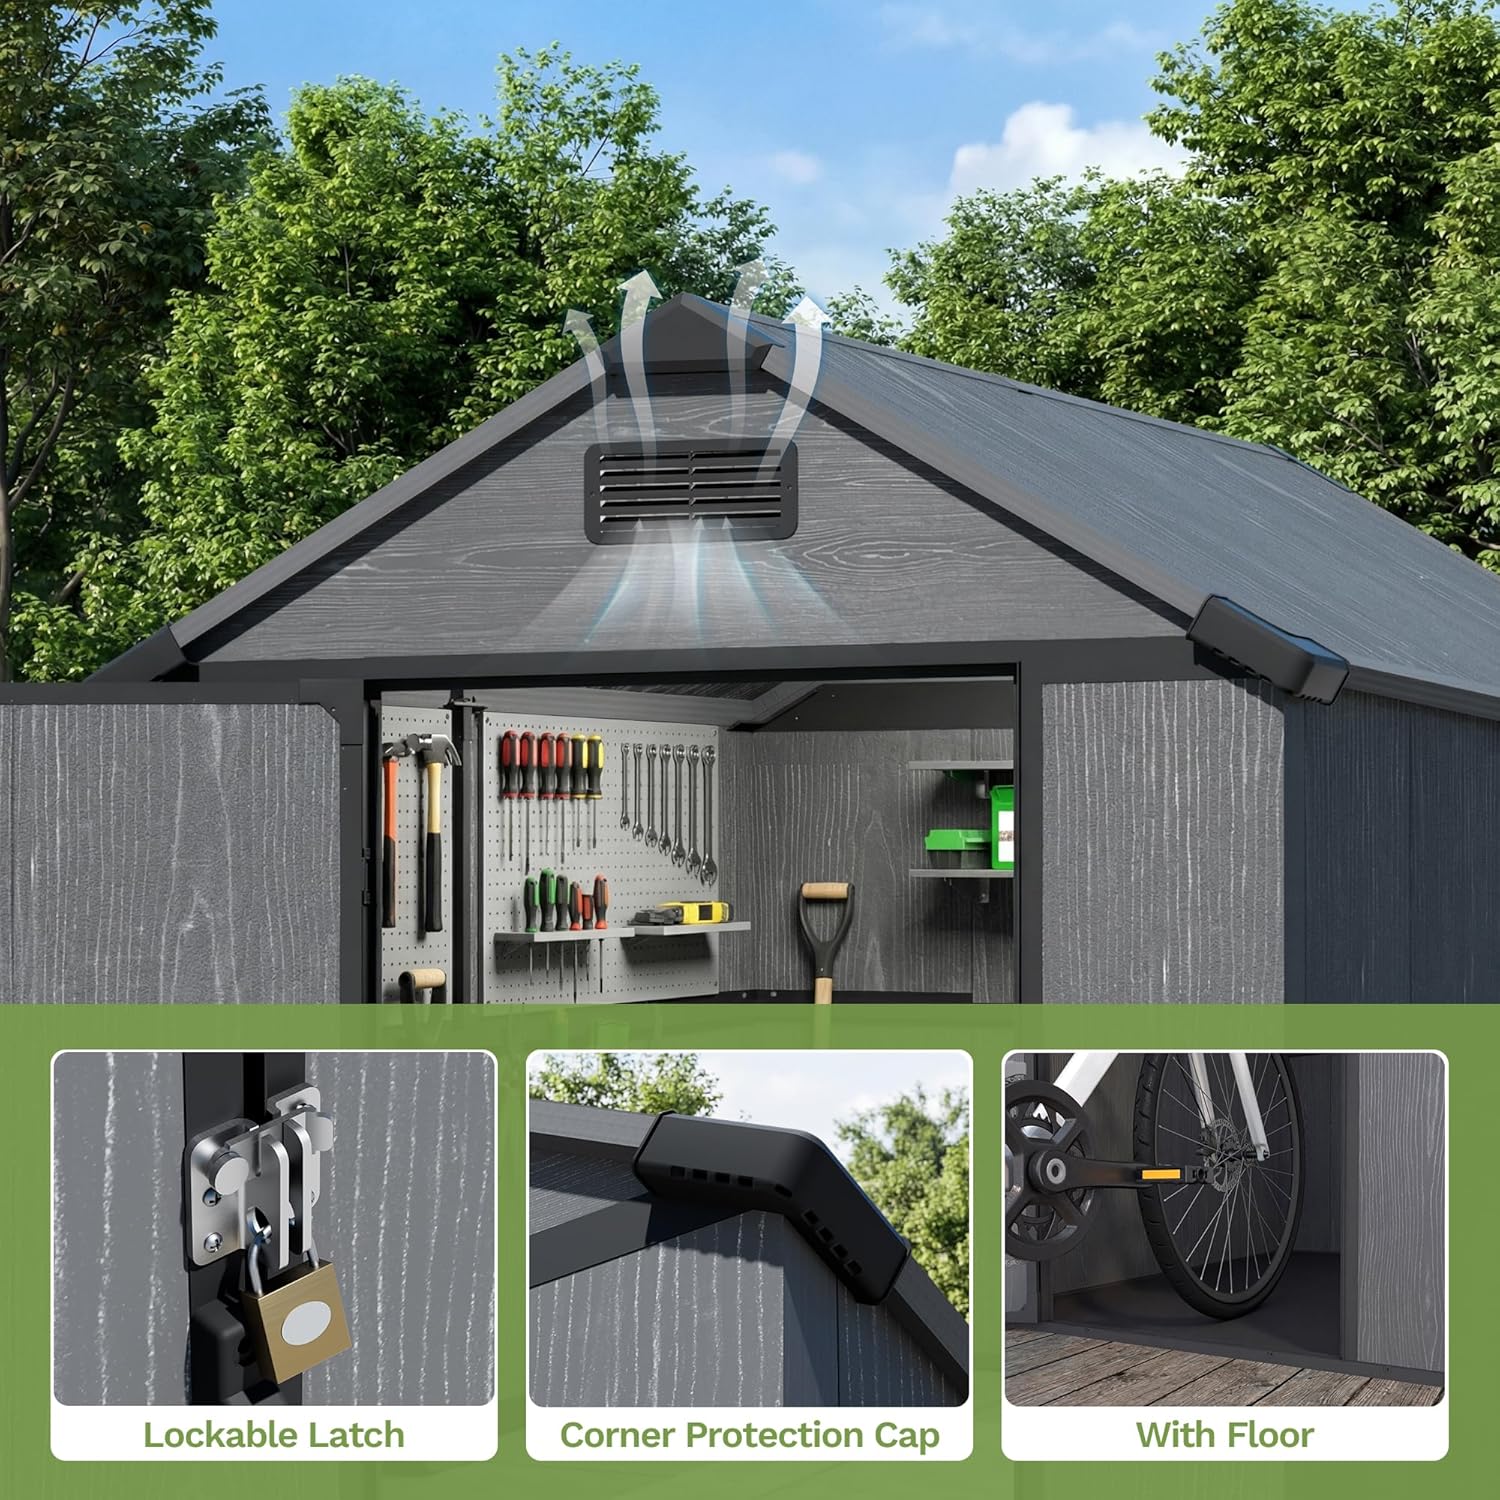
Image: Shed Features. This image details key features of the shed: a lockable latch for security, corner protection caps for enhanced durability, and the integrated floor that keeps contents off the ground.
Specifications
| Brand | Devoko |
| Model Number | DV-1277 |
| Color | Deep Grey |
| Material | Resin, Plastic |
| Product Dimensions (D x W x H) | 70.8"D x 47.5"W x 76.7"H (180cm D x 120.6cm W x 194.8cm H) |
| Item Weight | 92.44 Pounds (41.93 kg) |
| Floor Area | 28 Square Feet |
| Door Width | 26.6 Inches (67.6 cm) |
| Door Height | 63.3 Inches (160.8 cm) |
| Door Style | Lockable Door |
| Water Resistance Level | Water Resistant |
| Assembly Required | Yes (Two-person assembly recommended) |
Warranty and Support
For specific warranty details, please refer to the documentation included with your purchase or contact the retailer.
If you encounter any issues during assembly or operation, or if you have questions regarding your Devoko storage shed, please contact Devoko customer support or the seller directly.
- Customer Support: Contact the seller "devokowholesale" for assistance.
- Returns: This product typically offers a 30-day easy return policy.


