1. Introduction
The FTVOGUE XHM203 Automatic Water Level Controller is designed to manage water levels in various applications such as tanks, pools, and basements. This device provides fully automated control, preventing overflow and ensuring efficient water management through its reliable relay output. Its compact design and simple installation make it suitable for a wide range of environments.

Figure 1: FTVOGUE XHM203 Automatic Water Level Controller, top-down view showing the relay, capacitors, and connection terminals.
2. Safety Information
Please read and understand all safety instructions before installing and operating the device. Failure to follow these instructions may result in electric shock, fire, or serious injury.
- Ensure the power supply is disconnected before any installation or maintenance work.
- The device operates at AC/DC 12V. Use only the specified voltage.
- Installation should be performed by a qualified individual if you are unsure about electrical wiring.
- Keep the device away from direct water exposure unless properly enclosed and sealed for its intended use.
- Do not attempt to modify or repair the device. Contact support for assistance.
3. Package Contents
Verify that all items are present in the package:
- 1 x FTVOGUE XHM203 Automatic Water Level Controller
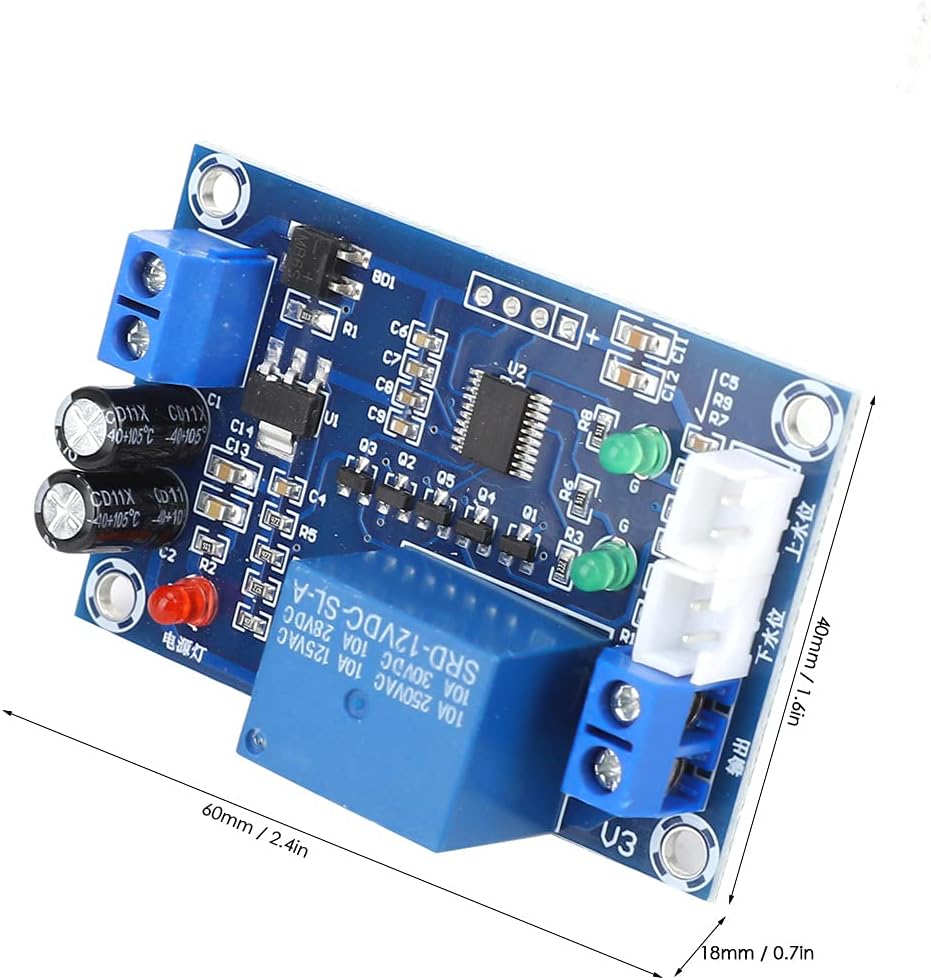
Figure 2: The water level controller board shown alongside a set of connection wires, typically included for sensor connections.
4. Product Features
- Automatic Control: Fully automated water level control prevents overflow with reliable relay output.
- Simple Setup: Easy installation with M3 screw hole design suitable for water tanks and basements.
- Wide Application: Effective for managing water in tanks, pools, garages, and areas prone to flooding.
- Durable Build: Constructed from plastic with a compact size.
- Efficient Performance: Operates at AC/DC 12V, managing water levels efficiently in various environments.
5. Specifications
| Parameter | Value |
|---|---|
| Model | XH-M203 |
| Working Voltage | AC/DC 12V |
| Output Capacity | 10A |
| Output Type | Relay Output |
| Control Type | Full Automatic |
| Installation | M3 Screw Hole |
| Material | Plastic |
| Size (Approx.) | 60 x 40 x 18 mm (2.4 x 1.6 x 0.7 in) |

Figure 3: Dimensions of the FTVOGUE XHM203 Automatic Water Level Controller, showing approximate measurements of 60mm by 40mm by 18mm.
6. Setup and Installation
Follow these steps for proper installation of the water level controller:
- Mounting: Secure the controller using the M3 screw holes to a stable surface near the water tank or area to be monitored. Ensure it is protected from direct water splashes.
- Power Connection: Connect the AC/DC 12V power supply to the terminals labeled "AC/DC12V" on the board. Observe polarity if using DC power.
- Sensor Connection: Connect the water level sensors (not included) to the designated terminals. Typically, there are three connections:
- Common (GND): Connect to the lowest point or bottom of the tank.
- Lower Water Level (下水位): Connect to the sensor placed at the desired minimum water level.
- Upper Water Level (上水位): Connect to the sensor placed at the desired maximum water level.
- Output Connection: Connect the device to be controlled (e.g., water pump, solenoid valve) to the "输出" (Output) relay terminals. This is a dry contact relay, meaning it provides a switch closure. Ensure the connected device's power requirements are within the 10A output capacity.
- Testing: After all connections are made, apply power and test the system by manually simulating water level changes to ensure the relay activates and deactivates as expected.

Figure 4: Detailed view of the FTVOGUE XHM203 controller showing the power input (AC/DC12V), output terminals (输出), and sensor input terminals (下水位 for lower level, 上水位 for upper level).
7. Operating Instructions
The FTVOGUE XHM203 operates automatically based on the water levels detected by its sensors. Once properly installed and powered, the controller will manage the connected device (e.g., pump) as follows:
- Water Filling Mode: If the controller is configured to fill a tank, the relay will activate (e.g., turn on a pump) when the water level drops below the "Lower Water Level" sensor. The relay will deactivate (e.g., turn off the pump) when the water level reaches the "Upper Water Level" sensor.
- Water Draining Mode: If the controller is configured to drain a tank, the relay will activate (e.g., turn on a pump) when the water level rises above the "Upper Water Level" sensor. The relay will deactivate (e.g., turn off the pump) when the water level drops below the "Lower Water Level" sensor.
The specific mode (filling or draining) depends on how the output relay is wired to your pump or valve. Consult the wiring diagram for your specific application.
8. Maintenance
Regular maintenance ensures optimal performance and longevity of your water level controller:
- Visual Inspection: Periodically inspect the controller and all connections for any signs of damage, corrosion, or loose wiring.
- Sensor Cleaning: If using conductive probes, ensure they are clean and free from mineral buildup or debris, which can affect their accuracy.
- Environmental Check: Ensure the controller remains in a dry, protected environment, free from excessive dust or moisture.
- Power Cycle: If the device exhibits unusual behavior, try disconnecting and reconnecting the power supply.
9. Troubleshooting
| Problem | Possible Cause | Solution |
|---|---|---|
| Controller not powering on | No power supply; incorrect voltage; faulty wiring | Check power connections; ensure 12V AC/DC supply; verify wiring. |
| Relay not activating/deactivating | Sensor issues; incorrect sensor wiring; faulty relay | Check sensor connections and cleanliness; verify sensor placement; test relay functionality. |
| Water level not controlled accurately | Dirty sensors; incorrect sensor placement | Clean sensors thoroughly; adjust sensor positions to desired levels. |
| Connected device not responding | Incorrect output wiring; device malfunction; overload | Verify output wiring; test the connected device independently; ensure device current draw is within 10A. |
10. Warranty and Support
This product is covered by a standard manufacturer's warranty against defects in materials and workmanship. For warranty claims or technical support, please contact your retailer or the manufacturer directly. Keep your purchase receipt as proof of purchase.
For further assistance, please refer to the contact information provided with your purchase or visit the FTVOGUE official website.


