1. Introduction
Thank you for purchasing the Ocypus Gamma A40 BK Compact CPU Cooler. This manual provides detailed instructions for installation, operation, maintenance, and troubleshooting to ensure optimal performance and longevity of your CPU cooler. Please read this manual thoroughly before installation and keep it for future reference.

Image: The Ocypus Gamma A40 BK CPU Cooler mounted inside a computer case, highlighting its compact form factor.
2. Product Features
- Compact Design: With a height of 133mm, this cooler is designed to fit a wide range of PC cases, including smaller form factors.
- Powerful Cooling Performance: Supports efficient heat dissipation for CPUs with a Thermal Design Power (TDP) of up to 200W.
- Direct Touch Heat Pipes: Features 4 x Φ6mm direct-touch copper heat pipes that maximize contact area with the CPU for rapid heat transfer.
- New Top Cover Design: Adopts a classic round dot matrix element for a refined and modern aesthetic.
- High-Performance, Low-Noise Fan: Equipped with a 100mm PWM fan, offering superior cooling performance while maintaining a low noise level compared to fans in similar compact coolers.
- Easy Installation: Designed for straightforward setup, supporting mainstream Intel and AMD platforms.

Image: Direct-touch heat pipe design for enhanced thermal conductivity.

Image: The 100mm fan, highlighting its performance metrics and low noise operation.
3. Package Contents
Please verify that all components are present in the package:
- Ocypus Gamma A40 BK CPU Cooler (with pre-attached 100mm fan)
- Mounting Tools and Hardware Kit (for Intel and AMD platforms)
- Thermal Paste (pre-applied or in a small tube)

Image: Included accessories and mounting hardware.
4. Installation Guide
This section outlines the general steps for installing the Ocypus Gamma A40 BK CPU Cooler. Specific steps may vary slightly depending on your motherboard and CPU socket type (Intel or AMD). Always refer to your motherboard manual for detailed instructions on CPU cooler installation.
Preparation:
- Ensure your computer is powered off and unplugged from the wall outlet.
- Open your PC case to access the motherboard and CPU socket.
- Remove any existing CPU cooler. Clean off any old thermal paste from the CPU and the cooler's base using isopropyl alcohol and a lint-free cloth.
- Identify the correct mounting brackets for your CPU socket (Intel LGA 115X/1200/1700/1851 or AMD AM4/AM5).
General Installation Steps:
- Install Backplate (if required): For some Intel sockets, you may need to install a backplate behind the motherboard. Align the backplate with the holes around the CPU socket.
- Attach Mounting Brackets: Secure the appropriate mounting brackets to the cooler's base or directly to the motherboard around the CPU socket using the provided screws.
- Apply Thermal Paste: If thermal paste is not pre-applied to the cooler's base, apply a small pea-sized amount to the center of your CPU's integrated heat spreader (IHS). Do not spread it manually; the pressure from the cooler will spread it evenly.
- Mount the Cooler: Carefully place the CPU cooler onto the CPU, aligning the mounting holes or clips. Ensure the heat pipes are positioned correctly.
- Secure the Cooler: Tighten the mounting screws in a diagonal pattern (e.g., top-left, bottom-right, top-right, bottom-left) until snug. Do not overtighten.
- Connect Fan Cable: Connect the 4-pin PWM fan cable from the cooler to the CPU_FAN header on your motherboard.
- Final Checks: Ensure the cooler is securely mounted and there are no cables obstructing the fan blades. Close your PC case.

Image: Visual representation of the cooler installation process.
5. Operation
Once installed, the Ocypus Gamma A40 BK CPU Cooler operates automatically. The 100mm PWM fan will adjust its speed based on the CPU temperature, as controlled by your motherboard's BIOS/UEFI settings. This ensures efficient cooling when needed and quieter operation during lighter loads.
- BIOS/UEFI Settings: You can typically adjust fan curves and monitoring settings in your motherboard's BIOS/UEFI to customize fan behavior. Consult your motherboard manual for details.
- Monitoring: Use system monitoring software (e.g., HWMonitor, CPU-Z) to keep track of your CPU temperatures and fan speeds to ensure proper operation.
6. Maintenance
Regular maintenance helps ensure the longevity and optimal performance of your CPU cooler.
- Dust Removal: Periodically (e.g., every 3-6 months), use compressed air to blow dust out of the heatsink fins and fan blades. Ensure the fan is held stationary while blowing to prevent damage to the bearings.
- Fan Cleaning: For stubborn dust, gently wipe the fan blades with a soft, damp cloth. Ensure the fan is completely dry before powering on your PC.
- Thermal Paste: The thermal paste typically lasts for several years. If you notice significantly higher CPU temperatures over time, consider reapplying fresh thermal paste. This involves removing the cooler, cleaning off old paste, and applying new paste before re-mounting.
7. Troubleshooting
If you encounter issues with your CPU cooler, refer to the following common troubleshooting steps:
- High CPU Temperatures:
- Ensure the cooler is securely mounted and making good contact with the CPU.
- Verify that thermal paste was applied correctly and is not dried out. Reapply if necessary.
- Check if the fan is spinning. If not, ensure it is properly connected to the CPU_FAN header.
- Clean any dust buildup from the heatsink fins and fan blades.
- Ensure adequate airflow within your PC case.
- Fan Not Spinning:
- Check the fan cable connection to the CPU_FAN header on the motherboard.
- Verify fan settings in your motherboard's BIOS/UEFI. Ensure the fan is not set to turn off at low temperatures.
- Inspect the fan for any physical obstructions.
- Excessive Fan Noise:
- Clean the fan blades and heatsink to remove dust.
- Check for any cables or objects touching the fan blades.
- Adjust fan speed settings in your motherboard's BIOS/UEFI to a quieter profile if temperatures allow.
8. Specifications
| Feature | Specification |
|---|---|
| Model Number | Gamma A40 BK |
| Product Dimensions (L x W x H) | 10.5 cm x 9.3 cm x 13.3 cm |
| Item Weight | 0.39 Kilograms |
| Cooling Method | Air |
| Compatible Devices | CPU |
| Supported Sockets | Intel LGA 115X/1200/1700/1851, AMD AM4/AM5 |
| Heat Pipes | 4 x Φ6mm Direct Touch Copper Heat Pipes |
| Fan Size | 100mm |
| Fan Speed (PWM) | 600-2400 ±10% RPM |
| Air Flow | 41 CFM |
| Air Pressure | 2.2 mmH2O |
| Noise Level | 29.5 Decibels (A) |
| Power Connector Type | 3-pin (Note: Product features mention 4-pin PWM, please use 4-pin for PWM control) |
| Voltage | 12 Volts (DC) |
| Wattage | 1.2 W |
| Material | Aluminum, Plastic, Copper |
| Country of Origin | China |
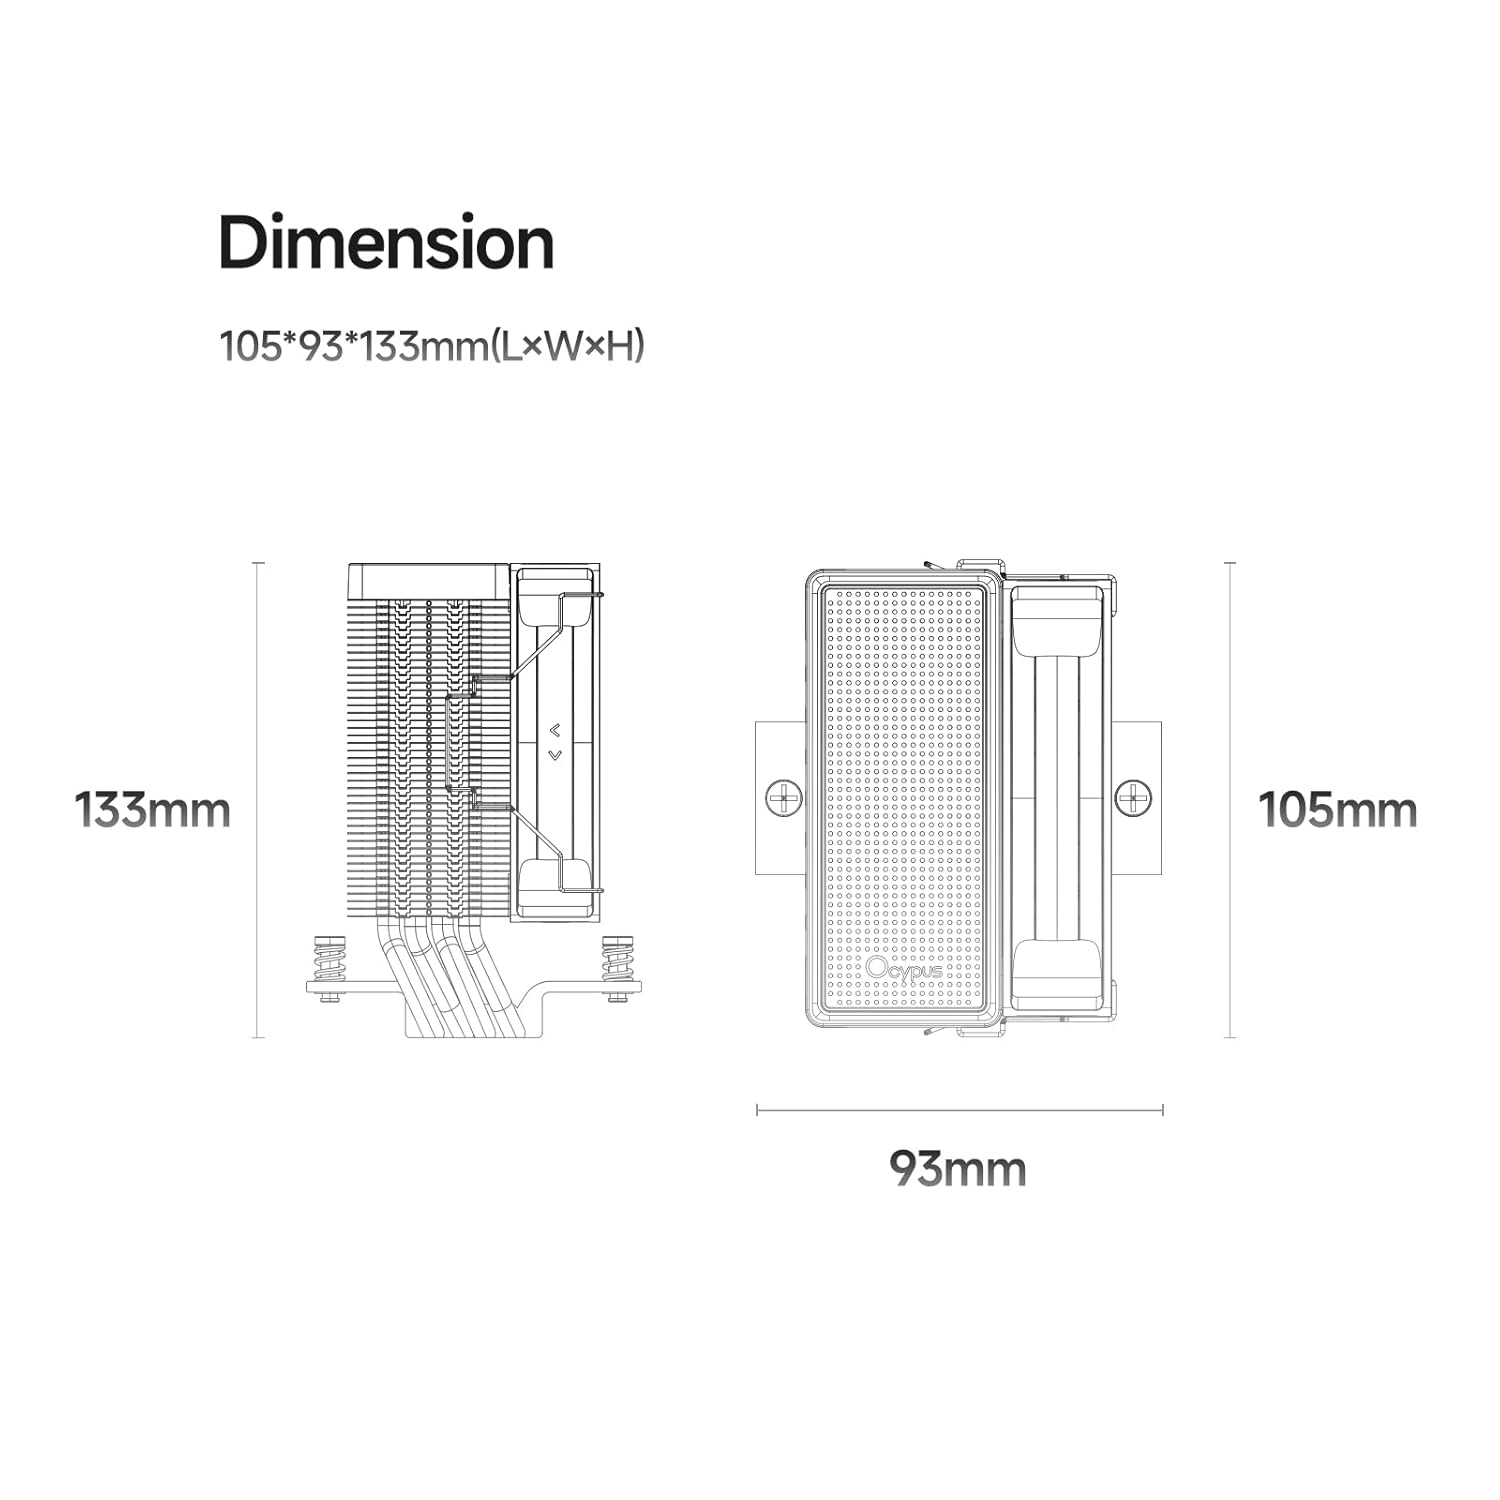
Image: Dimensional drawing of the CPU cooler.
9. Warranty and Support
Ocypus products are manufactured to high-quality standards. For warranty information, technical support, or any product-related inquiries, please contact the seller or the official Ocypus customer support channel through the platform where you purchased the product. Please retain your proof of purchase for warranty claims.