1. Introduction
The DigiQuest Q99 4K UHD Satellite Receiver is designed for receiving Italian television channels. It supports DVB-S2 and DVB-T2 standards, HEVC HDR, and includes an activated TiVuSat 4K card. This allows access to over 60 programs from RAI, Mediaset, and LA7 in HD and 4K UHD resolution. The receiver incorporates Smart TV functions for media libraries such as Rai Play and Mediaset Infinity, requiring an internet connection. The Q99 operates on 12V, making it suitable for mobile use.
2. What's in the Box
Verify that all components are present in the package:
- DigiQuest Q99 4K UHD Combo Satellite Receiver
- Activated TiVuSat 4K UHD Card
- Remote Control
- Power Adapter
- HTS e-com HDMI Cable
- User Manual (Italian and English)
3. Setup
3.1 Physical Connections
Follow these steps to connect your receiver:
- Satellite Antenna Connection: Connect your satellite dish cable to the "SAT IN" port on the rear panel. Ensure your satellite dish is pointed to Hotbird 13° East.
- Television Connection: Connect one end of the provided HDMI cable to the "HDMI" port on the receiver and the other end to an available HDMI input on your television.
- Power Connection: Connect the power adapter to the "DC IN 12V" port on the receiver and then plug it into a power outlet.
- Optional Network Connection: For Smart TV functions and software updates, connect an Ethernet cable to the "LAN" port on the receiver and to your internet router. Alternatively, a compatible Wi-Fi USB dongle can be used in a USB port.
- Optional USB Storage: For PVR (recording) and Timeshift functions, connect an external USB storage device (e.g., USB stick or hard drive) to one of the "USB" ports.

Figure 1: Rear panel of the DigiQuest Q99 receiver, illustrating satellite input/output, RF in, AV, S/PDIF, HDMI, USB 2.0, USB 3.0, LAN, and DC IN ports.
3.2 TiVuSat Card Insertion
The TiVuSat 4K card is pre-activated. Insert the card into the designated smart card slot on the side of the receiver, ensuring the chip faces downwards and the card is inserted correctly as indicated by the label.

Figure 2: Side view of the DigiQuest Q99 receiver, highlighting the smart card slot for TiVuSat card insertion.
3.3 Initial Power-On and Channel Scan
After connecting all cables and inserting the TiVuSat card, turn on your television and select the correct HDMI input. Power on the DigiQuest Q99 receiver. The initial setup wizard will guide you through language selection (Italian/English) and channel scanning. The receiver features an automatic update function for the TiVuSat station list.
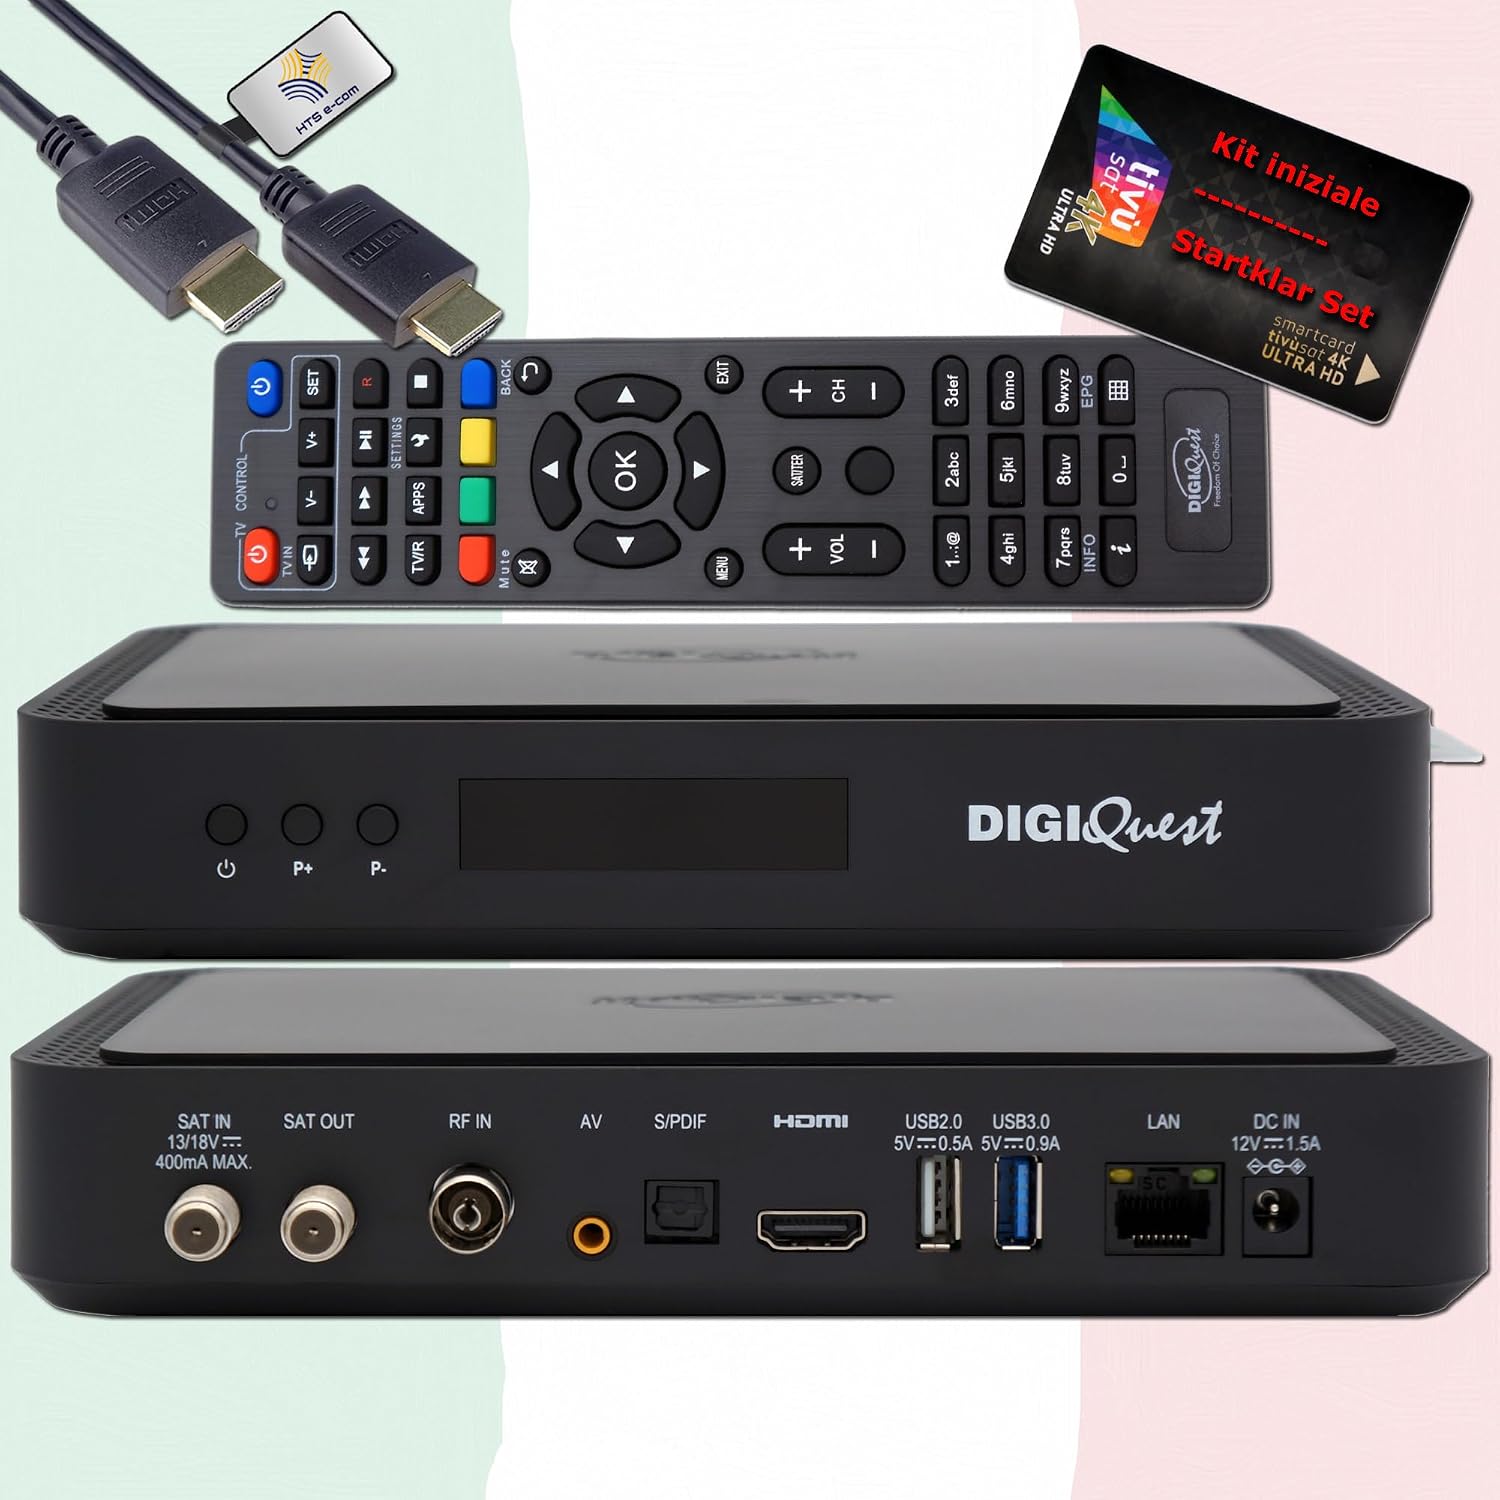
Figure 3: Front view of the DigiQuest Q99 receiver, showing the power button and channel selection buttons.
4. Operating Instructions
4.1 Basic Functions
Use the remote control to navigate the receiver's functions:
- Channel Selection: Use the "P+" and "P-" buttons or the numeric keypad to change channels.
- Volume Control: Adjust the volume using the dedicated volume buttons.
- Electronic Program Guide (EPG): Press the "EPG" button to view program schedules for upcoming broadcasts.
- Menu Navigation: Access the main menu for settings and features.

Figure 4: Remote control layout and detailed features of the DigiQuest Q99 receiver.
4.2 Advanced Features
- PVR (Personal Video Recorder) and Timeshift: With an external USB storage device connected, you can activate PVR functionality to record programs and use Timeshift to pause live TV.
- Smart TV Functions: Connect the receiver to the internet via LAN or a compatible Wi-Fi USB dongle to access media libraries such as Rai Play and Mediaset Infinity, and tivùon HbbTV services.
- 4K UHD Channels: The receiver supports 4K UHD content, providing access to channels like Rai 4K and other UHD programs available via TiVuSat.

Figure 5: Smart TV capabilities of the DigiQuest Q99, including HbbTV, Rai Play, and Mediaset Infinity.

Figure 6: Example of 4K Ultra HD channels accessible through the TiVuSat platform.

Figure 7: A selection of Italian and international television channels available with the DigiQuest Q99.
5. Maintenance
- Software Updates: The receiver supports software updates via OTA (Over-The-Air), USB, or FTP. Regularly check for and install updates to ensure optimal performance and access to the latest features.
- Cleaning: Use a soft, dry cloth to clean the exterior of the receiver. Do not use liquid cleaners or abrasive materials.
- Ventilation: Ensure the receiver is placed in a well-ventilated area to prevent overheating. Do not block ventilation openings.
6. Troubleshooting
If you encounter issues with your DigiQuest Q99 receiver, refer to the following common solutions:
- No Picture/Sound:
- Check all cable connections (HDMI, satellite, power).
- Ensure the TV is set to the correct HDMI input.
- Verify the receiver is powered on.
- No Satellite Signal:
- Check the satellite cable connection to the "SAT IN" port.
- Confirm your satellite dish is correctly aligned to Hotbird 13° East.
- Check for any obstructions blocking the satellite signal.
- TiVuSat Card Error:
- Ensure the TiVuSat card is inserted correctly into the smart card slot.
- Verify the card is clean and free from damage.
- No Internet Connection:
- Check the Ethernet cable connection to the "LAN" port and your router.
- If using Wi-Fi, ensure the USB dongle is compatible and properly connected, and check Wi-Fi settings in the receiver's menu.
- Restart your router and the receiver.
For more detailed troubleshooting, please refer to the complete user manual provided with your product.
7. Specifications
| Feature | Description |
|---|---|
| Model Number | Q99 |
| Brand | DigiQuest |
| Tuner Type | DVB-S2 (Satellite), DVB-T2 (Terrestrial - Italy only) |
| Video Resolution | Up to 4K UHD |
| Video Decoding | HEVC H.265 (10-bit), HDR support |
| Audio Output Mode | Dolby Digital, Dolby Digital Plus |
| Connectivity | HDMI (1), USB (2 - 2.0 & 3.0), LAN (Ethernet), S/PDIF, AV, RF IN, SAT IN/OUT |
| DiSEqC Support | DiSEqC 1.2, USALS, SCR, Unicable |
| Special Features | PVR Ready, Timeshift, EPG, Automatic TiVuSat channel list update, Smart TV functions (Rai Play, Mediaset Infinity, HbbTV) |
| Power Supply | 12V operation |
| Dimensions | 210 x 153 x 40 mm (approximate) |
8. Warranty and Support
This product comes with a manufacturer's warranty. Please refer to the warranty card included in your package or contact your retailer for specific warranty terms and conditions.
For technical support or service inquiries, please consult the contact information provided in the full user manual or visit the official DigiQuest website.