
1. Introduction
Thank you for choosing the XAMOFAN 1080P Mini Spy Camera Clock. This device combines a functional digital clock with a discreet high-definition camera, offering surveillance capabilities for your home or office. This manual provides detailed instructions for setup, operation, and maintenance to ensure optimal performance and security.
2. Package Contents
Please check the package for the following items:
- 1 x XAMOFAN Spy Camera Alarm Clock
- 1 x User Manual
- 1 x USB Charging Cable
- 1 x Back Cover Opening Tool
3. Product Overview
The XAMOFAN Mini Spy Camera Clock is designed for discreet surveillance. Below are images illustrating the device and its components.

Figure 3.1: Front view of the XAMOFAN Mini Spy Camera Clock, displaying the time 10:30 and featuring icons indicating its capabilities: camera, HD 1080P resolution, WiFi connectivity, motion detection, and night vision.
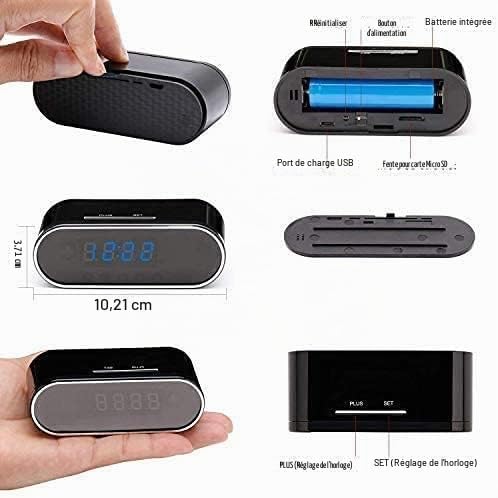
Figure 3.2: Detailed diagram of the camera clock, showing its dimensions (10.21 cm length, 3.71 cm height). Key components include the Reset button, Power button, integrated battery, USB charging port, Micro SD card slot, and clock adjustment buttons (PLUS and SET) located on the top and back of the device.
Component Identification:
- Display Screen: Shows current time.
- Camera Lens: Discreetly located on the front.
- Power Button: Turns the device on/off.
- Reset Button: Used to reset the device to factory settings.
- USB Charging Port: For power supply and charging.
- Micro SD Card Slot: For local video storage (supports up to 256GB, card not included).
- PLUS/SET Buttons: Used to adjust the clock time.
4. Setup
4.1 Charging the Device
- Connect the provided USB cable to the camera clock's USB port.
- Plug the other end of the USB cable into a USB power adapter (not included) or a computer's USB port.
- Allow approximately 4 hours for a full charge. The device can record for about 4 hours on a full charge. For continuous operation, keep the device connected to a power source.
4.2 Inserting the Micro SD Card
- Gently open the back cover of the device using the provided tool.
- Locate the Micro SD card slot.
- Insert a Micro SD card (Class 10 or higher, up to 256GB, not included) into the slot with the gold contacts facing down, until it clicks into place.
- To remove, gently push the card in again until it springs out.
4.3 App Installation and WiFi Connection
To utilize the remote viewing and advanced features, you need to install the companion mobile application.
- Download the App: Search for the recommended app (refer to the quick start guide or packaging for the app name, or scan a QR code if provided) in your smartphone's app store (App Store for iOS, Google Play Store for Android).
- Power On: Press and hold the Power button on the camera clock until the indicator light turns on.
- Connect to Camera's WiFi: On your smartphone, go to WiFi settings and connect to the camera's temporary WiFi hotspot (usually named something like
Ask a question about this manual
Ask about setup, troubleshooting, compatibility, parts, safety, or missing instructions. Manuals+ will review the question and use this page’s manual context to help answer it.