1. Product Overview
The Generic Remote Battery Disconnect Switch is an automotive device designed to provide convenient and secure control over your vehicle's battery power. It helps prevent battery drain during prolonged parking or storage and offers an anti-leakage power cut-off feature. The system includes a main switch unit and two wireless remote controls for easy operation.

Image 1.1: The Remote Battery Disconnect Switch unit with its two wireless remote controls.
Key Features:
- Wireless Power Control: Activate or deactivate your vehicle's electrical system remotely using the included wireless controllers.
- Battery Discharge Prevention: Effectively prevents parasitic battery drain when the vehicle is not in use, extending battery life.
- Wide Voltage Compatibility: Supports common vehicle voltage systems, including 12V and 24V.
- Simplified Wiring: Designed for straightforward installation without complex modifications.
- Enhanced Security: Provides an additional layer of security by allowing remote power cut-off.
2. Safety Information
Please read and understand all safety instructions before installing or operating this device. Failure to follow these instructions may result in electric shock, fire, or serious injury.
- Always disconnect the negative (-) battery terminal first before working on any electrical components in your vehicle.
- Wear appropriate personal protective equipment, including safety glasses and gloves.
- Ensure the vehicle is turned off and the ignition key is removed before installation.
- Avoid short-circuiting the battery terminals or the device's connections.
- Do not install the device in areas exposed to excessive heat, moisture, or corrosive substances.
- If you are unsure about any installation steps, consult a qualified automotive technician.
- Keep remote controls away from children.
3. Package Contents
Verify that all components are present before beginning installation:
- 1 x Remote Battery Disconnect Switch Unit
- 2 x Wireless Remote Controls
- 1 x Wiring Harness (for control circuit)
- 2 x Battery Terminal Connectors (pre-attached to main unit)
4. Installation Guide
Follow these steps for proper installation of the remote battery disconnect switch:

Image 4.1: Visual guide showing various components and connection points for installation.
- Prepare the Vehicle: Ensure the vehicle is off and the ignition key is removed. Open the hood and locate the vehicle battery.
- Disconnect Battery: Carefully disconnect the negative (-) battery terminal first, followed by the positive (+) battery terminal.
- Mount the Switch Unit: Choose a secure, dry location near the battery to mount the main disconnect switch unit. Ensure it is away from moving parts and excessive heat.
- Connect Main Power Cables:
- Connect one of the large terminals of the disconnect switch to the positive (+) terminal of your vehicle's battery.
- Connect the other large terminal of the disconnect switch to the positive (+) cable that leads to your vehicle's electrical system. This effectively places the switch in series with the positive battery circuit.
- Connect Control Wiring:
- Connect the red wire from the switch unit's control harness to the positive (+) battery terminal.
- Connect the black wire from the switch unit's control harness to the negative (-) battery terminal or a suitable chassis ground point.
- Secure Connections: Ensure all connections are tight and secure. Double-check that there are no loose wires or potential short circuits.
- Test Functionality: After installation, use the remote control to test the switch's on/off functionality before closing the hood.
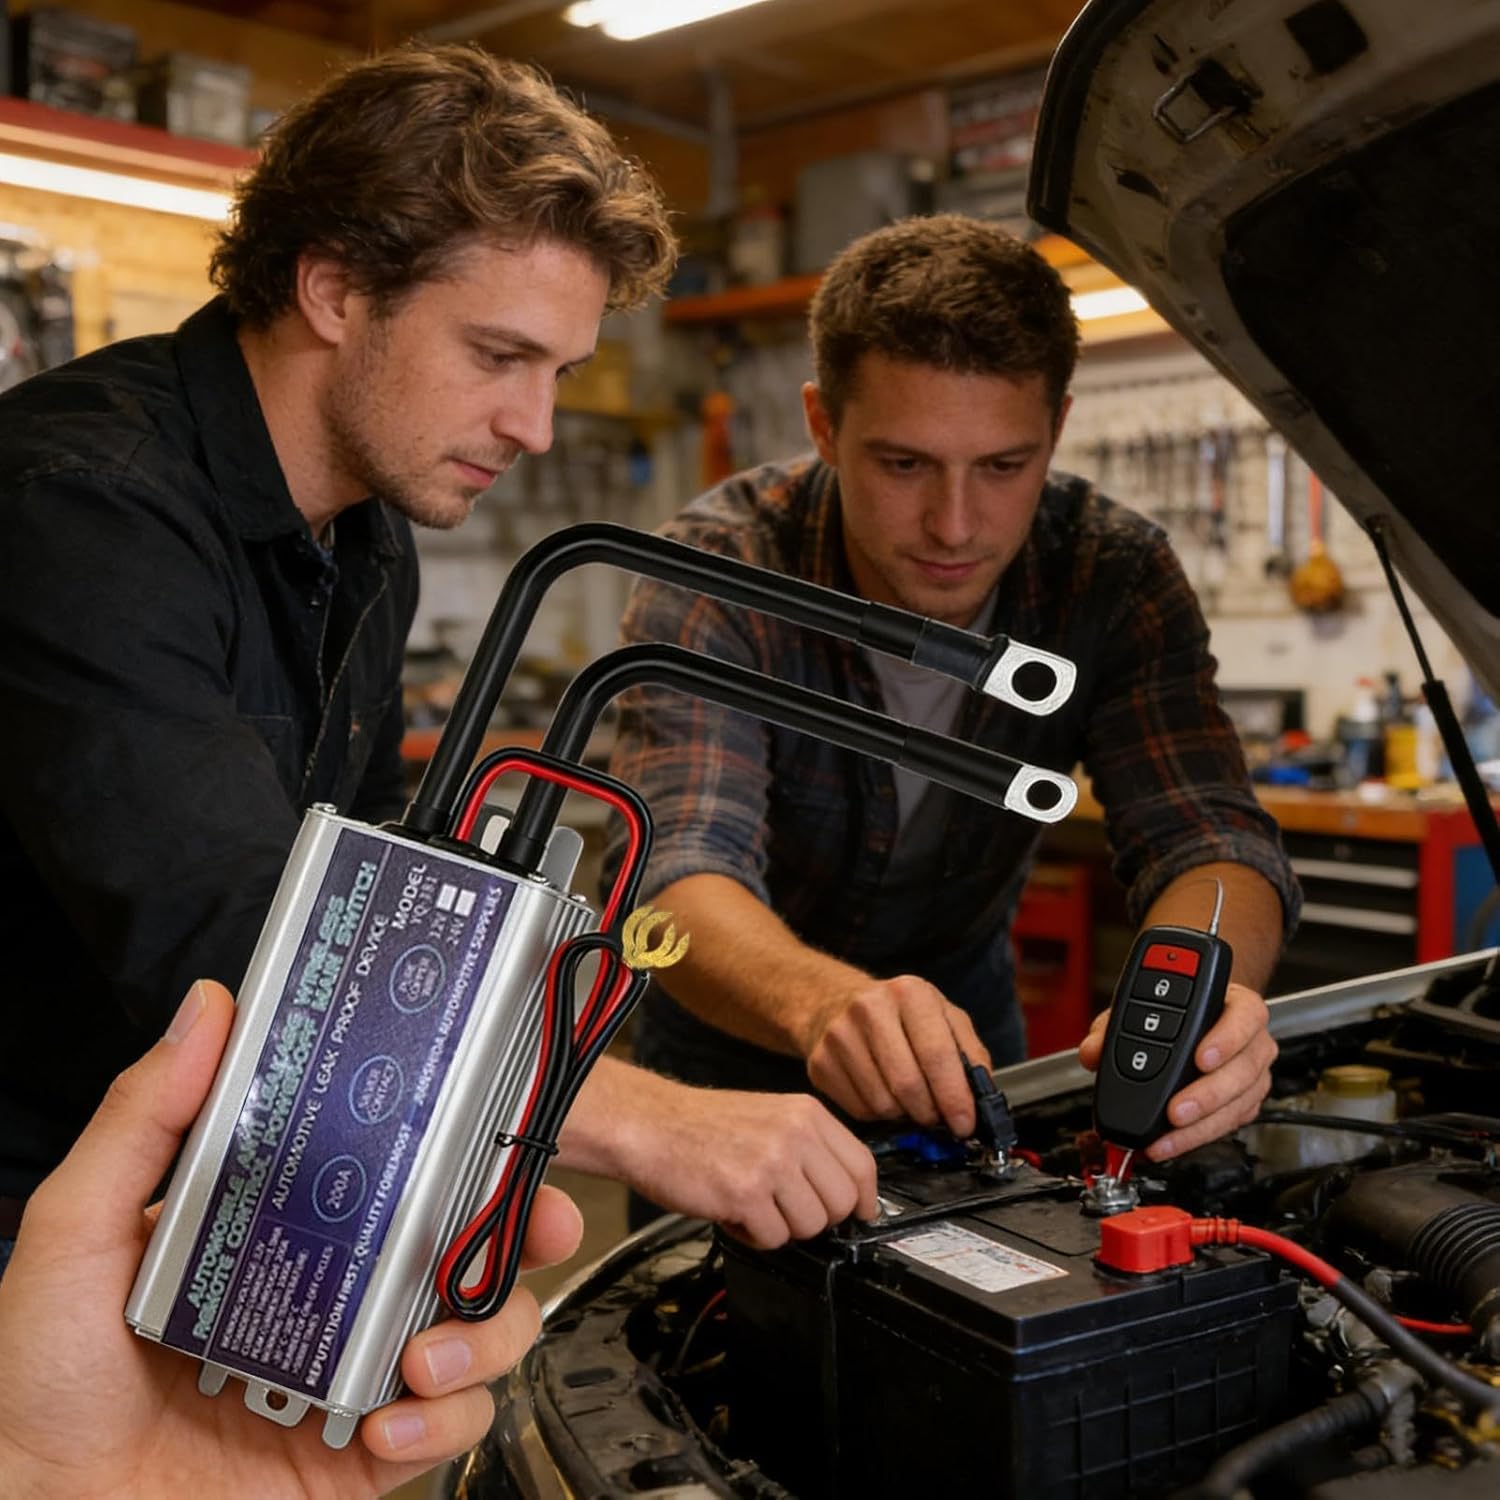
Image 4.2: Example of the remote battery disconnect switch being installed in a vehicle.
5. Operation
The remote battery disconnect switch is operated using the provided wireless remote controls.

Image 5.1: The wireless remote control for the battery disconnect switch.
Using the Remote Control:
- To Connect Power (Turn ON): Press the unlock button (often depicted as an open padlock) on the remote control. The switch will engage, connecting the battery to the vehicle's electrical system.
- To Disconnect Power (Turn OFF): Press the lock button (often depicted as a closed padlock) on the remote control. The switch will disengage, cutting off power from the battery to the vehicle's electrical system.
- The effective range for the remote control is approximately 50 meters (164 feet).
It is recommended to disconnect the battery when the vehicle will be parked for an extended period to prevent battery discharge.
6. Maintenance
To ensure optimal performance and longevity of your remote battery disconnect switch, consider the following maintenance tips:
- Regular Inspection: Periodically check all wiring connections for tightness and signs of corrosion. Clean any corrosion with a wire brush and battery terminal cleaner.
- Keep Dry: Ensure the switch unit remains dry and protected from direct water exposure.
- Battery Health: Regularly check your vehicle's battery health. A healthy battery is essential for the proper functioning of the disconnect switch.
- Remote Battery: If the remote control's range decreases or it becomes unresponsive, replace its internal battery.
7. Troubleshooting
If you encounter issues with your remote battery disconnect switch, refer to the following table for common problems and solutions:
| Problem | Possible Cause | Solution |
|---|---|---|
| Switch does not respond to remote. | Dead remote battery, remote out of range, interference, faulty switch unit. | Replace remote battery. Move closer to the vehicle. Check for strong radio interference. Inspect switch wiring. |
| Vehicle loses power intermittently. | Loose wiring connections, faulty switch unit, low vehicle battery. | Check and tighten all connections. Test vehicle battery voltage. If issues persist, the switch unit may need replacement. |
| Remote range is poor. | Low remote battery, environmental interference. | Replace remote battery. Try operating in a different location away from large metal structures or strong radio signals. |
| Switch unit gets hot. | Overload, loose connections, internal fault. | Ensure the current draw does not exceed the switch's rating (200A). Check for loose connections. Discontinue use if overheating persists and consult a professional. |
8. Specifications
Technical specifications for the Remote Battery Disconnect Switch:

Image 8.1: The remote battery disconnect switch unit showing its dimensions and key specifications.
| Feature | Specification |
|---|---|
| Model Number | B0GV8CCSNN (Manufacturer Part No: WTIQTLGLQ7NT7E8O) |
| Brand | Generic |
| Operating Voltage | 12V / 24V DC (Compatible) |
| Rated Current | 200A |
| Material | Metal |
| Dimensions (L x W x H) | 22 x 10 x 6 cm (8.66 x 3.94 x 2.36 inches) |
| Remote Control Range | Up to 50 meters (164 feet) |
| Number of Positions | 1 (On/Off) |
| Country of Origin | China |
9. Warranty and Support
This product comes with a standard manufacturer's warranty. For specific warranty details, please refer to the documentation included with your purchase or contact the retailer. For technical support or inquiries, please reach out to the seller through the platform where the product was purchased.