1. Introduction
This manual provides essential information for the safe and efficient operation, installation, and maintenance of your new XK Model 988 Tire Changer and SBM690S Wheel Balancer Combo. Please read this manual thoroughly before operating the equipment. Proper understanding and adherence to these instructions will ensure optimal performance and longevity of your machines.
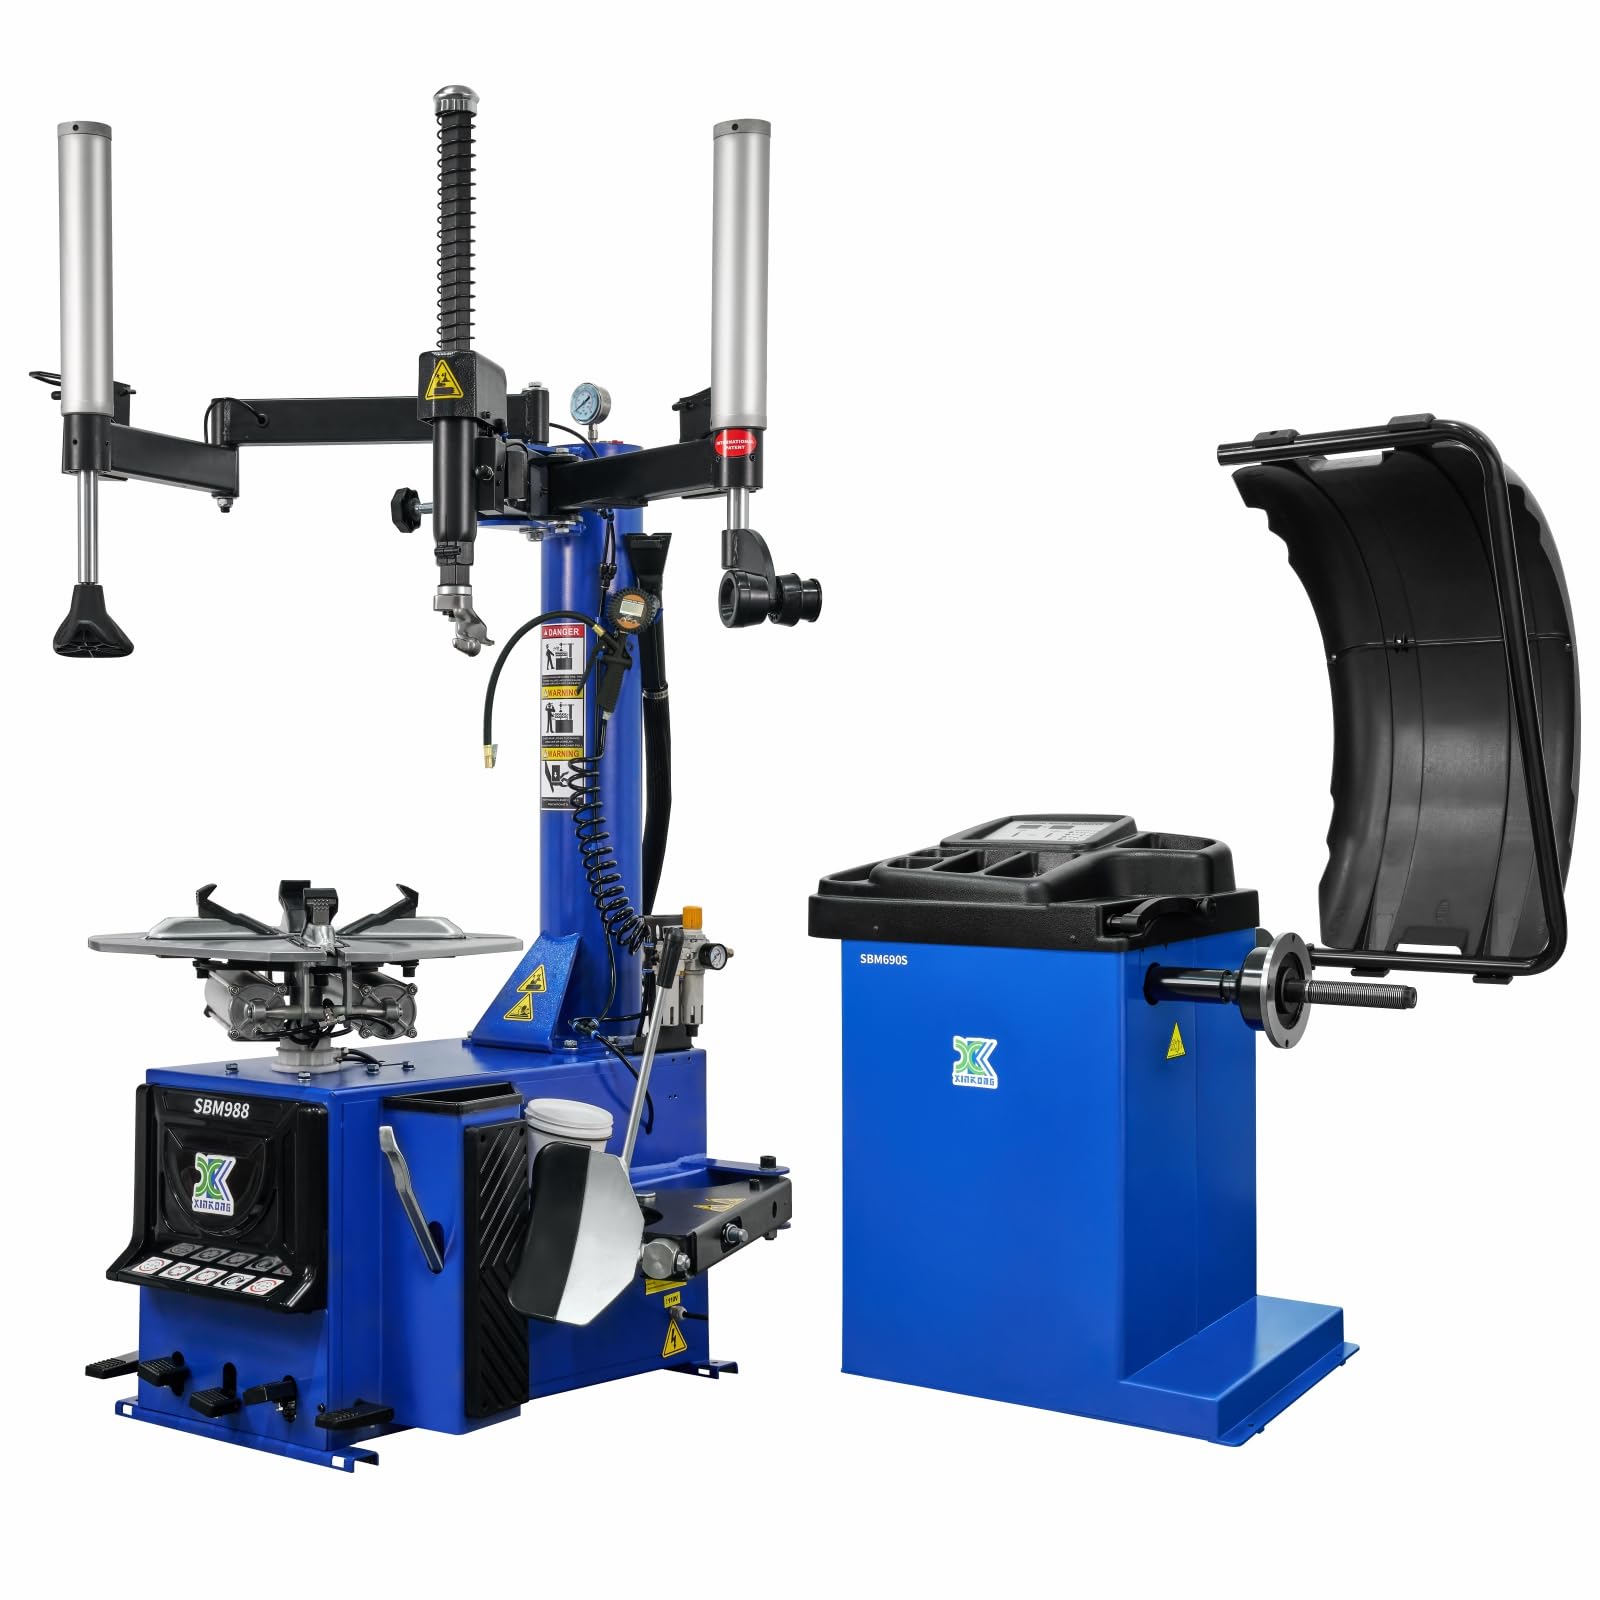
The XK Model 988 Tire Changer and 690S Wheel Balancer Combo, shown in blue, ready for operation.
2. Safety Information
Always prioritize safety when operating heavy machinery. Failure to follow safety guidelines can result in serious injury or equipment damage.
- Read the Manual: Understand all operating procedures and safety warnings before use.
- Personal Protective Equipment (PPE): Always wear appropriate safety glasses, gloves, and protective footwear.
- Work Area: Ensure the work area is clean, well-lit, and free from obstructions. Keep bystanders away from the equipment during operation.
- Power Supply: Connect the equipment to a grounded 110V power outlet. Ensure all electrical connections are secure.
- Air Supply: Ensure the air compressor is capable of providing the required pressure and volume. Check air hoses for damage before each use.
- Tire Inflation: Use caution when inflating tires. Over-inflation can cause tires to burst. Always use a tire cage or other restraint device when inflating.
- Maintenance: Disconnect power and air supply before performing any maintenance or adjustments.

Observe all danger and warning labels on the equipment, especially regarding tire inflation and moving parts.
3. What's in the Box
Your XK New Model 988 combo 690 package includes the following components:
- XK Model 988 Tire Changer
- XK Model 690S Wheel Balancer
- Auxiliary Arms for Tire Changer
- Tire Changer Bird Head
- Tire Changer Roller
- Tire Shovel / Bead Breaker
- Column-Type Burst Inflation Tank
- Digital Display Air Gun / Tire Pressure Gauge
- Wheel Chuck with Protective Covers
- Balance Clamp
- Cone Blocks (complete set)
- Measuring Calipers
- Air Hoses and Connectors
- Oil Mist Lubricator
- Mounting Hardware and Tools

This video shows the unboxing and initial setup of the XK 988 Tire Changer, detailing how to remove packaging and prepare the unit for assembly.
4. Setup
4.1. Unpacking and Initial Inspection
Carefully unpack all components from the shipping crates. Inspect for any visible damage that may have occurred during transit. Report any damage to the carrier immediately.

Illustration highlighting the patented structural design of the tire mounting component, protected under U.S. Patent No. 8,528,620 B2, which enhances efficiency and reduces bead damage.
4.2. Tire Changer Assembly (XK-988)
Follow these steps to assemble the tire changer:
- Remove Screws: Locate and remove the screws from the base of the tire changer.
- Position Column: Carefully position the main column onto the base, aligning the holes.
- Connect Air Hose: Connect the air hose to the designated port on the column.
- Secure Column: Tighten the screws to firmly attach the column to the base.
- Install Auxiliary Arm: Unscrew the top screws on the column. Install the main auxiliary arm into position, aligning it with the holes, and tighten the screws.
- Install Roller Auxiliary Arm: Remove the locking pin. Install the roller auxiliary arm, aligning it with the holes, and insert the locking pin. Tighten the screws.
- Tighten Bird Head Screw: Tighten the large screw on the tire changer bird head.
- Connect Air Hoses to Lubricator: Remove the screws from the base. Connect the air hose through the opening. Connect the end of the air hose to the oil mist separator properly.
- Install Pressure Gauge: Install the pressure gauge onto the oil mist separator.
- Mount Rapid Inflation Hose: Mount the rapid inflation hose securely onto the column.
- Install Chuck Guard: Install the chuck guard properly onto the working disc.

This video provides a step-by-step guide for installing the XK 988 Tire Changer, covering assembly of the main column, auxiliary arms, and air connections.
4.3. Wheel Balancer Placement (SBM690S)
Place the wheel balancer on a stable, level surface. Ensure adequate space around the machine for safe operation and tire handling. For optimal stability, consider anchoring the balancer to the floor as recommended in some user reviews.

The XK Model 690S Wheel Balancer with its control panel and protective hood.
5. Operating Instructions
5.1. Wheel Balancer Operation (SBM690S)
The SBM690S wheel balancer features 6 balancing modes and an OPT function for versatile use. Follow these steps for accurate wheel balancing:
- Power On: Turn on the power switch for the wheel balancer.
- Mount Tire: Place the tire onto the balancing machine's spindle.
- Secure Tire: Tighten the tire with a quick-release nut.
- Measure 'a' Value: Use the mobile measuring ruler to determine the distance from the machine to the inner rim edge (value 'a'). Read the displayed value on the ruler.
- Input 'a' Value: Press the 'a up' or 'a down' key on the control panel to enter the measured value for 'a'.
- Measure 'b' Value: Measure the width of the wheel rim using a measuring ruler (value 'b').
- Input 'b' Value: Press the 'b up' or 'b down' key to enter the measured value for 'b'.
- Measure 'd' Value: Read the diameter marked on the tire (value 'd').
- Input 'd' Value: Press the 'd up' or 'd down' key to enter the measured value for 'd'.
- Start Balancing: Lower the tire cover to initiate the balancing cycle. The machine will spin the wheel and display unbalanced parameters.
- Apply Inner Weight: Rotate the tire until all the inner indicator lights illuminate. Attach the corresponding weight balance weight to the 12 o'clock position on the inner side of the rim.
- Apply Outer Weight: Rotate the tire until all the outer indicator lights are illuminated. Attach the corresponding weight balance block to the 12 o'clock position on the outer side of the rim.
- Verify Balance: Lower the tire cover again. The display should show "00," indicating that the tire balancing is complete.
The digital control panel of the wheel balancer, showing balancing modes and input keys.
This video demonstrates the operation of the XK 690S Wheel Balancer, including mounting a tire, inputting measurements, and applying balance weights.
5.2. Tire Changer Operation (XK-988)
The XK-988 tire changer features dual independent mechanical arms and a thickened reinforced structure for efficient tire changing. The patented structural design improves mounting efficiency and reduces the risk of tire bead damage.
- Position Wheel: Place the wheel on the working disc, ensuring it is securely clamped by the precision cast steel claws with non-slip covers.
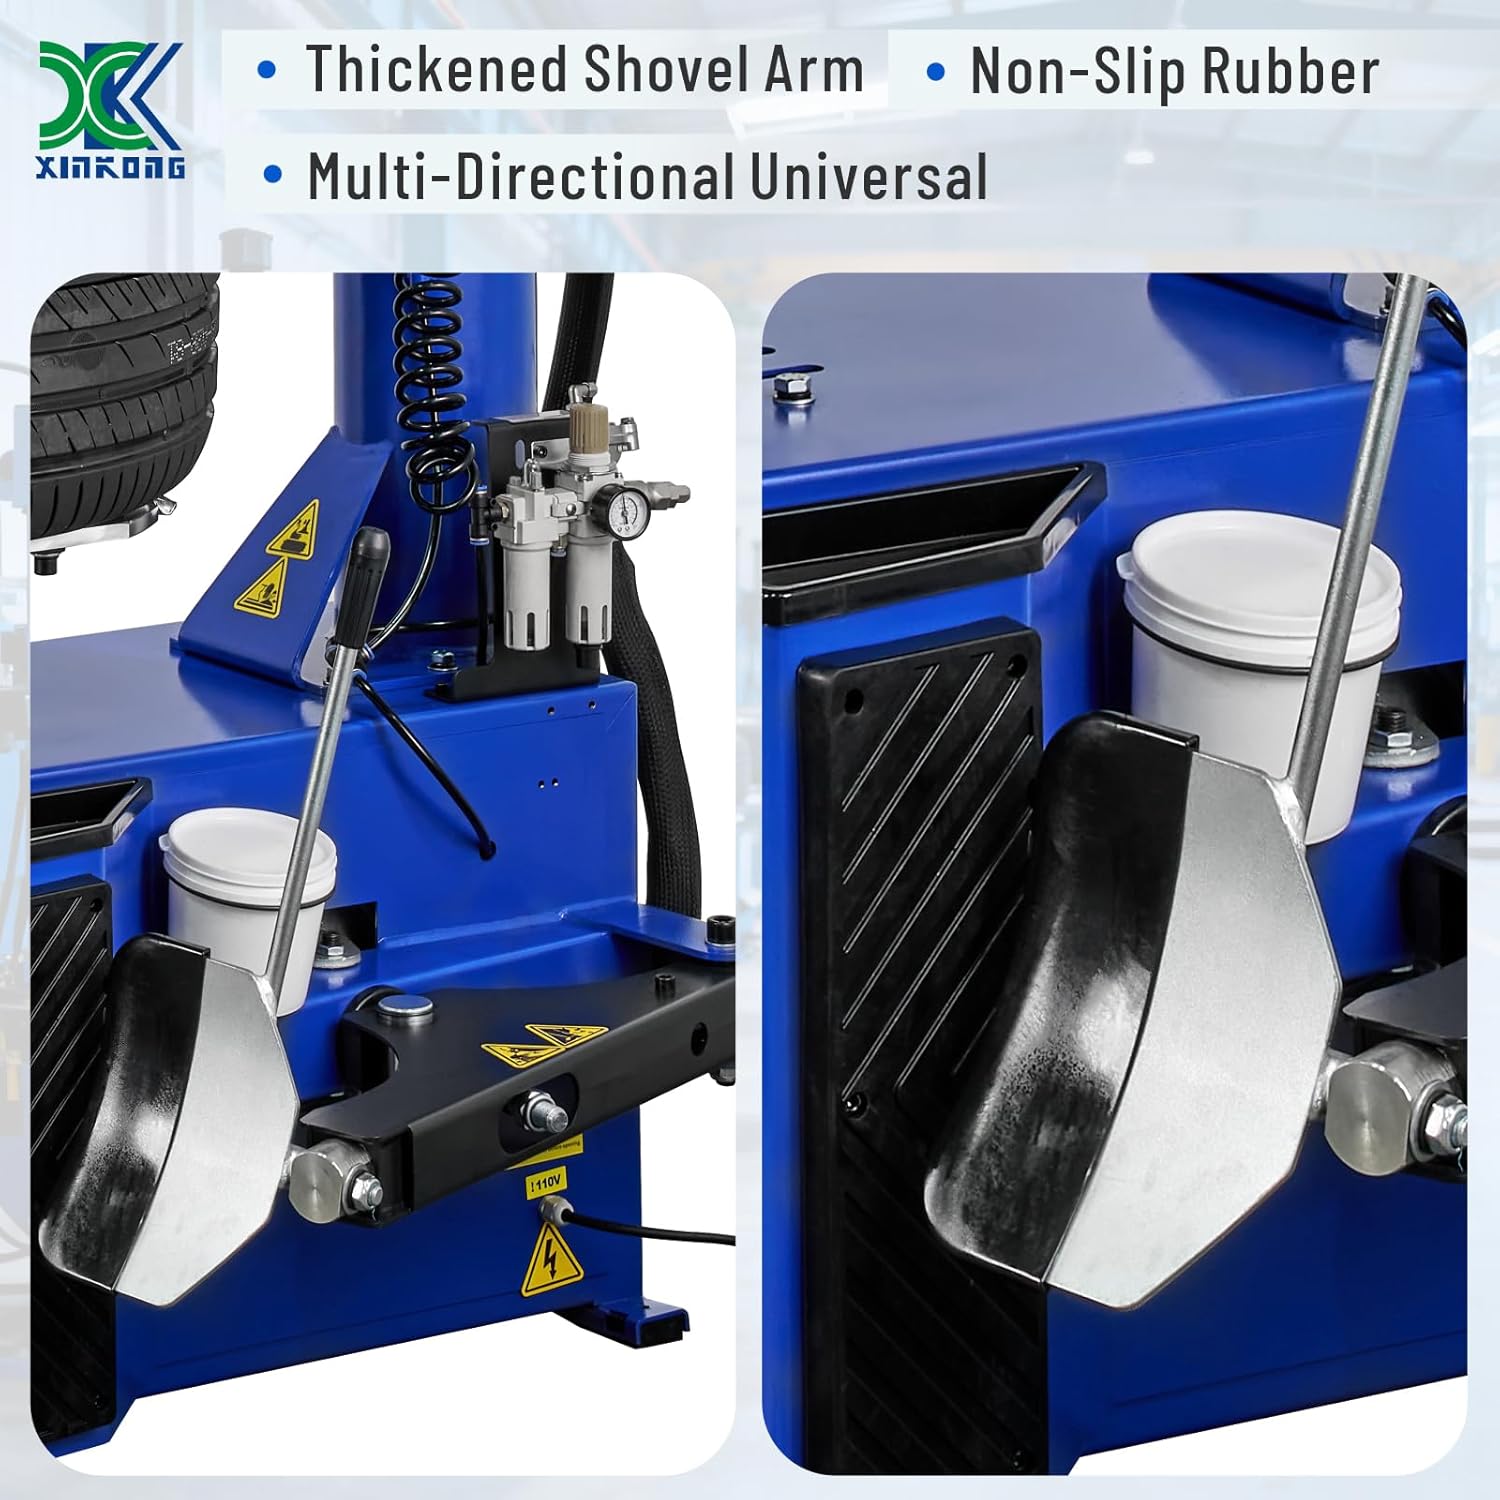
- Bead Breaking: Use the thickened shovel arm and multi-directional universal shaft to break the tire bead. The large curve-fitting shovel plate and non-slip rubber pad ensure stable and easy tire shoveling.
- Lubricate Beads: Apply appropriate tire lubricant to both tire beads.
- Dismounting Tire: Utilize the dual independently controlled mechanical arms and the tire changer bird head to dismount the tire from the rim.
- Mounting Tire: Position the new tire onto the rim. Use the dual independent mechanical arms and the tire changer roller to mount the tire onto the rim.
- Inflation: Inflate the tire using the column-type burst inflation tank and the electronic digital display air gun. Monitor tire pressure in real-time for safety.

The XK Model 988 Tire Changer, featuring dual assist arms and a robust base.
This video illustrates the process of dismounting and mounting a tire using the XK 988 Tire Changer, showcasing the assist arms and bead breaking functions.
6. Maintenance
Regular maintenance is crucial for the longevity and safe operation of your XK tire changer and wheel balancer.
- Daily Cleaning: Clean the machines daily to remove tire dust, dirt, and debris.
- Lubrication: Regularly check and replenish the oil mist lubricator for the pneumatic components. Ensure all moving parts are adequately lubricated as per the maintenance schedule.
- Air System Check: Inspect air hoses and connections for leaks or damage. Ensure the air filter is clean and functioning correctly.
- Fastener Check: Periodically check all bolts and fasteners for tightness. Tighten any loose fasteners.
- Chuck and Claws: Inspect the wheel chuck and clamping claws for wear or damage. Replace protective covers as needed to prevent rim damage.
- Calibration: The wheel balancer should be calibrated periodically to maintain accuracy. Refer to the operating instructions for the calibration process.

The electronic digital display air gun for real-time tire pressure monitoring and the pressure-resistant oil mist lubricator for smooth operation.
7. Troubleshooting
This section addresses common issues you might encounter. For problems not listed here, contact customer support.
7.1. Tire Changer Issues
- Tire difficult to dismount/mount: Ensure proper lubrication of tire beads. Check air pressure to the machine; insufficient pressure can reduce power to the bead breaker and assist arms. Verify the bird head and roller are correctly positioned and adjusted.
- Air leaks: Check all pneumatic connections, especially around the oil mist separator and rapid inflation hose. Tighten connections or replace damaged hoses/fittings.
- Rim damage during operation: Ensure plastic protective covers on claws and bird head are in place and not worn. Verify correct clamping pressure and technique.
7.2. Wheel Balancer Issues
- Inaccurate balancing results: Ensure the machine is properly calibrated. Input correct 'a', 'b', and 'd' values. Check for debris on the wheel or spindle. Verify the tire is securely mounted.
- Machine not starting/spinning: Check power connection and ensure the power switch is on. Verify the tire cover is fully lowered before starting the cycle.
- Display errors: If the display shows unusual readings or error codes, try restarting the machine. If the problem persists, consult the detailed troubleshooting section in the full manual or contact support.
8. Specifications
8.1. XK Model 988 Tire Changer
- Outer Clamp Rim Size: 10"-22"
- Inner Support Rim Size: 12"-24"
- Max. Wheel Diameter: 41"
- Dismounting Tire Width: 12.5"
- Total Weight: 566.5 lbs (257 kgs)
- Power: 110V
- Features: Heavy-duty stainless steel construction, dual independent mechanical arms, thickened reinforced structure, universal tire shovel, advanced digital display inflation, column-type burst inflation tank.
8.2. SBM690S Wheel Balancer
- Max. Balancing Diameter: 24"
- Rim Diameter: 10"-24"
- Balance Period: 8 seconds
- Total Weight: 213.8 lbs (97 kgs)
- Average Rim Width: 1.5"-20"
- Balance Accuracy: ±1g
- Features: 6 balancing modes, OPT function, extended pull rule for wide tire balancing.

Diagram showing the key dimensions of both the tire changer and wheel balancer units.
9. Warranty and Support
Your XK Model 988 Tire Changer and 690S Wheel Balancer Combo comes with a 36-month part replacement warranty. This warranty covers replacement parts for manufacturing defects or malfunctions under normal use conditions.
For technical support, warranty claims, or to order replacement parts, please contact XK customer service. Ensure you have your product model number and purchase date available when contacting support.