1. Important Safety Information
Please read and understand all instructions and safety warnings before assembling and using your YITAHOME Hardtop Gazebo. Failure to follow these instructions may result in injury or damage to the product.
- Assembly: This gazebo requires assembly by 2-4 people. Do not attempt to assemble alone.
- Site Selection: Choose a level surface for installation. Ensure adequate clearance from power lines, trees, and other structures.
- Anchoring: Always secure the gazebo to the ground using the provided ground stakes or other suitable anchoring methods to prevent wind uplift. Consult local building codes for specific anchoring requirements in your area.
- Weather Conditions: While designed for durability, this gazebo is not intended for use in extreme weather conditions. Remove accumulated snow from the roof to prevent collapse. In strong winds, remove curtains and netting, and consider disassembling the gazebo if winds are severe.
- Fire Safety: Keep all flame and heat sources away from the gazebo fabric and structure.
- Inspection: Regularly inspect all bolts, screws, and connections to ensure they are tight and secure.
2. Package Contents
Your YITAHOME 12x20FT Hardtop Gazebo is shipped in multiple packages. Please ensure you have received all packages before beginning assembly. The product typically arrives in 4 separate packages, which may be delivered on different days.
Carefully unpack all components and compare them against the parts list provided in your physical instruction manual. If any parts are missing or damaged, please contact YITAHOME customer support immediately.

Image: The gazebo components are delivered in multiple boxes.
3. Assembly Instructions
3.1. Preparation
- Tools Required: Gather necessary tools such as a screwdriver, wrench, and a drill with a hex bit (recommended for faster roof panel installation).
- Work Area: Clear a spacious and level area for assembly.
- Personnel: Assembly is recommended for 2-4 people and typically takes 2-4 hours.
3.2. Step-by-Step Assembly Overview
Follow the detailed graphical instructions provided in your physical manual for precise steps. The general assembly sequence is as follows:
- Base Frame Assembly: Connect the horizontal base beams to form the perimeter of the gazebo.
- Column Installation: Attach the vertical support columns to the base frame. Ensure all connections are secure.
- Roof Frame Assembly: Construct the upper roof frame structure. This step may require extra care and coordination due to its size.
- Roof Panel Installation: Install the galvanized steel roof panels. The sliding panel design allows for easier installation. Ensure panels are properly seated and secured to prevent leaks.
- Curtain and Netting Installation: Hang the polyester curtains and mesh netting onto the double track system.
- Final Securing: Anchor the gazebo legs to the ground using the provided ground stakes or other appropriate anchoring methods.
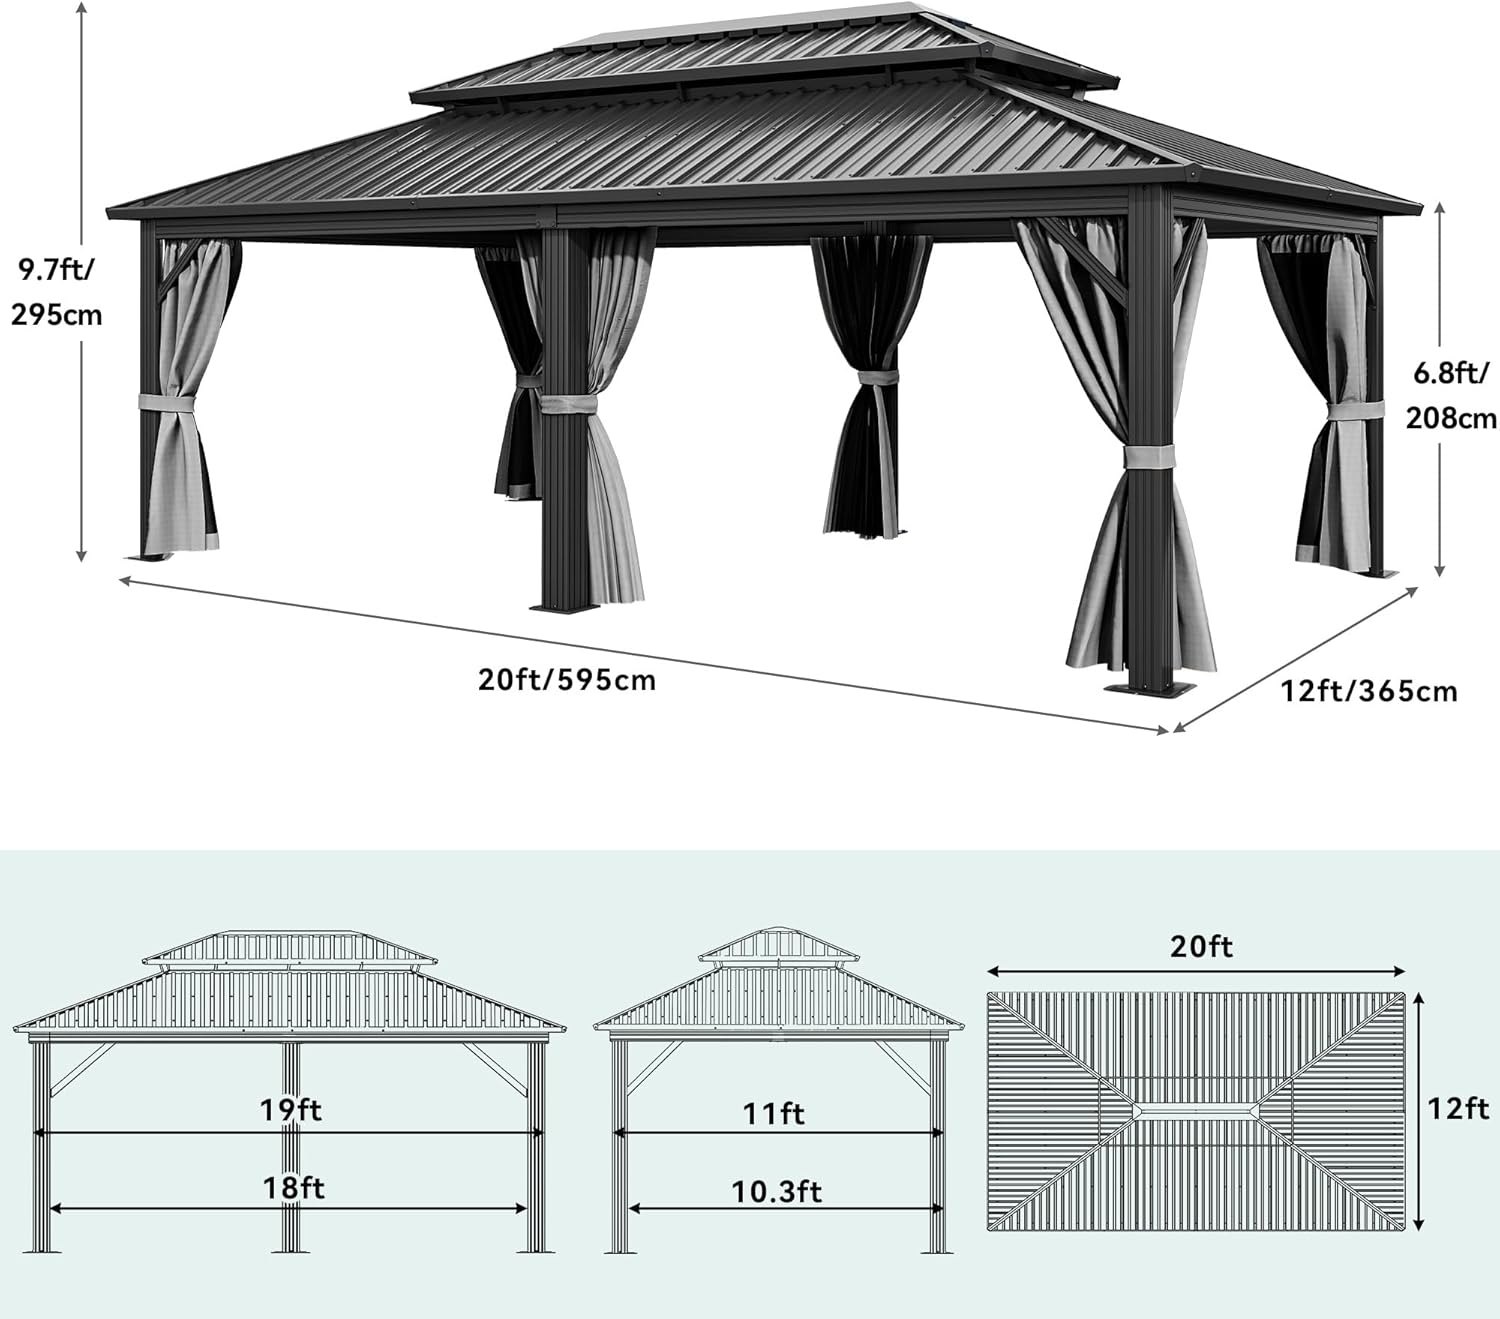
Image: Gazebo dimensions for planning your installation space.

Image: Detail of the aluminum frame construction, highlighting its durability and corrosion resistance.

Image: The sliding panel roof design simplifies the installation of the galvanized steel roof sections.
4. Operating Your Gazebo
4.1. Curtains and Netting
The gazebo features a double track system with grey polyester cloth curtains and black mesh sidewalls. These can be operated independently to provide various levels of privacy, sun protection, and insect control.
- Privacy/Sun Protection: Use the polyester curtains to block sunlight and create a private space. They are equipped with double-sided zippers for easy closure.
- Insect Control: Deploy the mesh netting to keep insects out while allowing airflow.
- Open Configuration: Tie back both curtains and netting to the gazebo posts for an open-air experience.
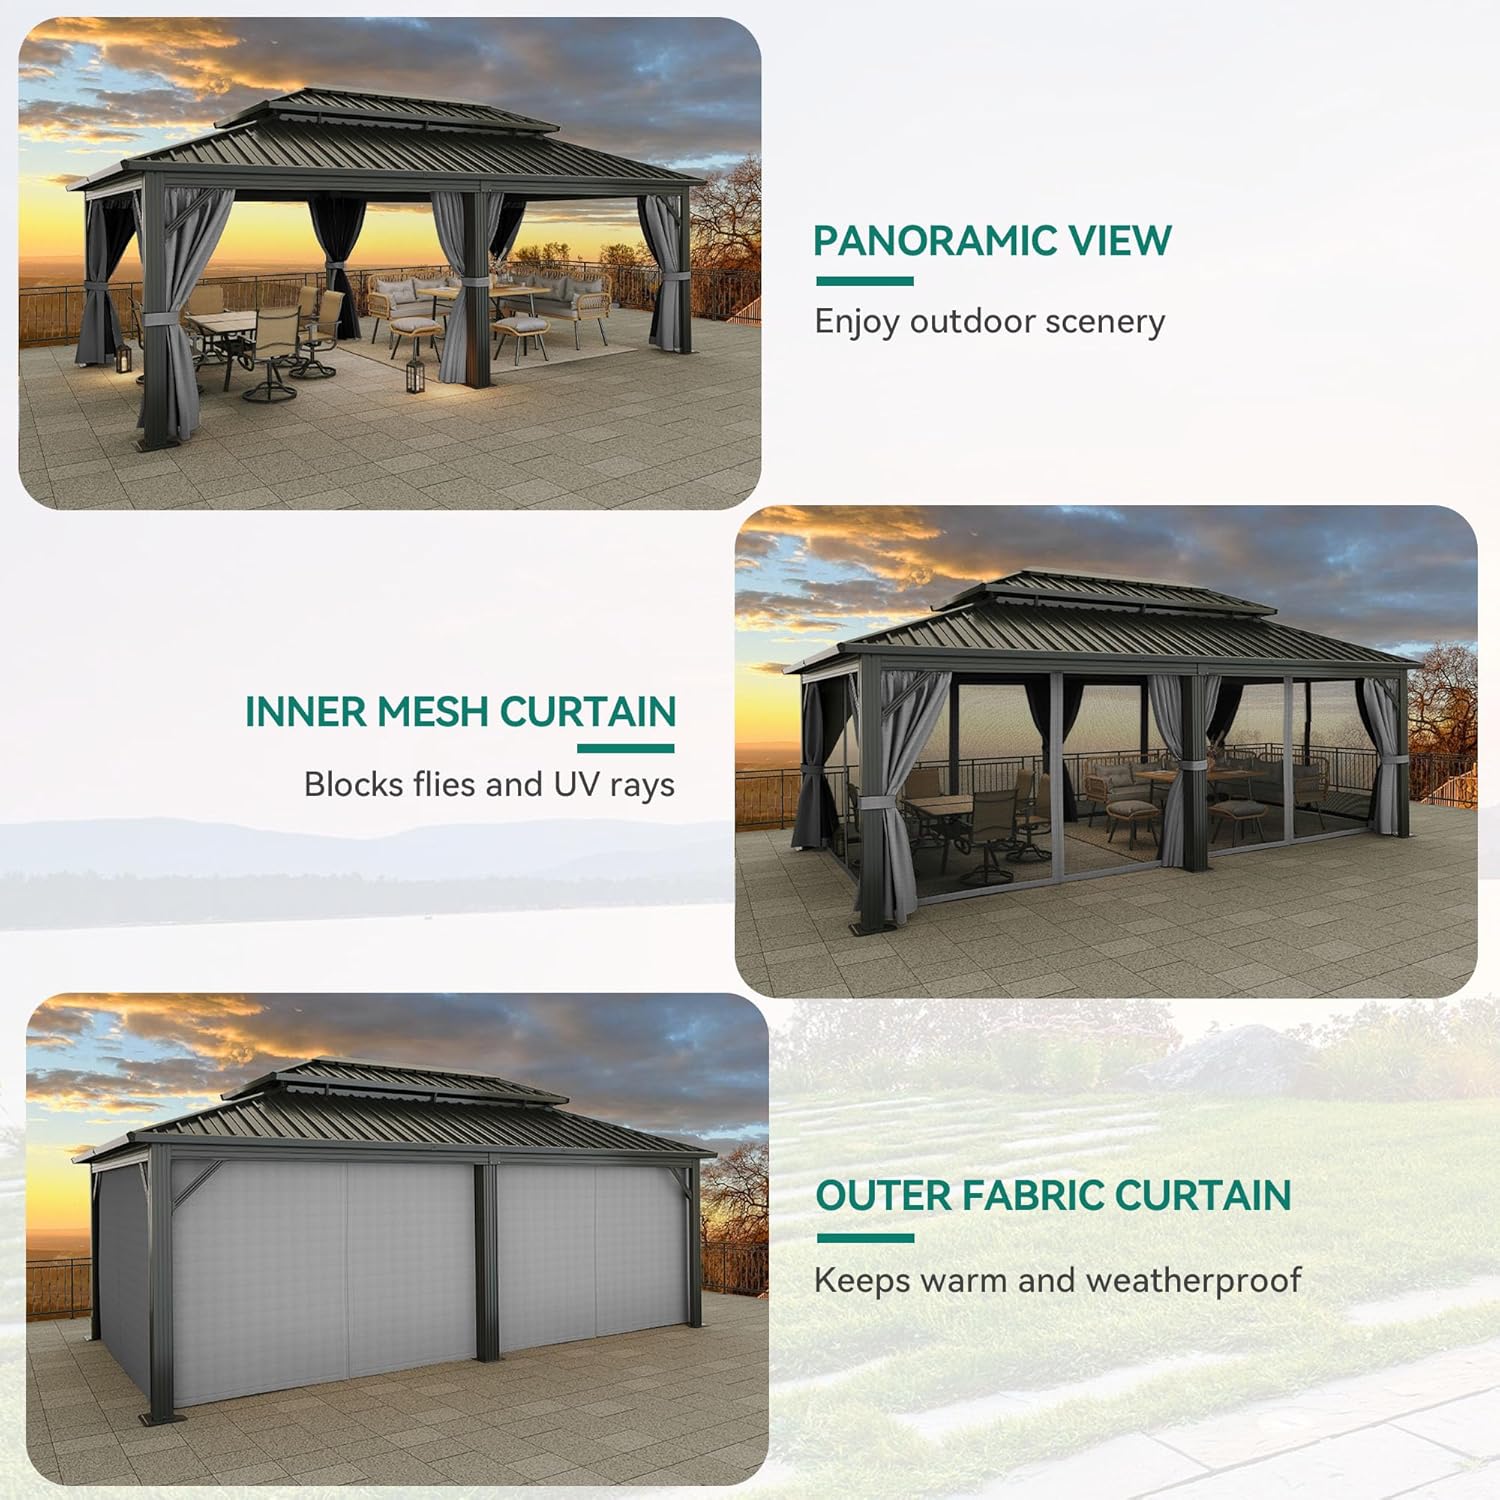
Image: The gazebo with curtains and netting deployed for privacy and insect protection.

Image: The premium dyed fabric of the curtains offers UV protection, water resistance, and colorfastness.
4.2. Ceiling Hook
An integrated 'J' shaped hook is located at the center of the gazebo roof. This hook is designed for hanging lightweight items such as electric lights or decorative fans to enhance your outdoor living space.

Image: The central ceiling hook provides a convenient point for hanging accessories.
5. Maintenance
Regular maintenance will extend the life and appearance of your YITAHOME Gazebo.
- Cleaning the Frame: Wipe the aluminum frame with a damp cloth and mild soap. Rinse thoroughly and dry. Avoid abrasive cleaners.
- Cleaning the Roof: The galvanized steel roof can be cleaned with water and a soft brush to remove debris. Ensure proper drainage to prevent water buildup.
- Cleaning Curtains and Netting: The polyester fabric and mesh can be spot cleaned with mild soap and water. For deeper cleaning, follow care instructions on the fabric tags. Ensure they are completely dry before storing or retracting for extended periods to prevent mildew.
- Seasonal Care: In regions with heavy snowfall, it is crucial to regularly remove snow from the roof to prevent structural damage. During periods of strong winds, it is advisable to remove the curtains and netting and ensure the gazebo is securely anchored.
- Fastener Check: Periodically check all bolts, screws, and connections for tightness. Tighten as needed to maintain structural integrity.

Image: The galvanized steel double roof is designed to prevent rainwater and snow buildup, but regular clearing is recommended in heavy conditions.
6. Troubleshooting
- Missing or Damaged Parts: If you discover any missing or damaged components upon unpacking, please contact YITAHOME customer service with your model number and a description of the issue.
- Misalignment During Assembly: If screw holes do not align perfectly, avoid forcing parts. Loosen any previously tightened screws in the affected section of the frame, gently adjust the components until alignment is achieved, then retighten all screws.
- Water Leakage: Ensure all roof panels are correctly installed and overlap as per the instructions. Check that all screws securing the roof panels are tight. Verify that the drainage system is clear of debris.
- Gazebo Instability: Confirm that all frame connections are securely fastened. Ensure the gazebo is properly anchored to the ground using appropriate stakes or weights for your specific installation surface.
7. Product Specifications
| Feature | Specification |
|---|---|
| Brand | YITAHOME |
| Model Number | MAYIH43pSW |
| Product Dimensions (L x W x H) | 240"L x 144"W x 116"H (20ft x 12ft x 9.7ft) |
| Frame Material | Aluminum (Black powder-coated) |
| Roof Material | Galvanized Steel (Double Roof, Vented) |
| Curtain Material | Grey Polyester Cloth |
| Netting Material | Black Mesh |
| Water Resistance Level | Water Resistant |
| Ultraviolet Light Protection | Yes |
| Occupancy | 8-10 People |
| Assembly Required | Yes |
8. Warranty and Customer Support
YITAHOME stands behind the quality of its products. For specific warranty details, please refer to the warranty card included with your purchase or visit the official YITAHOME website.
If you have any questions regarding assembly, missing parts, product operation, or require technical assistance, please contact YITAHOME customer support. Our team is available to assist you.
Contact Information: Please refer to your purchase documentation or the YITAHOME official website for the most current customer service contact details.