
1. Introduction
The PBSS SBK-858D SMD Rework Station is a professional-grade hot air gun designed for precision soldering and desoldering tasks. This manual provides essential information for the safe and effective operation, maintenance, and troubleshooting of your device. It is intended for both professional technicians and electronics enthusiasts involved in PCB repair, component replacement, or electronic assembly work.
2. Safety Instructions
Always observe the following safety precautions to prevent injury or damage to the equipment:
- Electrical Safety: Ensure the power supply matches the station's requirements. Do not operate with wet hands or in damp environments. Disconnect power before cleaning or maintenance.
- Heat Safety: The hot air gun produces high temperatures. Avoid direct contact with the nozzle or heated components. Allow components and the nozzle to cool before handling. Use heat-resistant surfaces.
- Ventilation: Operate in a well-ventilated area to disperse fumes generated during soldering/desoldering.
- Personal Protective Equipment (PPE): Wear safety glasses to protect against solder splatter and fumes. Consider heat-resistant gloves.
- Proper Use: Use the station only for its intended purpose. Do not modify the unit. Keep out of reach of children.
- Storage: Store the unit in a dry, safe place when not in use.
3. Package Contents
Verify that all items are present in the package:
- SBK-858D Soldering Station Control Unit
- Hot Air Gun
- Hot Air Gun Holder
- Power Cord
- Two (2) Metal Nozzles (different sizes)
- Instruction Manual (this document)
4. Product Overview
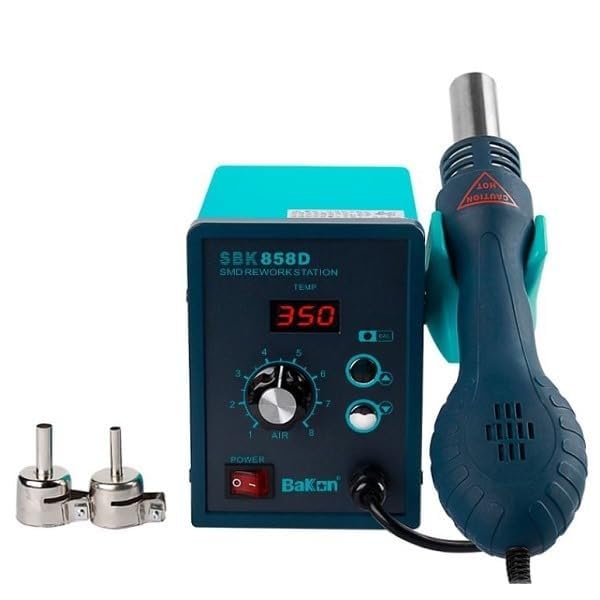
Figure 4.1: PBSS SBK-858D SMD Rework Station. This image shows the compact, teal-colored control unit with an LED display, power switch, and adjustment dials. The hot air gun, with a dark blue handle and a metallic nozzle, is securely placed in its side-mounted holder.
The SBK-858D features a clear LED display for temperature monitoring, adjustable temperature controls for precise heat settings, and an air flow adjustment dial for varying hot air intensity. It is designed for working on surface-mounted devices (SMD) and delicate electronic components, providing reliable performance and consistent results.
5. Setup
- Unpacking: Carefully remove all components from the packaging.
- Placement: Place the control unit on a stable, heat-resistant, and well-ventilated surface. Ensure adequate space around the unit for air circulation.
- Hot Air Gun Holder: Attach the hot air gun holder to the side of the control unit if not already assembled. Ensure it is secure.
- Connect Hot Air Gun: Connect the hot air gun's cable to the designated port on the control unit. Ensure a firm connection.
- Nozzle Attachment: Select an appropriate metal nozzle for your task and securely attach it to the hot air gun. Ensure it is fully seated to prevent air leakage.
- Power Connection: Connect the power cord to the control unit and then plug it into a grounded electrical outlet.
- Initial Check: Before powering on, ensure all connections are secure and the work area is clear of flammable materials.
6. Operating Instructions
6.1 Powering On and Off
- Power On: Flip the main power switch (usually red) on the front panel to the 'ON' position. The LED display will illuminate, showing the current temperature.
- Power Off: After use, place the hot air gun back into its holder. The unit will automatically enter a cooling mode. Once cooled, flip the main power switch to the 'OFF' position.
6.2 Temperature Control
- Adjusting Temperature: Use the temperature adjustment knob (or buttons, if present) on the control unit to set the desired temperature. The LED display will show the set temperature and then the actual temperature as it heats up or cools down.
- Temperature Range: The station typically operates within a range suitable for various soldering and desoldering applications. Refer to the specifications for the exact range.
- Stability: The digital control ensures temperature stability, maintaining the set temperature within a narrow tolerance.
6.3 Air Flow Control
- Adjusting Air Flow: Use the air flow adjustment dial on the front panel to control the intensity of the hot air output. Start with a lower setting and gradually increase as needed for your application.
- Application: Lower air flow is suitable for delicate components to prevent them from blowing away, while higher air flow can be used for larger components or faster heating.
6.4 Rework Process (General Guidelines)
- Preparation: Secure the PCB or component to be worked on. Apply flux if necessary.
- Set Parameters: Adjust the temperature and air flow settings according to the component type and solder alloy.
- Heating: Hold the hot air gun a few centimeters above the component, moving it gently in a circular motion to ensure even heating. Avoid prolonged heating of one spot.
- Component Removal/Placement: Once the solder melts, carefully remove or place the component using tweezers or a vacuum pick-up tool.
- Cooling: Allow the component and PCB to cool naturally before handling.
7. Maintenance
- Cleaning: Regularly clean the exterior of the control unit and hot air gun with a soft, dry cloth. Ensure the unit is unplugged and cool before cleaning.
- Nozzle Care: Inspect nozzles for blockages or damage. Clean any solder residue from the nozzles using a suitable tool. Replace damaged nozzles.
- Air Filter (if applicable): Some models may have an air filter. Check and clean/replace it as per manufacturer recommendations to maintain optimal airflow.
- Storage: When not in use for extended periods, store the unit in its original packaging or a protective case in a dry environment.
8. Troubleshooting
| Problem | Possible Cause | Solution |
|---|---|---|
| Unit does not power on. | No power supply; faulty power cord; internal fuse blown. | Check power cord connection and outlet. Replace power cord if damaged. Consult a qualified technician for fuse replacement. |
| Hot air gun not heating. | Heating element failure; loose connection; incorrect temperature setting. | Ensure temperature is set correctly. Check hot air gun connection to the unit. If problem persists, contact support. |
| Weak or no airflow. | Air pump failure; blocked nozzle; air filter clogged. | Check air flow setting. Clean or replace nozzle. Check and clean air filter (if applicable). |
| Temperature display error. | Sensor malfunction; loose connection. | Ensure hot air gun connection is secure. If error persists, contact support. |
For issues not listed above or if solutions do not resolve the problem, please contact customer support.
9. Specifications
| Model | SBK-858D |
| Brand | PBSS (Generic) |
| Type | SMD Rework Station / Digital Hot Air Gun |
| Display Type | LED |
| Wattage | 90 Watts |
| Temperature Stability | 1 Degrees Celsius |
| Upper Temperature Range | 600 Degrees Celsius |
| Item Weight | 2000 Grams |
| Product Dimensions (D x W x H) | 15D x 10W x 12H Centimeters |
| Included Components | Soldering Station Control Unit |
10. Warranty and Support
For warranty information, technical support, or service inquiries, please contact your retailer or the manufacturer directly. Keep your purchase receipt as proof of purchase.
Manufacturer Contact Information:
PBSS
Prop. No. 1-A, 1st Floor, Shiv Mandir Mohalla, Badli Chowk New Delhi- 110042
Phone: +91 9810022588


