
1. Introduction
This manual provides essential information for the safe and efficient operation, setup, and maintenance of your ACMER Ascarva 3 S 500W CNC Milling Machine. This machine is designed for precise machining on various materials including wood, acrylic, plastic, and soft metals, offering both intricate engraving and efficient cutting capabilities.
2. Safety Instructions
Always prioritize safety when operating the CNC machine. Failure to follow safety guidelines can result in injury or damage to the equipment.
- Ensure the work area is clean, well-lit, and free from obstructions.
- Wear appropriate personal protective equipment (PPE), including safety glasses, hearing protection, and gloves.
- Never operate the machine under the influence of drugs or alcohol.
- Keep hands and loose clothing away from moving parts.
- The machine is equipped with an emergency stop button. Familiarize yourself with its location and use it immediately in case of any unexpected operation or hazard.
- Six limit switches are installed for safe operation. Do not bypass or disable these safety features.
- Always disconnect power before performing maintenance or making adjustments.
- Ensure proper ventilation when working with materials that produce dust or fumes.
3. Package Contents
Verify that all components listed below are present in your package before beginning assembly.

This image displays all components included in the ACMER Ascarva 3 S CNC Milling Machine package.
- Bolt Driver (1 pc)
- Brush (1 pc)
- Control Board (1 pc)
- Assembly Instructions
- Instructions for using the toolbox
- Profile Channel Seal
- Power Line (1 pc)
- Zip Ties
- Emergency Stop Switch
- Fixture (machining)
- 1/8-inch Engraving Knife
- ER11 Collet
- USB Cable
- Limit Wire
- Motor Wires
- Braided Tube Motor Wire
- Spindle Wire
- Power Supply (1 pc)
- Spindle Motor (1 pc)
- Steel Ruler (1 pc)
- Tool Setting Instrument (1 pc)
- XZ-axis Module (1 pc)
- Y-axis Module (1 pc)
4. Setup and Assembly
The ACMER Ascarva 3 S features a modular design for straightforward assembly. Refer to the included assembly instructions for detailed, step-by-step guidance.
4.1 Initial Assembly
- Unpack all components and verify against the package contents list.
- Assemble the main frame components, ensuring all screws are securely tightened. The reinforced aluminum alloy panels and extrusions provide a stable base.
- Install the XZ-axis and Y-axis modules according to the instructions.
- Mount the 500W spindle motor and connect its wiring.
- Connect all motor wires, limit switches, and the emergency stop switch to the control board.
- Attach the power supply and power line.
4.2 Connecting to a Computer
The CNC machine connects to your computer via USB. It is compatible with Windows, macOS, and Linux operating systems.
- Connect the USB cable from the control board to your computer.
- Install the necessary drivers if prompted by your operating system.
- Install a compatible CNC control software such as Candle, Universal G-code Sender (UGS), or Easel.
5. Operating Instructions
This section outlines the basic steps for operating your ACMER Ascarva 3 S CNC Milling Machine.
5.1 Machine Overview
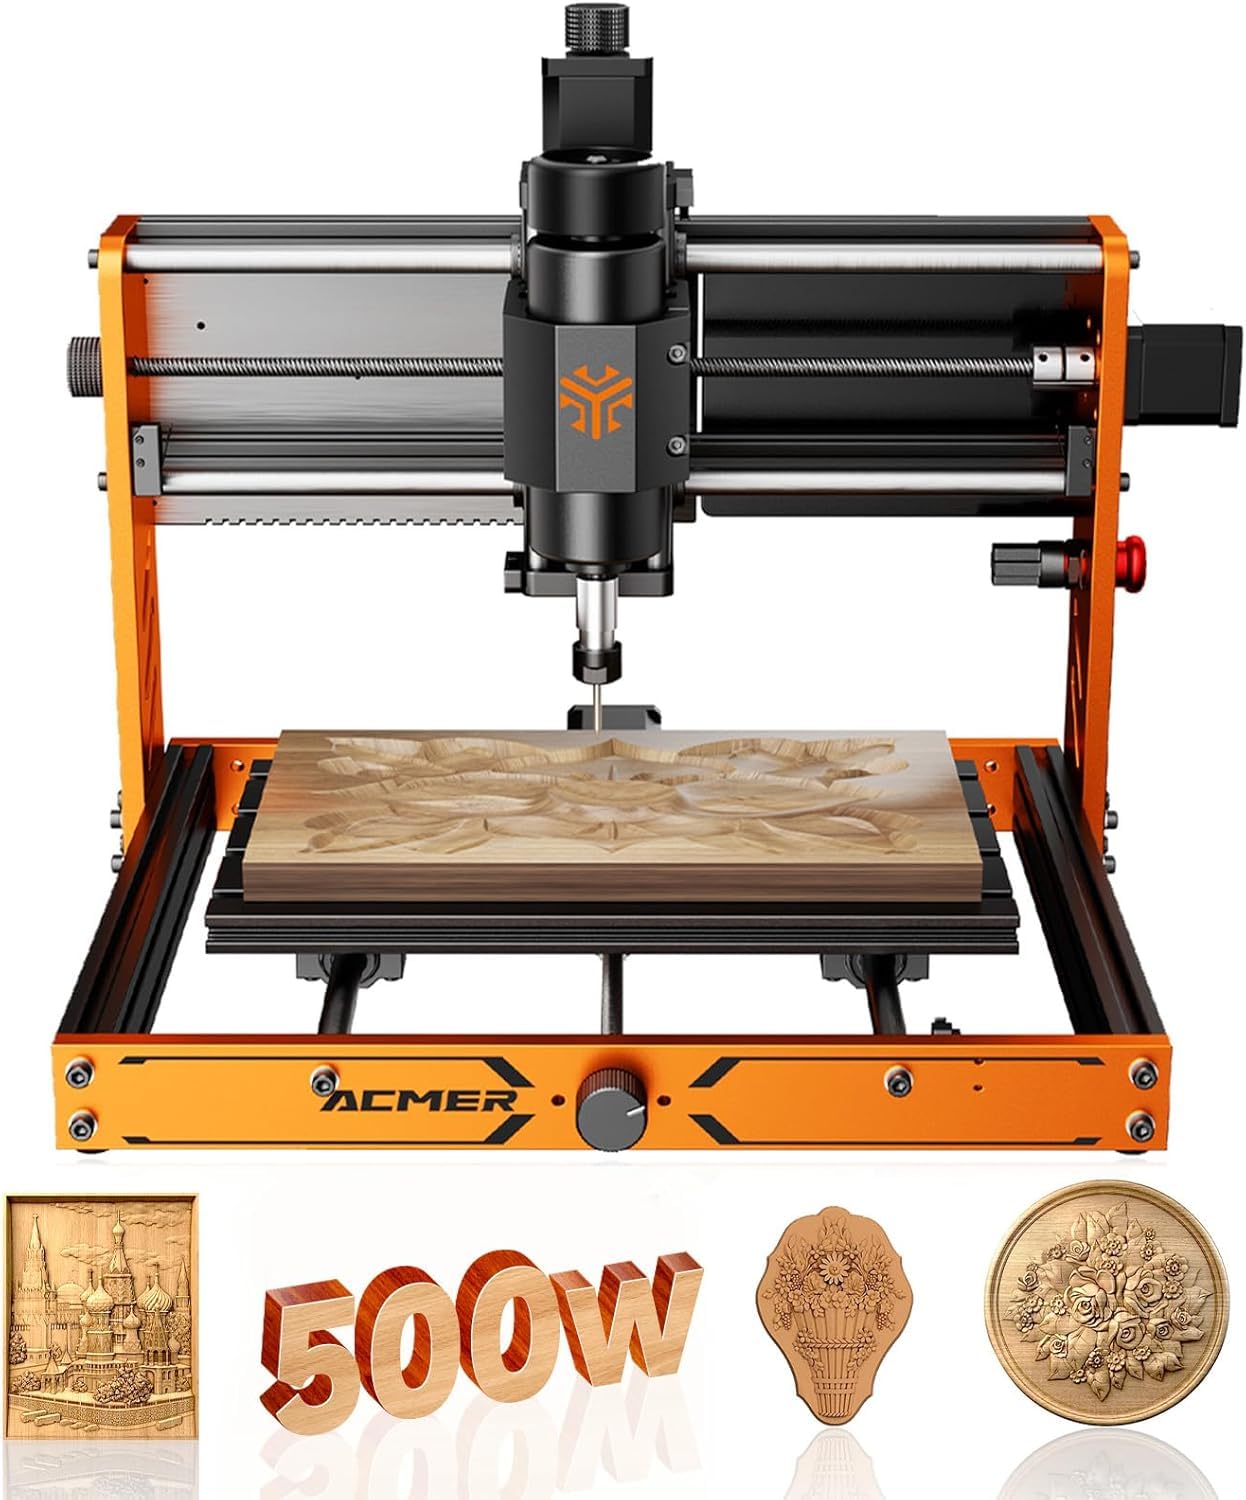
This image provides a detailed view of the ACMER Ascarva 3 S CNC machine, highlighting its full metal body structure and key dimensions, including the working area of 300mm x 180mm x 78mm.
The machine features a working area of 300 × 180 × 78 mm (11.81” x 7.09” x 3.07”). Its robust aluminum frame provides superior rigidity and stability for various projects.

This image provides a close-up of the ACMER Ascarva 3 S CNC machine's spindle motor, highlighting the 500W spindle motor (0-12000 RPM) and the hand knob for manual adjustments, emphasizing its high accuracy and stability.
The 500W (48V) high-speed DC spindle motor can reach up to 12,000 RPM, providing strong cutting performance. The ER11 collet ensures secure tool holding.

This image details the Z-axis travel of the ACMER Ascarva 3 S CNC machine, indicating a travel distance of 80mm (3.15 inches) and illustrating the maximum pass height for materials.
5.2 Software and File Compatibility

This image illustrates the ACMER Ascarva 3 S CNC machine connected to a laptop running compatible control software, demonstrating its broad compatibility with Windows, macOS, and Linux systems and various GRBL-compatible software.
The machine is powered by an ESP32 mainboard and supports popular GRBL-compatible software such as Candle, Universal G-code Sender (UGS), and Easel. It works with standard file formats like .nc and .gcode. The intuitive multilingual interface simplifies operation.
5.3 Material Processing

This image demonstrates the ACMER Ascarva 3 S CNC machine's versatility by showing examples of its capability to cut and engrave various materials such as acrylic, wood, PCB, and soft aluminum.
The ACMER Ascarva 3 S is capable of machining a wide range of materials, including:
- Wood (e.g., plywood, density board)
- Plastics (e.g., acrylic, nylon)
- Soft Metals (e.g., aluminum)
- MDF
- PC Board

This image shows the ACMER Ascarva 3 S CNC machine actively engraving a wooden piece, illustrating its engraving speed of 2000 mm/min and movement speed of 5000 mm/min.
The machine offers an engraving speed of 2000 mm/min and a movement speed of 5000 mm/min.
5.4 Parameter Reference Table
Use the following table as a reference for recommended cutting and engraving settings for various materials. These are starting points and may require adjustment based on specific material properties and desired finish.
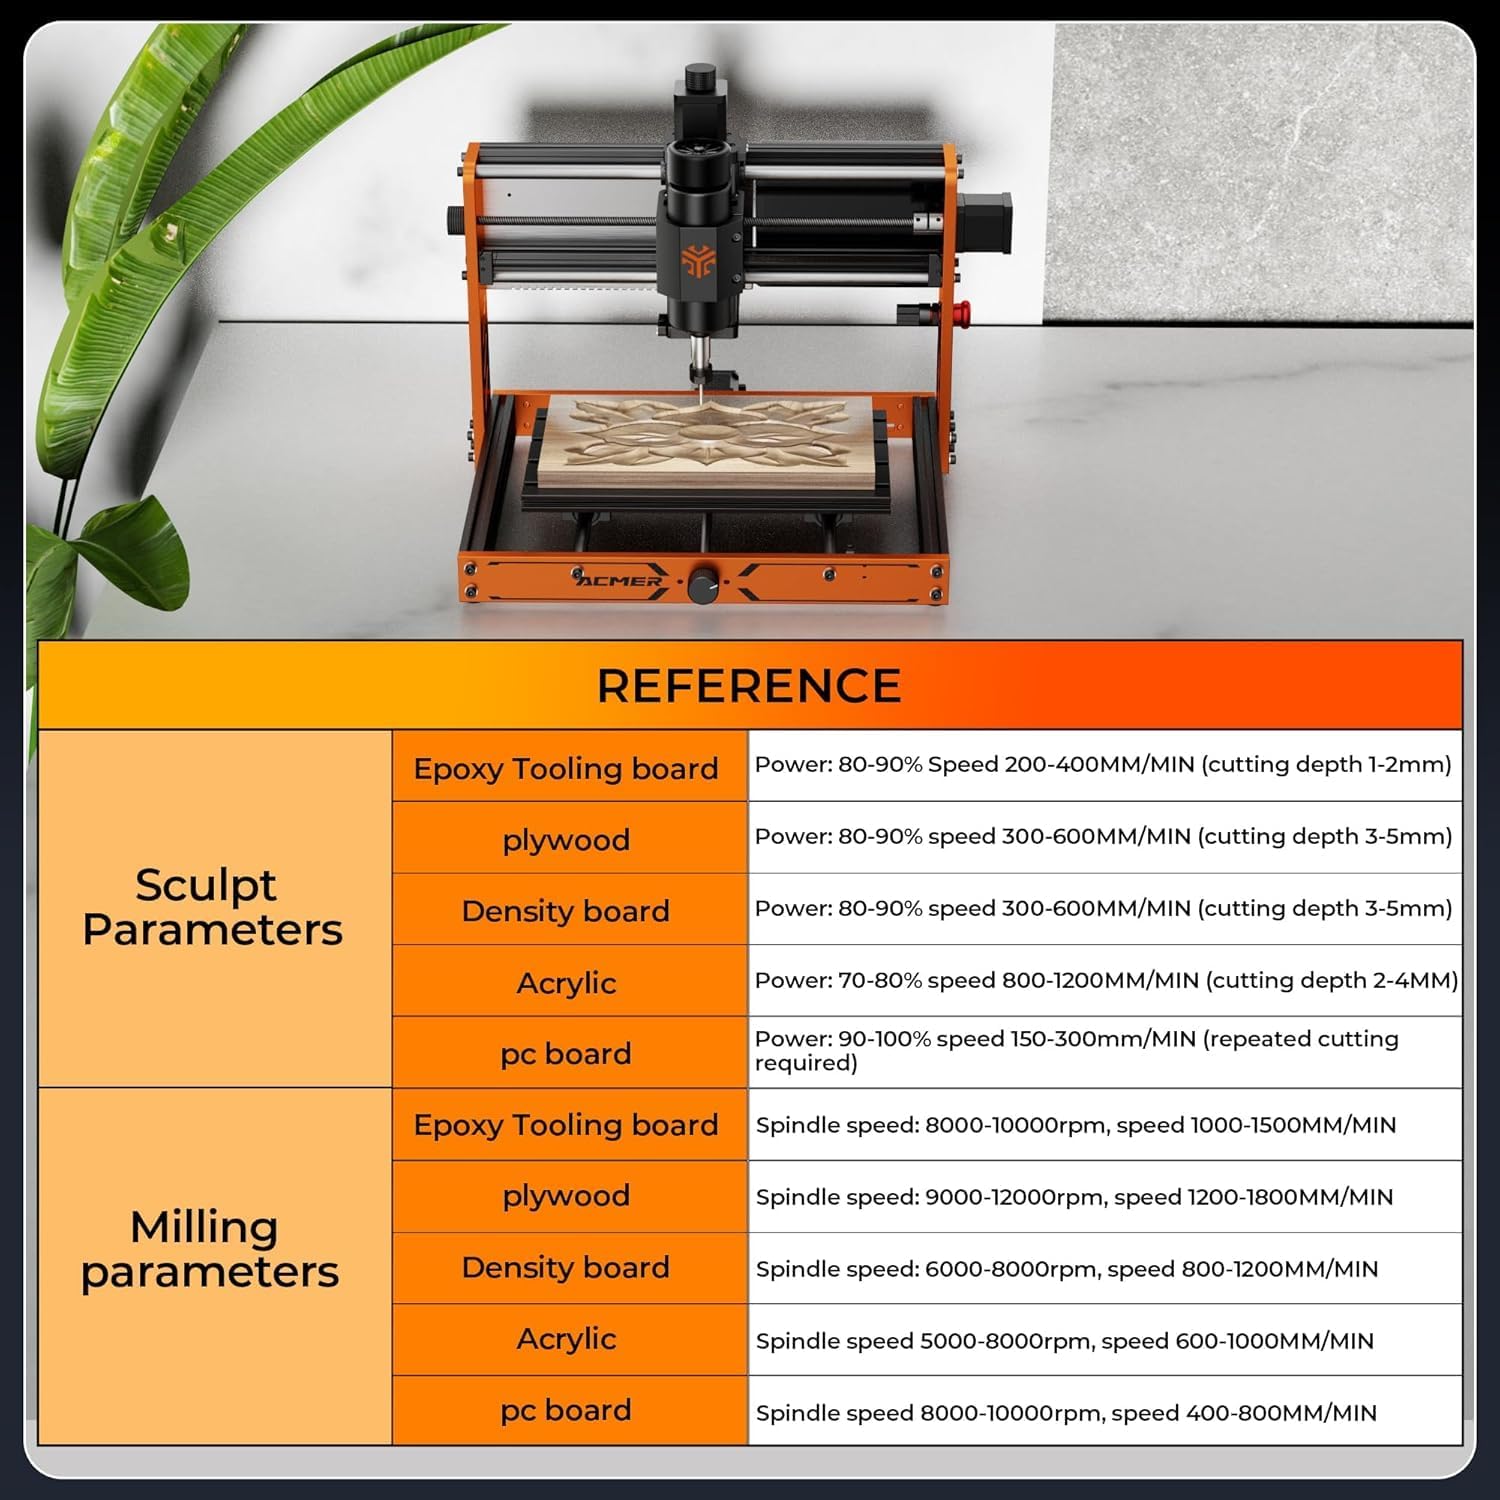
This image presents a reference table with recommended sculpt and milling parameters for various materials, including Epoxy Tooling board, plywood, density board, acrylic, and PC board, detailing power/spindle speed and cutting depth/feed rates.
| Category | Material | Recommended Settings |
|---|---|---|
| Sculpt Parameters | Epoxy Tooling board | Power: 80-90% Speed 200-400MM/MIN (cutting depth 1-2mm) |
| Plywood | Power: 80-90% Speed 300-600MM/MIN (cutting depth 3-5mm) | |
| Density board | Power: 80-90% Speed 300-600MM/MIN (cutting depth 3-5mm) | |
| Acrylic | Power: 70-80% Speed 800-1200MM/MIN (cutting depth 2-4MM) | |
| PC board | Power: 90-100% Speed 150-300MM/MIN (repeated cutting required) | |
| Milling Parameters | Epoxy Tooling board | Spindle speed: 8000-10000rpm, speed 1000-1500MM/MIN |
| Plywood | Spindle speed: 9000-12000rpm, speed 1200-1800MM/MIN | |
| Density board | Spindle speed: 6000-8000rpm, speed 800-1200MM/MIN | |
| Acrylic | Spindle speed 5000-8000rpm, speed 600-1000MM/MIN | |
| PC board | Spindle speed 8000-10000rpm, speed 400-800MM/MIN |
5.5 Tool Calibration
A dedicated tool setter is provided to make tool calibration quick and accurate. Follow the instructions in your software or the included assembly guide for proper tool length setting.
6. Maintenance
Regular maintenance ensures the longevity and optimal performance of your CNC machine.
- Cleaning: After each use, clean the work area and machine components to remove dust, chips, and debris. Use a soft brush or compressed air. Avoid using harsh chemicals that could damage surfaces.
- Lubrication: Periodically lubricate the lead screws and linear rails according to the manufacturer's recommendations to ensure smooth movement.
- Inspecting Connections: Regularly check all electrical connections, wires, and mechanical fasteners for tightness and wear. Tighten any loose connections and replace damaged wires.
- Spindle Care: Keep the spindle motor clean and free of obstructions. Ensure proper airflow for cooling.
- Tooling: Inspect cutting tools before each use. Replace dull or damaged bits to maintain cutting quality and prevent excessive strain on the spindle.
7. Troubleshooting
This section addresses common issues you might encounter and provides potential solutions.
| Problem | Possible Cause | Solution |
|---|---|---|
| Machine does not power on | Power cable disconnected; Emergency stop engaged; Faulty power supply | Check power connections; Release emergency stop button; Test power supply |
| Motors not moving | Loose motor wiring; Software connection issue; Limit switch triggered | Check motor wire connections; Verify USB connection and software settings; Check and clear limit switches |
| Inaccurate cutting/engraving | Dull or incorrect tool; Incorrect feed rate/spindle speed; Loose material clamping; Mechanical play | Replace tool, ensure correct type; Adjust parameters (refer to Section 5.4); Secure material firmly; Inspect for loose belts or screws |
| Spindle not rotating | Spindle wiring issue; Software command error; Spindle motor fault | Check spindle wire connections; Verify G-code and software settings; Contact support if motor is faulty |
| Software not connecting to machine | Incorrect COM port selected; Driver not installed; USB cable fault | Select correct COM port in software; Install necessary USB drivers; Try a different USB cable |
If you encounter issues not listed here or require further assistance, please contact ACMER customer support.
8. Specifications
Key technical specifications for the ACMER Ascarva 3 S 500W CNC Milling Machine.
| Feature | Specification |
|---|---|
| Brand | ACMER |
| Model Number | 3S |
| Manufacturer Part Number | JRT-CNC 3S-0083010002-US-001 |
| Material | Aluminum |
| Power Source | Corded Electric |
| Spindle Power | 500W (48V DC) |
| Maximum Rotational Speed | 12000 RPM |
| Working Area (X, Y, Z) | 300 × 180 × 78 mm (11.81” x 7.09” x 3.07”) |
| Repeat Positioning Accuracy | ±0.025 mm |
| Net Weight | 11.5 kg (25.4 lbs) |
| Product Dimensions (W x H) | 46W x 30H Centimetres (overall) |
| Control Board | ESP32 |
| Connectivity | USB |
| Compatible OS | Windows, macOS, Linux |
| Compatible Software | Candle, UGS, Easel (GRBL compatible) |
| File Formats | .nc, .gcode |
9. Warranty and Support
For warranty information, technical support, or service inquiries, please refer to the warranty card included with your product or contact ACMER customer service directly. Ensure you have your product model number and purchase date available when contacting support.
