1. Introduction
This manual provides essential instructions for the safe assembly, operation, and maintenance of your EROMMY Outdoor Shower Enclosure (S Version). Please read this manual thoroughly before assembly and retain it for future reference. This enclosure is designed for outdoor use, offering privacy and convenience for showering, changing, or as a toilet cubicle in various outdoor settings such as backyards, pool areas, or beach houses.
Safety First:
- Always ensure all fasteners are securely tightened during and after assembly.
- Do not modify the product in any way, as this may compromise its structural integrity and void any potential warranty.
- Keep children and pets away from the assembly area.
- Use appropriate personal protective equipment during assembly.
2. Package Contents
Before beginning assembly, verify that all parts listed below are present and undamaged. If any parts are missing or damaged, please contact EROMMY customer support.
Accessory List:
- Self-tapping Screws: 0.16 inches x 0.79 inches (160 pieces, 4mm x 20mm)
- Self-tapping Screws: 0.16 inches x 2.36 inches (160 pieces, 4mm x 60mm)
- Door Hinges: 3 pieces
- Door Locks: 2 pieces
- Bolts: 8 pieces
- Phillips Screwdrivers: 2 pieces
- Wrenches: 1 piece
All hardware is included in one box. Parts are labeled for easy identification.
3. Setup and Assembly
The EROMMY Outdoor Shower Enclosure is shipped unassembled. Follow these steps carefully for proper installation. An electric drill is required for assembly.
3.1 Component Overview
Familiarize yourself with the various components of the shower enclosure.

Figure 1: Key product details including inclined supports, hook group, door locks, storage rack, and door frame.

Figure 2: Close-up view of high-quality details including handles, hinges, anchors, and structural elements.
3.2 Assembly Steps
- Unpack and Identify Parts: Carefully unpack all components and lay them out. Refer to the detailed instructions provided in the packaging to identify each part by its label.
- Assemble the Wood Frame: Begin by connecting the vertical posts, top beams, and diagonal braces using the specified screws. Ensure all connections are snug but do not overtighten until the frame is fully aligned.
- Attach Metal Panels: Secure the galvanized metal panels to the wood frame. The panels are designed to fit into reserved holes. An electric drill will be necessary for this step.
- Install the Door: Attach the door using the provided hinges. Ensure the door swings freely and aligns correctly with the frame. Install the interior and exterior door locks.
- Install Storage Racks and Hooks: Mount the enlarged storage racks and hook groups as desired within the enclosure.
- Final Fastening: Once the entire structure is assembled and aligned, go back and securely tighten all screws and bolts.

Figure 3: Illustration of reserved holes for guided installation, requiring an electric drill.
3.3 Installation Options
The shower enclosure offers versatile installation options:
- Concrete/Wood Surface: Use expansion screws (not included) to secure the enclosure to a solid concrete or wood foundation.
- Soil/Lawn: Utilize the included L-shaped stakes (ground anchors) to firmly secure the enclosure into soil or lawn.
- Wall-Mounted or Freestanding: An optional rear panel (not included) allows for wall-mounted installation, utilizing existing plumbing. Otherwise, the enclosure can be used freestanding.

Figure 4: Visual guide for securing the enclosure to different surfaces: expansion bolts for cement and ground anchors for lawn.
4. Operating Instructions
The EROMMY Outdoor Shower Enclosure is designed for straightforward use.
- Privacy Door: The double-sided lockable door ensures privacy and security. Use the interior latch for privacy from within, or the exterior latch for securing the enclosure when not in use.
- Storage: Utilize the integrated storage racks and hooks for towels, toiletries, and other personal items.
- Ventilation: The design allows for air circulation while maintaining privacy.
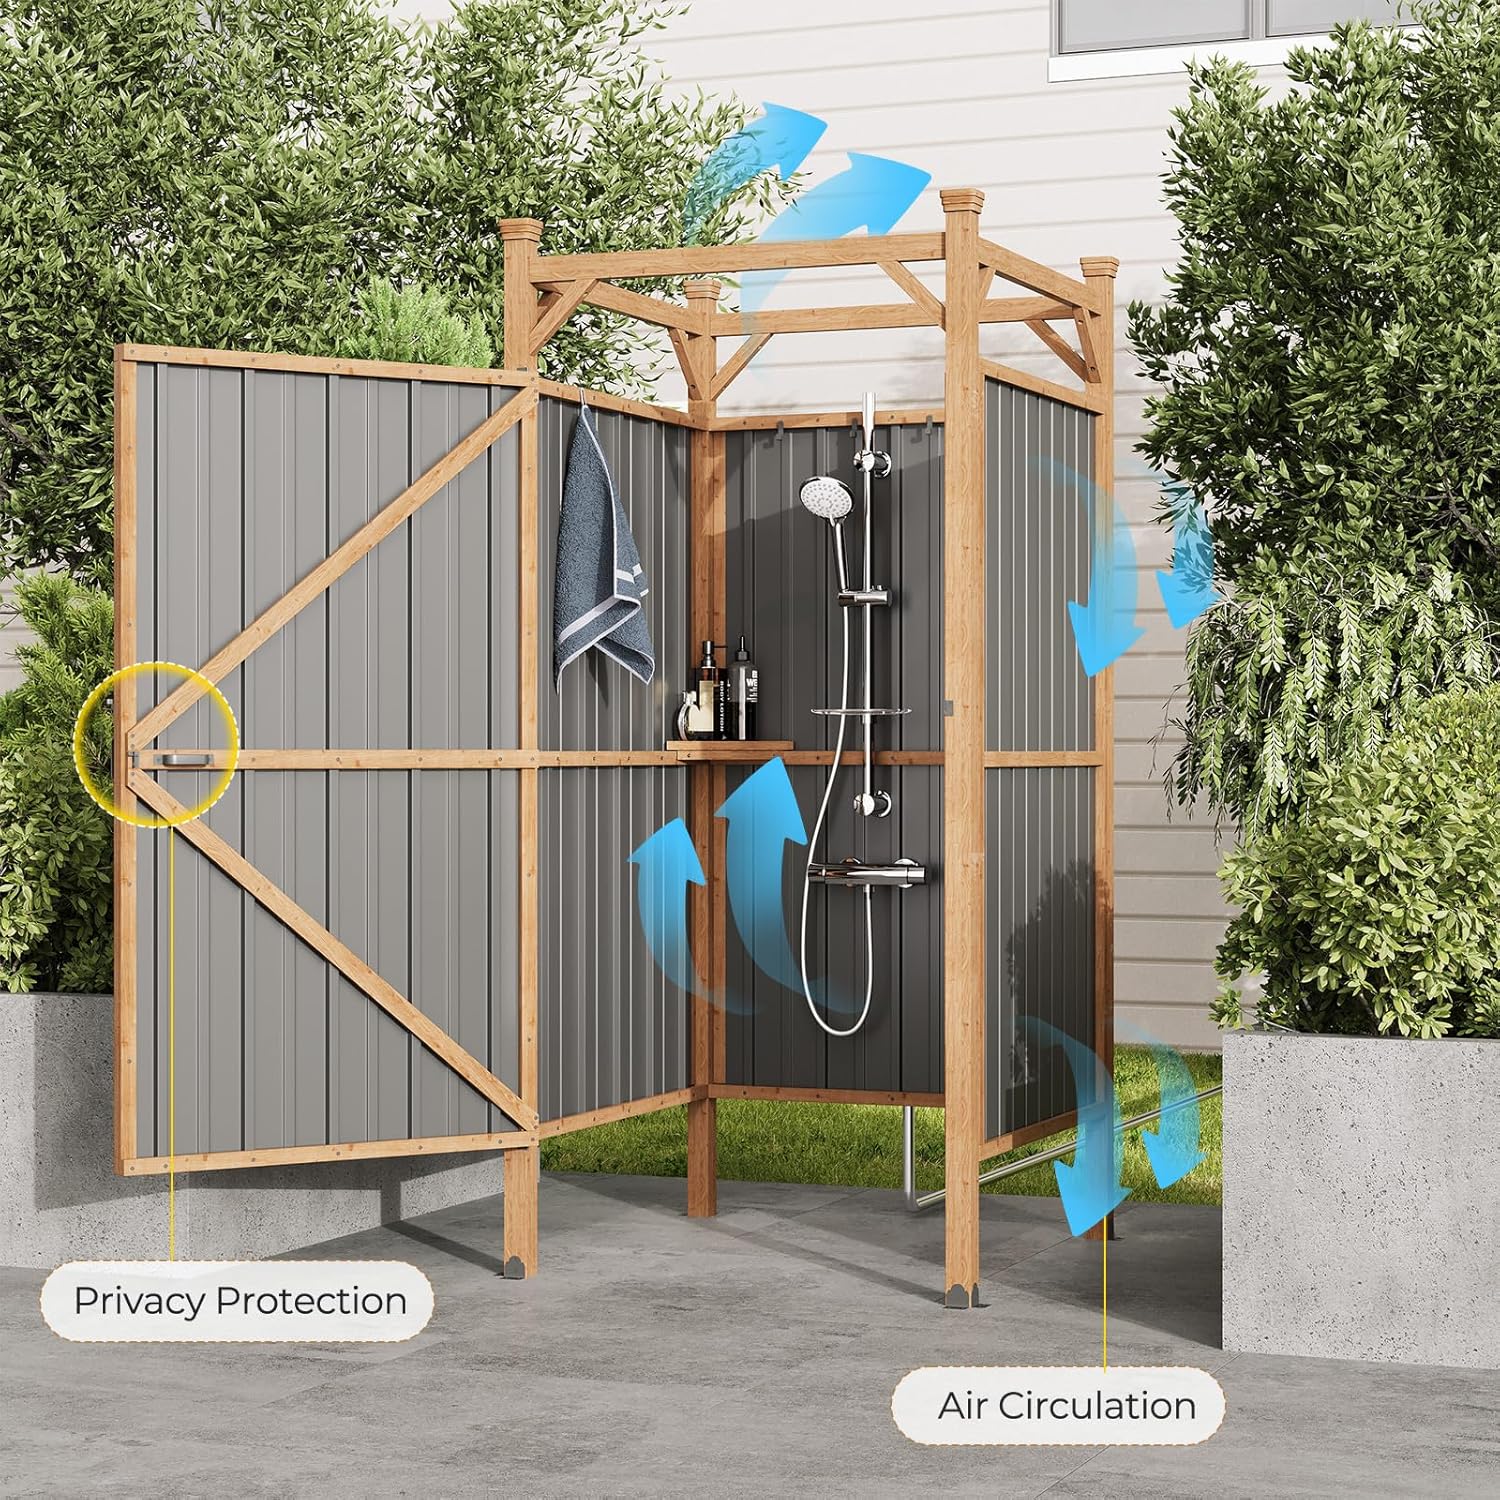
Figure 5: Depiction of privacy protection and air circulation within the enclosure.
5. Maintenance
Regular maintenance will ensure the longevity and optimal performance of your outdoor shower enclosure.
- Cleaning: Clean the wood and metal surfaces periodically with a mild soap and water solution. Avoid abrasive cleaners or harsh chemicals that could damage the finish.
- Inspection: Regularly inspect all screws, bolts, and connections for tightness. Retighten as necessary to maintain structural stability.
- Wood Care: The wood frame is designed for weather resistance. However, applying a wood sealant or stain annually can further protect it from UV exposure and moisture, extending its lifespan.
- Metal Panel Care: The galvanized metal panels feature a waterproof coating and are corrosion-resistant. Wipe them down to remove dirt and debris.

Figure 6: Features highlighting the enclosure's weather resistance, including corrosion-resistant and waterproof coated metal panels.
6. Troubleshooting
If you encounter issues with your EROMMY Outdoor Shower Enclosure, refer to the following common problems and solutions.
| Problem | Possible Cause | Solution |
|---|---|---|
| Enclosure feels wobbly or unstable. | Loose fasteners; uneven ground; improper anchoring. | Check and tighten all screws and bolts. Ensure the enclosure is on a level surface. Verify ground anchors or expansion bolts are securely installed. |
| Door does not close or latch properly. | Misaligned hinges; bent door frame; obstruction. | Inspect hinges for proper alignment and tightness. Check for any obstructions. If the frame is bent, contact customer support. |
| Difficulty during assembly (e.g., holes not aligning). | Parts incorrectly oriented; minor manufacturing variance. | Carefully re-read the assembly instructions and ensure parts are oriented correctly. Sometimes, slight pressure or adjustment is needed to align holes. Do not force components if they do not fit easily. |
7. Specifications
Detailed specifications for the EROMMY Outdoor Shower Enclosure (S Version).

Figure 7: Product dimensions for the S Version, illustrating its capacity to accommodate an adult and a child.

Figure 8: Comprehensive specification sheet for the shower enclosure.
| Feature | Detail |
|---|---|
| Product Dimensions (L x W x H) | 38.6 inches x 38.6 inches x 80.7 inches (98cm x 98cm x 205cm) |
| Wood Type | Spruce |
| Vertical Posts | Cross-section 1.97 inches x 1.97 inches (50mm x 50mm) |
| Top Beam | 1.97 inches x 0.98 inches (50mm x 25mm) |
| Top Diagonal Braces | 0.98 inches x 0.98 inches (25mm x 25mm) |
| Door Frame Crossbars + Fixed Bars | 1.18 inches x 0.79 inches (30mm x 20mm) |
| Baffle Press Plates | 1.18 inches x 0.59 inches (30mm x 15mm) |
| Door Middle Press Plates + Pull Rods | 1.57 inches x 0.79 inches (40mm x 20mm) |
| Metal Material & Thickness | 0.012-inch thick Q235B color steel tile (0.3mm) |
| Door Type | 1 swinging flush door |
| Door Clearance from Floor | 10.6 inches (270mm) |
| Door Specification | 60.2 inches - 34.6 inches (1530mm - 880mm) |
| Packaging Dimensions (L x W x H) | 84.6 inches x 15.7 inches x 5.1 inches (215cm x 40cm x 13cm) |
| Gross Weight / Net Weight | 99.2 lbs / 94.8 lbs (45kg / 43kg) |
8. Warranty Information
EROMMY products are manufactured to high-quality standards. For specific warranty details regarding your Outdoor Shower Enclosure, please refer to the warranty information provided with your purchase documentation or contact EROMMY customer support directly. Warranty terms typically cover manufacturing defects under normal use.
9. Customer Support
If you have any questions, require assistance with assembly, or need to report missing/damaged parts, please contact EROMMY customer support. You can typically find contact information on the EROMMY official website or through the retailer where you purchased the product.
For more information about EROMMY products, visit the EROMMY Store on Amazon.