1. Introduction
This manual provides essential information for the safe and effective operation, maintenance, and troubleshooting of your INGCO Cordless Concrete Nailer, Model CCNLI9008. Please read this manual thoroughly before using the tool to ensure proper handling and to prevent injury or damage.
The INGCO CCNLI9008 is a powerful 20V cordless concrete nailer designed for fastening cables and conduits to concrete (up to C60) and steel (up to 6mm thick). It features a brushless motor for extended lifespan and comes with two 4.0Ah batteries and a charger for continuous operation.
2. Safety Instructions
WARNING: Read all safety warnings, instructions, illustrations, and specifications provided with this power tool. Failure to follow all instructions listed below may result in electric shock, fire, and/or serious injury.
- Always wear eye protection and hearing protection when operating the nailer.
- Keep work area clean and well lit. Cluttered or dark areas invite accidents.
- Do not operate power tools in explosive atmospheres, such as in the presence of flammable liquids, gases, or dust.
- Keep children and bystanders away while operating a power tool. Distractions can cause you to lose control.
- Ensure the nailer is switched off and the battery pack is removed before making any adjustments, changing accessories, or storing power tools.
- Use the correct tool for your application. Do not force the tool.
- Do not point the nailer at yourself or others.
- Always maintain a firm grip on the tool during operation.
- Only use fasteners specified for this tool.
3. Product Components and Package Contents
The INGCO Cordless Concrete Nailer CCNLI9008 package includes the following items:
- 1 x INGCO Cordless Concrete Nailer (CCNLI9008)
- 2 x 20V 4.0Ah Li-Ion Battery (FBLI20021)
- 1 x Battery Charger (FCLI20411)
- 1000 Pcs x 27mm Nails
- 1 x Air Nozzle
- 1 x Pin
- Various Nozzles (Color-matched with 4 different nozzles)
- 1 x Carrying Case
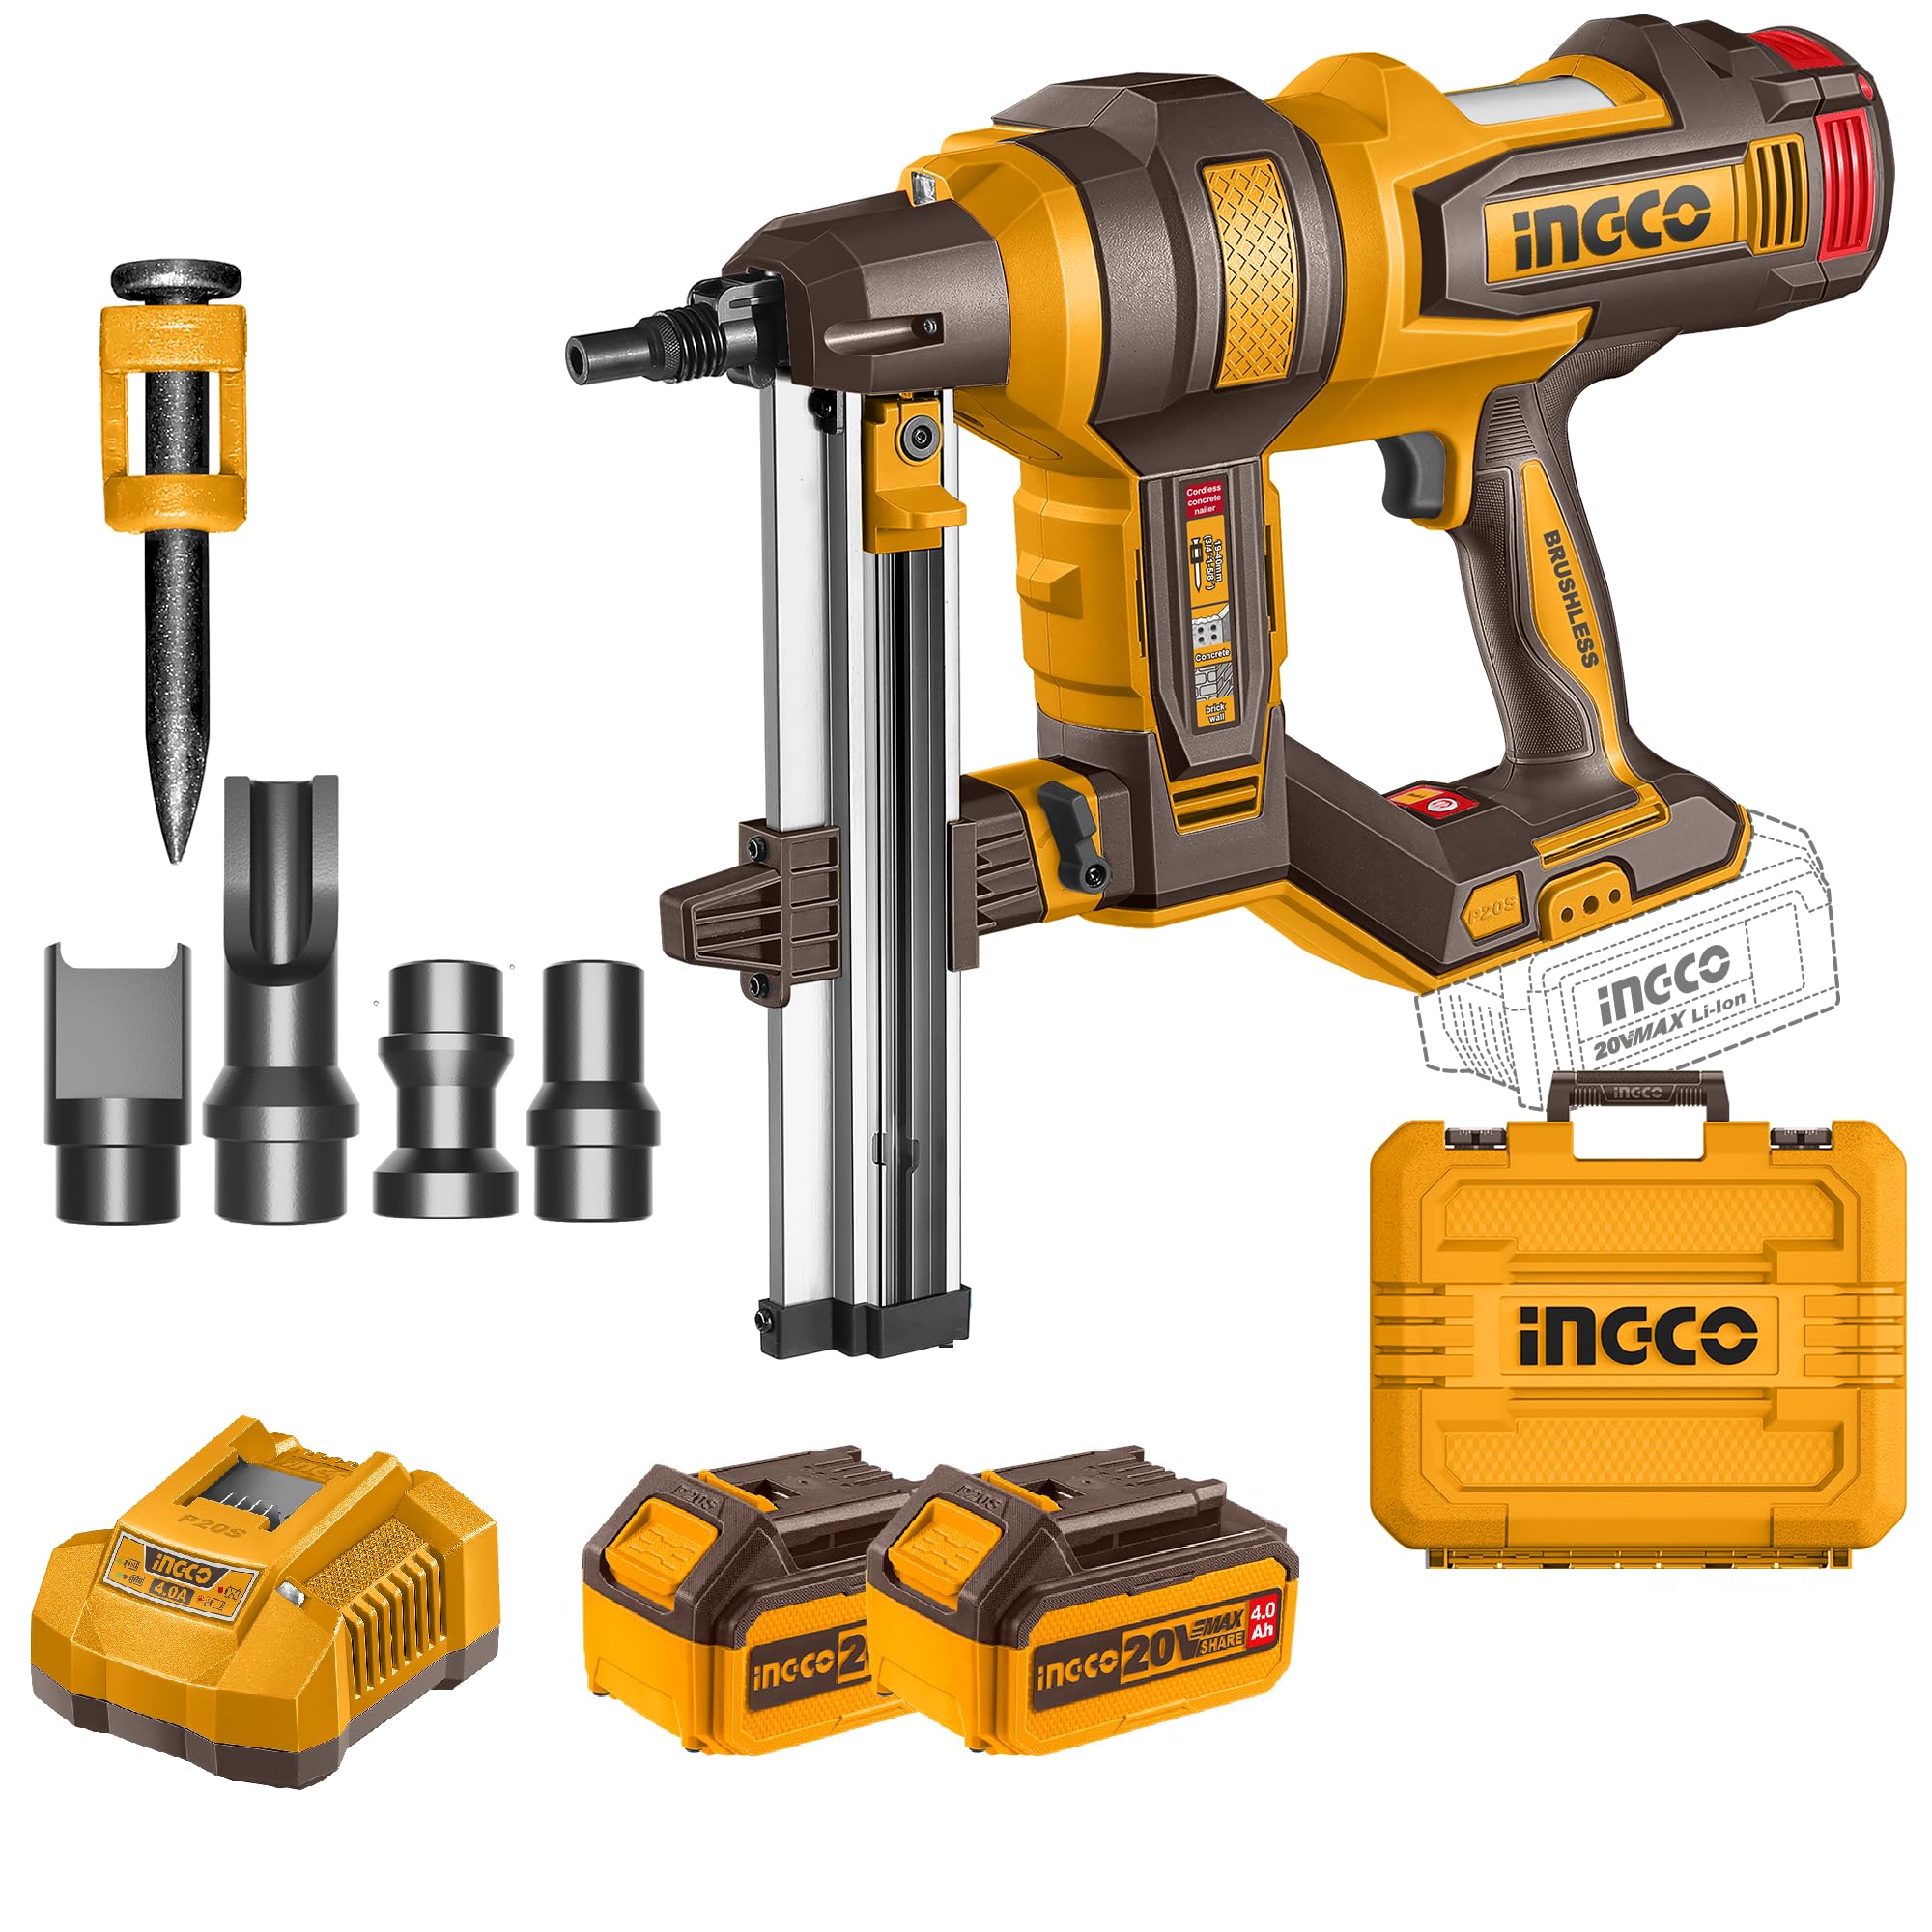
This image displays the complete INGCO Cordless Concrete Nailer kit. It features the main nailer unit, two 20V 4.0Ah Li-Ion batteries, a battery charger, a set of 40mm nails, and different types of nozzles for various applications. All components are neatly arranged alongside a durable carrying case, highlighting the portability and comprehensive nature of the product.
4. Specifications
| Specification | Value |
|---|---|
| Voltage | 20V |
| Fastener Length Range | 19 - 40 mm (3/4'' - 1-5/8'') |
| Max. Nail Length (Concrete C60 & Steel 6mm) | 27mm |
| Motor Type | Brushless |
| Battery Capacity | 2 x 4.0Ah Li-Ion |
| Charger Voltage | 220-240V~50/60Hz |
| Product Dimensions (L x W) | 58L x 41W Centimeters |
| Item Weight | 10 Kilograms |
5. Setup
5.1. Battery Installation and Charging
- Ensure the battery is fully charged before first use. Connect the charger (FCLI20411) to a 220-240V~50/60Hz power outlet.
- Slide the 4.0Ah Li-Ion battery (FBLI20021) onto the charger until it clicks into place. The charger indicator light will show charging status.
- Once fully charged, remove the battery from the charger.
- To install the battery into the nailer, align the battery with the tool's battery port and slide it in until it locks securely.
- To remove the battery, press the release button on the battery pack and slide it out.
5.2. Loading Nails
- Ensure the nailer is disconnected from the battery for safety.
- Open the nail magazine latch.
- Insert a strip of nails (e.g., 27mm nails) into the magazine, ensuring the nail points are facing forward.
- Close the magazine latch securely until it clicks.
5.3. Attaching Nozzles
The nailer comes with various color-matched nozzles for different applications. Select the appropriate nozzle for your task and securely attach it to the tool's firing mechanism.
6. Operating Instructions
6.1. Powering On/Off
- To power on, ensure a charged battery is inserted. The tool is ready for use when the safety mechanism is engaged.
- To power off, simply remove the battery pack from the tool.
6.2. Fastening Procedure
- Select the appropriate nail length (19-40mm) and nozzle for your material. For concrete C60 and steel 6mm, use nails up to 27mm.
- Place the nose of the nailer firmly against the workpiece surface where the fastener is to be driven.
- Ensure the safety contact trip is fully depressed against the surface.
- Pull the trigger to drive the nail. The tool will fire a single nail.
- Release the trigger and lift the tool from the workpiece.
- Repeat for subsequent fastenings.
Note: The brushless motor ensures efficient power delivery and extended tool life.
7. Maintenance
7.1. Cleaning
- Always remove the battery before cleaning.
- Wipe the tool's exterior with a clean, damp cloth. Do not use harsh chemicals or abrasive cleaners.
- Keep the air vents clear of dust and debris to prevent overheating.
- Regularly inspect the nail magazine for any obstructions or damage.
7.2. Battery Care
- Store batteries in a cool, dry place away from direct sunlight and extreme temperatures.
- Do not store batteries in a discharged state for extended periods. Charge them periodically if not in use.
- Do not expose batteries to water or moisture.
8. Troubleshooting
| Problem | Possible Cause | Solution |
|---|---|---|
| Nailer does not fire | Battery not inserted correctly or discharged; No nails in magazine; Safety contact trip not fully depressed. | Check battery connection and charge; Load nails; Ensure tool nose is firmly against workpiece. |
| Nails jam in magazine | Incorrect nail size; Damaged nails; Debris in magazine. | Use correct nail size; Replace damaged nails; Clean magazine thoroughly. |
| Nailer operates intermittently | Loose battery connection; Overheating. | Ensure battery is securely seated; Allow tool to cool down if used continuously. |
9. Warranty and Support
The INGCO Cordless Concrete Nailer CCNLI9008 comes with a 6 Months Warranty from the date of purchase. This warranty covers manufacturing defects under normal use.
For warranty claims, technical support, or service inquiries, please contact your authorized INGCO dealer or customer service center. Please have your model number (CCNLI9008) and proof of purchase ready when contacting support.
Importer Contact Information: INGCO
Manufacturer: INGCO


