SPUNALP CM026
SPUNALP CM026 UHD 8K Underwater Camera Instruction Manual
Model: CM026
Introduction
This manual provides essential information for the safe and effective operation of your SPUNALP CM026 UHD 8K Underwater Camera. Please read this manual thoroughly before using the camera and retain it for future reference.
The SPUNALP CM026 is a robust, waterproof digital camera designed for capturing high-quality photos and videos in various environments, including underwater. It features 8K video recording, 70MP still image resolution, dual screens, Wi-Fi connectivity, and a durable construction.
Package Contents
Verify that all items listed below are included in your package:
- SPUNALP CM026 UHD 8K Underwater Camera
- 64GB Micro SD Card
- USB Charging Cable
- Lanyard
- User Manual

Image: SPUNALP CM026 camera with a 64GB memory card, USB cable, and lanyard, illustrating the package contents.
Camera Overview
Familiarize yourself with the camera's components and controls.
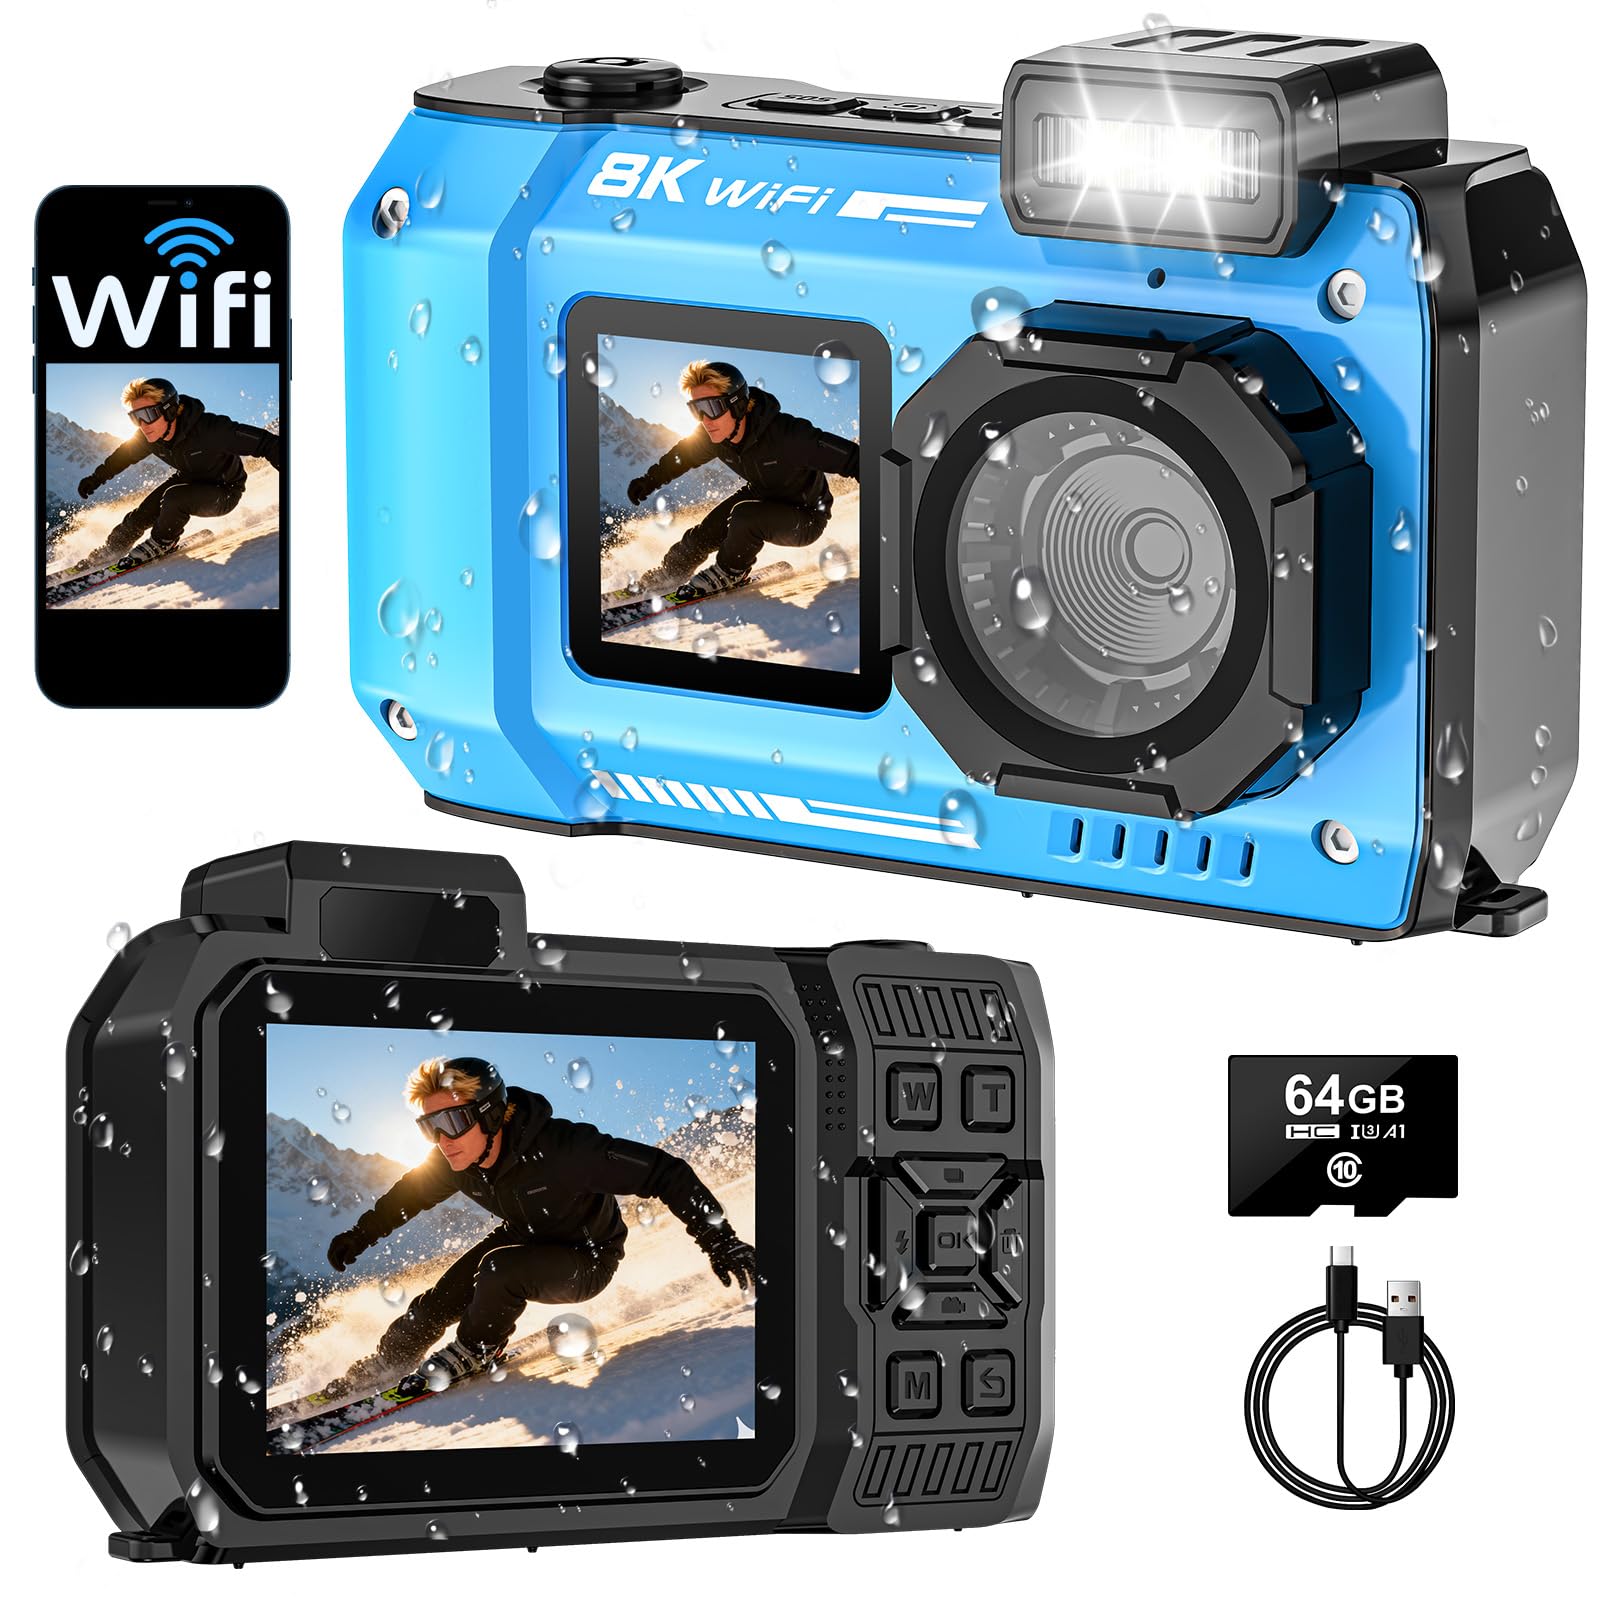
Image: Front view of the SPUNALP CM026 camera, highlighting the lens, front display, and flash module.
Key Features:
- Dual-Screen Design: 2.88-inch HD rear screen and 1.44-inch HD front screen for easy selfies and framing.
- Waterproof & Durable: Submersible up to 33 feet (10 meters), dustproof, sandproof, freeze-resistant, and shockproof up to 4 feet.
- High Resolution: Captures 8K video and 70MP still images.
- Autofocus: Ensures sharp images and videos in various lighting conditions.
- 18X Digital Zoom: Allows for magnification of subjects.
- Wi-Fi Connectivity: For wireless transfer and sharing of media.
- 2500mAh Battery: Provides extended operation time.
- SOS Emergency Light: Integrated signaling system for critical situations.
Setup
1. Charging the Battery
The camera is equipped with a built-in 2500mAh lithium battery. Before first use, fully charge the battery.
- Locate the USB port cover on the side of the camera.
- Carefully open the cover to expose the USB port. Ensure the camera and port are dry before opening.
- Connect the provided USB charging cable to the camera's USB port and the other end to a USB power adapter (not included) or a computer.
- The charging indicator light will illuminate. Once fully charged (approximately 4.5-5 hours), the indicator light will change or turn off.
- After charging, securely close the USB port cover to maintain the camera's waterproof seal.

Image: The camera displaying battery status and highlighting the SOS light feature.
Important: Always ensure the USB port cover is completely sealed before exposing the camera to water.
2. Inserting the Micro SD Card
Your camera comes with a 64GB Micro SD card. This card must be inserted for photo and video storage.
- Locate the Micro SD card slot, usually near the battery compartment or USB port.
- Gently insert the Micro SD card into the slot with the gold contacts facing the correct direction (refer to the diagram inside the slot if available) until it clicks into place.
- To remove, press the card gently until it springs out.
Note: The camera supports Micro SD cards up to 64GB. Ensure the card is formatted by the camera before first use for optimal performance.
Operating Instructions
Power On/Off
- To power on, press and hold the Power button (usually marked with ● or ▪) for a few seconds.
- To power off, press and hold the Power button again until the screen turns off.
Switching Modes (Photo/Video)
Use the Mode button (often labeled 'M') to cycle through different modes such as Photo, Video, and Playback.
Taking Photos
- Switch to Photo mode.
- Frame your shot using either the front or rear screen.
- Press the Shutter button (usually labeled 'OK' or with a camera icon) to capture the image. The camera features autofocus to ensure clarity.

Image: The camera demonstrating its autofocus capability on a butterfly, along with self-timer settings.
Recording Videos
- Switch to Video mode.
- Press the Shutter button to start recording. A red indicator or timer will appear on the screen.
- Press the Shutter button again to stop recording.
Using Digital Zoom
The camera supports 18X digital zoom. Use the 'W' (Wide) and 'T' (Telephoto) buttons to zoom in and out during photo or video capture.

Image: Illustration of the camera's 18X digital zoom feature, showing different levels of magnification.
Wi-Fi Connectivity
Connect your camera to a smartphone, tablet, or computer via Wi-Fi to transfer and share media.
- Download the "Smart DV2" app from Google Play Store or Apple App Store on your mobile device.
- Turn on the Wi-Fi function on your camera (refer to camera settings).
- On your mobile device, go to Wi-Fi settings, find the camera's Wi-Fi network, and enter the password (usually displayed on the camera screen).
- Once connected, use the "Smart DV2" app to browse, download, and share photos and videos.
Important: Wi-Fi signals do not transmit underwater. This feature is for use above water only, with an effective range of approximately 5 meters.

Image: The camera's Wi-Fi function in use, showing connection to a mobile device via the "Smart DV2" app.
Self-Timer Function
The self-timer allows you to set a delay before taking a photo.
- Access the self-timer settings in the camera menu.
- Select a delay of 2, 5, or 10 seconds.
- Press the Shutter button, and the camera will count down before capturing the image.

Image: Visual representation of the self-timer function with 2s, 5s, and 10s delay options.
SOS Emergency Signaling
The camera includes an integrated SOS emergency signaling system.
- To activate the SOS light, press and hold the dedicated SOS button (refer to camera diagram for location).
- The light will flash in a distress pattern.
- Deactivate by pressing the button again.
This feature is intended for emergency situations to attract attention.
Flash Light
The built-in flash provides additional illumination in low-light conditions.
- The flash can be set to Auto, On, or Off via the camera's menu or a dedicated flash button.
- In Auto mode, the camera will automatically activate the flash when needed.

Image: Demonstration of the camera's flash light function, showing its effect in low-light photography.
Maintenance
Waterproof Care
- Before submerging the camera, ensure all covers (battery compartment, USB port) are securely closed and sealed.
- After use in saltwater, rinse the camera thoroughly with fresh water and dry it completely with a soft cloth.
- Do not open any compartments while the camera is wet or submerged.
- Regularly inspect rubber seals for any signs of damage or wear.

Image: The camera's robust design, highlighting its waterproof, dustproof, and shockproof features for various outdoor activities.
Cleaning the Camera
- Use a soft, lint-free cloth to clean the camera body.
- For the lens and screens, use a specialized lens cleaning cloth and solution to avoid scratches.
- Do not use harsh chemicals or abrasive materials.
Battery Care
- Avoid fully discharging the battery frequently.
- Store the camera with a partially charged battery if not used for extended periods.
- Do not expose the battery to extreme temperatures.
Troubleshooting
| Problem | Possible Cause | Solution |
|---|---|---|
| Camera does not power on. | Battery is discharged. | Charge the battery fully. |
| Cannot take photos/videos. | Micro SD card is full or not inserted correctly. | Insert or reinsert the Micro SD card. Delete unnecessary files or replace the card. Ensure the card is formatted. |
| Poor image/video quality. | Lens is dirty; insufficient lighting; incorrect settings. | Clean the lens. Use flash in low light. Adjust resolution settings. |
| Wi-Fi connection issues. | Camera Wi-Fi is off; incorrect password; too far from device. | Ensure camera Wi-Fi is on. Re-enter password. Move closer to the mobile device (within 5 meters). |
| Camera freezes or becomes unresponsive. | Software glitch. | Press and hold the Power button for 10 seconds to force a restart. If issues persist, contact customer support. |
Specifications
| Feature | Detail |
|---|---|
| Model Name | CM026 |
| Video Resolution | 8K (7680x4320 pixels) |
| Photo Resolution | 70 Megapixels |
| Water Resistance | Up to 33 feet (10 meters) |
| Shockproof | Up to 4 feet drop resistance |
| Digital Zoom | 18X |
| Display Screens | Front: 1.44" HD, Rear: 2.88" HD |
| Battery Capacity | 2500mAh Lithium Ion |
| Battery Life | Approx. 4.5-5 hours continuous operation |
| Storage | Micro SD card (up to 64GB, 64GB included) |
| Connectivity | Wi-Fi, USB |
| Image Stabilization | Digital |
| Sensor Type | CMOS |
| File Format | AVI (Video) |
Warranty and Support
Warranty Information
Your SPUNALP CM026 camera comes with a 2-year warranty from the date of purchase. This warranty covers manufacturing defects and workmanship under normal use. It does not cover damage caused by misuse, accidents, unauthorized modifications, or failure to follow the instructions in this manual.
Please retain your proof of purchase for warranty claims.
Customer Support
If you encounter any issues with your SPUNALP CM026 camera or have questions not covered in this manual, please contact our customer support team. We aim to respond to inquiries within 12 hours.
For support, please visit the SPUNALP store on Amazon or refer to the contact information provided with your product packaging.
Ask a question about this manual
Ask about setup, troubleshooting, compatibility, parts, safety, or missing instructions. Manuals+ will review the question and use this page’s manual context to help answer it.