Introduction
This Generic V539 OBD2 Diagnostic Scanner is designed to assist in diagnosing engine issues for compatible vehicles, specifically the Acura MDX Second Generation (YD2) 2007-2013. It provides functionalities such as reading and clearing engine fault codes, displaying live data, checking I/M readiness status, and more. The device features a 2.8-inch high-definition color screen and an industrial-grade ABS protective shell for durability, ensuring reliable performance in various environments.
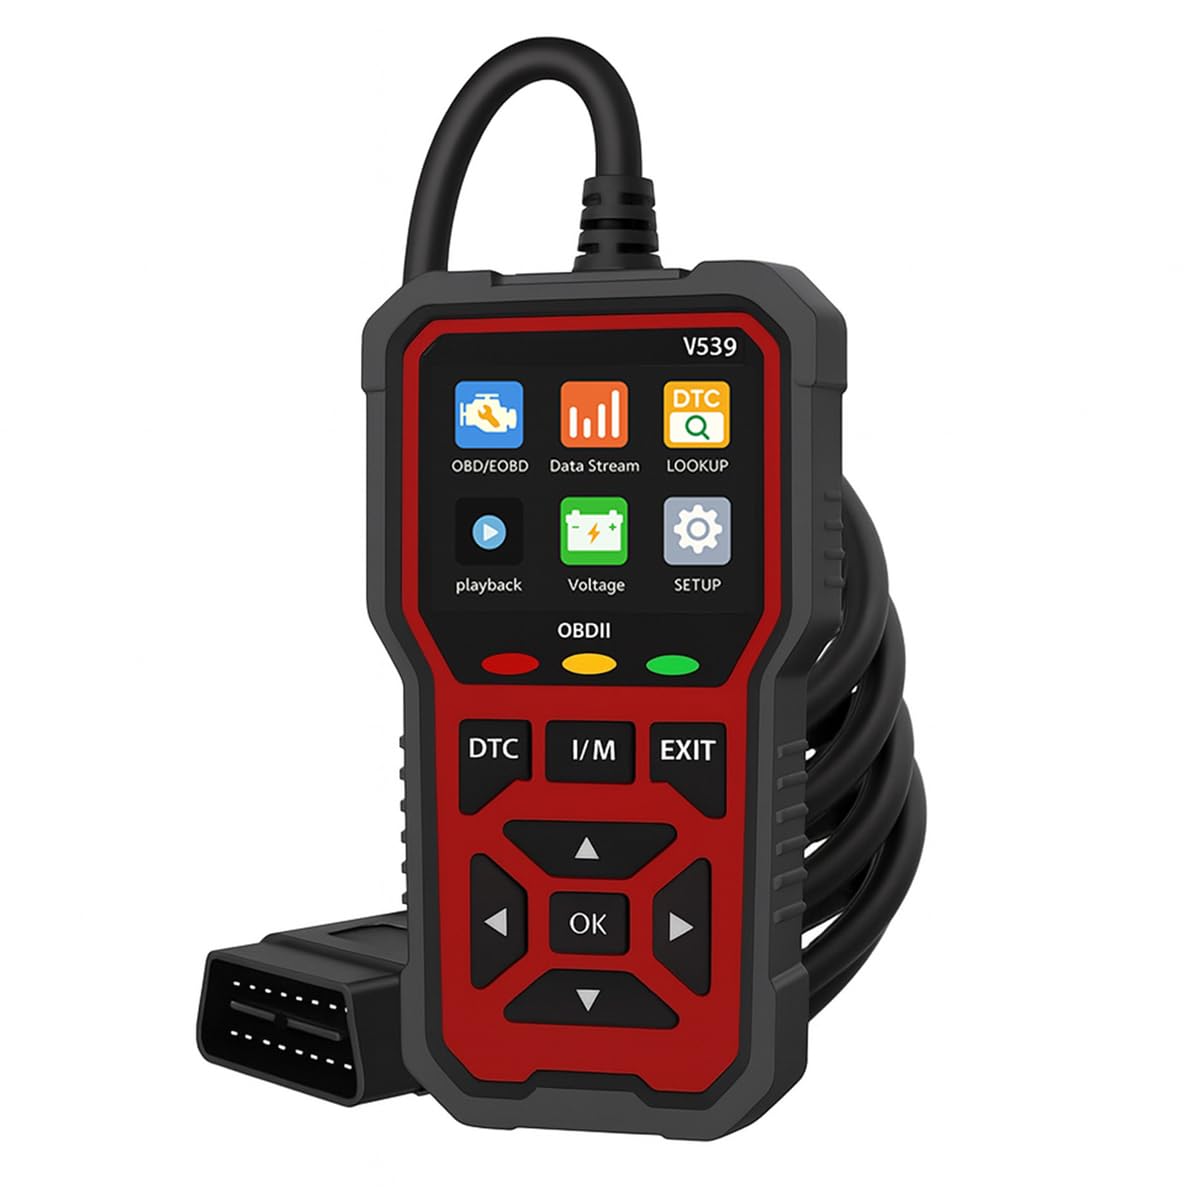
Front view of the Generic V539 OBD2 Diagnostic Scanner, showing its screen and control buttons.
Setup
- Locate the OBD-II Port: The OBD-II (On-Board Diagnostics II) port is typically located under the dashboard on the driver's side of your vehicle. Consult your vehicle's owner's manual if you cannot find it.
- Ensure Vehicle is Off: Before connecting the scanner, ensure the vehicle's ignition is in the OFF position.
- Connect the Scanner: Plug the V539 scanner's OBD-II connector firmly into the vehicle's OBD-II port. Ensure a secure connection.
- Turn Ignition On: Turn the vehicle's ignition to the ON position. The engine can be off or running, depending on the diagnostic function you intend to perform.
- Power On: The scanner will power on automatically and display the main menu, indicating it is ready for use.
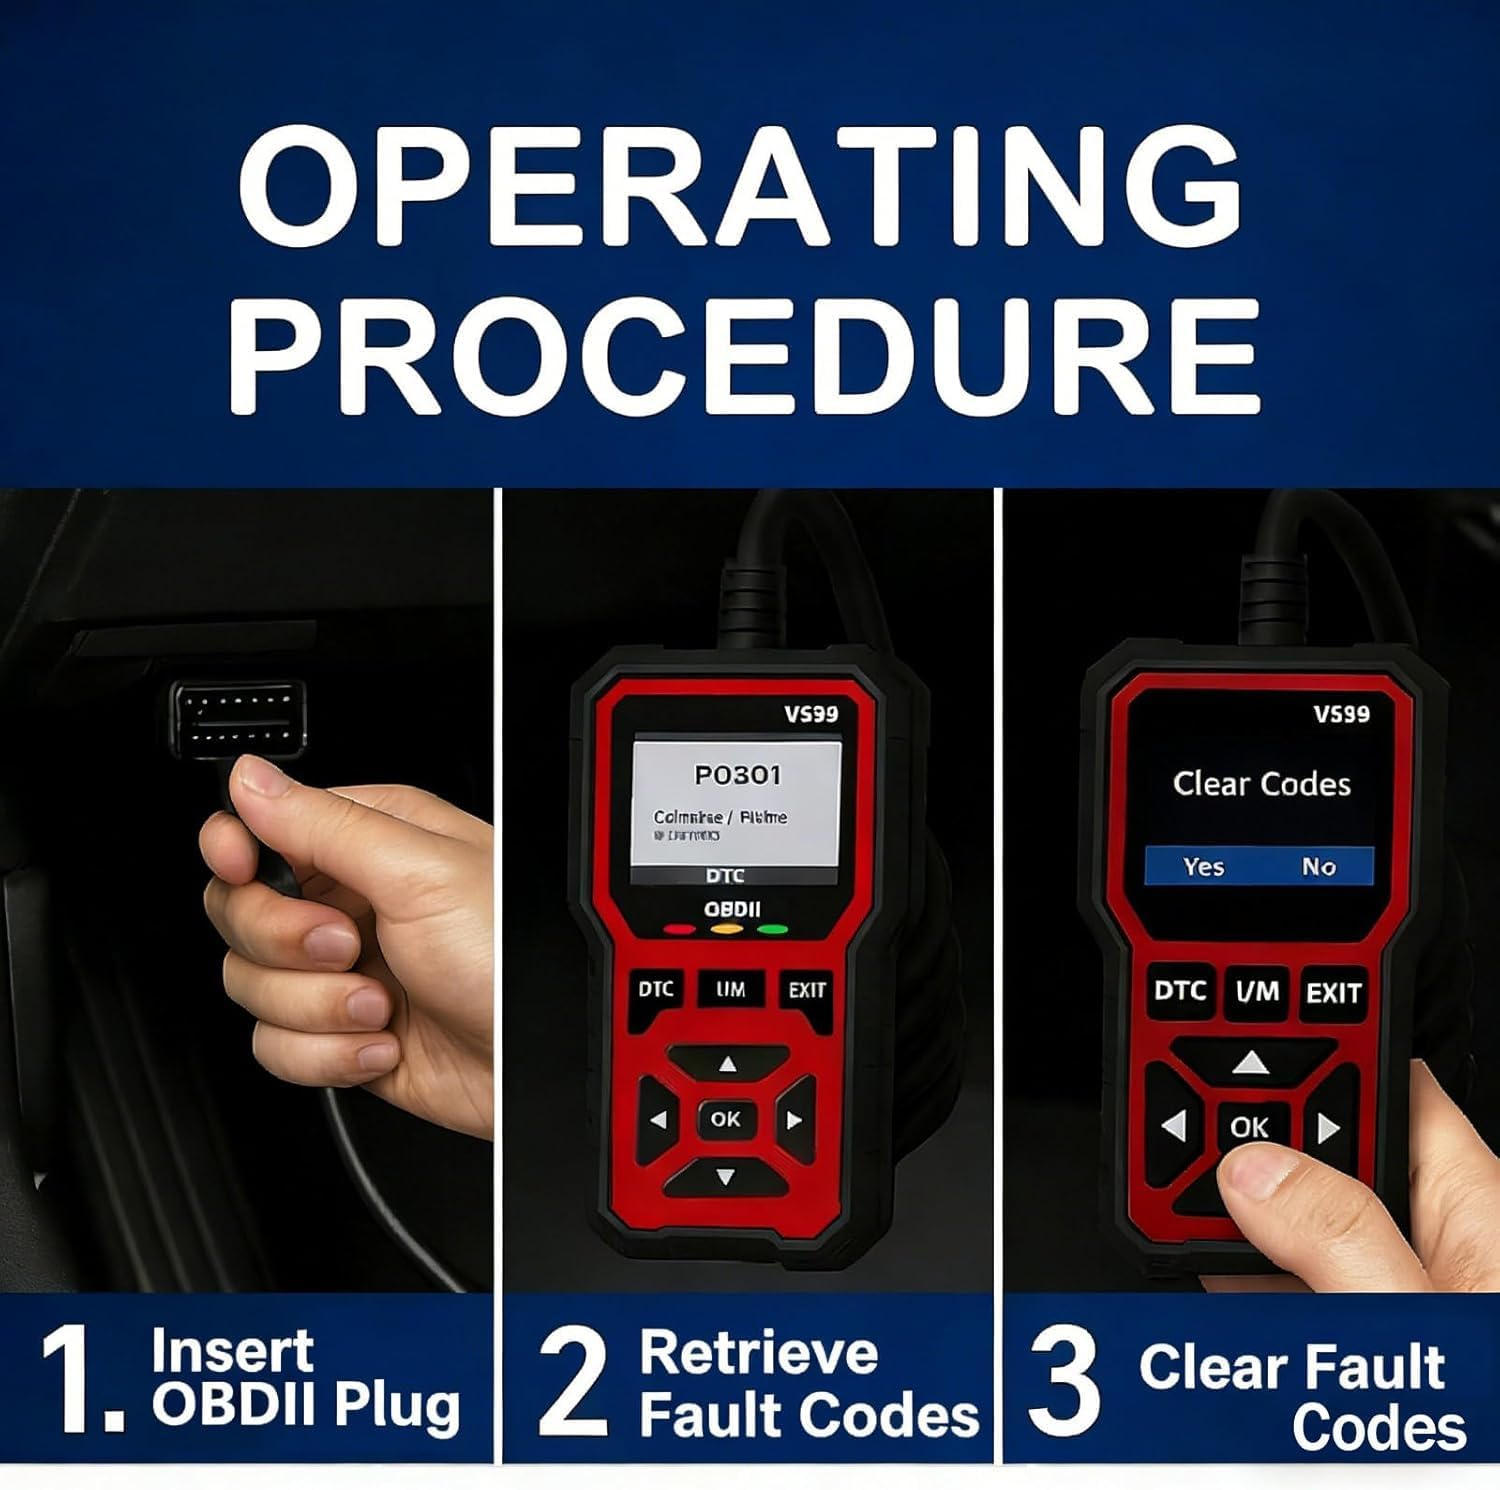
Image illustrating the first step of the operating procedure: inserting the OBDII plug into the vehicle's port.
Operating Procedures
Navigating the Menu
Use the directional arrow buttons (Up, Down, Left, Right) on the scanner to navigate through menu options. Press the 'OK' button to confirm a selection or enter a submenu. The 'EXIT' button returns to the previous screen or menu.
Reading Fault Codes (DTC)
- From the main menu, select 'Read Codes' or press the dedicated 'DTC' button.
- The scanner will establish communication with the vehicle's Engine Control Unit (ECU) and display any stored Diagnostic Trouble Codes (DTCs).
- Use the arrow buttons to scroll through the codes and their corresponding descriptions.
Image illustrating the second step of the operating procedure: retrieving fault codes from the vehicle's system.
Clearing Fault Codes
- After identifying and resolving the underlying issue that caused the fault code, select 'Clear Codes' from the menu.
- Confirm the action when prompted. Clearing codes will turn off the Malfunction Indicator Lamp (MIL) on your dashboard.
Note: Clearing codes without addressing the root cause of the problem will likely result in the codes reappearing shortly.
Image illustrating the third step of the operating procedure: clearing fault codes from the vehicle's system.
I/M Readiness Status
- Select 'I/M Readiness' from the main menu or press the dedicated 'I/M' button.
- The scanner will display the status of various emission-related monitors (e.g., O2 Sensor, EVAP System). 'OK' indicates the monitor has completed its self-test, while 'INC' (Incomplete) means it has not yet run or completed.
This function is crucial for checking if your vehicle is ready for an emissions inspection.
Live Data Stream
- Select 'Data Stream' from the main menu.
- The scanner will display real-time sensor data from the vehicle's engine, such as engine RPM, vehicle speed, coolant temperature, and oxygen sensor readings.
Monitoring live data can help in diagnosing intermittent problems or verifying the correct operation of various sensors.
Viewing Vehicle Information
- Select 'Vehicle Info' from the main menu.
- The scanner will display information such as the Vehicle Identification Number (VIN), Calibration ID (CALID), and Calibration Verification Number (CVN).
Core Functions
The V539 OBD2 Diagnostic Scanner offers a comprehensive set of functions to assist in vehicle maintenance and troubleshooting:
- Engine Fault Diagnosis: Identifies and displays Diagnostic Trouble Codes (DTCs) related to engine and emission systems.
- Engine Fault Code Clearance: Erases DTCs and turns off the Malfunction Indicator Lamp (MIL) after repairs.
- Record Freeze Frame Information: Captures a snapshot of vehicle operating conditions at the moment an emission-related fault occurred.
- Vehicle Information Reading: Retrieves vehicle identification data such as VIN, CALID, and CVN.
- I/M Readiness Status: Checks the status of emission-related monitors to determine if the vehicle is ready for an emissions test.
- Real-time Data Stream Reading: Displays live sensor data from the vehicle's ECU.
- Battery Voltage Test: Monitors the vehicle's battery voltage.
- Oxygen Sensor Test: Retrieves O2 sensor monitor test results.
- Retrieve Fault Code Library: Provides definitions for generic (P0, P2, P3, U0) and manufacturer-specific (P1, P3, U1) codes.
- Playback Function: Allows review of previously recorded data.

Visual representation of the core functions available on the V539 diagnostic scanner.
Specifications
| Model | V539 |
| Operating Voltage | 9~16 V |
| Operating Temperature | -20 °C to 60 °C (-4 °F to 140 °F) |
| Storage Temperature | -20 °C to 70 °C (-4 °F to 158 °F) |
| Supported Languages | English, German, Dutch, Spanish, French, Italian, Chinese, Portuguese, Russian |
| Display | 2.8-inch High-Definition Color Screen |
| Dimensions (L x W x H) | Approx. 1 x 1 x 1 cm (Product dimensions from specifications, actual device is larger) |
| Weight | Approx. 800 g |
| Housing Material | Industrial-grade ABS protective shell |
| Built-in Fault Codes | Over 40,000 |
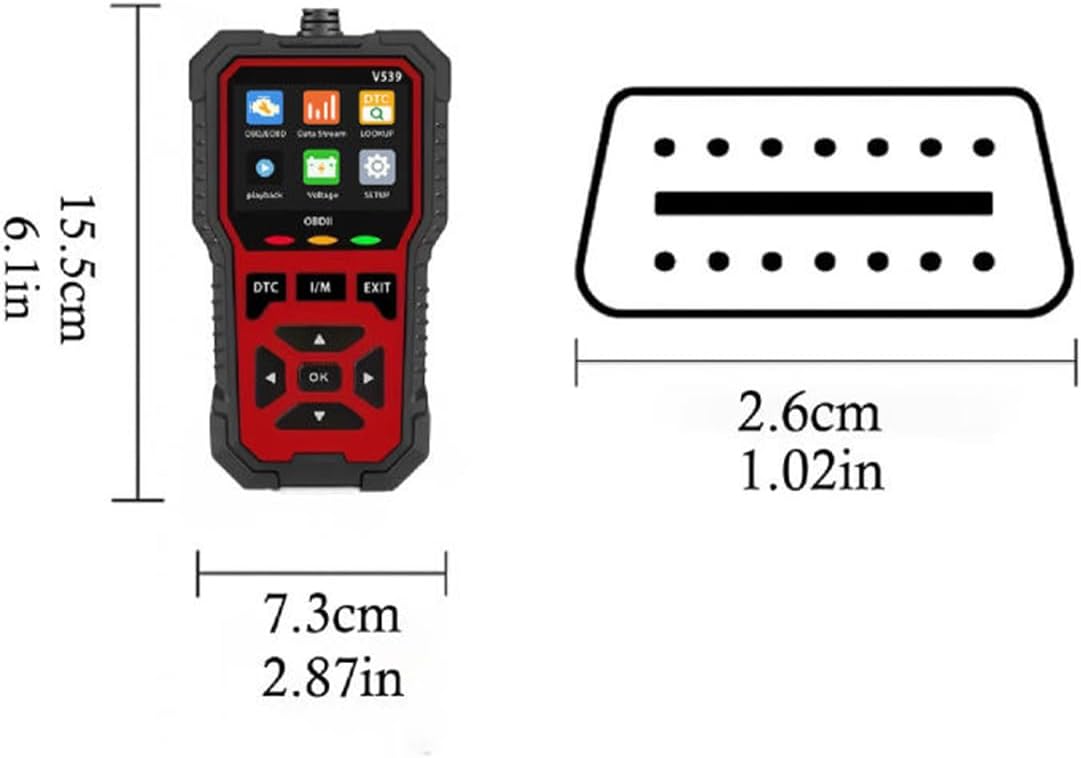
Diagram showing the physical dimensions of the V539 diagnostic scanner.

Close-up view of the scanner's 2.8-inch high-definition color screen, highlighting its clarity and detail.
Troubleshooting
- Scanner does not power on:
- Ensure the OBD-II connector is securely plugged into the vehicle's port.
- Verify the vehicle's ignition is in the ON position.
- Check the vehicle's battery voltage. The scanner requires 9-16V to operate.
- Communication error with vehicle:
- Ensure the vehicle is OBD-II compliant (most vehicles from 1996 onwards in the US, 2001 in Europe for petrol, 2004 for diesel).
- Check for loose connections at the OBD-II port.
- Try the scanner on another compatible vehicle to rule out scanner malfunction.
- Ensure the vehicle's ECU is functioning correctly.
- Codes cannot be cleared:
- The underlying fault that triggered the code must be repaired first. Codes will reappear if the issue persists.
- Ensure the ignition is ON and the engine is OFF when attempting to clear codes.
- Screen is blank or frozen:
- Disconnect the scanner from the vehicle and reconnect it.
- If the issue persists, contact customer support.
Maintenance
- Cleaning: Use a soft, dry cloth to clean the scanner's screen and body. Do not use abrasive cleaners, solvents, or harsh chemicals, as these can damage the device.
- Storage: Store the scanner in a cool, dry place, away from direct sunlight, extreme temperatures, and excessive humidity.
- Cable Care: Avoid bending or twisting the OBD-II cable excessively to prevent internal wire damage. Always grasp the connector when plugging or unplugging, not the cable itself.

The V539 scanner featuring its engineering-grade ABS protective shell, designed for durability.
Warranty and Support
Information regarding specific warranty terms for this product is not available in the provided details. For technical assistance, warranty claims, or any product-related inquiries, please refer to the contact information provided by your retailer or the manufacturer's official website.