1. Introduction
This manual provides essential information for the safe and effective assembly, operation, and maintenance of your AUTOSAVER88 60-Inch Tow Behind Dethatcher. This heavy-duty lawn rake is designed to be towed by an ATV, UTV, or lawn tractor, efficiently clearing thatch, pine needles, and other debris from large areas. Please read this manual thoroughly before using the product and retain it for future reference.
2. Safety Information
Always observe the following safety precautions to prevent injury or damage to the dethatcher and towing vehicle.
- Read and understand all instructions in this manual before operation.
- Ensure all fasteners are securely tightened before each use.
- Do not operate the dethatcher at excessive speeds. Maintain a safe and controlled speed appropriate for terrain and conditions.
- Keep children and pets away from the operating area.
- Wear appropriate safety gear, including eye protection and sturdy footwear.
- Be aware of your surroundings and potential obstacles such as rocks, roots, or uneven ground.
- Never attempt to clear debris from the tines while the dethatcher is in motion or attached to a running vehicle.
- Always disengage the dethatcher and turn off the towing vehicle before performing any adjustments or maintenance.
3. Package Contents
Verify that all components are present before beginning assembly. If any parts are missing or damaged, contact customer support.
- Main Frame Assembly
- 24 Spring Steel Tines
- Wheel Assemblies (2)
- Lift Handle Assembly
- Hitch Bar
- Hardware Kit (bolts, nuts, washers, hitch pin, chain)
4. Assembly Instructions
Follow these steps to assemble your dethatcher. It is recommended to have a second person assist with assembly.
- Attach Wheel Assemblies: Securely attach the two wheel assemblies to the main frame using the provided hardware. Ensure wheels spin freely.
- Install Spring Steel Tines: Insert each of the 24 spring steel tines into the designated slots on the main frame and secure them with the appropriate fasteners. Ensure all tines are facing the correct direction for dethatching.
- Mount Lift Handle: Attach the lift handle assembly to the main frame. This handle allows you to raise and lower the tines.
- Connect Hitch Bar: Fasten the hitch bar to the front of the main frame. This bar will connect to your towing vehicle.
- Final Check: Double-check all bolts, nuts, and pins to ensure they are tightened and secured.

Image: Overview of the dethatcher showing the control lever and the 24 spring steel tines.

Image: Detailed view highlighting the high-strength hitch pin, pneumatic tires, and the durable powder-coated finish.
5. Operating Instructions
Proper operation ensures efficient dethatching and extends the life of your equipment.
- Attaching to Towing Vehicle: Connect the dethatcher's hitch bar to the hitch receiver of your ATV, UTV, or lawn tractor using the provided hitch pin and clip. Ensure a secure connection.
- Adjusting Tine Engagement: Use the integrated lift handle to adjust the depth of the tines. For dethatching, lower the tines so they make contact with the ground and can effectively rake through thatch. For transport, raise the tines completely off the ground.
- Dethatching Process: Drive your towing vehicle at a slow, consistent speed across the area to be dethatched. Overlap passes slightly to ensure complete coverage. The spring steel tines will flex and pull up dead grass, leaves, and other debris.
- Clearing Debris: Periodically stop and clear accumulated thatch and debris from the dethatcher to maintain optimal performance.
- Transport Mode: When moving the dethatcher over driveways, gravel paths, or between work areas, use the lift handle to raise the tines clear of the ground to prevent wear and damage.

Image: The dethatcher in operation, being towed by an ATV to clear a lawn of leaves and thatch.
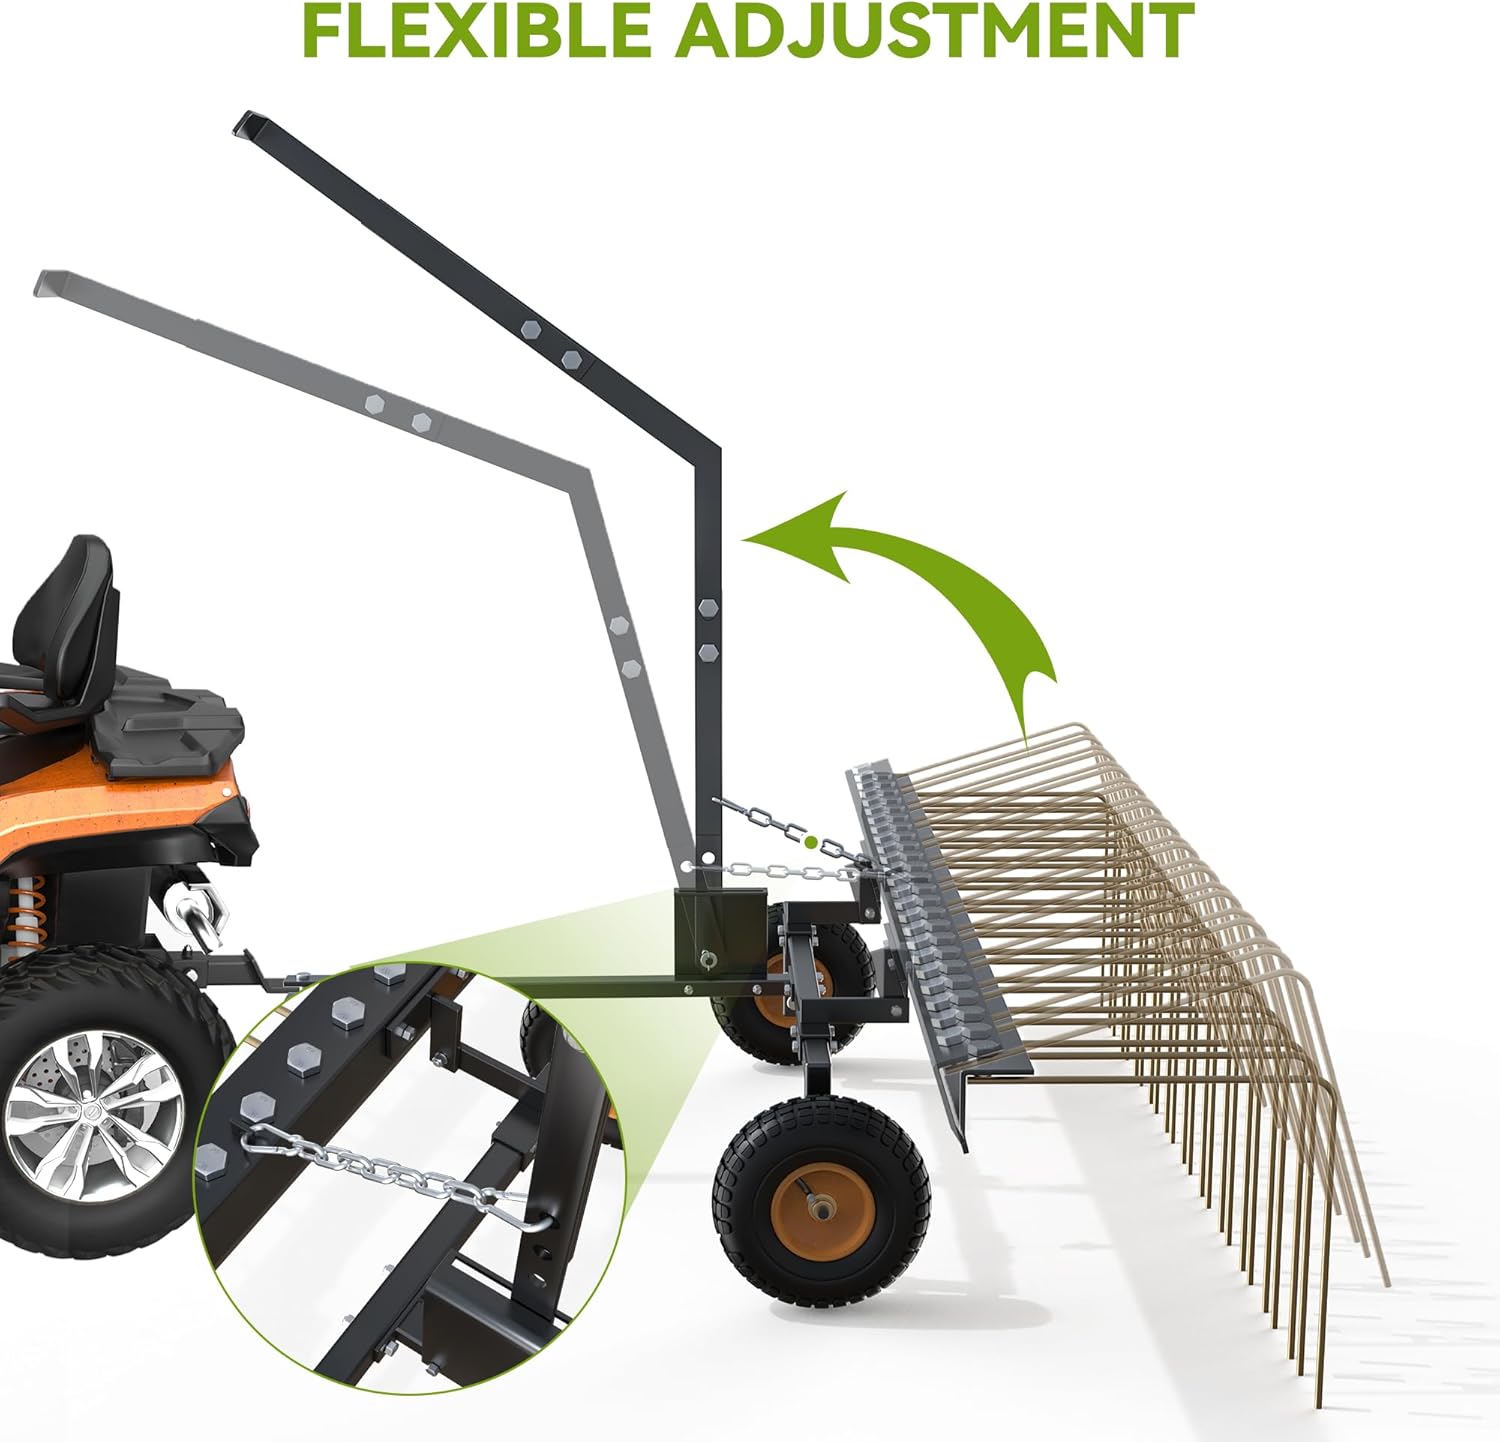
Image: Illustration demonstrating the flexible adjustment mechanism of the lift handle, enabling easy raising and lowering of the tines.

Image: The dethatcher in use, clearing leaves and debris from a natural landscape.

Image: A view from behind the dethatcher, illustrating its effectiveness in gathering leaves on a lawn.
6. Maintenance
Regular maintenance ensures optimal performance and longevity of your dethatcher.
- Cleaning: After each use, clean the dethatcher to remove any accumulated dirt, grass, or debris. This prevents rust and ensures smooth operation.
- Tine Inspection: Regularly inspect the spring steel tines for wear, bending, or breakage. Worn or damaged tines can be individually replaced using common tools.
- Fastener Check: Periodically check all bolts, nuts, and pins for tightness. Tighten any loose fasteners to prevent parts from detaching during operation.
- Lubrication: Apply a light lubricant to moving parts, such as wheel axles and the lift handle pivot points, to ensure smooth operation.
- Storage: Store the dethatcher in a dry, covered area to protect it from the elements when not in use.
7. Troubleshooting
Refer to this section for common issues and their solutions.
- Ineffective Dethatching:
- Ensure tines are fully engaged and making proper contact with the ground.
- Check for excessively worn or bent tines that may need replacement.
- Reduce towing speed for better tine action.
- Dethatcher Drags or Skips:
- Verify that the hitch connection is secure and the dethatcher is level.
- Check tire pressure on the dethatcher wheels.
- Ensure no large debris is caught in the tines, impeding movement.
- Excessive Wear on Tines:
- Avoid operating on hard surfaces like concrete or asphalt with tines engaged.
- Raise tines when transporting over non-turf areas.
- Inspect for obstacles in the operating area that may cause premature wear.
8. Specifications
| Feature | Specification |
|---|---|
| Model Number | MAAUT1Xi1k |
| Coverage Width | 60 inches |
| Number of Tines | 24 |
| Tine Material | Heat-treated Spring Steel |
| Frame Material | All-steel with Powder-coated Finish |
| Item Weight | 63.6 Pounds |
| Product Dimensions (W x H) | 60"W x 15"H (approximate, excluding hitch/handle) |
| Hitch Type | Standard Pin-and-Clip Receiver |

Image: Product dimensions diagram for the dethatcher.
9. Warranty and Support
For warranty information or technical support, please refer to the documentation included with your purchase or contact AUTOSAVER88 customer service. Keep your purchase receipt and model number (MAAUT1Xi1k) handy for faster service.


