
1. Safety Information
Read all instructions carefully before using the Fitkit Pulse Run Pro Treadmill. Keep this manual for future reference.
- Maximum User Weight: This treadmill supports a maximum user weight of 150 kg. Ensure the user's weight is within this limit.
- Power Source: Connect the treadmill to a 220-240V power source. A 1000 VA stabilizer is recommended for optimal performance and warranty validity.
- Placement: Place the treadmill on a flat, stable surface. Ensure adequate clear space around the treadmill for safe operation and emergency dismount.
- Safety Key: Always attach the safety key to your clothing before starting a workout. In case of an emergency, pulling the safety key will immediately stop the treadmill.
- Children and Pets: Keep children and pets away from the treadmill during operation.
- Medical Conditions: Consult a physician before starting any new exercise program, especially if you have pre-existing medical conditions.
- Footwear: Always wear appropriate athletic footwear while using the treadmill.
- Maintenance: Perform regular maintenance as described in this manual to ensure safe and efficient operation.
2. Product Overview
The Fitkit Pulse Run Pro is a home-use treadmill designed for walking, jogging, and running. It features a powerful BLDC motor, automatic incline, and a comprehensive LED display.
Key Features:
- Motor: 6HP BLDC Motor for quiet and efficient operation.
- Weight Capacity: Supports users up to 150 kg.
- Speed Range: Up to 15 km/hr.
- Incline: 20-level automatic incline.
- Running Belt: Spacious 120x45 cm running belt with triple shock absorption.
- Display: Smart LED display tracking speed, time, distance, calories, and heart rate.
- Programs: 16 pre-set workout programs.
- Additional Features: Built-in massager belt and transport wheels.
Components:
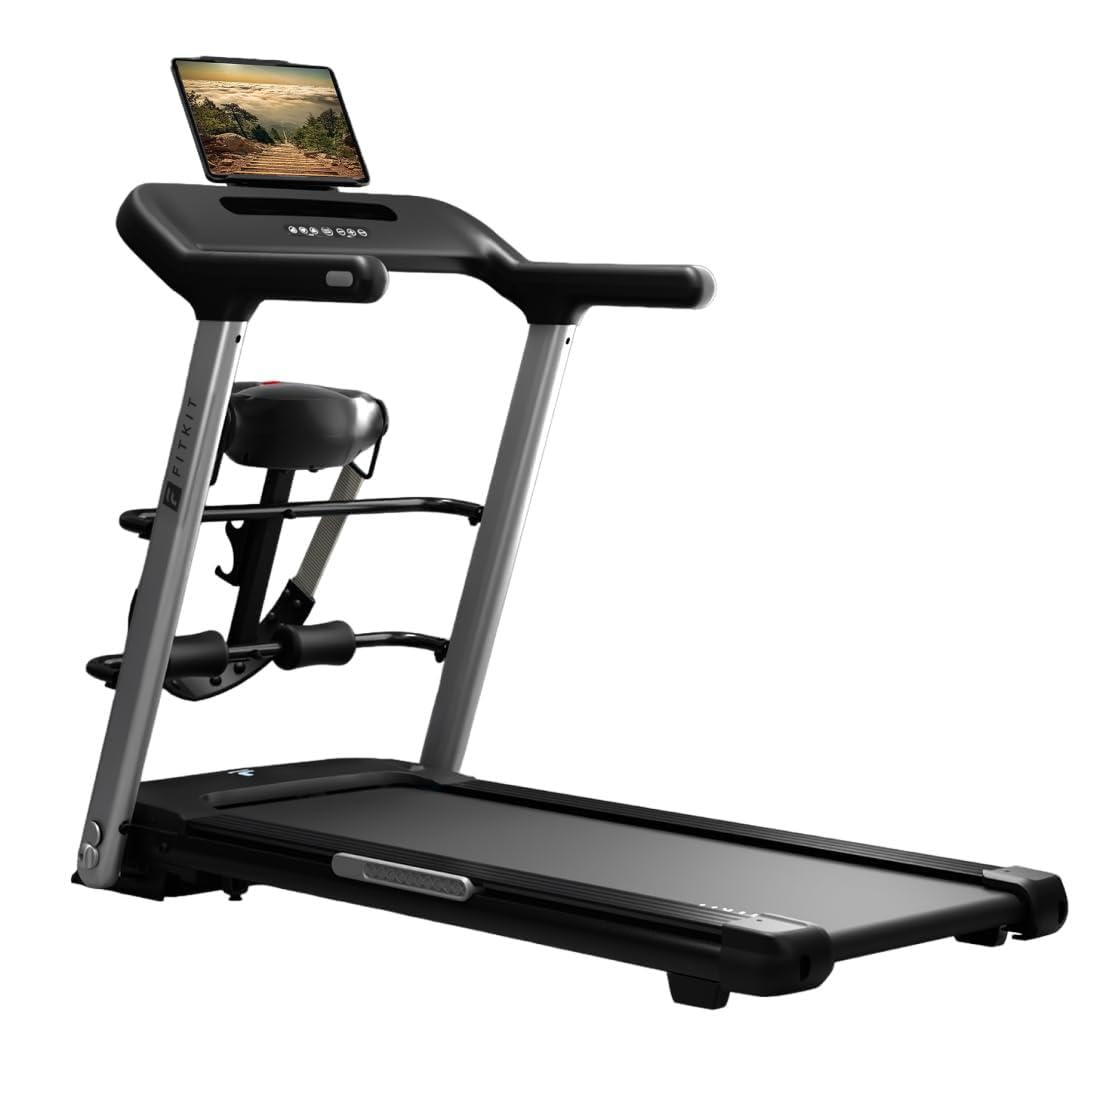
Figure 2.1: Overview of the Fitkit Pulse Run Pro Treadmill. This image shows the complete treadmill unit, including the console, handlebars, running deck, and base.

Figure 2.2: Internal view of the 6HP BLDC motor. This illustration highlights the components of the brushless DC motor, emphasizing its durable and quiet design.

Figure 2.3: Detail of the triple shock absorption system. This image illustrates the cushioning elements beneath the running belt, designed to reduce impact during exercise.
3. Setup
The Fitkit Pulse Run Pro Treadmill requires minimal assembly. Follow these steps for initial setup:
- Unpacking: Carefully remove all components from the packaging. Retain packaging materials for potential future transport or service.
- Placement: Position the treadmill on a level, solid surface. Ensure there is at least 2 meters of clear space behind the treadmill and 0.5 meters on each side.
- Power Connection: Connect the power cord to the treadmill and then to a grounded 220-240V outlet. Use of a 1000 VA stabilizer is recommended.
- Safety Key Placement: Locate the safety key and ensure it is properly placed in its designated slot on the console. The treadmill will not operate without the safety key in place.
- Initial Lubrication: Before first use, apply silicone oil to the running belt as instructed in the maintenance section or by the provided video.
Video 3.1: Product demonstration and setup guide for the Fitkit Pulse Run Pro Treadmill. This video illustrates the treadmill's features, including initial setup, safety key usage, display operation, incline adjustment, running, massager belt use, and transport.
4. Operation
Familiarize yourself with the control panel and functions before beginning your workout.
4.1 Control Panel and Display

Figure 4.1: The Smart LED Display and integrated pulse sensors. The display shows workout metrics, and the sensors on the handlebars monitor heart rate.
The LED display provides real-time feedback on your workout, including:
- Speed: Current running speed (km/hr).
- Time: Duration of your workout.
- Distance: Total distance covered.
- Calories: Estimated calories burned.
- Heart Rate: Your pulse when holding the hand sensors.
4.2 Starting a Workout
- Ensure the safety key is correctly attached to your clothing and placed on the console.
- Step onto the treadmill's side rails, not directly onto the running belt.
- Press the START/PAUSE button to begin. The belt will start moving at a low speed.
- Carefully step onto the moving belt and begin walking.
4.3 Adjusting Speed and Incline
- Speed Adjustment: Use the SPEED + and SPEED - buttons on the console to increase or decrease the running speed. Quick speed buttons (e.g., 3, 6, 9 km/hr) are also available.
- Incline Adjustment: Use the INCLINE + and INCLINE - buttons to adjust the incline level from 0 to 20.

Figure 4.2: Illustration of the 20-level automatic incline feature. This shows how the treadmill deck elevates to simulate uphill training.
4.4 Using Workout Programs
The treadmill includes 16 pre-set workout programs. Refer to the full user manual for detailed instructions on selecting and customizing these programs.
4.5 Heart Rate Monitoring
To monitor your heart rate, grip the pulse sensors on the handlebars with both hands. Your heart rate will be displayed on the LED screen after a few seconds.
4.6 Using the Massager Belt

Figure 4.3: The built-in massager belt. This feature is designed to aid in muscle recovery after a workout.
The treadmill is equipped with an in-built massager belt for post-workout recovery. To use:
- Ensure the treadmill is stopped and powered off.
- Position yourself correctly with the massager belt around the desired area (e.g., waist, hips).
- Activate the massager function using the dedicated control (refer to the full user manual for exact button location).
- Use for a recommended duration to assist with muscle relaxation.
4.7 Ending a Workout
- Press the START/PAUSE button to gradually slow down and stop the treadmill.
- Alternatively, pull the safety key to immediately stop the treadmill.
- Once the belt has completely stopped, step off the treadmill.
- Disconnect the power cord from the outlet when not in use.
5. Maintenance
Regular maintenance ensures the longevity and safe operation of your treadmill.
- Cleaning: Wipe down the treadmill surfaces with a damp cloth after each use. Avoid using abrasive cleaners.
- Running Belt Lubrication: The running belt requires periodic lubrication with silicone oil. Refer to the full user manual for the specific lubrication schedule and procedure.
- Belt Tension and Alignment: Periodically check the running belt for proper tension and alignment. Adjust as needed according to the full user manual instructions.
- Motor Area: Keep the motor area clean and free of dust and debris to prevent overheating.
- Power Cord: Inspect the power cord regularly for any damage. Do not use the treadmill if the cord is damaged.
6. Troubleshooting
This section addresses common issues you might encounter with your treadmill.
| Problem | Possible Cause | Solution |
|---|---|---|
| Treadmill does not start. | Power cord not connected; Safety key not in place; Power switch off. | Ensure power cord is securely plugged in; Place safety key correctly; Turn on the power switch. |
| Running belt slips or hesitates. | Belt tension too loose; Belt requires lubrication. | Adjust belt tension (refer to manual); Apply silicone lubricant to the belt. |
| Unusual noise during operation. | Loose components; Belt friction; Motor issue. | Check and tighten all visible bolts and screws; Lubricate the running belt; If noise persists, contact customer support. |
| Incline not adjusting. | Incline motor issue; Obstruction. | Check for any obstructions under the treadmill; If issue persists, contact customer support. |
For issues not listed here or if solutions do not resolve the problem, please contact Fitkit customer support.
7. Specifications
| Feature | Detail |
|---|---|
| Brand | Fitkit |
| Model Name | PulseRunPro |
| Colour | Grey |
| Product Grade | Designed for home use |
| Product Dimensions (D x W x H) | 156D x 81W x 27H Centimeters |
| Item Weight | 50.6 Kilograms |
| Maximum Speed | 15 Kilometers per Hour |
| Special Features | Auto Incline, Heart Rate Monitor, Quiet Operation |
| HP (Peak Motor Power) | 6 Horsepower |
| Maximum Incline Percentage | 20 Levels |
| Display Type | LED |
| Power Source | Corded Electric (220-240V) |
| Metrics Measured | Calories Burned, Distance, Heart Rate, Speed, Time |
| Maximum Weight Recommendation | 150 Kilograms |
| Number of Programs | 16 |
| Material Type | Alloy Steel |
| Frame Material | Alloy Steel |
| What's In The Box | Tool Kit, User Manual |
| Country Of Origin | China |
| Assembly Required | No (Minimal setup required) |
8. Warranty & Support
Warranty Information:
The Fitkit Pulse Run Pro Treadmill comes with the following warranty:
- 1 Year Warranty on Motor and Manufacturing Defects.
- 3 Years Warranty on Frame.
- Warranty for manufacturing defects and electronic parts is valid only if the treadmill is used with a stabilizer (1000 VA recommended).
- To maintain the treadmill and extend its life, ensure the rated voltage is between 220 - 240V.
For detailed warranty terms and conditions, please refer to the warranty card included with your product.
Customer Support:
For technical assistance, service requests, or any inquiries regarding your Fitkit Pulse Run Pro Treadmill, please contact Fitkit customer support. Refer to the contact information provided in your product packaging or on the official Fitkit website.
Manufacturer: CULTSPORT PRIVATE LIMITED
Importer: CULTSPORT PRIVATE LIMITED