Introduction
This manual provides essential instructions for the safe and efficient operation of your VEVOR M9 Portable Power Station and 200W Solar Panel. This portable power station features a 1008Wh LiFePO4 battery and an 1800W output, designed to provide reliable power for outdoor adventures, emergency backup, and various portable electronic devices. Please read this manual thoroughly before use and retain it for future reference.
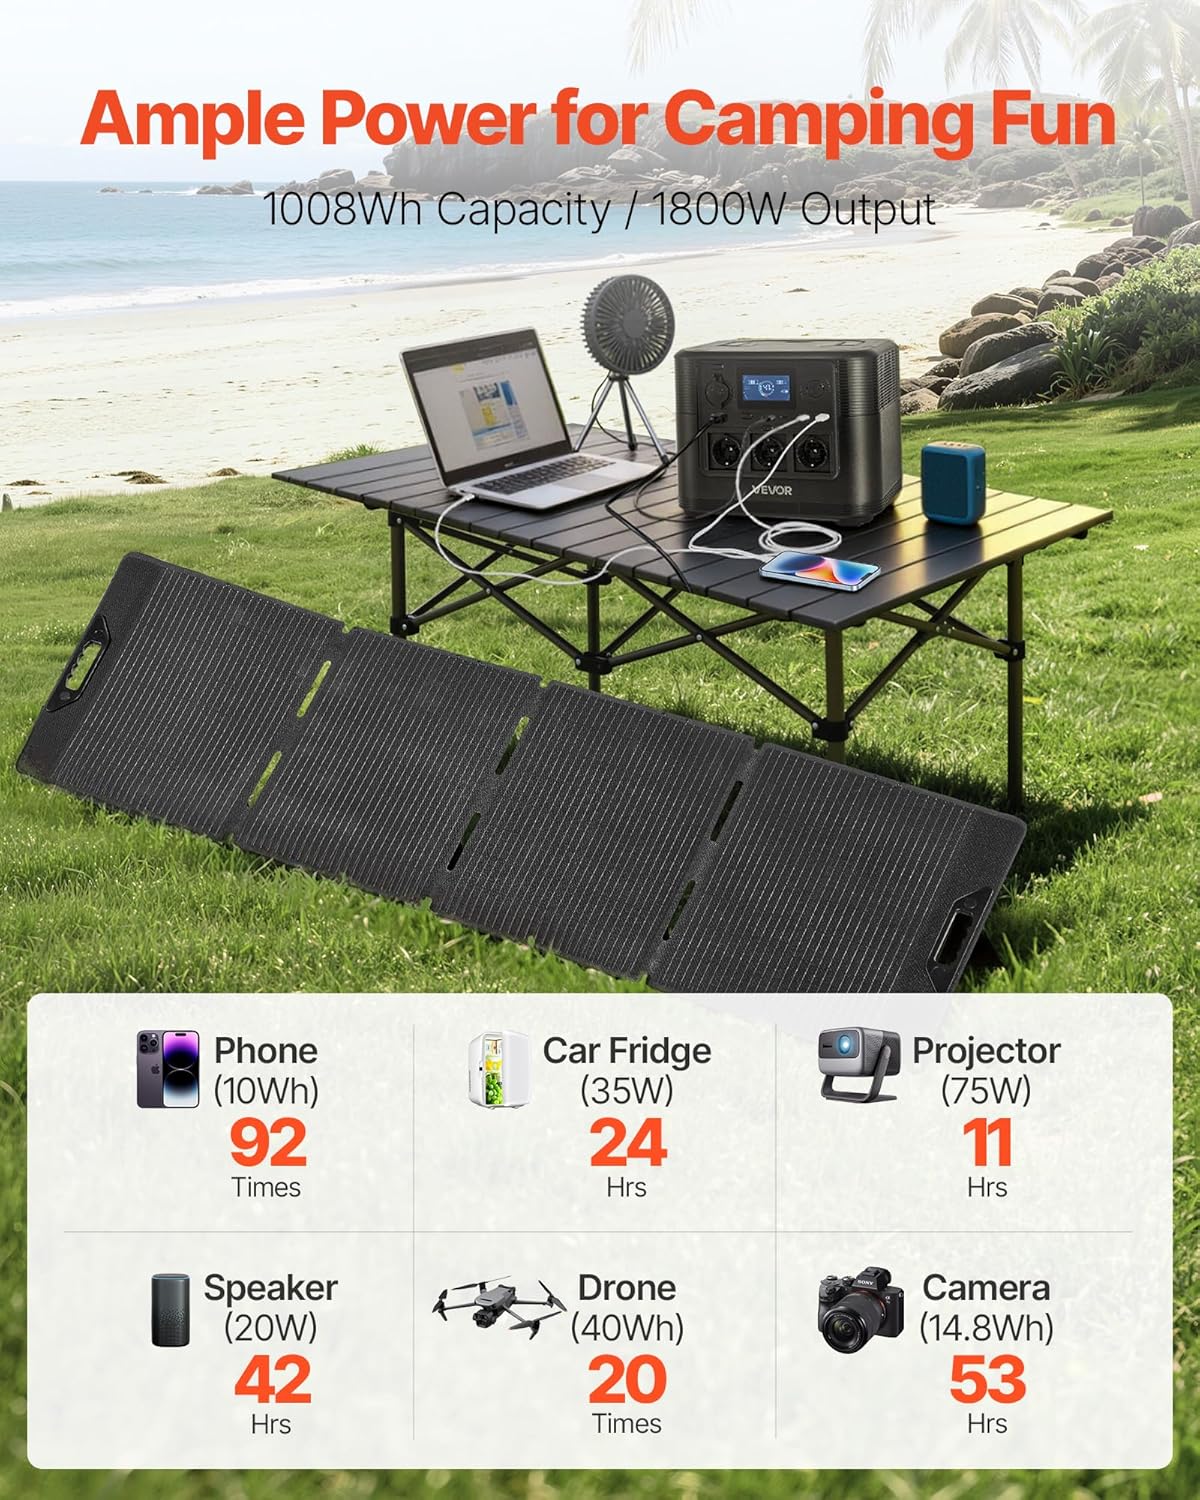
Image: The VEVOR M9 Portable Power Station and 200W Solar Panel providing power in an outdoor camping environment, demonstrating its use for various devices.

Image: A visual comparison illustrating the advantages of a solar generator (clean, quiet, easy setup) over a traditional gas generator (noisy, smoky, tough startup).
Safety Instructions
- Do not disassemble, repair, or modify the unit.
- Do not place the unit near fire or expose it to heat.
- Do not use or store the unit in a bathroom or in an area exposed to water or rain.
- Do not use the unit in an environment with strong static electricity or strong magnetic fields.
- Do not use the unit if the power cord is damaged or broken.
- Do not use the unit if it is damaged or has been dropped.
- Keep the unit out of reach of children and pets.
- Ensure proper ventilation during use and charging. Do not cover the unit.
- Dispose of the product according to local regulations.
Package Contents
Verify that all items listed below are included in your package. If any items are missing or damaged, please contact VEVOR customer support.
- 1 x Portable Power Station
- 1 x Solar Panel (200W)
- 1 x User Manual
- 1 x Power Cable (AC charging cable)
- 1 x Car Charging Cable
Product Overview
The VEVOR M9 Portable Power Station is designed for versatility and durability. It features a robust LiFePO4 battery, advanced Battery Management System (BMS), and multiple output ports. The accompanying 200W solar panel allows for efficient solar recharging.
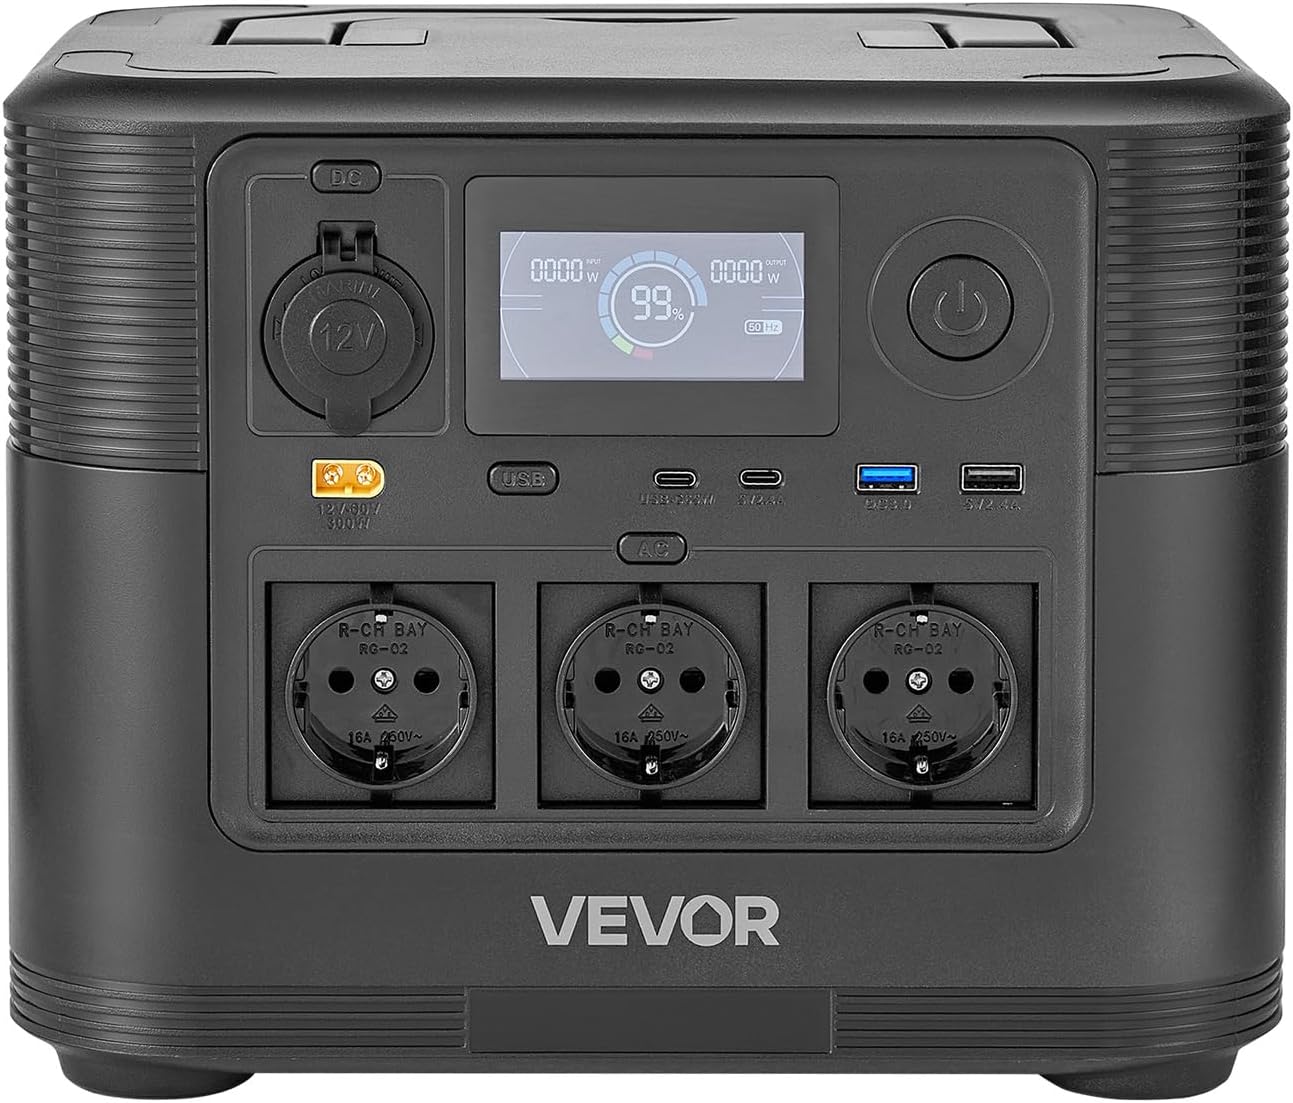
Image: Detailed view of the power station's control panel, highlighting various input and output ports, and the digital display.
Key Components:
- Power Station: Main unit with battery, inverter, and control panel.
- Display Screen: Shows battery level, input/output power, and status indicators.
- AC Outlets: For powering standard household appliances.
- USB Ports (Type-C, QC, Standard): For charging mobile devices, laptops, etc.
- DC Output Ports (Car Socket, XT60): For 12V devices and specific DC applications.
- DC Input Port: For charging via solar panel, AC adapter, or car charger.
- 200W Solar Panel: Foldable panel for solar energy conversion.

Image: An illustration detailing the 9 output ports available on the power station, specifying their types and power ratings.
Setup
Initial Charging:
- Upon receiving your power station, it is recommended to fully charge it before first use.
- Connect the provided AC power cable to the DC input port on the power station and plug the other end into a wall outlet.
- The display will indicate charging status. The unit is fully charged when the battery indicator shows 100%.
Connecting the Solar Panel:
- Unfold the 200W solar panel and place it in direct sunlight.
- Connect the solar panel's output cable to the DC input port on the power station.
- Ensure the connection is secure. The display will show "Solar Input" and the charging wattage.
- Adjust the angle of the solar panel periodically to maximize sun exposure for optimal charging efficiency.
Operating Instructions
Turning On/Off:
- To turn on the power station, press and hold the main power button for a few seconds until the display illuminates.
- To turn off, press and hold the main power button again until the display turns off.
Using AC Outlets:
- Press the AC power button to activate the AC outlets. The AC indicator will light up on the display.
- Plug your AC devices into the outlets. Ensure the total power consumption does not exceed 1800W.
- After use, press the AC power button again to turn off the AC outlets to conserve power.
Using USB and DC Ports:
- The USB ports (Type-C, QC, Standard) and DC ports (Car Socket, XT60) are typically active once the main power station is turned on.
- Plug your USB or DC devices into the appropriate ports.
- Monitor the display for output wattage to ensure devices are charging correctly.

Image: The power station and solar panel in active use during an outdoor trip, demonstrating its capability to power devices like a laptop.
Charging Options
Your VEVOR M9 Portable Power Station offers versatile charging methods to ensure you always have power.
1. AC Wall Outlet Charging:
- Use the provided AC power cable.
- Connect to a standard wall outlet.
- Max AC input power: 650W.
- Approximate charging time: ~5 hours (from 0% to 100%).
2. Solar Panel Charging:
- Connect the 200W solar panel to the DC input port.
- Position the solar panel in direct sunlight for maximum efficiency.
- Max solar input power: 300W.
- Approximate charging time: ~5 hours (with 200W solar panel under ideal sunlight).
3. Car Charging:
- Use the provided car charging cable.
- Plug one end into your vehicle's 12V cigarette lighter socket and the other into the power station's DC input port.
- This method is slower and best for maintaining charge or topping up during travel.
Maintenance
Proper maintenance ensures the longevity and optimal performance of your VEVOR M9 Portable Power Station.
- Storage: Store the unit in a dry, well-ventilated area, away from direct sunlight and extreme temperatures. For long-term storage, charge the unit to 50-80% every 3-6 months to preserve battery health.
- Cleaning: Use a soft, dry cloth to clean the exterior of the power station and solar panel. Do not use abrasive cleaners or solvents.
- Battery Health: The LiFePO4 battery is designed for 3500+ charge cycles, offering a long lifespan of 10-15 years. Avoid fully discharging the battery frequently to maximize its lifespan.
- Ventilation: Ensure the ventilation openings on the power station are clear and unobstructed during operation and charging to prevent overheating.

Image: An illustration showcasing the internal components responsible for the power station's durability, including the LiFePO4 battery, BMS, and smart temperature control.
Troubleshooting
If you encounter issues with your power station, refer to the following common problems and solutions.
| Problem | Possible Cause | Solution |
|---|---|---|
| Unit does not turn on. | Battery is completely discharged; Power button not pressed long enough. | Charge the unit using the AC adapter; Press and hold the power button for 3-5 seconds. |
| AC outlets not working. | AC output not activated; Device power consumption exceeds 1800W; Overload protection triggered. | Press the AC power button; Check device wattage; Disconnect devices, restart unit. |
| Solar charging is slow or not working. | Insufficient sunlight; Solar panel not properly connected; Panel is dirty or obstructed. | Reposition panel in direct sunlight; Ensure secure connection; Clean panel surface. |
| Unit is overheating. | Poor ventilation; Excessive load. | Ensure vents are clear; Reduce connected load; Allow unit to cool down. |
Specifications
Detailed technical specifications for the VEVOR M9 Portable Power Station and 200W Solar Panel.
| Feature | Detail |
|---|---|
| Model Number | M9 |
| Battery Capacity | 1008 Wh |
| Battery Type | LiFePO₄ |
| Max AC Output Power | 1800 W |
| Max AC Input Power | 650 W |
| Max Solar Input Power | 300 W |
| Solar Panel | 1 x 200W |
| Number of Output Ports | 9 |
| Main Housing Material | ABS + PC |
| Power Station Net Weight | 12.00 kg (26.46 lbs) |
| Solar Panel Net Weight | 5.60 kg (12.35 lbs) |
| Power Station Dimensions (L x W x H) | 290 x 220 x 230 mm (11.42 x 8.66 x 9.06 inches) |
| Solar Panel Dimensions (L x W x H) | 2030 x 430 x 500 mm (80.02 x 16.93 x 19.69 inches) |

Image: Technical drawing with dimensions for both the power station and the solar panel, accompanied by a summary of specifications.

Image: Demonstrates the portability of the power station (12.00 kg / 26.46 lbs) and the solar panel (5.60 kg / 12.35 lbs).
Warranty and Support
Warranty: According to the product information, there is no specific warranty provided for this product. Please refer to your point of purchase for any return or exchange policies.
Customer Support: For any questions, technical assistance, or issues not covered in this manual, please contact VEVOR customer support directly through their official website or the retailer where you purchased the product.
You can visit the VEVOR store for more information: VEVOR Official Store


