Introduction
This manual provides essential information for the safe assembly, operation, and maintenance of your ELEMARA 24V Ride-On Toy. Please read all instructions carefully before use to ensure proper function and child safety.
What's in the Box
- Ride on Car x1
- Manual x1
- Shovel x1
- Sun Shade x1
Setup and Assembly
Follow these steps to assemble your ride-on toy. Refer to the accompanying video for visual guidance.
Assembly Video Guide
This video provides a detailed assembly guide for a 24V ride-on car, demonstrating each step from unboxing to final setup. While the model shown may vary slightly in color, the assembly process is generally the same.
1. Unboxing and Initial Inspection
Carefully remove all components from the packaging. Ensure all parts listed in the 'What's in the Box' section are present and undamaged.
2. Connecting the Battery
Locate the battery compartment, typically under the seat or hood. Connect the battery terminals as instructed. Ensure a secure connection to prevent power interruptions.

Image showing the battery compartment and connection points. Ensure the orange connectors are firmly pushed together.
3. Wheel Assembly
Attach the wheels to the axles. Secure them with the provided washers and nuts. Ensure all wheels spin freely after installation.
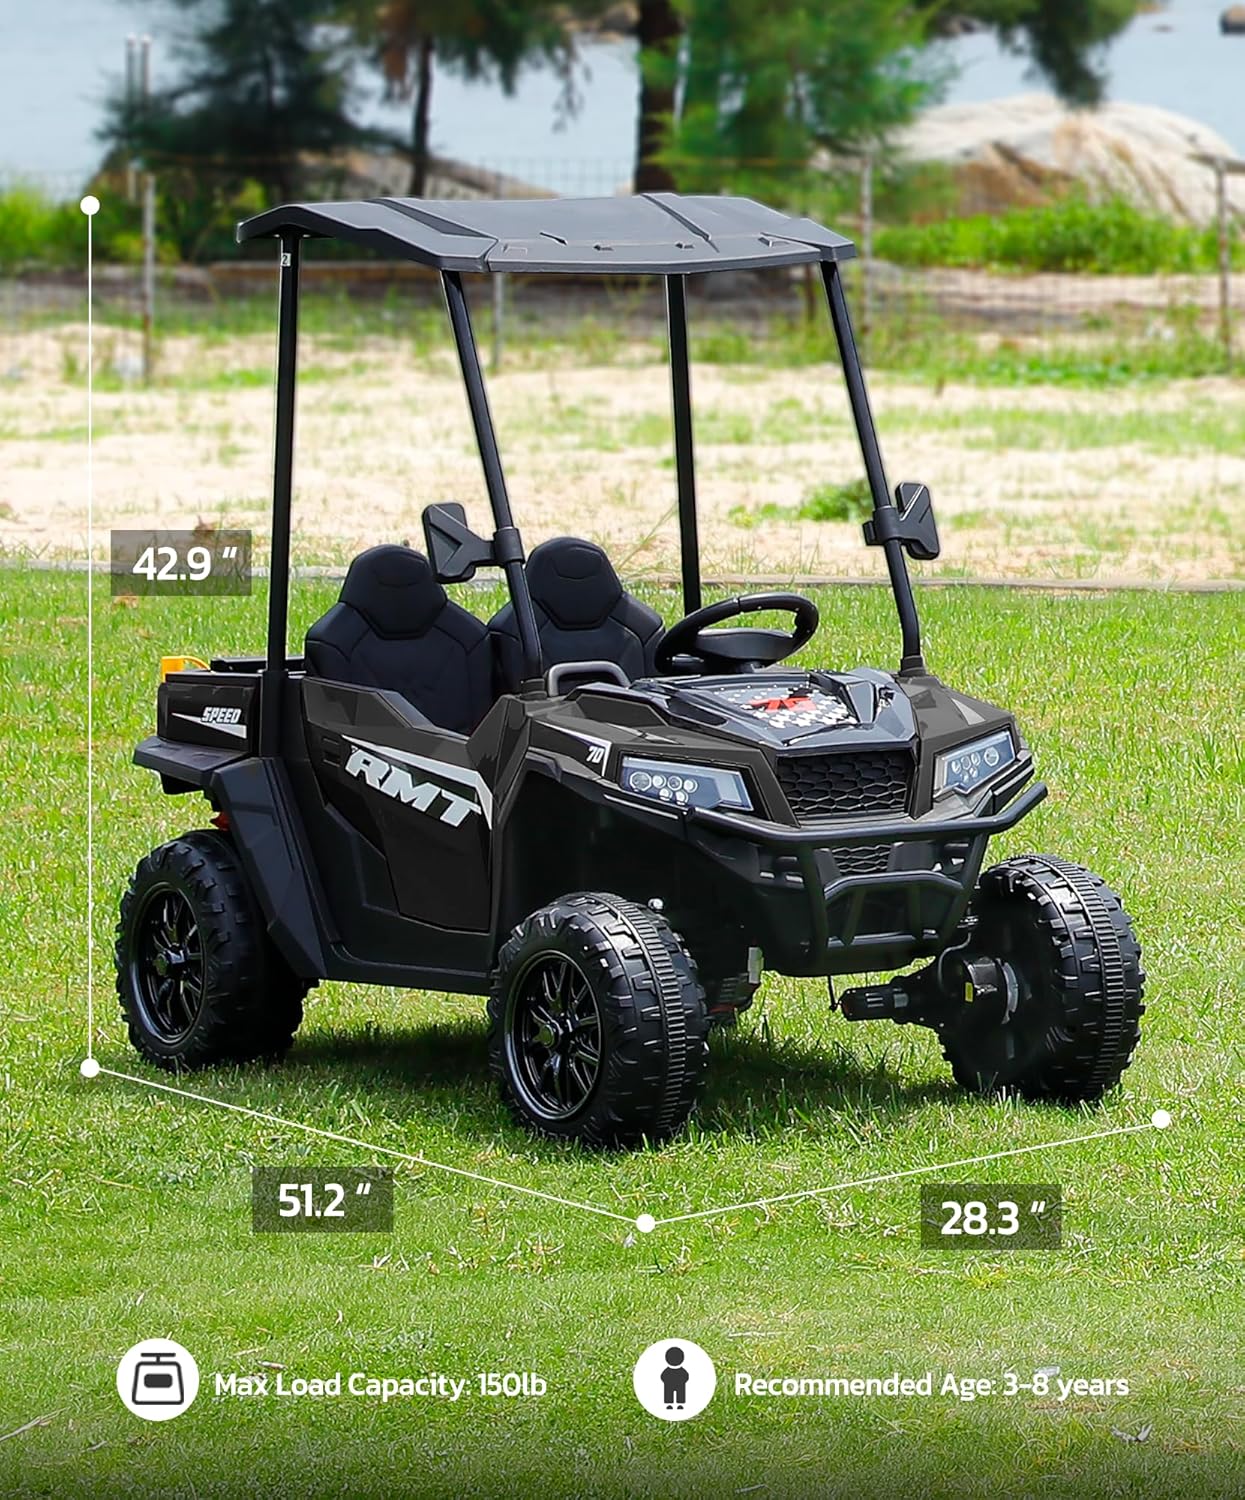
Image displaying the vehicle's dimensions and the robust anti-slip wheels designed for various terrains.
4. Steering Wheel Installation
Connect the steering wheel's electrical cable to the corresponding port on the dashboard. Slide the steering wheel onto the steering column and secure it with the provided screw.
5. Seat and Roll Bar Installation
Place the seats into their designated slots and secure them. Attach the roll bar components, ensuring they click firmly into place or are screwed down as per the instructions.
6. Fender Flares and Mirrors
Attach the fender flares over each wheel well. Install the side mirrors by snapping or screwing them into position on the vehicle's frame.
7. Remote Control Battery Installation
Open the battery compartment on the remote control. Insert the required batteries (typically AAA, not included) ensuring correct polarity. Close the compartment securely.
Operating Instructions
Your ELEMARA ride-on toy offers multiple ways to play and ensures a safe and fun experience.
1. Powering On/Off
Insert the key (if applicable) and turn it to the ON position, or press the power button on the dashboard. The vehicle will emit a startup sound and lights may illuminate.
2. Driving Modes (Manual & Remote)
The vehicle supports dual control. Children can drive manually using the steering wheel and foot pedal. Parents can override manual control at any time using the remote control for added safety.

Image illustrating the two driving modes: manual control by the child and remote control by an adult.
3. Speed Settings
The vehicle features three-speed settings (3.1/3.7/4.5 MPH). These can be adjusted via the dashboard controls or the remote control. The 'Soft Start' feature ensures smooth acceleration, preventing sudden jolts.

Diagram explaining the soft start feature and different speed levels for a comfortable ride.
4. Dump Bed Operation
The rear dump bed can be manually lifted to unload items. It also includes a removable shovel for interactive play.

A child using the lifting dump bed to transport items, highlighting the included shovel.
5. Music and Lights
The dashboard features a music player with Bluetooth connectivity and LED lights. Children can enjoy their favorite tunes while riding, and the LED lights enhance visibility and fun.
6. Safety Features
The vehicle is equipped with a safety belt for secure seating, lockable doors, and spring suspension for a stable ride. The remote control includes an emergency stop function, allowing parents to halt the vehicle instantly if needed.
Maintenance
1. Charging the Battery
Connect the charger to the charging port on the vehicle and then to a power outlet. Charge the battery for 8-12 hours before first use and after each play session. Do not overcharge.

Visual representation of the 24V 10AH battery, indicating charging time (8-12H) and play time (1.5H), along with a low battery reminder.
2. Cleaning and Storage
Wipe the vehicle with a damp cloth. Avoid using harsh chemicals. Store the ride-on toy in a dry, cool place away from direct sunlight when not in use.
Troubleshooting
- Vehicle not moving: Check battery connection, ensure the power switch is ON, and the foot pedal is pressed. Verify the remote control is not in 'Park' mode.
- Slow speed: Ensure the battery is fully charged. Check the speed setting on the dashboard or remote control.
- Remote control not working: Replace batteries in the remote control. Ensure the remote is paired correctly with the vehicle.
Specifications
| Feature | Detail |
|---|---|
| Brand | ELEMARA |
| Model Number | XB-1038 |
| Battery | 24V 10AH |
| Max Speed | 4.5 MPH (3 speed settings: 3.1/3.7/4.5 MPH) |
| Weight Capacity | 150 Pounds |
| Recommended Age | 37-144 Months (approx. 3-12 years) |
| Drive Type | 4WD |
| Dimensions (L x W x H) | 51.2"L x 29.3"W x 42.9"H |
| Material Type | Metal, Polyethylene |
Warranty and Support
For warranty information or technical support, please refer to the contact details provided on your purchase receipt or visit the official ELEMARA website. Keep your purchase receipt for proof of warranty.