
Introduction
This manual provides detailed instructions for the installation, operation, and maintenance of your GEARGO RV Tire Pressure Monitoring System (TPMS). This system is designed to monitor the pressure and temperature of your vehicle's tires in real-time, enhancing driving safety by alerting you to potential tire issues.
The system includes a main monitor unit with solar and USB charging capabilities, and four external sensors for precise tire data collection. It is suitable for various four-wheel vehicles, including sedans, SUVs, MPVs, pick-up trucks, and RVs.
Package Contents
Before installation, please verify that all components are present in the package:
- 1 x LCD Display Monitor
- 4 x External Tire Pressure Sensors
- 4 x Anti-theft Nuts
- 1 x Installation Clamp
- 1 x USB Charging Cable (Type-C)
- 1 x User Manual (this document)
- 1 x Double-sided Tape
- 1 x Wrench for anti-theft nuts

Figure 1: Package Contents
Product Features
- Real-time Monitoring: Simultaneously displays pressure and temperature for four tires.
- 6 Alarm Modes: Includes high/low pressure, high temperature, disconnection, low battery, and sensor fault alarms.
- Precise External Sensors: Compact, lightweight, and highly accurate sensors (0-99 PSI detection range) with easy installation.
- Dual Charging Options: Supports both solar and USB charging for continuous power.
- Color LCD Display: Intelligent screen with automatic backlighting adjustment for clear visibility in various light conditions.
- Automatic On/Off: The monitor automatically powers on when the vehicle starts and off when parked.
- Voice Prompt: Provides audible alerts for detected issues.
- Durable Design: Sensors are waterproof and dust-proof.

Figure 2: System Features Overview
Setup and Installation
Follow these steps to install your GEARGO RV TPMS:
- Prepare the Monitor: Place the monitor unit on your dashboard using the provided double-sided tape or installation clamp. Ensure it is in a position where it receives sufficient sunlight for solar charging and does not obstruct your view.
- Charge the Monitor: Before first use, fully charge the monitor via the USB cable.
- Install Anti-theft Nuts: For each tire, remove the original valve cap. Screw an anti-theft nut onto the tire valve stem.
- Install Sensors: Screw the corresponding sensor (marked FL, FR, RL, RR for Front Left, Front Right, Rear Left, Rear Right) onto the valve stem until it is hand-tight.
- Secure Anti-theft Nuts: Use the provided wrench to tighten the anti-theft nut against the sensor, securing it in place. This prevents unauthorized removal of the sensors.
- Power On: The monitor will automatically power on when the vehicle starts. The sensors are pre-paired and will begin transmitting data automatically.
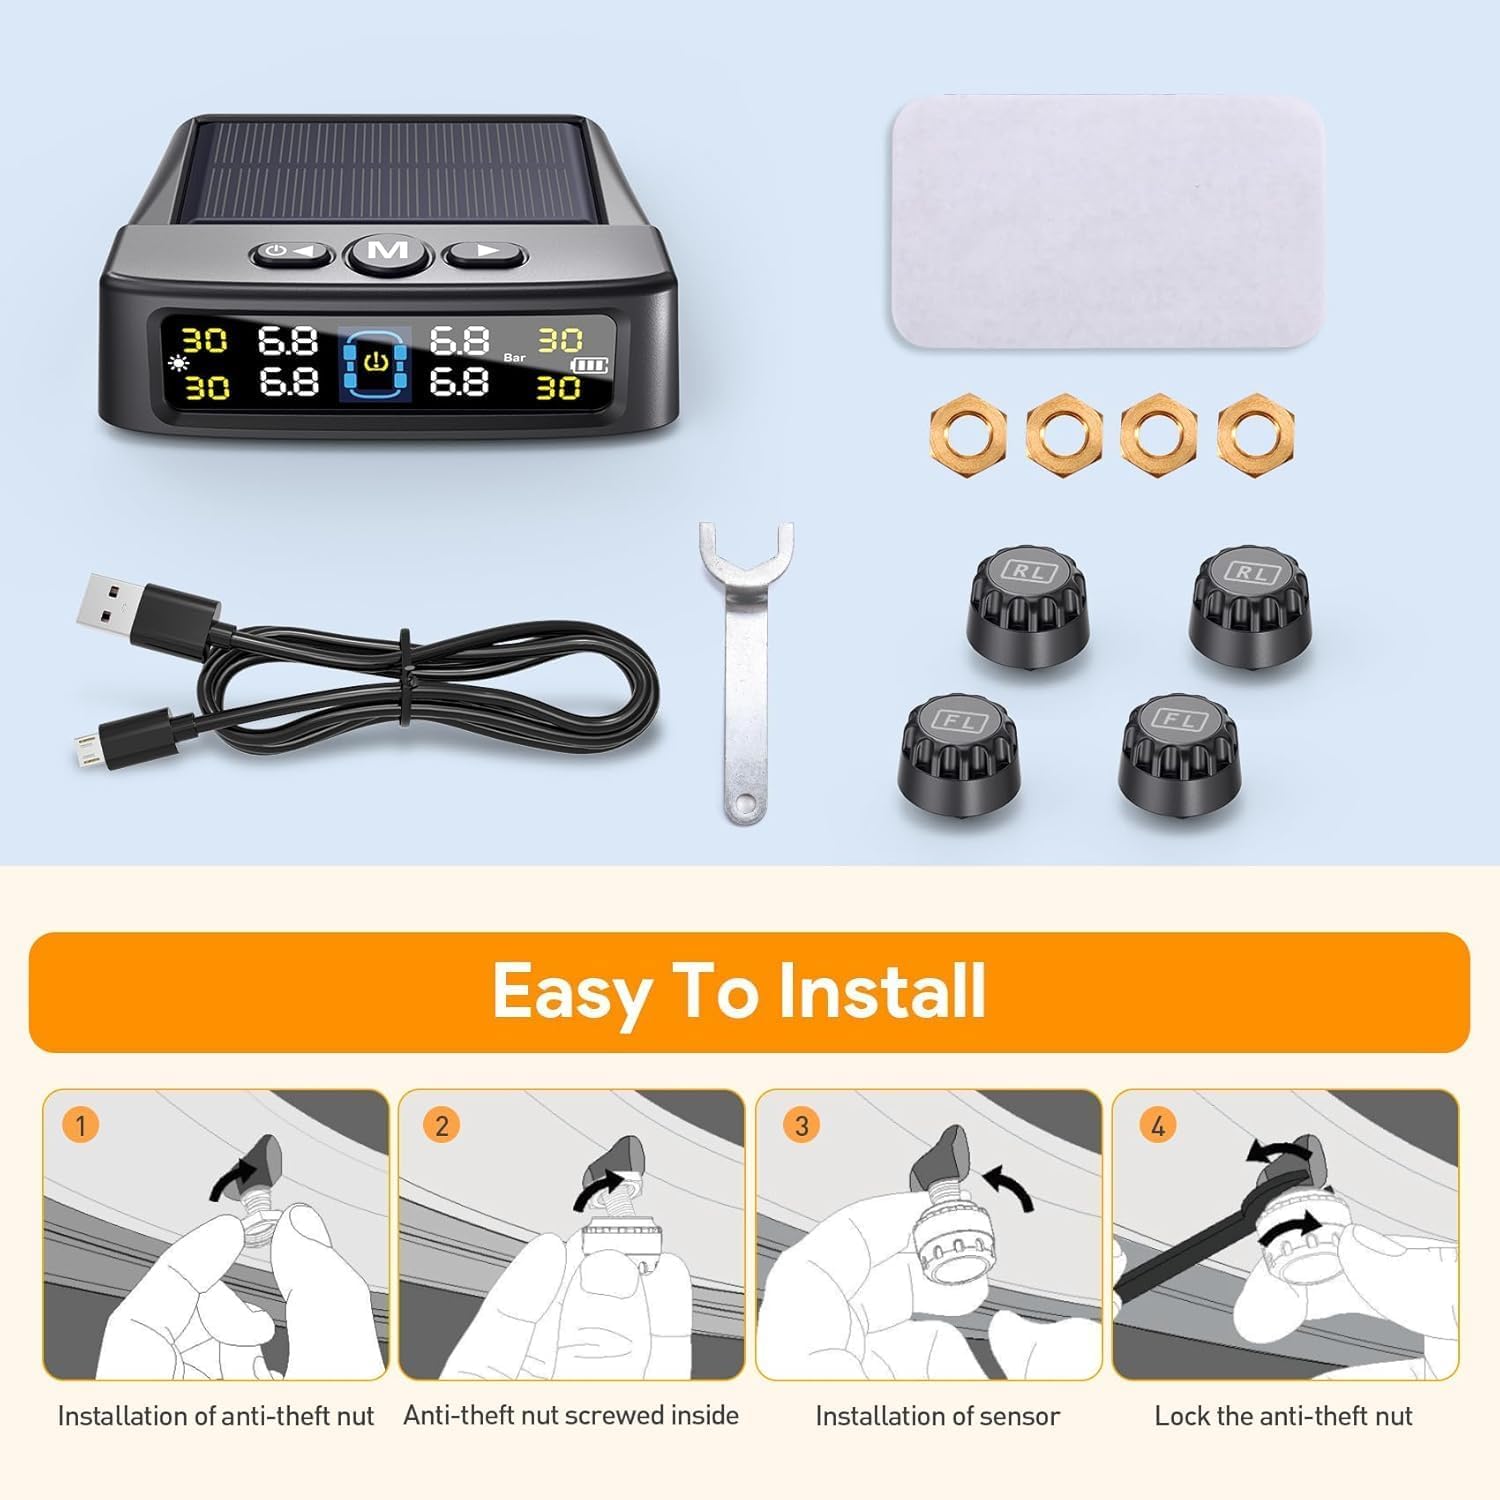
Figure 3: Sensor Installation Steps
Operating Instructions
Monitor Display
The color LCD screen displays real-time tire pressure and temperature for all four tires. The display automatically adjusts its brightness based on ambient light conditions for optimal visibility.

Figure 4: Monitor Display and Sensor Components
Automatic On/Off
The system is designed for convenience. It will automatically turn on when your vehicle starts moving and turn off when the vehicle is parked for an extended period, conserving battery life.
Setting Alarm Thresholds
Upon initial pairing (which occurs automatically), the system configures the current tire pressure as the reference point. You can adjust high/low pressure and high temperature alarm thresholds through the monitor's menu. Refer to the detailed instructions in the included printed manual for specific button functions and menu navigation.
Alarm Modes
The GEARGO TPMS provides comprehensive alerts for various tire conditions:
- High Pressure Alarm: Alerts when tire pressure exceeds the set upper limit.
- Low Pressure Alarm: Alerts when tire pressure falls below the set lower limit.
- High Temperature Alarm: Alerts when tire temperature exceeds the set upper limit.
- Fast Leak Alarm: Detects and alerts rapidly decreasing tire pressure.
- Disconnection Alarm: Alerts if communication with a sensor is lost.
- Low Battery Alarm: Indicates low battery level in either the monitor or a sensor.
- Sensor Fault Alarm: Alerts if a sensor malfunctions.
Upon an alarm, the monitor will display the specific tire affected, emit an audible warning (voice prompt), and flash the relevant icon.

Figure 5: Overview of 6 Alarm Modes
Charging the Monitor
The monitor unit can be charged using two methods:
- Solar Charging: The integrated solar panel on top of the monitor charges the internal battery when exposed to sunlight. Ensure the monitor is placed in a location on your dashboard that receives adequate sun exposure.
- USB Charging: For faster charging or when solar charging is insufficient (e.g., during prolonged cloudy weather or night driving), connect the monitor to a USB power source using the provided Type-C charging cable.

Figure 6: Solar and USB Charging Options
Maintenance
- Cleaning: Wipe the monitor and sensors with a soft, dry cloth. Avoid using abrasive cleaners or solvents.
- Sensor Battery: The external sensors have a long lifespan. If a sensor low battery alarm occurs, the sensor may need replacement. Contact customer support for assistance.
- Monitor Battery: Ensure the monitor is regularly charged via solar power or USB to maintain optimal performance.
- Storage: If storing the system for an extended period, ensure the monitor battery is fully charged and store in a cool, dry place.
Troubleshooting
| Problem | Possible Cause | Solution |
|---|---|---|
| Monitor not turning on. | Low battery; vehicle not moving. | Charge the monitor via USB. Ensure the vehicle is in motion for auto-on feature. |
| No tire data displayed. | Sensors not installed correctly; sensor battery low; signal interference. | Re-check sensor installation. Drive for a few minutes to allow sensors to transmit. Ensure no large metal objects are blocking the signal. |
| Inaccurate pressure readings. | Sensor not fully tightened; sensor malfunction. | Ensure sensors are securely tightened. Compare readings with a reliable tire gauge. If discrepancy persists, contact support. |
| Alarm sounds frequently. | Alarm thresholds set too sensitively; actual tire issue. | Check tire pressure and temperature manually. Adjust alarm thresholds if necessary (refer to printed manual). Address any actual tire issues immediately. |
Specifications
| Feature | Detail |
|---|---|
| Model Number | AM50-PRO |
| Brand | GEARGO |
| Pressure Detection Range | 0-99 PSI (0-6.8 Bar) |
| Charging Options | Solar, USB Type-C |
| Display Type | Color LCD with auto-brightness |
| Alarm Modes | 6 (High/Low Pressure, High Temp, Disconnection, Low Battery, Sensor Fault, Fast Leak) |
| Working Distance (TPMS) | Up to 32.8 feet |
| Monitor Dimensions | Approximately 3.7 x 3.55 x 1.18 inches (95mm x 80mm x 20mm) |
| Item Weight | 6.3 ounces |
| Batteries | 1 A battery required (included) |
Vehicle Compatibility
The GEARGO RV Tire Pressure Monitoring System is suitable for a wide range of four-wheel vehicles, including but not limited to:
- Sedans
- SUVs (Sport Utility Vehicles)
- MPVs (Multi-Purpose Vehicles)
- Pick-up Trucks
- RVs (Recreational Vehicles)
- Off-Road Vehicles

Figure 7: Compatible Vehicle Types
Warranty and Support
For warranty information, technical support, or any inquiries regarding your GEARGO RV Tire Pressure Monitoring System, please refer to the contact details provided in the original product packaging or visit the official GEARGO website. Keep your purchase receipt for warranty claims.
GEARGO Official Store: Visit GEARGO Store on Amazon