
1. Introduction
Thank you for choosing the MUPATER 8x16 FT Outdoor Walk-in Greenhouse Kit. This manual provides essential information for the safe assembly, operation, and maintenance of your greenhouse. Please read these instructions carefully before beginning assembly and retain them for future reference.
Product Overview
This heavy-duty walk-in greenhouse is designed to provide an optimal environment for growing plants. It features a robust aluminum frame and durable polycarbonate panels, offering protection and stability in various weather conditions.
Key Features
- Heavy-Duty Construction: Corrosion- and weather-resistant powder-coated thickened aluminum frame.
- Adjustable Roof Vent: Features an adjustable pole for customized airflow and temperature control.
- Upgraded Structure: Simplified assembly process and a swing-up locking door for improved safety and ease of access.
- Versatile Space: Ideal for cultivating plants, storing gardening tools, or as a relaxing outdoor area.
- Durable Panels: Thickened polycarbonate panels with a diffused pattern for optimal light penetration and frost protection.
2. Safety Information
Always prioritize safety during assembly and use. Failure to follow these instructions may result in injury or damage to the product.
- Ensure all components are securely fastened during assembly.
- Do not assemble in strong winds or adverse weather conditions.
- Wear appropriate safety gear, such as gloves, during assembly.
- Keep children and pets away from the assembly area.
- Anchor the greenhouse securely to the ground to prevent wind damage.
- Regularly inspect the structure for any loose parts or damage.
3. Package Contents
Please refer to the detailed packing list included with your product for a complete inventory of all parts and hardware. Verify all components are present and undamaged before beginning assembly.
4. Assembly and Setup
The MUPATER greenhouse features an upgraded structure designed for a faster and easier installation process. Follow the step-by-step instructions provided in the separate assembly guide for detailed visual instructions.
Key Assembly Considerations:
- Foundation: Ensure a level and stable foundation for the greenhouse.
- Sliding Panel System: The panels are designed for easier sliding assembly into the frame channels. Handle with care to avoid damage.
- Door Installation: The upgraded swing-up locking door should be installed according to the specific instructions to ensure proper function and security.
- Roof Vent Placement: The adjustable roof vent can be mounted on any panel. Customize its position during assembly for optimal airflow.

Image: Details of the sliding panel assembly, lockable door, and sturdy frame construction.

Image: Illustration of the sliding panel system for easier assembly.
Increasing Wind Rating (Not Included)
For enhanced stability and wind resistance, consider the following recommendations:
- Anchoring: Bolt the greenhouse down to the ground using base plates or flanged feet, ideally onto a concrete slab.
- Tie-Down Kits: Utilize extra tie-down kits for additional security.
- Panel Sealing: Apply silicone sealant to seal the panels, reducing air gaps and improving structural integrity.

Image: Recommendations for increasing greenhouse wind rating.
5. Operating Instructions
Ventilation with Adjustable Roof Vents
The greenhouse is equipped with adjustable roof vents to help regulate internal temperature and humidity. These vents can be opened and closed to control airflow.
- To open the vent, adjust the pole by rotating and fixing the buttons tightly to the desired angle.
- Adjusting the vents allows for better air circulation, preventing overheating and promoting healthy plant growth.

Image: Double adjustable roof vents for ventilation.
Using the Lockable Door
The greenhouse features an upgraded swing-up locking door for easy access and security.
- To open, lift the handle and swing the door outwards.
- To close and lock, ensure the door is fully shut and engage the locking mechanism.

Image: Upgraded lockable door handle.
6. Maintenance
Regular maintenance will extend the lifespan of your MUPATER greenhouse and ensure optimal performance.
- Cleaning Panels: Clean the polycarbonate panels periodically with mild soap and water. Avoid abrasive cleaners or tools that could scratch the surface.
- Frame Inspection: Annually inspect the aluminum frame for any signs of corrosion, loose bolts, or damage. Tighten any loose fasteners.
- Ventilation System: Ensure the roof vents operate smoothly and are free from obstructions.
- Snow Removal: In areas with heavy snowfall, gently remove accumulated snow from the roof to prevent structural stress.

Image: Thickened polycarbonate panels and powder-coated aluminum frame.
7. Troubleshooting
This section addresses common issues you might encounter with your greenhouse.
Problem: Water Leakage
- Solution: Check all panel seals and connections. Apply silicone sealant where necessary to ensure a watertight fit.
Problem: Poor Ventilation/High Temperature
- Solution: Ensure roof vents are fully open and unobstructed. Consider adding additional ventilation if needed.
Problem: Greenhouse Instability in Wind
- Solution: Verify the greenhouse is securely anchored to the ground. Consider reinforcing with additional tie-down kits or bolting to a concrete foundation as described in Section 4.
8. Specifications
Detailed specifications for the MUPATER 8x16 FT Outdoor Walk-in Greenhouse Kit.
| Model Number | PG0101-15GY-0302 |
| Overall Dimensions (L x W x H) | 189.56" x 97.3" x 90.5" |
| Interior Dimensions (L x W) | 185.06" x 92.8" |
| Door Size (W x H) | 49.7" x 79.5" |
| Frame Material | Powder-Coated Aluminum |
| Cover Material | Polycarbonate (PC) |
| Color | Gray |
| Indoor/Outdoor Usage | Outdoor |
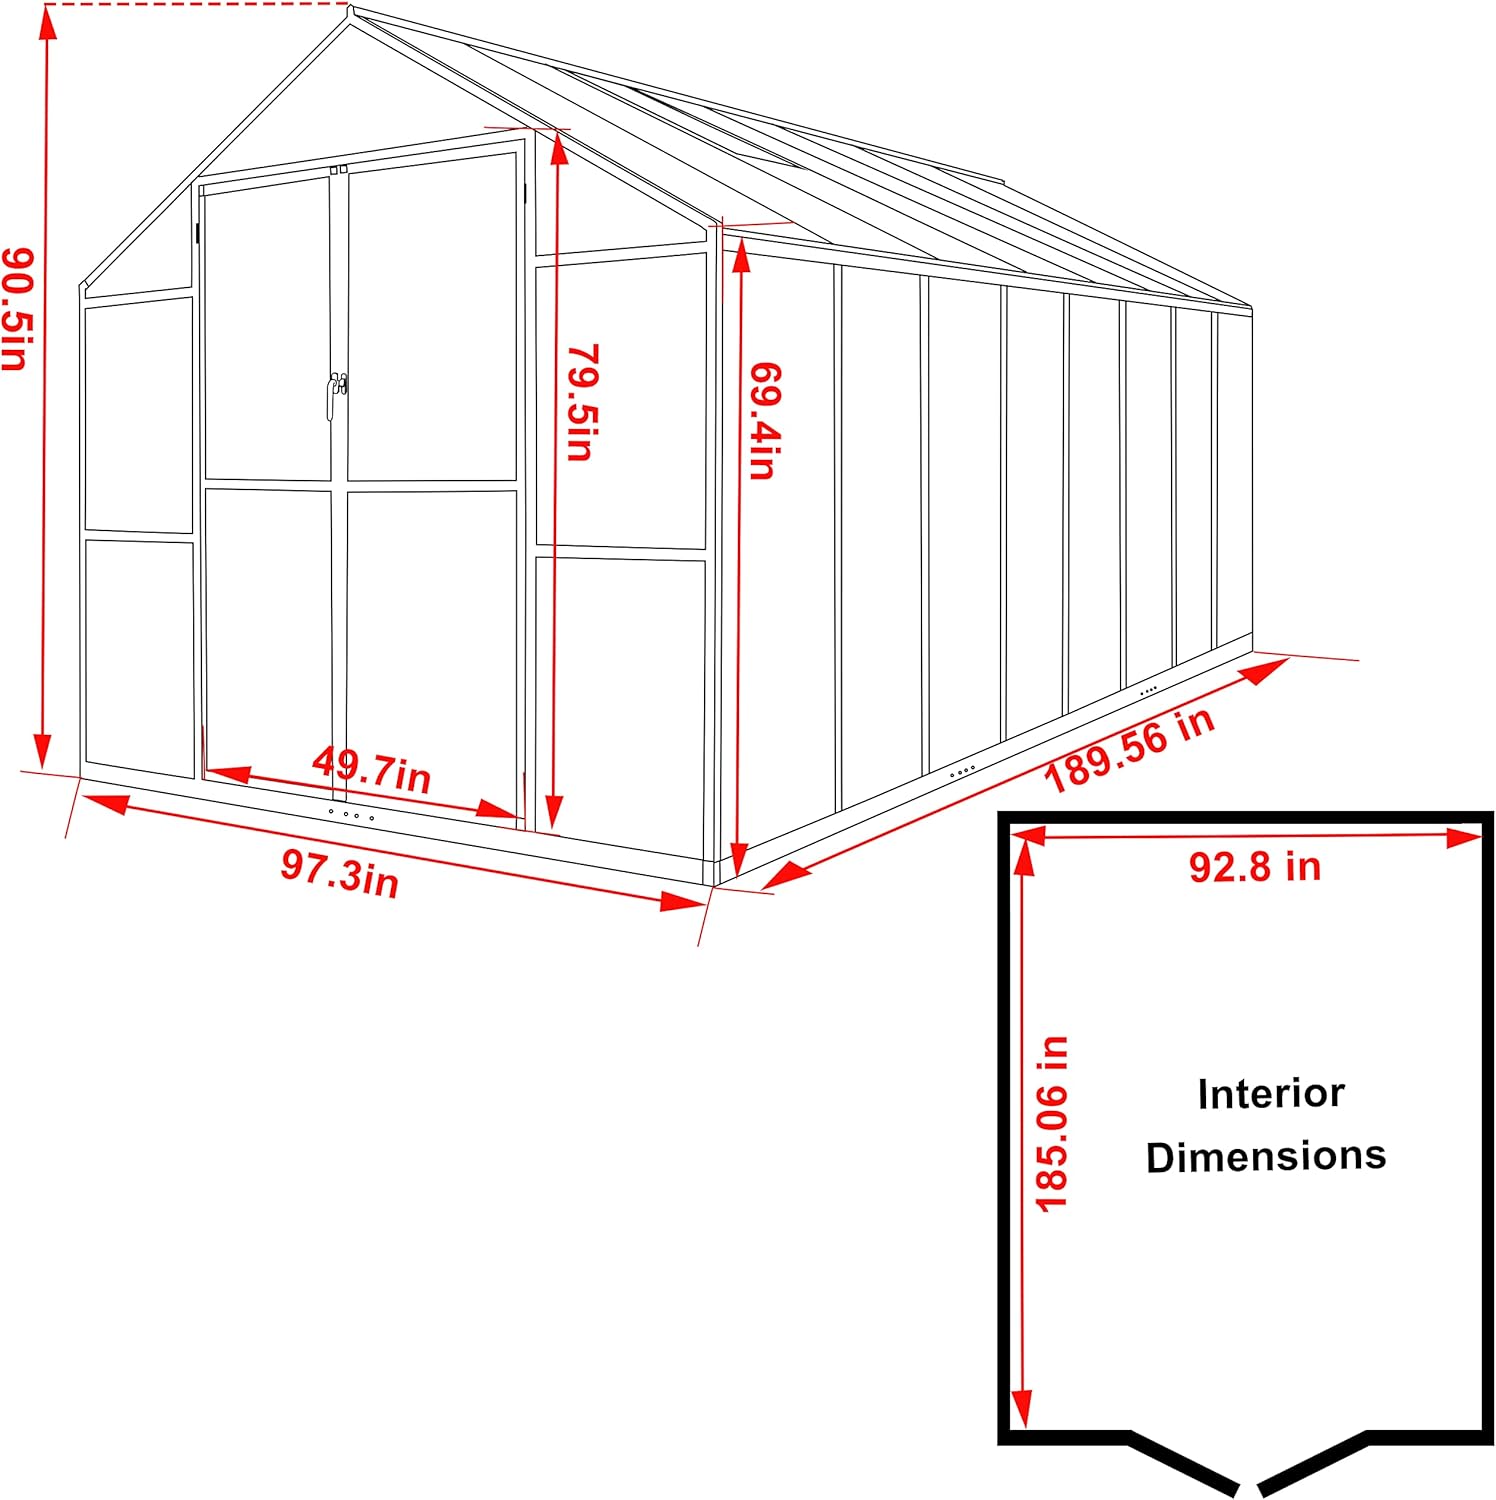
Image: Dimensional diagram of the MUPATER 8x16 FT Greenhouse.
9. Warranty and Support
For warranty information, product support, or to order replacement parts, please contact MUPATER customer service. Refer to your purchase documentation for specific warranty terms and contact details.
You can typically find support information on the MUPATER official website or through the retailer where you purchased the product.