1. Safety Information
Please read all safety instructions carefully before operating the fishkeeper FK121-30W Aquarium Canister Filter. Failure to follow these instructions may result in damage to the product, injury, or electric shock.
- Always disconnect the power supply before performing any maintenance, cleaning, or assembly.
- Ensure the filter is placed on a stable, level surface below the aquarium water level to facilitate proper siphoning and operation.
- Do not operate the filter if the power cord or plug is damaged.
- This appliance is intended for indoor use only with freshwater and saltwater aquariums.
- Keep out of reach of children.
- Never immerse the electrical components of the filter in water.
2. Product Overview
The fishkeeper FK121-30W is an ultra-quiet, high-performance external canister filter designed for aquariums ranging from 10 to 66 gallons. It features multi-stage filtration for superior water clarity and a healthy aquatic environment.
Key Features:
- Multi-Stage Filtration: Utilizes multi-density cotton, activated carbon, and bio-balls for comprehensive mechanical, chemical, and biological filtration.
- Self-Priming System: Innovative pull-vent valve allows for quick and easy priming without manual water addition.
- 3-Way Flow Control: Independent adjustment points on the top lid, inlet pipe, and outlet pipe for precise water flow management.
- Ultra-Quiet Operation: Built with an all-copper brushless motor, operating at a low noise level of 28dB.
- Leak-Proof Design: Precision-crafted and sealed canister for enhanced durability and leak prevention.
Included Components:
The filter comes with a complete set of accessories for immediate setup and operation.

Image: Complete parts list for the fishkeeper FK121-30W canister filter, including the main unit, filter baskets, inlet/outlet pipes, hoses, suction cups, and various filter media.
- Canister Filter Unit
- 3x Modular Filter Baskets
- 1x Filter Basket Cover
- Retractable Water Inlet Pipe
- Outlet Pipe with Nozzle and Spray Bar options
- 2x 4.92ft Premium PVC Hoses
- 8x Suction Cups
- 3x White Filter Cotton pads
- 1x Activated Carbon bag
- 2x Bio-balls bags
3. Setup Instructions
3.1 Filter Media Installation
The filter utilizes a multi-stage filtration system. Ensure the filter media is correctly placed in the modular baskets.
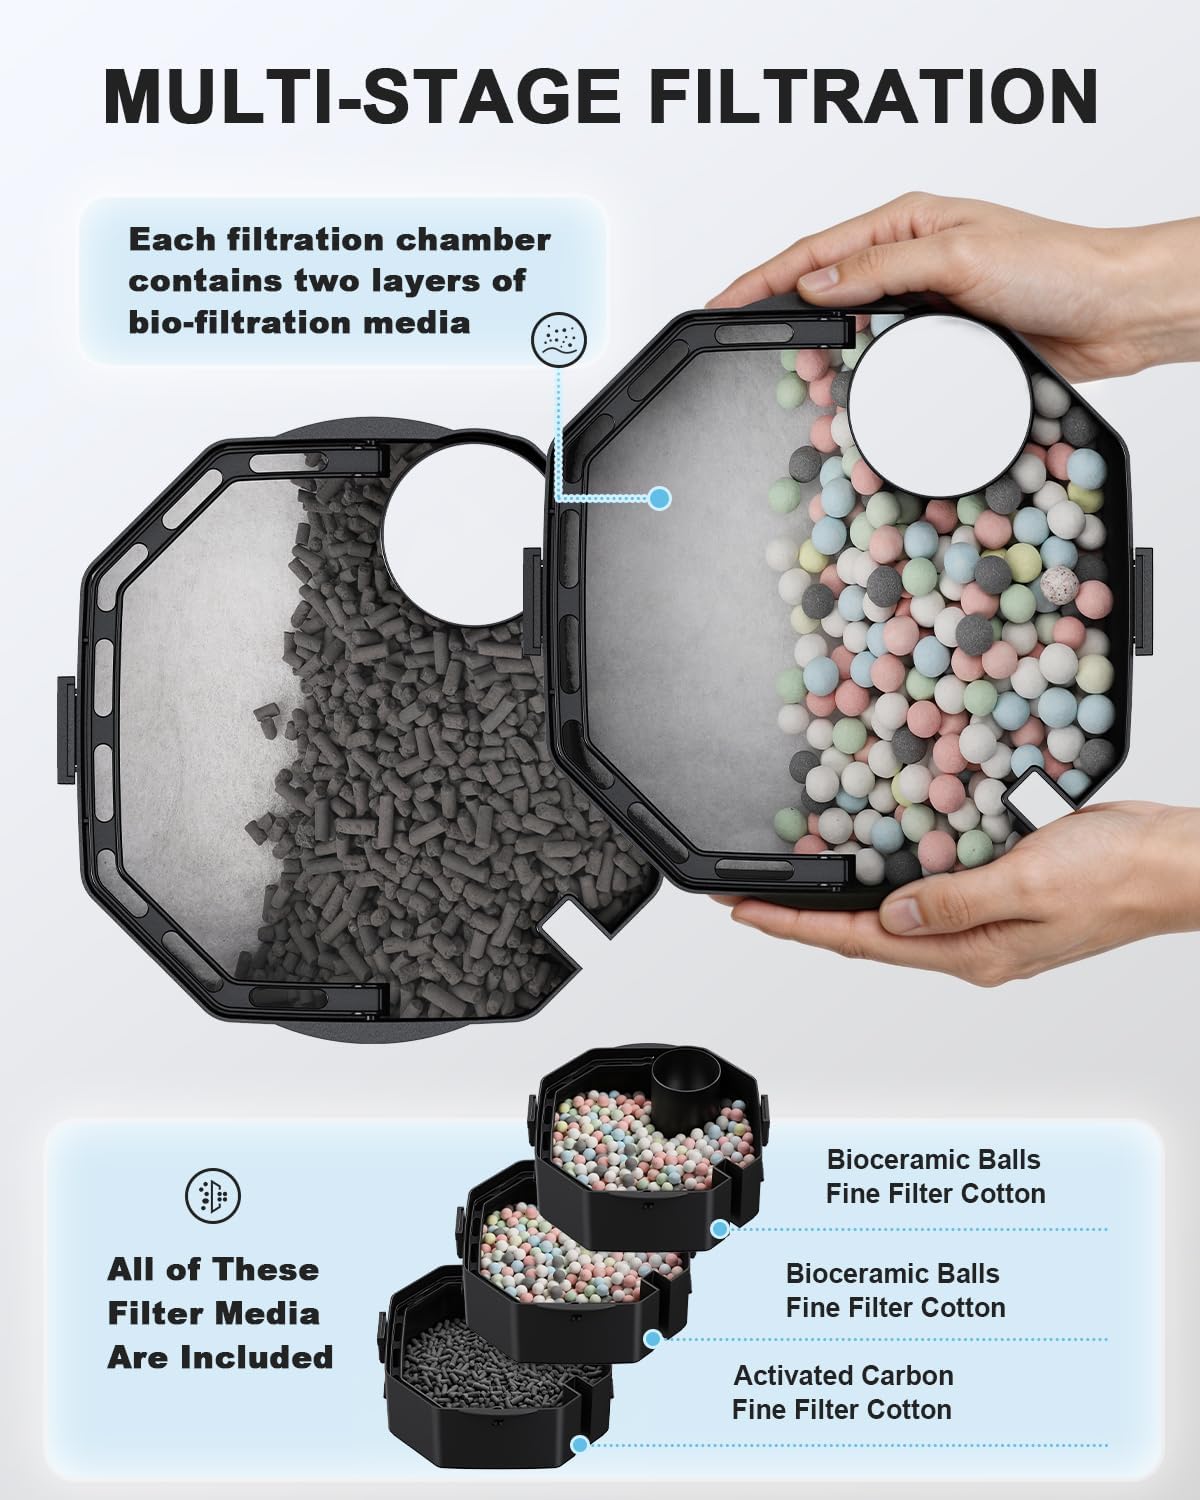
Image: Detailed view of the filter media setup, illustrating the placement of bioceramic balls, fine filter cotton, and activated carbon within the filter baskets.
- Open the filter head and remove the modular filter baskets.
- Place the white filter cotton at the bottom of each basket for mechanical filtration.
- Distribute the activated carbon and bio-balls in the remaining layers as desired for chemical and biological filtration.
- Ensure all media is evenly spread and the baskets are securely stacked before reinserting them into the canister.
- Close the filter head securely.
3.2 Hose and Pipe Connection
Connect the inlet and outlet pipes and hoses to the filter unit and the aquarium.

Image: Visual guide for connecting the water inlet and outlet pipes, including the choice between a nozzle and a spray bar for water return.
- Attach the PVC hoses to the inlet and outlet connectors on the filter head.
- Assemble the retractable water inlet pipe and secure it inside the aquarium using suction cups.
- Assemble the outlet pipe, choosing either the nozzle or spray bar, and secure it inside the aquarium.
- Ensure all connections are tight to prevent leaks.
3.3 Filter Placement and Activation
Proper placement is crucial for efficient siphoning and operation.

Image: Guidelines for activating the filter, showing that the water surface must be within 1.97 inches (5cm) from the tank rim and the canister filter at least 15.75 inches (40cm) below the water surface. It also warns against twisting hoses or tilting the filter.
- Place the canister filter on a flat, stable surface. The filter must be positioned below the aquarium's water level, with a minimum vertical distance of 15.75 inches (40cm) between the water surface and the filter unit for optimal siphoning.
- Ensure the water surface in the tank is no more than 1.97 inches (5cm) from the tank rim.
- Avoid twisting the water outlet hose or tilting/inverting the canister filter, as this can impede proper function.
3.4 Priming the Filter
The self-priming feature simplifies startup.

Image: Close-up of the filter's pull-vent valve, showing the action of lifting it to drain air and prime the pump.
- Once all connections are secure and the filter is positioned correctly, lift the pull-vent valve on the top of the filter head 2-5 times.
- This action will drain air from the system and automatically prime the pump.
- After priming, plug in the power cord. The filter should start operating.
4. Operating Instructions
4.1 Flow Control
Adjust the water flow to suit your aquarium's needs using the three independent control points.

Image: Illustration of the 3-way flow control system, detailing how to adjust flow via the top lid valve, the inlet pipe valve, and the outlet pipe valve.
- Top Lid Valve: Push this valve to precisely control or completely shut off the water flow, useful during maintenance.
- Rigid Inlet Pipe Valve: Rotate this valve to adjust the water intake flow. This is convenient for hidden installations within an aquarium cabinet.
- Rigid Outlet Pipe Valve: Rotate this valve to adjust the water output strength.
4.2 General Operation
Once set up and primed, the filter will continuously circulate and purify your aquarium water. Monitor water clarity and fish health regularly.

Image: Visual representation of the filter's effectiveness, showing cloudy water before filtration and crystal clear water after filtration.

Image: Depiction of the filter's low noise level, showing a sleeping person undisturbed by the filter operating at 28dB.
For a visual guide on the filter's features and operation, please watch the official product video:
Video: Official product video demonstrating the features and setup of the fishkeeper Performance Ultra-Quiet Aquarium Canister Filter.
5. Maintenance
Regular maintenance ensures optimal performance and longevity of your filter.
5.1 Cleaning the Filter
- Disconnect Power: Always unplug the filter from the power outlet before any cleaning or maintenance.
- Shut Off Flow: Use the top lid valve to completely shut off water flow to the filter.
- Disconnect Hoses: Carefully disconnect the inlet and outlet hoses from the filter head.
- Open Canister: Release the clamps and remove the filter head.
- Clean Media: Remove the filter baskets. Rinse mechanical filter media (cotton pads) with old aquarium water to preserve beneficial bacteria. Replace heavily soiled cotton pads. Rinse biological media (bio-balls) gently with old aquarium water.
- Replace Chemical Media: Replace activated carbon every 2-4 weeks, or as needed, as its effectiveness diminishes over time.
- Clean Canister and Hoses: Clean the inside of the canister and hoses with a brush to remove any accumulated debris.
- Reassemble: Reassemble the filter in reverse order, ensuring all seals are properly seated and connections are tight.
- Restart: Follow the priming instructions in Section 3.4 to restart the filter.
6. Troubleshooting
If you encounter issues with your fishkeeper canister filter, refer to the following common problems and solutions:
| Problem | Possible Cause | Solution |
|---|---|---|
| Filter not starting/no flow | Not plugged in; air in system; clogged impeller; incorrect placement. | Check power connection; re-prime the filter (Section 3.4); clean impeller; ensure filter is below water level (Section 3.3). |
| Reduced flow rate | Clogged filter media; dirty hoses/pipes; partially closed flow control valves. | Clean or replace filter media (Section 5.1); clean hoses and pipes; ensure flow control valves are fully open (Section 4.1). |
| Leaking | Loose connections; damaged O-ring/gasket; improper assembly. | Check all hose connections and clamps; inspect and properly seat the O-ring on the filter head; ensure canister is assembled correctly. |
| Excessive noise | Air in system; impeller obstruction; filter not level. | Re-prime the filter (Section 3.4); clean impeller; ensure filter is on a stable, level surface. |
7. Specifications
Detailed specifications for the fishkeeper FK121-30W Aquarium Canister Filter.
| Specification | Value |
|---|---|
| Model Name | FK121-30W |
| Power | 30W |
| Max Flow Rate | 1800 L/H (475 GPH) |
| Applicable Tank Size | 10-66 Gallons (38-250L) |
| Item Dimensions (LxWxH) | 7.9 x 7.9 x 16 inches |
| Item Weight | 13.01 pounds |
| Cable Length | 3.28 FT (1.8M) |
| Color | White and Gray |
Model Comparison:

Image: A visual comparison of the 20W, 30W, and 45W fishkeeper canister filter models, detailing their dimensions, flow rates, and recommended tank capacities.
8. Warranty and Support
8.1 Warranty Information
This fishkeeper product is covered by a 2-Year Warranty from the date of purchase. This warranty covers defects in materials and workmanship under normal use. It does not cover damage resulting from misuse, accident, modification, or unauthorized repair.
8.2 Customer Support
For technical assistance, warranty claims, or any questions regarding your fishkeeper aquarium canister filter, please contact our customer support team. Refer to the contact information provided with your product packaging or visit the official fishkeeper website for support details.
Please have your model number (FK121-30W) and purchase date available when contacting support.
