1. Important Safety Instructions
Please read all instructions carefully before using the appliance. Keep this manual for future reference.
- Ensure the power supply matches the voltage specified on the rating label.
- Do not immerse the appliance, power cord, or plug in water or other liquids.
- Unplug from the outlet when not in use, before cleaning, or during maintenance.
- Do not operate any appliance with a damaged cord or plug, or after the appliance malfunctions or has been damaged in any manner.
- This appliance is for household use only. Do not use outdoors.
- Keep the appliance away from heat sources and direct sunlight.
- Ensure proper ventilation around the unit. Maintain at least 15cm clearance on all sides.
- Use only potable water in the water tank.
- Do not store explosive substances such as aerosol cans with a flammable propellant in this appliance.
2. Product Overview
The EUHOMY IM004-CSI is an automatic ice maker designed for convenient ice production at home or for small business use. It features high-speed ice making, adjustable ice thickness, and an automatic cleaning function.

Image: The EUHOMY IM004-CSI ice maker filled with clear ice cubes, highlighting its capacity and rapid ice production capabilities.
Package Contents:
- EUHOMY IM004-CSI Ice Maker
- Ice Basket
- Ice Scoop
- User Manual
3. Setup
3.1 Unpacking and Placement
- Remove all packaging materials and check for any damage.
- Place the ice maker on a stable, level surface, away from direct sunlight and heat sources.
- Ensure there is at least 15cm of space around the unit for proper ventilation.
- Allow the unit to stand upright for at least 2 hours before plugging it in, especially if it was transported horizontally. This allows the refrigerant to settle.
3.2 Initial Cleaning
Before first use, clean the ice maker thoroughly.
- Open the lid and remove the ice basket.
- Clean the interior with a soft cloth and warm water with a mild detergent. Rinse thoroughly.
- Drain any remaining water by removing the drain plug at the bottom.
- Wipe the exterior with a damp cloth.
3.3 Water Filling Methods
The ice maker offers two convenient ways to add water to its 3.2L tank:

Image: Illustration showing two ways to fill the water tank: directly pouring water into the tank or using an inverted water bottle (up to 5cm diameter opening).
- Method 1: Direct Fill
Open the lid and directly pour potable water into the water tank until it reaches the MAX fill line. - Method 2: Water Bottle Connection
Place an inverted water bottle (with a mouth diameter of 5cm or less) onto the designated water inlet. The ice maker will automatically draw water as needed.
4. Operating Instructions
4.1 Control Panel Overview

Image: A detailed view of the ice maker's control panel, showing buttons for power, timer/clean, ice full indicator, water shortage indicator, and ice size adjustment.
- ON/OFF Button: Powers the unit on or off.
- TIMER/CLEAN Button: Press once to set the timer. Press and hold for 5 seconds to activate the automatic cleaning function.
- Ice Full Indicator: Lights up when the ice basket is full.
- Water Shortage Indicator: Lights up when the water tank is low.
- +/- Buttons: Adjust ice thickness or timer settings.
4.2 Ice Making Process
- Ensure the water tank is filled with potable water.
- Plug the ice maker into a grounded electrical outlet.
- Press the ON/OFF button to start the ice making cycle.
- The unit will produce 24 clear ice cubes per cycle, taking approximately 12-18 minutes depending on ambient temperature and selected ice thickness.
- When the ice basket is full, the ice full indicator will light up, and the unit will pause ice production. Remove ice to resume.
- If the water level is low, the water shortage indicator will light up. Add more water to continue ice production.
4.3 Adjusting Ice Thickness
You can adjust the thickness of the ice cubes to suit your preference.
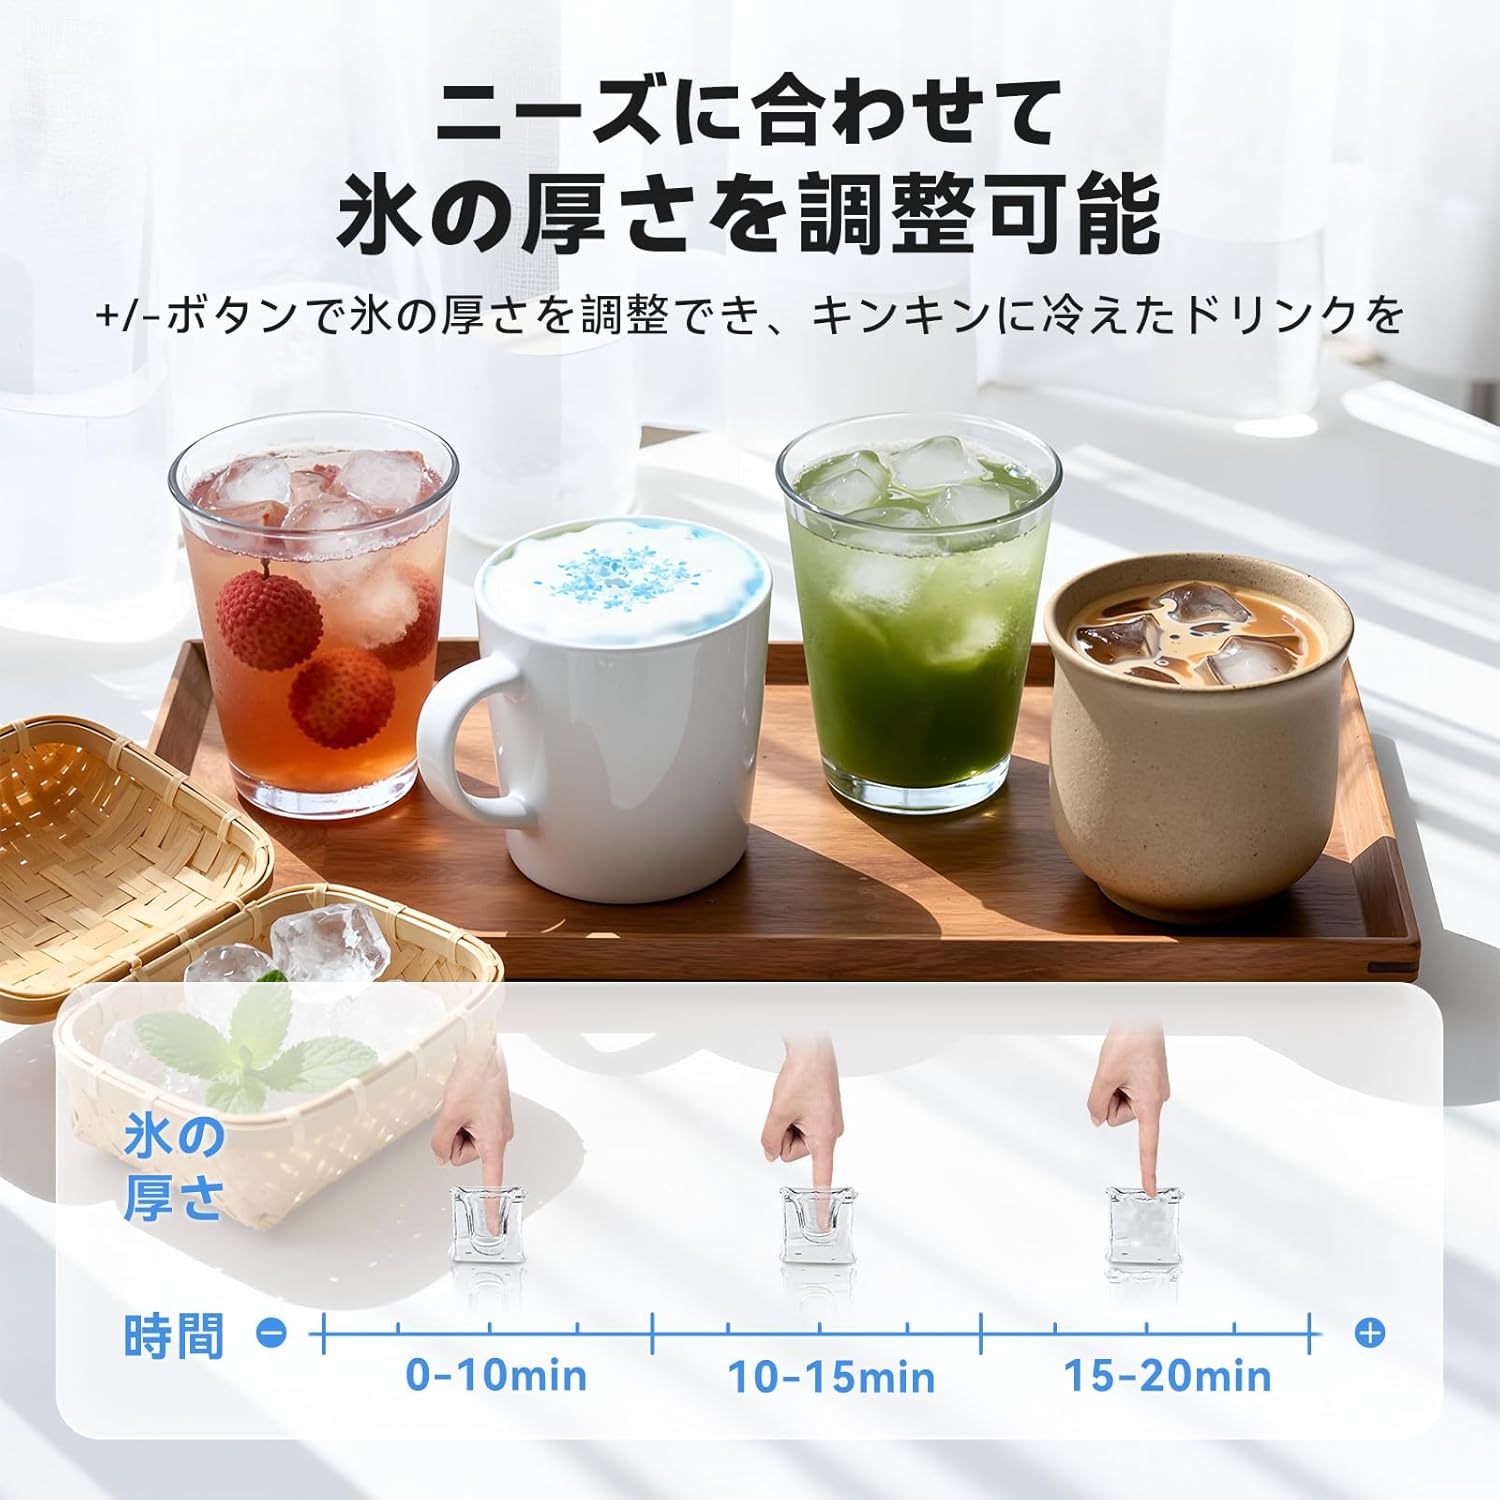
Image: Visual representation of ice thickness adjustment, showing different ice cube sizes corresponding to various production times (0-10 min, 10-15 min, 15-20 min).
Use the +/- buttons on the control panel to select your desired ice thickness. A longer production time results in thicker ice.
4.4 Timer Function
The ice maker features a timer function, allowing you to schedule ice production up to 8 hours in advance.

Image: The ice maker with a visual indicating a 24-hour timer function, suggesting convenience for scheduled ice production.
- Press the TIMER/CLEAN button once.
- Use the +/- buttons to set the desired delay time (in hours).
- The unit will start ice production after the set time has elapsed.
5. Maintenance
5.1 Automatic Cleaning Function
The ice maker is equipped with an automatic cleaning function to simplify maintenance.

Image: An animated diagram illustrating the internal water circulation during the automatic cleaning cycle, showing water being thoroughly circulated and drained.
- Ensure the water tank is filled with clean water.
- Press and hold the TIMER/CLEAN button for 5 seconds.
- The cleaning cycle will begin and last for approximately 20 minutes.
- After the cycle, drain the water from the unit.
5.2 Draining Water
To drain water from the unit:
- Unplug the ice maker from the power outlet.
- Locate the drain plug at the bottom of the unit.
- Place a container under the drain plug and remove the plug to allow water to flow out.
- Once drained, replace the plug securely.
5.3 Regular Cleaning
For optimal performance and hygiene, perform regular cleaning:
- Clean the ice basket and ice scoop with warm, soapy water.
- Wipe the exterior of the unit with a soft, damp cloth.
- Periodically clean the water tank and ice-making components using a solution of water and vinegar (10:1 ratio) to prevent mineral buildup. Run a cleaning cycle with this solution, then rinse by running two cycles with fresh water.
6. Troubleshooting
Refer to the table below for common issues and their solutions.
| Problem | Possible Cause | Solution |
|---|---|---|
| Water Shortage Indicator is on | Water tank is empty or water level is too low. | Add potable water to the water tank. |
| Ice Full Indicator is on | Ice basket is full. | Remove ice from the basket. |
| No ice production | Unit not plugged in; water tank empty; ambient temperature too high; refrigerant issue. | Check power connection; add water; ensure proper ventilation; contact customer support if issue persists. |
| Ice cubes are too small or soft | Short ice making cycle; water temperature too high; ambient temperature too high. | Adjust ice thickness setting to a longer cycle; use colder water; ensure unit is in a cool, well-ventilated area. |
| Unusual noise | Unit not level; fan obstruction; normal compressor operation. | Ensure unit is on a level surface; check for obstructions around the fan; some noise from compressor is normal. |
7. Specifications
| Feature | Specification |
|---|---|
| Brand | EUHOMY |
| Model Number | IM004-CSI |
| Dimensions (D x W x H) | 25 cm x 37.4 cm x 35 cm |
| Water Tank Capacity | 3.2 Liters |
| Daily Ice Production | Up to 18 KG |
| Ice Storage Capacity | 1200g |
| Voltage | 100V AC |
| Wattage | 120 Watt-hours |
| Refrigerant | R290a |
| Material | Stainless Steel exterior, Plastic interior components |
| Noise Level | Approx. 45dB |
8. Warranty and Customer Support
8.1 One-Year Quality Guarantee

Image: A badge indicating a "ONE YEAR GUARANTEE" for the product.
EUHOMY provides a one-year quality guarantee for this product. All products undergo strict quality inspection before shipment to ensure customer satisfaction.
8.2 Customer Support

Image: Customer support representatives wearing headsets, ready to assist.
Should you encounter any issues or have questions regarding your EUHOMY ice maker, please do not hesitate to contact our customer support team. We are committed to providing prompt and courteous service.
For inquiries after purchase, please follow these steps:
- Go to your Amazon "Order History."
- Select "Problem with order."
- Choose "View profile."
- Click "Ask a question."
Alternatively, you may contact the dedicated customer service channel provided in the Japanese instruction manual included with your product.