1. Product Overview
The RAINPOINT ITP159 is an easy-to-setup automatic plant waterer designed for both indoor and outdoor use. This battery-powered drip irrigation system provides adjustable water output, making it suitable for various pot plants and garden setups. It features a user-friendly interface with two dials for setting watering duration and frequency, eliminating complex programming.
Key features include automatic and manual watering modes, adjustable drip emitters for customized plant hydration, and a low water auto shut-off mechanism with an LED indicator to prevent pump damage and plant dehydration. The system is IP54 waterproof, ensuring durability in outdoor conditions.
2. What's In The Box
Verify that all components are present before beginning installation:
- 1x Auto Watering Pump
- 1x 32.81ft (10m) Long 1/6 inch Tubing
- 10x T Barb Fitting
- 10x Adjustable Drip Emitter
- 10x Support Stake
- 1x T Cross Barb Fitting
- 1x Anti-Siphon Valve
- 1x Filter
- 3x Tubing End Plug

Image: All components included in the RAINPOINT ITP159 kit.
3. Setup Instructions
Follow these steps to set up your RAINPOINT ITP159 Automatic Plant Waterer:
- Prepare the Water Source: Place the auto watering pump near a water reservoir (e.g., a bucket or bottle). Ensure the pump is positioned securely.
- Insert Filter: Connect the filter to the end of the main tubing that will be submerged in the water reservoir. This prevents debris from entering the system.

Image: Connecting the filter to the tubing.
- Install Anti-Siphon Valve: Integrate the anti-siphon valve into the tubing line. This valve prevents water backflow and ensures consistent water distribution.

Image: Proper placement of the anti-siphon valve.
- Cut Tubing to Desired Length: Measure and cut the 1/6 inch tubing to appropriate lengths to reach each plant pot. Use the T barb fittings to create branches for multiple plants.

Image: Cutting the tubing for custom layout.
- Connect Sections with Fittings: Use the T barb fittings and T cross barb fittings to connect the cut tubing sections, creating a network that reaches all plants. Secure connections firmly.
Image: Assembling the drip lines with fittings.
- Attach and Adjust Emitters: Insert an adjustable drip emitter into the end of each tubing line leading to a plant. Use the support stakes to secure the emitters in the soil. Adjust each emitter to control the water flow rate for individual plants.

Image: Installing and fine-tuning the drip emitters.
- Secure Tubing: Use the provided support stakes or other means to secure the tubing along its path to prevent dislodgement.
- Power On: Ensure batteries are installed or the USB-C power cable is connected.

Image: A fully set up RAINPOINT ITP159 system watering multiple plants.
4. Operating Instructions
The RAINPOINT ITP159 features a simple dual-dial interface for programming and a manual watering option.
4.1 Setting the Automatic Watering Schedule
To set the automatic watering schedule, use the two green dials on the control panel:
- Set Watering Duration (HOW LONG): Turn the left dial to select the desired watering duration. Options range from 15 seconds to 20 minutes.

Image: Adjusting the 'HOW LONG' dial for watering duration.
- Set Watering Frequency (HOW OFTEN): Turn the right dial to select how often the system should water. Options range from every 6 hours to every 14 days.

Image: Adjusting the 'HOW OFTEN' dial for watering frequency.
Once both dials are set, the system will begin its automatic watering schedule.
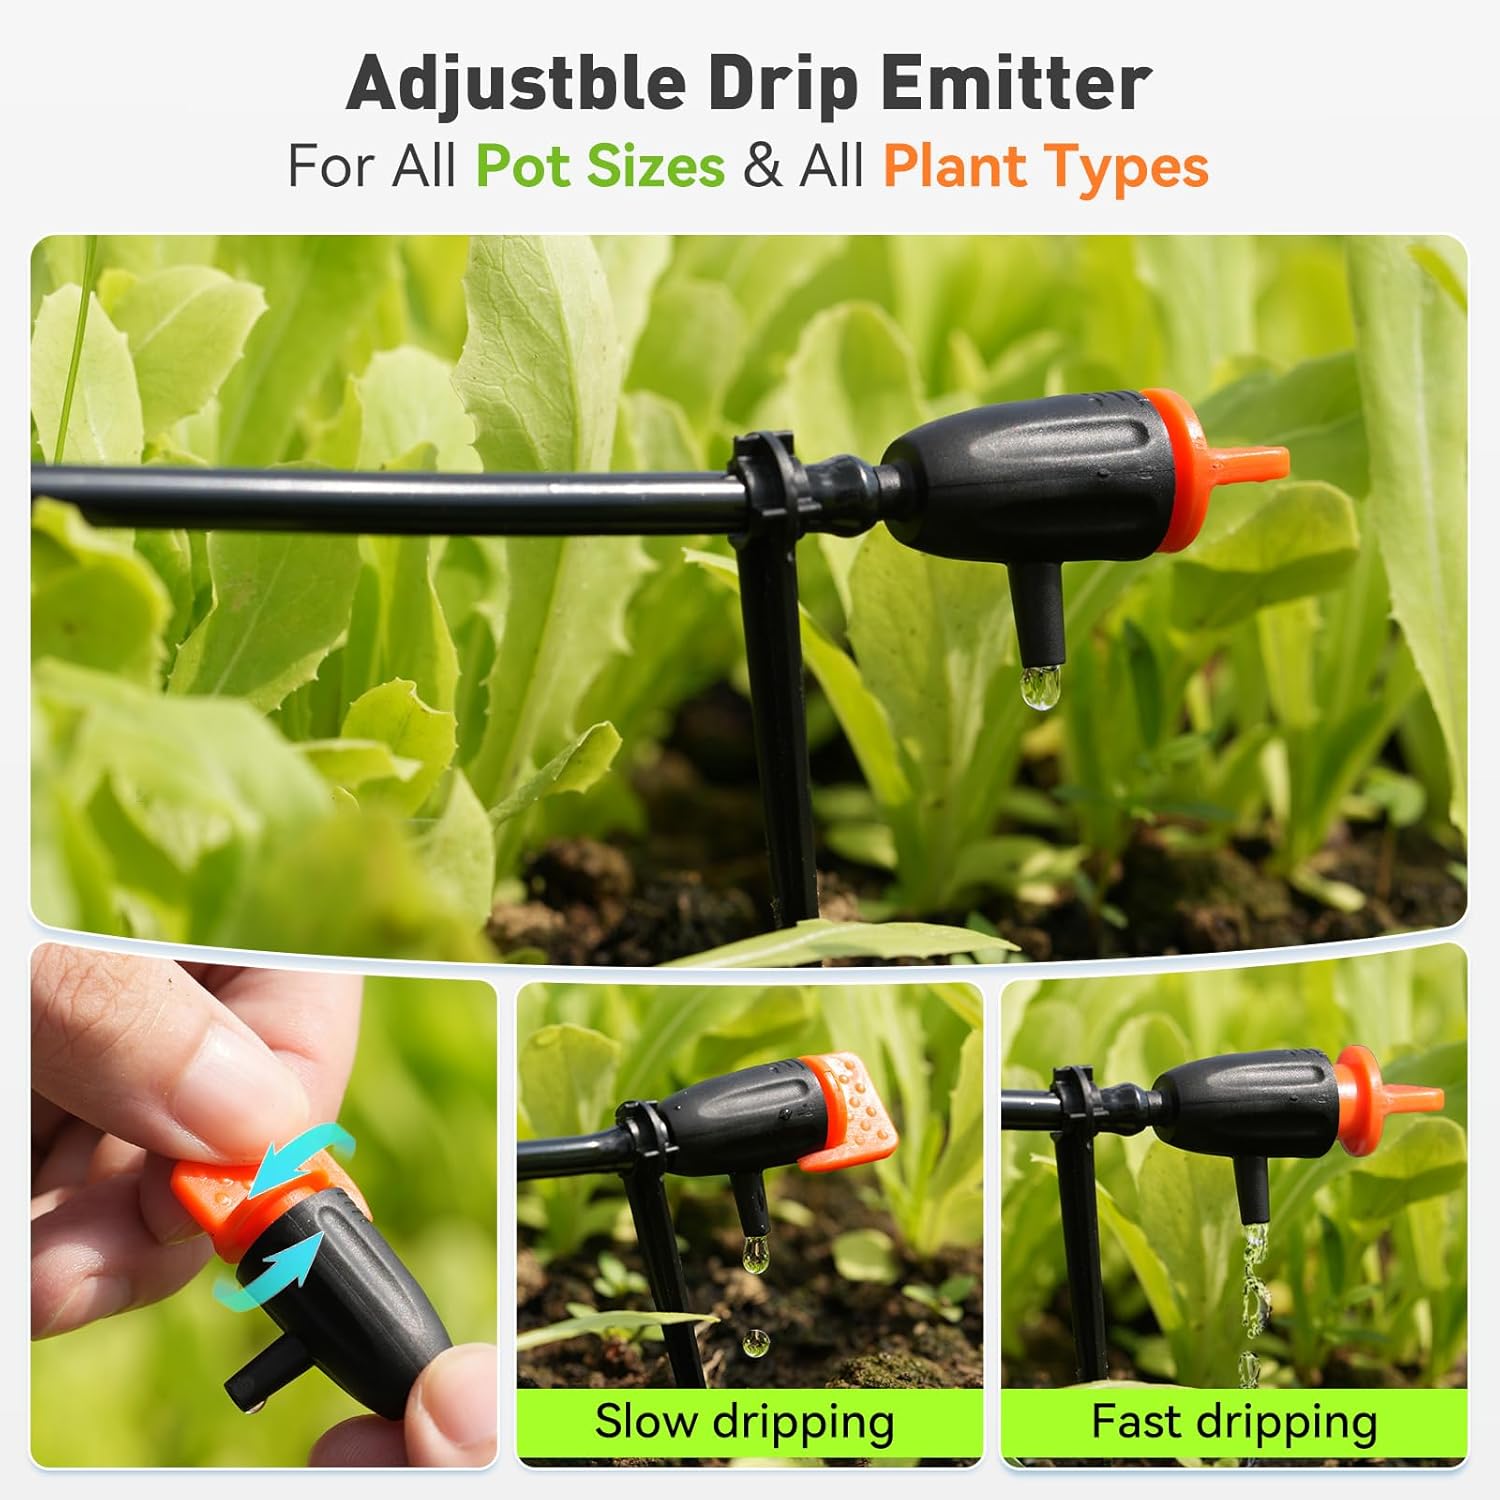
Image: The control panel after setting the watering plan.
4.2 Manual Watering
To initiate manual watering without interrupting the preset automatic schedule, press the "MANUAL" button located on the front of the device. This will provide an on-demand watering cycle. Pressing it again will stop the manual watering.

Image: Using the manual watering feature.
4.3 Adjustable Drip Emitters
Each drip emitter can be adjusted to control the water flow rate. Twist the orange cap on the emitter to increase or decrease the drip speed, allowing you to customize watering for different plant needs. Turn clockwise for slower drips, counter-clockwise for faster flow.

Image: Adjusting the drip emitter for customized water output.
5. Maintenance
5.1 Water Source Monitoring
The device is equipped with a low water LED indicator. When the water reservoir runs dry, the LED will illuminate, and the pump will automatically shut off to prevent damage. Refill the reservoir promptly when the indicator light is on.

Image: Low water indicator and auto shut-off mechanism.
5.2 Power Source
The ITP159 is battery-powered and can also be powered via USB-C for continuous operation. Ensure batteries are charged or replaced as needed. The battery level indicator on the control panel provides status updates.
5.3 Cleaning
Periodically check and clean the filter submerged in the water reservoir to prevent clogging and ensure optimal pump performance. Inspect tubing and emitters for any blockages or debris.
6. Troubleshooting
| Problem | Possible Cause | Solution |
|---|---|---|
| Pump not operating / No water flow |
|
|
| Inconsistent water flow from emitters |
|
|
| Water leakage |
|
|
7. Specifications
- Model Number: ITP159
- Brand: RAINPOINT
- Material: Plastic
- Power Source: Battery Powered & Plug-in (USB-C)
- Special Features: Automatic Watering, Leak Resistant, Programmable, Weather Resistant (IP54)
- Hose Length: 32.81 Feet (10 meters)
- Number of Pieces: 17 (including pump, tubing, and accessories)
- Fit Type: Barbed Fittings with Tubing End Plugs
8. Warranty and Support
For warranty information or technical support, please refer to the contact details provided with your product packaging or visit the official RAINPOINT website. Keep your purchase receipt for warranty claims.