1. Introduction
The PQWT S150 is an advanced groundwater detector designed for efficient and accurate water well exploration. Utilizing the natural electric field method, this device simplifies the process of identifying underground water-bearing layers. It features one-button mapping, adjustable depth settings, and a multilingual interface, making it suitable for various field requirements and users worldwide.
This manual provides essential information for the proper setup, operation, maintenance, and troubleshooting of your PQWT S150 Groundwater Detector.

Image 1.1: The PQWT S150 Automatic Mapping Water Finder displaying a geological structure profile.
2. Product Components
The PQWT S150 Groundwater Detector comes with several key components to facilitate its operation. Familiarize yourself with each part before beginning any work.

Image 2.1: Detailed diagram of the PQWT S150 main unit and accessories.
Main Unit Features:
- LCD Touch Screen: For displaying data and interacting with the device.
- System Reset Button: To restart the device if needed.
- Test Light: Indicates operational status.
- USB Port: For data transfer and charging.
- Memory Card Slot: For inserting an SD card (8GB included) to store measurement data.
- M N Port: Connection point for electrode cables.
- Main Switch: Power on/off control.
- Power Light: Indicates power status.
Accessories:
- Electrode Rods: High-quality alloy rods for soil insertion.
- Copper Electrodes: Used with electrode rods for signal acquisition.
- Electrode Cable: Strong, anti-aging cable for connecting electrodes to the main unit.
- M N Connector: Connects the electrode cable to the M N port.
- Flash Drive & Manual: For data transfer and detailed instructions.
- 8GB SD Card: For data storage.
3. Setup
Proper setup is crucial for accurate measurements. Follow these steps to prepare your PQWT S150 for operation:
- Unpack the Device: Carefully remove all components from the carrying case. Ensure all items listed in the 'Product Components' section are present.
- Charge the Battery: The device uses 2 Nonstandard Battery batteries (included). Ensure they are fully charged before use.
- Insert SD Card: Locate the memory card slot on the main unit and insert the provided 8GB SD card. This is essential for data storage.
- Connect Electrodes: Connect the electrode cable to the M N port on the main unit. Attach the copper electrodes to the electrode rods, then connect the electrode cable to the copper electrodes.
- Power On: Flip the main switch to the 'ON' position. The power light should illuminate.

Image 3.1: PQWT S150 and accessories in its carrying case.

Image 3.2: PQWT S150 with connected electrode rods and cables.
Setup Video: Water Detector Case
Video 3.1: This video demonstrates the contents of the water detector case and initial setup steps.
4. Operating Instructions
The PQWT S150 is designed for simple, one-button operation to generate geological profiles.
4.1 Field Measurement
- Site Selection: Choose a suitable measurement line in the area of interest.
- Electrode Placement: Insert the electrode rods into the soil along the chosen line. Ensure good contact with the ground.
- Device Positioning: Hold or place the main unit in a stable position.
- Start Measurement: On the touch screen, select the desired depth (100m or 150m for S150) and initiate the measurement process. The device will automatically capture the Earth’s electromagnetic field data.
- Real-time Mapping: The device will instantly plot real-time curves and convert them into clear profile maps on the screen, indicating underground layers and potential water sources.

Image 4.1: Setting up the detector in the field.
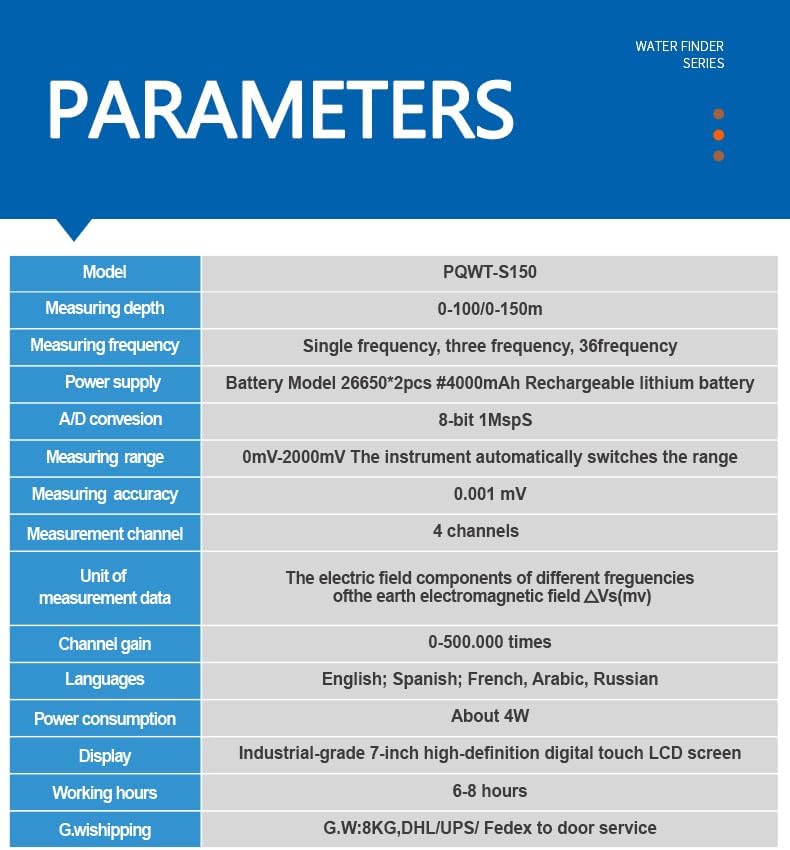
Image 4.2: Operating the PQWT S150 for groundwater detection.
4.2 Data Interpretation
The device generates curves and profile maps that visually represent subsurface geological structures. Areas indicating lower resistance typically correspond to water-bearing layers (aquifers).

Image 4.3: Example of a geological profile map on the device screen.
Operation Video: Water Detector in Use
Video 4.1: This video demonstrates the PQWT S150 in action, showing the measurement process and data display.
5. Data Export & Analysis
The PQWT S150 allows for professional data export and analysis.
- Export Data: Connect the device to a computer using the USB port or transfer the SD card directly. Export measurement files, curves, and profile maps.
- Analysis: Utilize specialized software or consult with geologists, hydrogeologists, or drilling professionals for in-depth analysis of the exported data. This empowers informed decisions regarding well drilling locations.

Image 5.1: Expert remote assistance for data analysis.
6. Specifications
| Feature | Specification |
|---|---|
| Model | PQWT-S150 |
| Measuring Depth | 100/150m |
| Measuring Frequency | Single frequency, three frequency, 36 frequency |
| Power Supply | Battery Model 26650*2pcs 4000mAh Rechargeable lithium battery |
| A/D Conversion | 8-bit 1Msps |
| Measuring Range | 0mV-2000mV (automatic range switching) |
| Measuring Accuracy | 0.001 mV |
| Measurement Channel | 4 channels |
| Unit of Measurement Data | Electric field components of different frequencies of the earth electromagnetic field ΔVs(mV) |
| Channel Gain | 0-500.000 times |
| Languages | English, Spanish, French, Arabic, Russian, Polish, Turkish, Italian, Portuguese |
| Power Consumption | About 4W |
| Display | Industrial-grade 7-inch high-definition digital touch LCD screen |
| Working Hours | 6-8 hours |
| Item Weight | 5.7 Kilograms |
| Product Dimensions (L x W x H) | 11.4" x 7.87" x 4.72" |
7. Maintenance
To ensure the longevity and optimal performance of your PQWT S150 Groundwater Detector, follow these maintenance guidelines:
- Cleaning: Regularly wipe the device with a soft, dry cloth. Avoid using harsh chemicals or abrasive materials.
- Storage: Store the device and its accessories in the provided carrying case in a cool, dry place away from direct sunlight and extreme temperatures.
- Battery Care: Fully charge the batteries before long-term storage and recharge them every few months to prevent deep discharge.
- Electrode Inspection: Periodically check electrode rods and cables for any signs of wear, corrosion, or damage. Replace if necessary to maintain measurement accuracy.
- Software Updates: Check the manufacturer's website for any available software or firmware updates to ensure your device has the latest features and improvements.
8. Troubleshooting
If you encounter issues with your PQWT S150, refer to the following common troubleshooting steps:
- Device Not Powering On:
- Ensure the battery is fully charged.
- Check that the main switch is in the 'ON' position.
- If issues persist, try pressing the system reset button.
- Inaccurate Readings or No Signal:
- Verify that electrodes are properly inserted into the soil and have good contact.
- Check all cable connections between the electrodes and the main unit.
- Ensure the measurement area is free from significant electromagnetic interference.
- Confirm that the correct depth setting is selected for the terrain.
- Data Transfer Issues:
- Ensure the USB cable is securely connected to both the device and the computer.
- Check if the SD card is properly inserted and not full.
- Try using a different USB port or computer.
For more complex issues or if troubleshooting steps do not resolve the problem, please contact PQWT customer support.
9. Warranty & Support
PQWT is committed to providing reliable products and excellent customer service.
Warranty Information:
- The host machine is guaranteed for two years.
- The cable is guaranteed for one year.
- The charger and charging stand are guaranteed for one month.
- Battery, data cable, and other accessories are not covered under warranty.
Customer Support:
PQWT offers lifetime maintenance service for the main unit, ensuring dependable long-term performance. For technical assistance, warranty claims, or general inquiries, please refer to the contact information provided in your product packaging or visit the official PQWT website.
The user interface supports 9 languages: English, French, Spanish, Arabic, Russian, Polish, Turkish, Italian, and Portuguese, facilitating global support.