Introduction
This manual provides essential information for the safe and efficient operation, maintenance, and care of your MFSTUDIO Gas and Charcoal Grill Combo with Side Smoker, Model 032. Please read all instructions carefully before assembly and use.
The MFSTUDIO 3-in-1 grill offers versatile cooking options, combining a propane gas grill, a charcoal grill, and a side smoker. This design allows for simultaneous grilling, smoking, or searing, with independent temperature control for each section. The total cooking area is 839 square inches, featuring porcelain-enameled cast iron grates for durability and even heat distribution.

Image: Overview of the MFSTUDIO 3-in-1 Multifunctional Grill, highlighting the separate gas grill, charcoal grill, and side smoker sections with their respective cooking areas.
Product Specifications
| Brand | MFSTUDIO |
| Model Name | 032 |
| Product Dimensions (D x W x H) | 22.6"D x 66.7"W x 49.2"H |
| Total Cooking Surface Area | 839 Square Inches (311 SQ.IN. gas, 257 SQ.IN. charcoal, 140 SQ.IN. side smoker, 131 SQ.IN. warming rack) |
| Fuel Type | Charcoal, Propane (20LB tank, not included) |
| Gas Burner Output | 3 x 10,000 BTU (Total 30,000 BTU) |
| Material Type | Alloy Steel, Stainless Steel (control panel, lid handle), Porcelain-Enameled Cast Iron (grates) |
| Special Features | Adjustable Air Vent, Digital Temperature Control (implied by thermometers), Heavy Duty, Movable Bamboo Cutting Board, Seasoning Rack, Gas Cylinder Hook, Swivel and Fixed Wheels |
| Assembly Required | Yes (2 people recommended) |

Image: Detailed product parameters including overall dimensions, cooking area breakdown for gas, charcoal, and smoker sections, and weight information.
Setup Instructions
Assembly of the MFSTUDIO Gas and Charcoal Grill Combo requires two people for efficient and safe setup. Ensure all components are present before beginning. A 20LB propane tank is required for the gas grill section and is not included with the product.
- Unpack Components: Carefully remove all parts from the packaging. Verify against the parts list (usually found in the included paper manual) that all pieces are accounted for and undamaged.
- Assemble Main Cart: Follow the step-by-step diagrams to construct the main cart frame. Attach the swivel and fixed wheels, ensuring they are securely fastened.
- Install Grill Bodies: Mount the gas grill, charcoal grill, and side smoker bodies onto the assembled cart. Ensure all connections are tight and stable.
- Connect Gas Components: Attach the gas burners and control panel. Connect the propane hose to the gas grill and ensure a leak-free connection to your propane tank. Perform a leak test as per safety guidelines.
- Insert Grates and Trays: Place the porcelain-enameled cast iron cooking grates, warming rack, charcoal pan, and ash/grease trays into their designated positions.
- Attach Side Tables and Accessories: Secure the left side table with the movable bamboo cutting board and the seasoning rack. Install the side hook for the gas cylinder.
Safety Note: Always perform a leak test on gas connections before first use and after any tank replacement. Refer to the detailed assembly instructions provided in the product packaging for specific steps and safety warnings.
Operating Instructions
Gas Grill Operation
- Connecting Propane: Ensure the propane tank is securely connected to the gas line. Open the valve on the propane tank slowly.
- Lighting the Burners: Open the gas grill lid. Turn one burner control knob to the HIGH position. Immediately press and hold the electronic igniter button until the burner ignites. If it doesn't light within 5 seconds, turn the knob off, wait 5 minutes, and try again. Repeat for other burners.
- Temperature Control: Adjust the individual burner control knobs to achieve the desired cooking temperature. The integrated lid thermometer provides real-time temperature monitoring.
- Preheating: Close the lid and preheat the grill for 10-15 minutes to reach the desired temperature before placing food on the grates.

Image: View of the gas grill's three independent burners and control panel, illustrating the 30,000 BTU output and stainless steel construction.
Charcoal Grill Operation
- Adding Charcoal: Open the charcoal grill lid. Place charcoal briquettes or lump charcoal into the adjustable charcoal pan.
- Lighting Charcoal: Use a charcoal chimney starter or appropriate fire starters to ignite the charcoal. Once the charcoal is covered in a light gray ash, spread it evenly.
- Temperature Control: The charcoal grill features two independent heat controls: a chimney control and a front panel control. Adjust these air vents to regulate airflow and thus the temperature. More airflow increases heat, less airflow reduces it. The 3-level height adjustable charcoal pan also allows for precise heat management by moving the charcoal closer or further from the cooking grates.
- Preheating: Close the lid and allow the grill to preheat to the desired temperature.

Image: Illustration of the charcoal grill's dual independent heat controls, including the chimney and front panel vents, for precise temperature regulation.
Side Smoker Operation
- Preparing Smoker: Place wood chips or chunks (soaked in water if desired) in the side smoker box.
- Lighting Smoker: Ignite the wood chips/chunks. Once they begin to smoke, close the smoker lid.
- Temperature and Smoke Control: Use the air vent on the side smoker to control the airflow and smoke intensity. Maintain a low, consistent temperature for optimal smoking results.

Image: The side smoker in operation, demonstrating how to add charcoal or wood chips and adjust the air vent for temperature control.
General Cooking Tips
- Always preheat the grill to the desired temperature before cooking.
- Use the dual lid-mounted thermometers to monitor internal grill temperatures.
- Utilize the movable bamboo cutting board for convenient food preparation.
- Keep grill tools organized using the stainless steel side hooks.
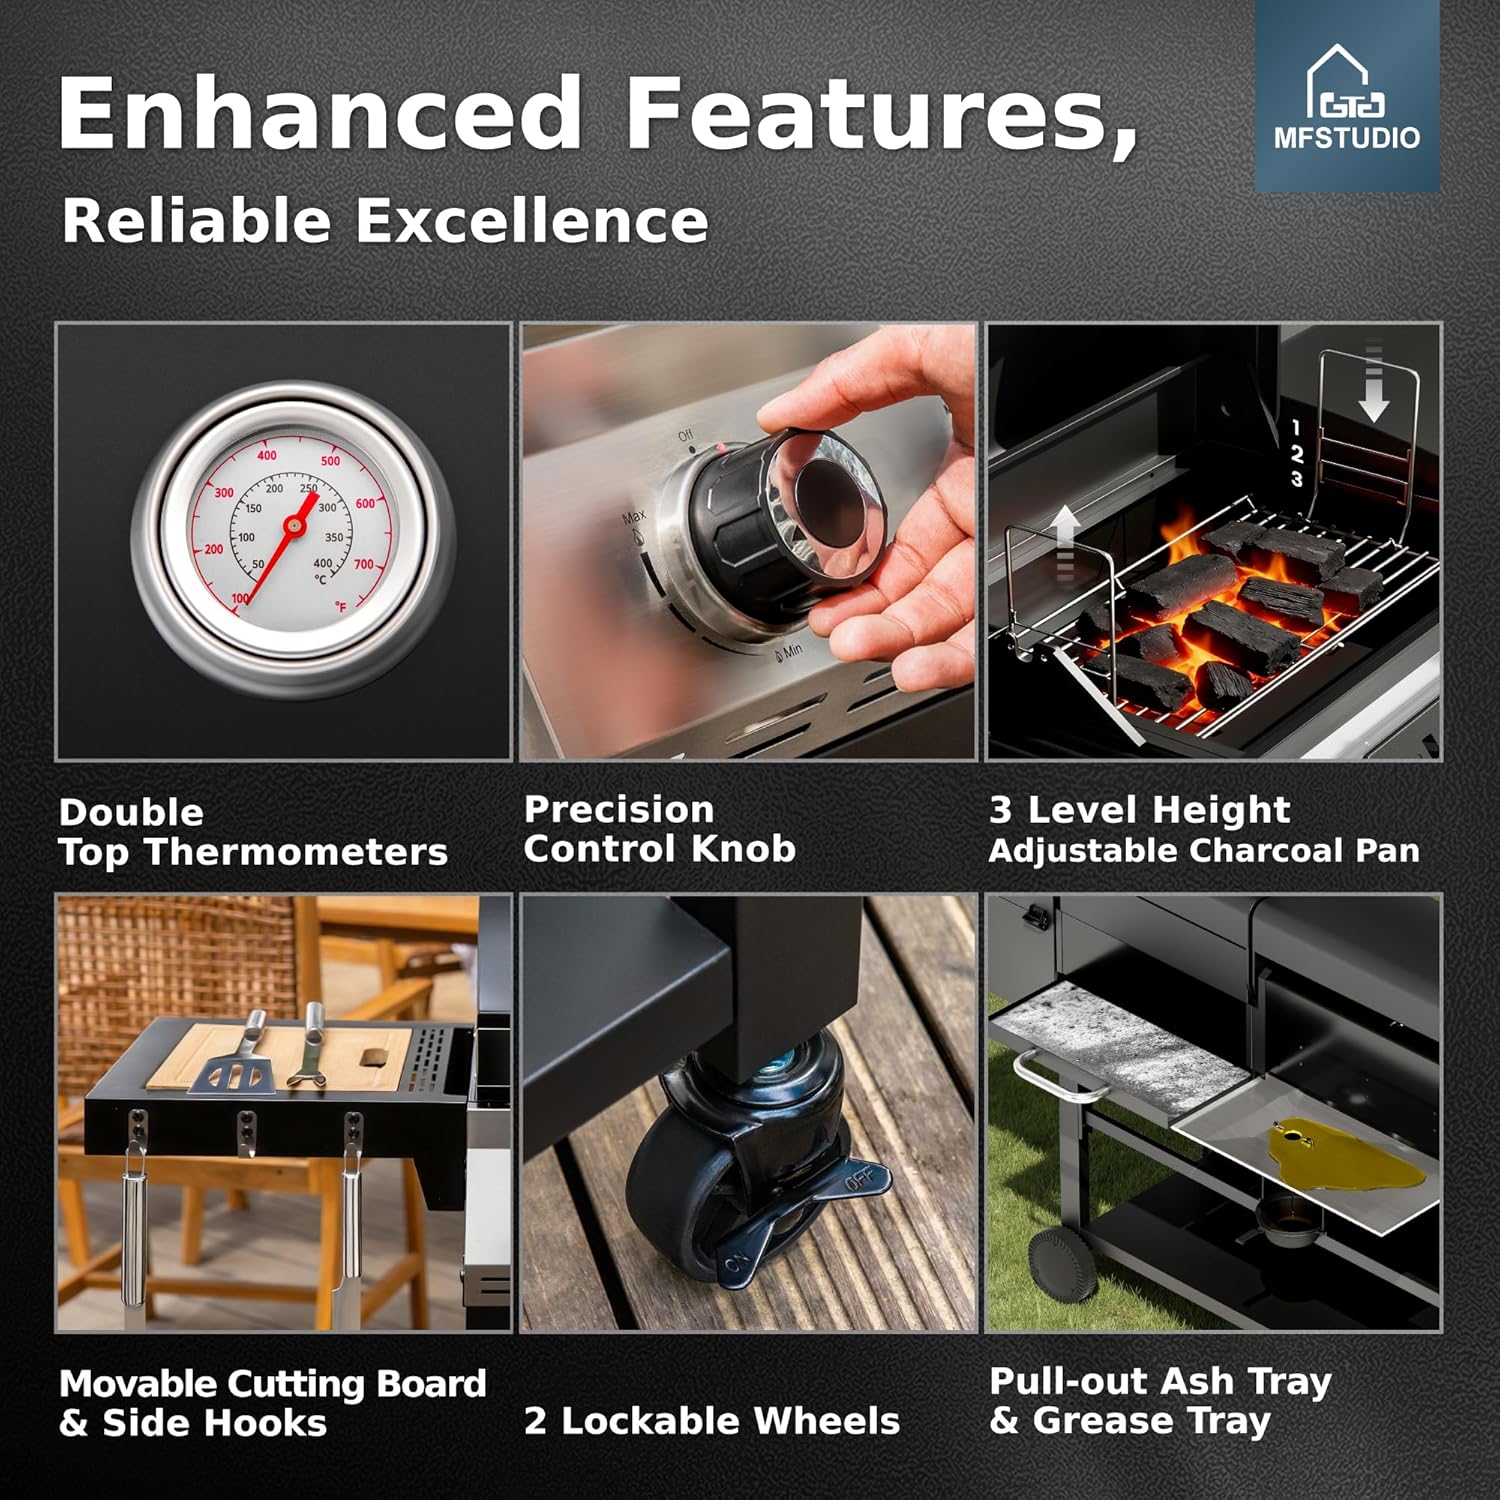
Image: A collage showcasing various enhanced features of the grill, such as dual thermometers, precision control knobs, a 3-level adjustable charcoal pan, a movable cutting board, lockable wheels, and a pull-out ash/grease tray.
Official Product Video: MFSTUDIO 3 IN 1 Gas Charcoal Grill with Smoker
Video: An official product video from MFSTUDIO demonstrating the features and use of the 3-in-1 Gas and Charcoal Grill with Smoker.
Maintenance and Care
Regular maintenance ensures the longevity and optimal performance of your grill. The porcelain-enameled cast iron grates and stainless steel components are designed for durability and easy cleaning.
- Cleaning Cooking Grates: After each use, while the grates are still warm, brush off any food residue with a grill brush. For deeper cleaning, remove the grates and wash with warm, soapy water. The porcelain-enameeled surface is non-stick and rust-resistant.
- Cleaning Burners and Flame Tamers: Periodically inspect gas burners for blockages. Clean flame tamers to prevent grease buildup and ensure even heat distribution.
- Emptying Ash and Grease Trays: Regularly empty the pull-out ash tray from the charcoal section and the grease tray from the gas section to prevent fire hazards and maintain cleanliness.
- Exterior Cleaning: Wipe down exterior surfaces with a damp cloth and mild detergent. Avoid abrasive cleaners that can damage the finish.
- Storage: When not in use, especially during inclement weather, cover the grill with a protective cover to shield it from elements and extend its lifespan.

Image: A visual comparison highlighting the superior heat resistance, rust resistance, and heat retention of the grill's porcelain-enameled cast iron grates, indicating a longer lifespan compared to other materials.
Troubleshooting Guide
This section addresses common issues you might encounter with your grill. For problems not listed here, please contact customer support.
| Problem | Possible Cause | Solution |
|---|---|---|
| Gas burner does not light. |
|
|
| Uneven heating on gas grill. |
|
|
| Charcoal grill not reaching desired temperature. |
|
|
| Excessive smoke from gas grill. |
|
|
Warranty and Support
MFSTUDIO provides a one-year warranty period for this product. For any questions, concerns, or warranty claims, please contact MFSTUDIO customer support via the messaging system on the platform where you purchased the product.
When contacting support, please have your model number (032) and purchase information readily available to expedite assistance.