1. Introduction
This manual provides detailed instructions for the safe and effective use of your RYRMCVPVCT Digital Torque Gauge. This device is designed for precise torque measurement in various applications, including automotive and bicycle repair. Please read this manual thoroughly before operation and retain it for future reference.
2. Safety Information
Always observe basic safety precautions when using this tool to reduce the risk of injury or damage. This device is a measuring instrument; handle it with care.
- Ensure the torque gauge is securely attached to your wrench before use.
- Do not exceed the maximum torque capacity of the gauge or the wrench.
- Keep the device clean and dry. Avoid exposure to extreme temperatures or corrosive environments.
- Do not attempt to disassemble or modify the device.
- Store the gauge in a safe place when not in use to prevent damage.
3. Product Overview
The RYRMCVPVCT Digital Torque Gauge is a compact and accurate tool for measuring torque. It features a clear digital display and intuitive controls.
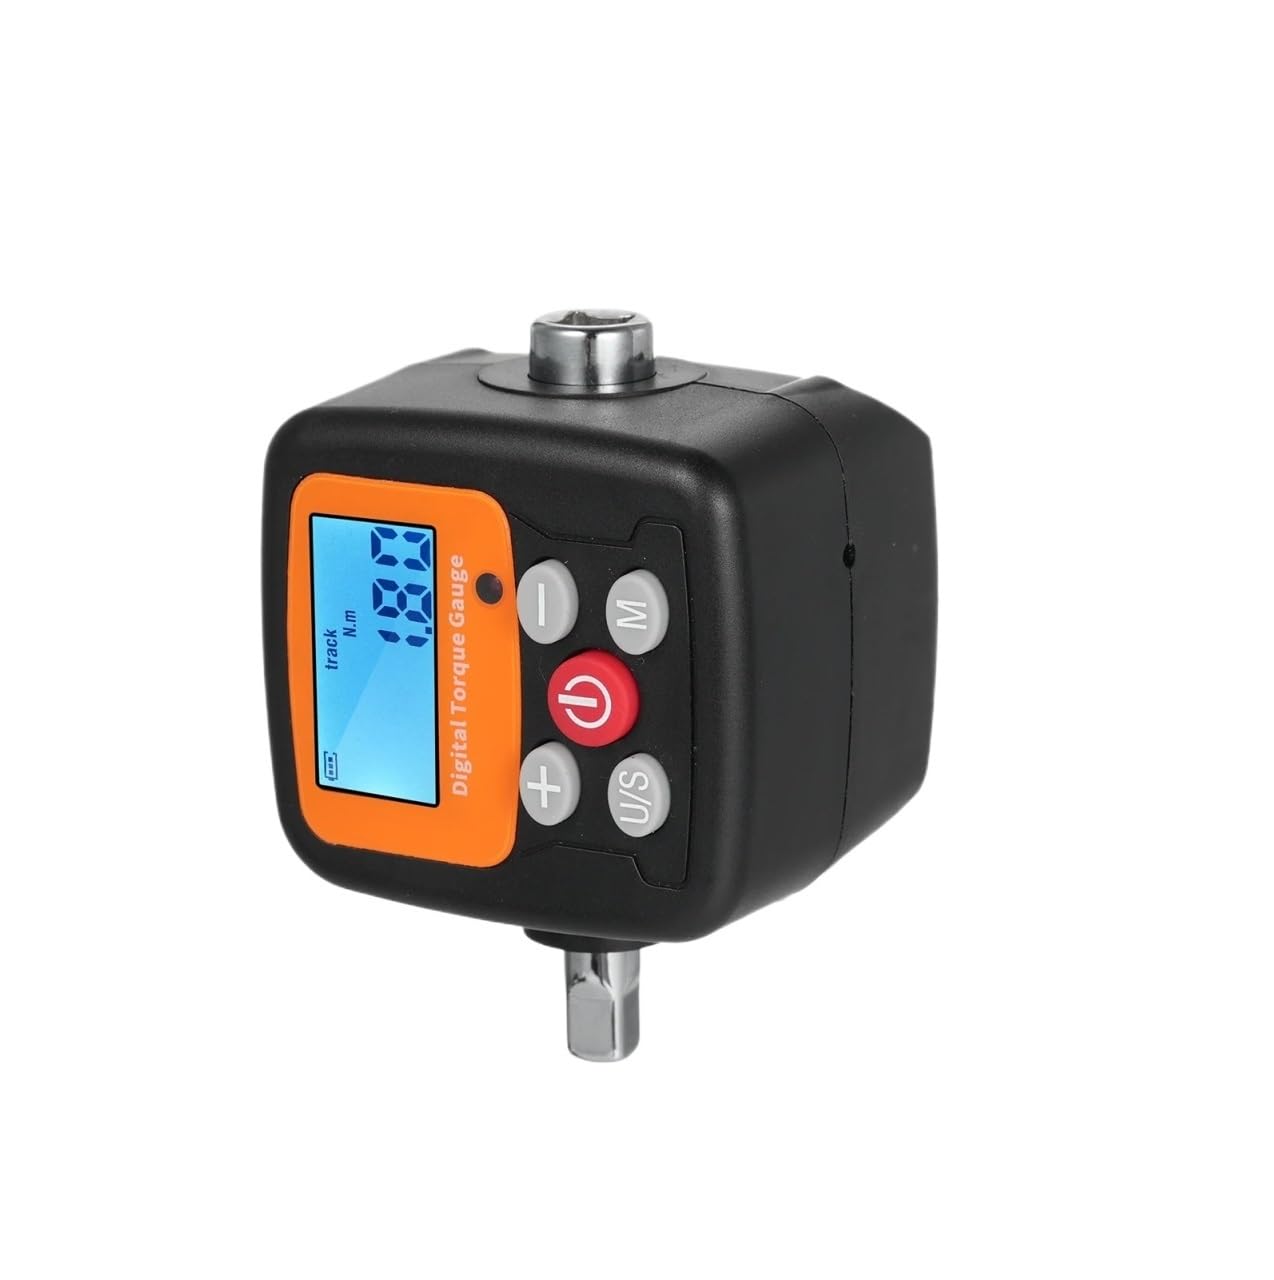
Figure 3.1: Digital Torque Gauge with key components indicated. The image shows the digital display, power button, mode button (M), unit/set button (U/S), and plus (+) and minus (-) buttons for adjustments. The square drive for attaching to a wrench is visible at the top and bottom.
Key Components:
- Digital Display: Shows torque readings, selected unit, and mode.
- Power Button (⑂): Turns the device on or off.
- Mode Button (M): Switches between Real-time (Track) mode and Peak mode.
- Unit/Set Button (U/S): Changes the torque unit (N.m, kgf.cm, lbf.ft, lbf.in) and may be used for setting values.
- Plus (+) Button: Increases values or navigates menus.
- Minus (-) Button: Decreases values or navigates menus.
- Square Drive: For attaching to a ratchet or torque wrench.
4. Setup
4.1 Battery Installation
The Digital Torque Gauge requires two AAA batteries (not included) for operation.
- Locate the battery compartment cover on the device.
- Open the cover.
- Insert two AAA batteries, ensuring correct polarity (+/-).
- Close the battery compartment cover securely.
4.2 Attaching the Gauge
The torque gauge can be attached to a standard ratchet or torque wrench.
- Select the appropriate square drive size on the gauge that matches your wrench.
- Securely attach the gauge to the drive of your wrench.
- Ensure the gauge is firmly seated and does not wobble.
5. Operating Instructions
5.1 Power On/Off
- To power on, press the ⑂ button.
- To power off, press and hold the ⑂ button for a few seconds until the display turns off.
5.2 Unit Selection
Press the U/S button repeatedly to cycle through the available torque units: N.m, kgf.cm, lbf.ft, and lbf.in. The selected unit will be displayed on the screen.
5.3 Mode Selection
Press the M button to switch between operating modes:
- Real-time (Track) Mode: Displays the current torque being applied in real-time. This is useful for monitoring torque as it is applied.
- Peak Mode: Captures and displays the maximum torque value reached during an application. The display will hold the highest value until reset or a higher value is achieved.
5.4 Torque Measurement
- Ensure the gauge is powered on and the desired unit and mode are selected.
- Attach the gauge to your wrench and the appropriate socket to the fastener.
- Apply force to the wrench. The digital display will show the torque value.
- In Peak mode, the highest torque applied will be held on the display.
6. Maintenance
6.1 Cleaning
Wipe the device with a soft, dry cloth. Do not use abrasive cleaners or solvents, as these can damage the display or casing. The device is designed to resist rust, but keeping it clean and dry will prolong its lifespan.
6.2 Storage
Store the torque gauge in a cool, dry place, away from direct sunlight and extreme temperatures. If storing for an extended period, remove the batteries to prevent leakage.
6.3 Battery Replacement
When the battery indicator on the display shows low power, replace the batteries as described in Section 4.1.
7. Troubleshooting
- Device does not power on:
- Check if batteries are installed correctly with proper polarity.
- Replace with fresh AAA batteries.
- Inaccurate readings:
- Ensure the gauge is securely attached to the wrench.
- Verify the correct unit is selected.
- Ensure the gauge is within its specified operating range.
- Display is dim or flickering:
- Batteries may be low. Replace them.
8. Specifications
The RYRMCVPVCT Digital Torque Gauge is available in several models, each with specific torque ranges and connector sizes.

Figure 8.1: Comparison of specifications across different RYRMCVPVCT Digital Torque Gauge models.
| Feature | ENGC-30 | ENGC-135 | ENGC-200 | ENGC-340 |
|---|---|---|---|---|
| Min. Graduation Value | 0.1 N.m | 0.1 N.m | 0.1 N.m | 0.1 N.m |
| Max. Operating Range | 0.9-30 N.m | 4-135 N.m | 6-200 N.m | 10.2-340 N.m |
| Connector | 1/4" | 3/8" | 1/2" | 1/2" |
General Specifications:
- Torque Accuracy: ±2% clockwise, ±2.5% counter-clockwise
- Four Torque Units: kgf.cm, N.m, lbf.ft, lbf.in
- Multi-mode: Real-time (Track) mode, Peak mode
- Power Supply: 2 x AAA batteries (not included)
- Material: ABS + Steel
- Item Size: 75 x 53 x 45 mm (approx. 2.95 x 2.08 x 1.77 inches)
- Item Weight: 164 g / 5.4 oz

Figure 8.2: Dimensions of the Digital Torque Gauge, showing approximate measurements of 75mm (2.95in) in length, 53mm (2.08in) in width, and 45mm (1.77in) in height.
9. Warranty and Support
Specific warranty information for the RYRMCVPVCT Digital Torque Gauge is not provided in this manual. For warranty details, technical support, or service inquiries, please refer to the product packaging or contact the retailer where the product was purchased. Keep your purchase receipt as proof of purchase.