1. Important Safety Instructions
Read all instructions carefully before using this product. Failure to follow these instructions may result in electric shock, fire, or serious injury.
- Ensure the power outlet is properly grounded and rated for the charger's specifications (230V AC, 16A).
- Do not use the charger if the cable, plug, or control box is damaged. Contact VEVOR support for assistance.
- Do not attempt to open, disassemble, or modify the charger. There are no user-serviceable parts inside.
- Keep the charger away from flammable materials, liquids, and gases.
- Ensure the charging cable is not pinched, stepped on, or subjected to damage during use.
- Always disconnect the charger from the vehicle and power source when not in use or before cleaning.
- This charger is designed for electric vehicles compliant with IEC 62196-2 (Type 2). Do not use with incompatible vehicles.
- The control box is IP66 rated for outdoor use, but avoid submerging it in water.
2. Product Overview
The VEVOR 3.6 kW 16A Type 2 Portable EV Charger is designed for efficient and reliable charging of electric vehicles. It features an adjustable current, programmable charging times, and a clear LCD display for real-time status monitoring.

Image: Overview of the VEVOR portable EV charger, showing the control box, Type 2 connector, and Schuko plug.
Key Features:
- Fast Charging: Delivers up to 3.6 kW, providing approximately 34 km of range per hour.
- Adjustable Current: Selectable current settings from 6A to 16A to match power source capabilities.
- Programmable Charging: Schedule charging delays from 1 to 12 hours to utilize off-peak electricity rates.
- Real-time LCD Display: Shows charging status, current, voltage, power, temperature, and fault alerts.
- Comprehensive Protection: Built-in safeguards against overvoltage, leakage, grounding faults, overcurrent, overheating, and overload.
- Durable Design: IP66 rated control box for reliable operation in various weather conditions (rain, snow, dust).
- Long Cable: 6-meter (19.7 ft) TPU charging cable for flexible placement.
- Universal Compatibility: Compatible with most Type 2 electric vehicles (IEC 62196-2 standard).

Image: The charger shown in both home and on-the-go scenarios, highlighting its portability and IP66 rating for outdoor use.
What's in the Box:
- 1 x Electric Vehicle Charger (Control Box with Type 2 Connector and Schuko Plug)
- 1 x Carrying Bag
- 2 x Hook-and-Loop Straps
- 1 x Wall Mount Bracket
- 1 x Connector Holder
- 1 x Screw Kit
3. Specifications
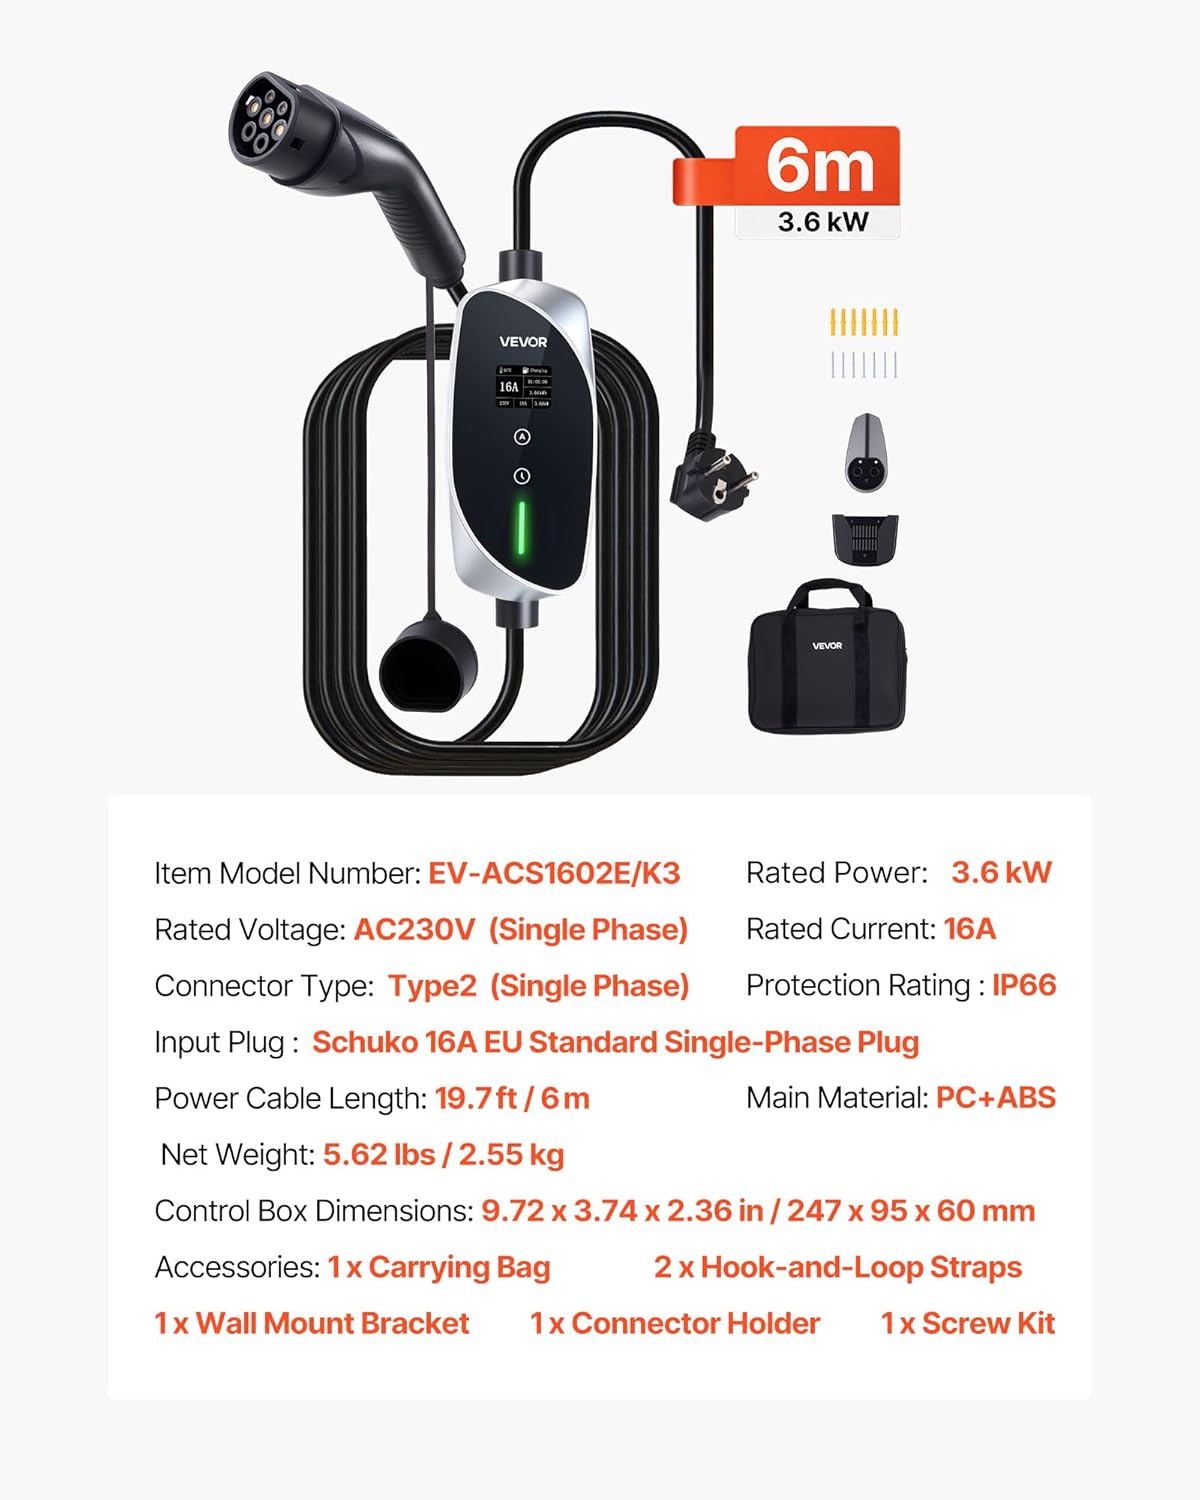
Image: A visual representation of the charger with its key technical specifications listed.
| Parameter | Value |
|---|---|
| Item Model Number | EV-ACS1602E/K3 |
| Rated Voltage | 230V AC (Single Phase) |
| Rated Power | 3.6 kW |
| Rated Current | 16 A |
| Connector Type | Type 2 (IEC 62196-2, Single Phase) |
| Input Plug | Schuko 16A, European Standard Single-Phase |
| Power Cable Length | 6 meters / 19.7 feet |
| Main Material | PC + ABS |
| Protection Rating | IP66 (Control Box) |
| Product Dimensions (D x W x H) | 24.7 x 9.5 x 6 cm |
| Item Weight | 2.55 kg / 5.62 lbs |
| Standards Complied | IEC, CE |
| Compatible Vehicles | Model 3 Y, Leaf, i3, ID.3, Kona Electric, and other EVs compliant with IEC 62196-2 |
4. Setup
4.1 Initial Inspection
- Unpack all components and verify that all items listed in the "What's in the Box" section are present and undamaged.
- Inspect the charger's control box, cables, and connectors for any visible signs of damage. Do not use if damage is found.
4.2 Mounting (Optional)
The charger includes a wall mount bracket and screw kit for fixed installation, if desired. This is optional as the charger is designed for portability.
- Choose a suitable location near a grounded 230V 16A Schuko outlet, ensuring the 6-meter cable can reach your vehicle's charging port.
- Use the wall mount bracket as a template to mark drilling points on the wall.
- Drill holes and insert appropriate wall anchors (if necessary for your wall type).
- Secure the wall mount bracket and connector holder using the provided screws.
- Place the control box onto the mounted bracket.
4.3 Connecting to Power
Plug the Schuko input plug of the charger into a dedicated, properly grounded 230V 16A single-phase power outlet. The LCD screen on the control box will illuminate, indicating it is ready for operation.

Image: Illustration of the 6-meter charging cable providing ample reach for charging vehicles, demonstrating flexibility in setup.
5. Operating Instructions
5.1 Connecting to Your Electric Vehicle
- Ensure the charger is plugged into the power outlet.
- Open your vehicle's charging port cover.
- Insert the Type 2 connector firmly into your vehicle's charging port until it clicks into place.
- The charger will perform a self-check, and the LCD screen will display the charging status.
5.2 Adjusting Charging Current
The charger allows you to adjust the charging current to suit your power supply or desired charging speed.
- Before connecting to the vehicle, or if charging has not yet started, press the 'A' button on the control box.
- Each press cycles through available current options: 6A, 8A, 10A, 12A, 16A.
- Select the desired current. The setting will be saved.
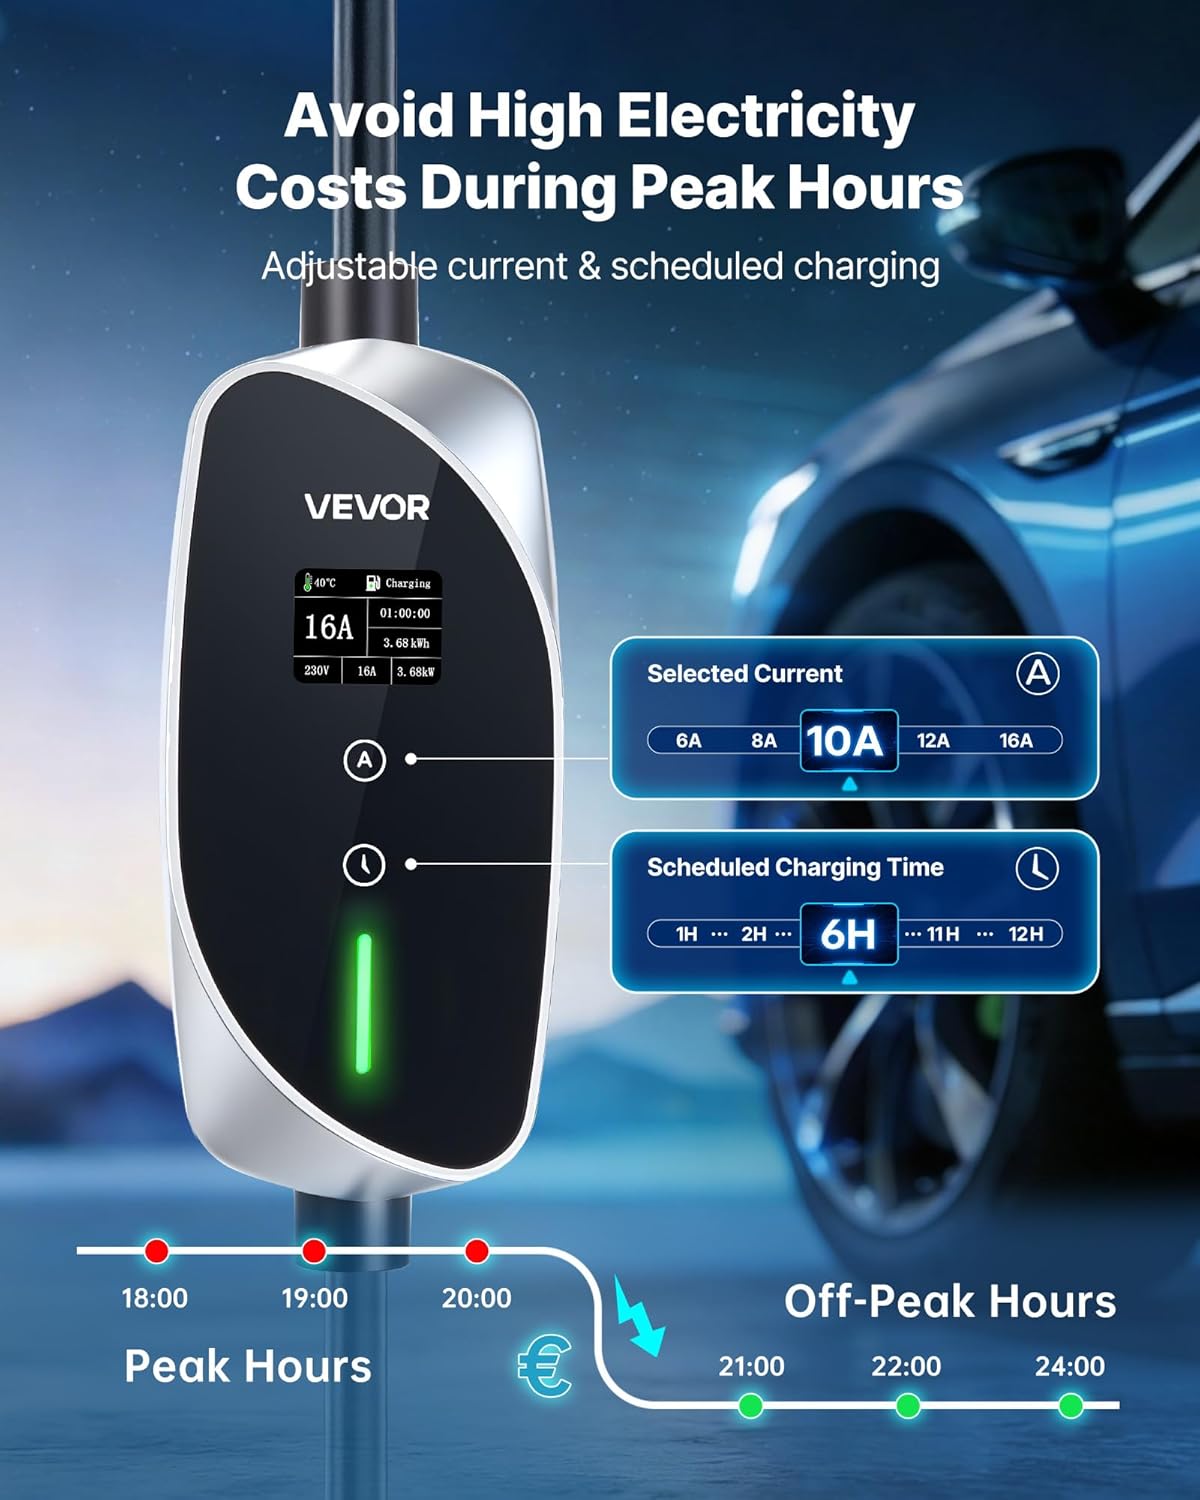
Image: The control box display showing options for selecting current (6A-16A) and setting scheduled charging times (1H-12H).
5.3 Setting Scheduled Charging (Delayed Start)
To delay the start of charging, for example, to take advantage of off-peak electricity rates:
- Before connecting to the vehicle, or if charging has not yet started, press the 'Time' button (clock icon) on the control box.
- Each press cycles through delay options from 1 to 12 hours.
- Select the desired delay. The charger will start charging after the set delay period.
5.4 Understanding the LCD Display and Indicator Lights
The LCD screen provides real-time information about the charging process. The indicator lights on the control box provide quick visual status updates.
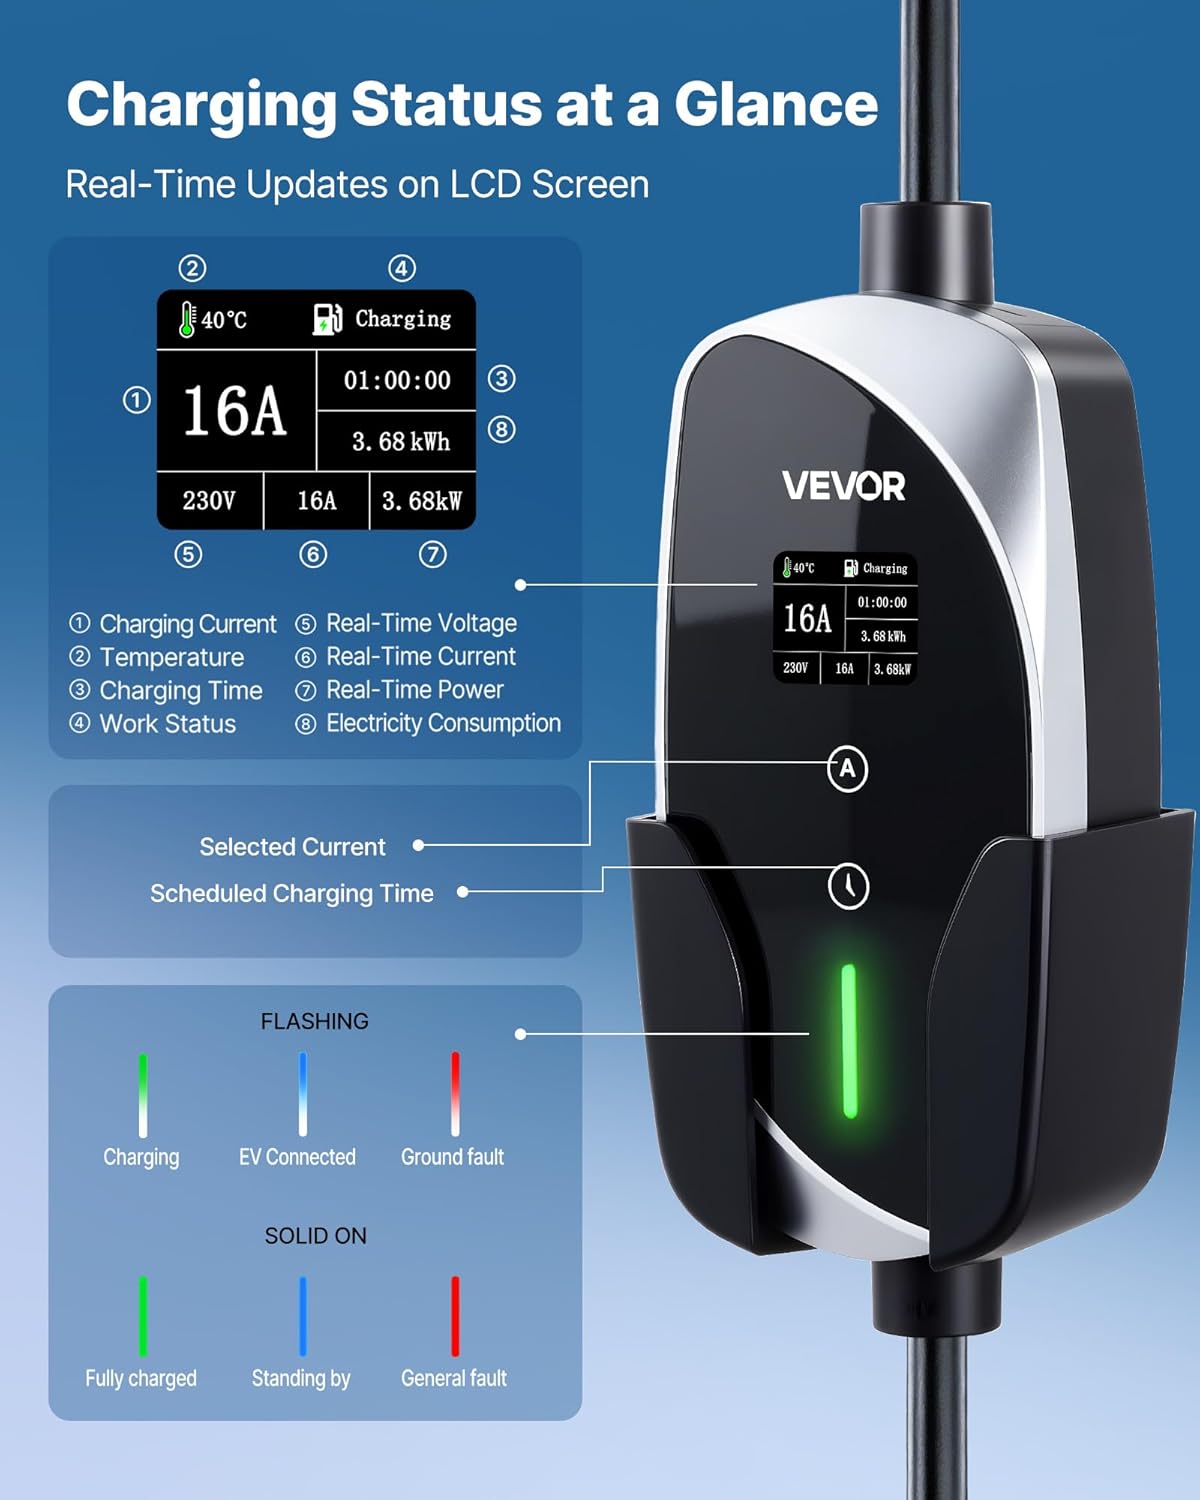
Image: Detailed view of the LCD screen showing various parameters like charging current, temperature, charging time, work status, real-time voltage, current, power, and electricity consumption. Also includes a guide for flashing and solid indicator lights.
LCD Display Information:
- Charging Current: Displays the selected or active charging current (e.g., 16A).
- Temperature: Shows the internal temperature of the control box.
- Charging Time: Indicates the duration of the current charging session.
- Work Status: Shows the current operational state (e.g., Charging, Standby).
- Real-Time Voltage: Displays the current voltage from the power supply.
- Real-Time Power: Shows the instantaneous charging power in kW.
- Electricity Consumption: Accumulates the total energy delivered during the charging session.
Indicator Lights:
- Green (Flashing): Charging in progress.
- Green (Solid On): Fully charged or standing by.
- Blue (Flashing): EV connected, waiting to charge.
- Red (Flashing): Ground fault detected.
- Red (Solid On): General fault.
5.5 Stopping Charging
- Disconnect the Type 2 connector from your vehicle's charging port.
- Unplug the Schuko input plug from the power outlet.
6. Maintenance
Proper maintenance ensures the longevity and safe operation of your EV charger.
6.1 Cleaning
- Always disconnect the charger from both the power outlet and the vehicle before cleaning.
- Wipe the control box and cables with a soft, damp cloth. Do not use harsh chemicals, solvents, or abrasive cleaners.
- Ensure all components are dry before reconnecting to power.
6.2 Storage
- When not in use, store the charger in a cool, dry place, away from direct sunlight and extreme temperatures.
- Use the provided carrying bag for convenient and protected storage.
- Avoid coiling the cable too tightly to prevent damage.

Image: The charger operating in a snowy environment, demonstrating its IP66 weather resistance. Regular cleaning after exposure to harsh conditions is recommended.
7. Troubleshooting
If you encounter issues with your VEVOR EV charger, refer to the table below for common problems and solutions.
| Problem | Possible Cause | Solution |
|---|---|---|
| Charger does not power on | No power from outlet; Faulty outlet; Damaged charger cable/plug. | Check power outlet with another device; Try a different outlet; Inspect charger cable and plug for damage. If damaged, do not use. |
| Charging does not start | Connector not fully inserted; Vehicle not ready to charge; Delayed charging set; Fault detected. | Ensure Type 2 connector is fully seated; Check vehicle's charging status; Verify if a charging delay is active; Check LCD for fault codes and indicator lights for red status. |
| Red indicator light (Flashing/Solid) | Ground fault; General fault (overcurrent, overvoltage, overheating, etc.). | Disconnect charger from power and vehicle. Wait a few minutes, then reconnect. If fault persists, contact support. Ensure proper grounding of the power outlet. |
| Charging is slow | Lower current setting selected; Vehicle's charging rate limitation. | Adjust the charging current to a higher setting (e.g., 16A) using the 'A' button; Consult your vehicle's manual for its maximum AC charging rate. |
| LCD display is blank or erratic | Power issue; Internal fault. | Ensure stable power supply. Disconnect and reconnect the charger. If the issue persists, contact VEVOR support. |
If the problem persists after attempting these solutions, please contact VEVOR customer support.
8. Warranty and Support
8.1 Warranty Information
VEVOR provides a commitment to product quality. Spare parts for this product are available for 10 years within the EU.
For specific warranty terms and conditions, please refer to the warranty card included with your product or visit the official VEVOR website.
8.2 Customer Support
If you have any questions, require technical assistance, or need to report a problem, please contact VEVOR customer support through their official website or the contact information provided in your product packaging.
Please have your model number (EV-ACS1602E/K3) and purchase details ready when contacting support.


