1. Introduction
Thank you for choosing the maXpeedingrods T6 Series Coilover Suspension Kit. This manual provides essential information for the proper installation, operation, and maintenance of your new coilovers. Please read this manual thoroughly before installation and retain it for future reference. Proper installation and adjustment are crucial for optimal performance and safety.
2. Safety Information
Warning: Installation of this product should only be performed by qualified professionals. Improper installation can lead to vehicle damage, loss of control, and serious injury or death. Always wear appropriate personal protective equipment (PPE) during installation.
- Ensure the vehicle is securely supported on jack stands or a lift before beginning any work.
- Never work under a vehicle supported only by a jack.
- Disconnect the vehicle's battery before working on any electrical components.
- Refer to your vehicle's service manual for specific torque specifications and procedures not covered here.
- After replacing suspension components, a wheel alignment check must be performed.
3. Product Overview
The maXpeedingrods T6 Series Coilovers are designed for street performance driving, offering a balance between comfort, speed, and safety. Key features include:
- 24 Levels Adjustable Damper: Allows fine-tuning for various driving conditions (street, mountain, race tracks).
- Adjustable Height: Thread-type ride height adjustment for 1-3 inches lowering (does not maintain original ride height).
- High Tensile Performance Spring: Stress-tested over 600,000 times with less than 0.04% distortion.
- Upgraded Damper Knob: Easier adjustment.
- High-Quality Damping Oil: Improved viscosity for better performance.
- Upgraded Full Aluminum Plates: Enhanced strength and lighter weight.
Product Components

Adjustable Camber Plates: Provides sharp and precise handling. Top mount made of 6061-T6 Aluminum.

Adjuster Knob: Easily adjust damping settings (Soft to Hard). 24 clicks of rebound damping force adjustment.

Height Adjustable: Independent ride height and spring tension settings. Thread-type adjustment for 1-3 inches lowering.

High Rigid Piston Rod: 22mm front rod diameter. Uses high-frequency heat treatment for high rigidity and toughness.

Coilover Components: Includes full-length dust boot, 6061-T6 AL perch, high rigidity 55CrSi steel cold-bent coil springs, anodized shock body with galvanized anti-corrosion coating, and matte finish lower mount.

Dimension Details: Front coil-over length 210mm, spring rate 6 kg/mm (336 lbs/in). Rear coil-over length 200mm, spring rate 5 kg/mm (280 lbs/in).
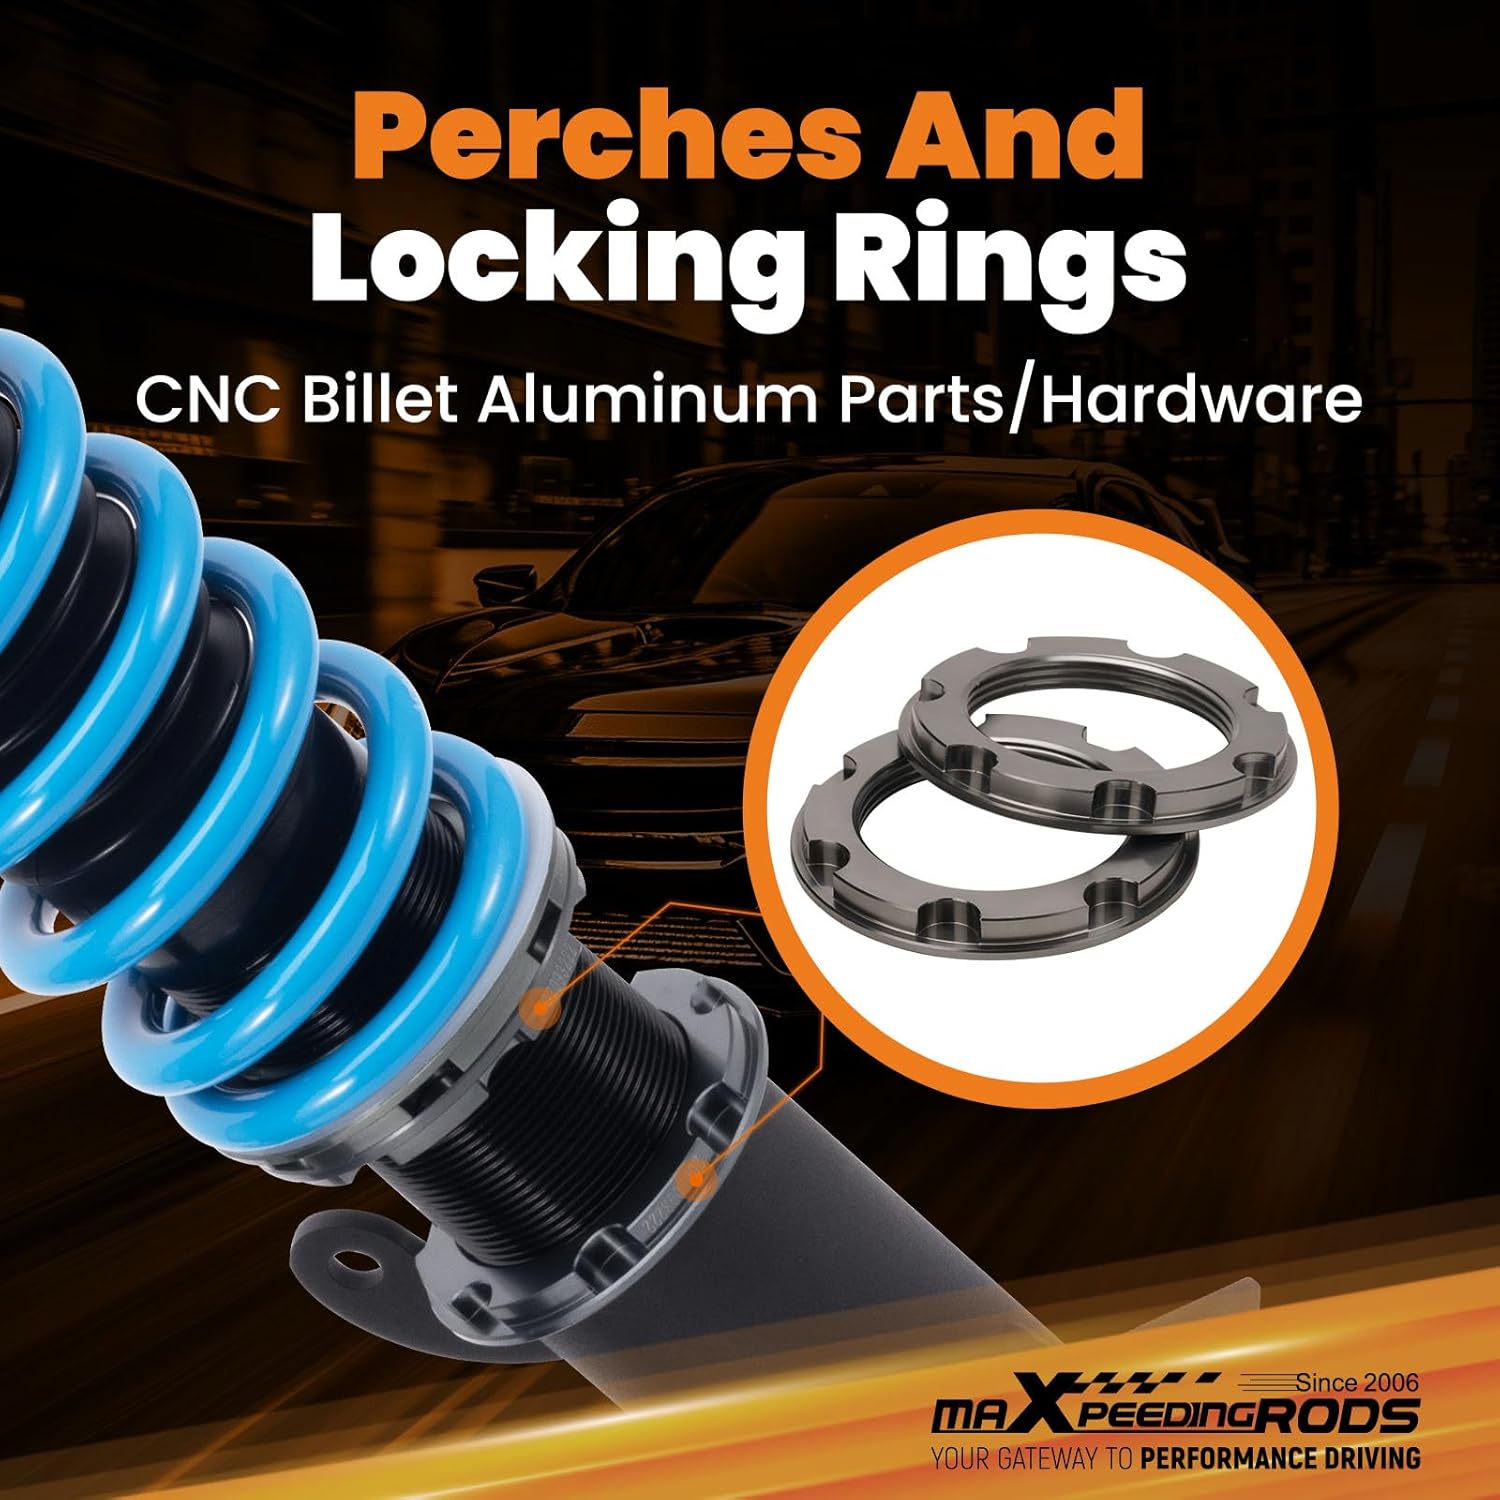
Perches and Locking Rings: Made from CNC Billet Aluminum for durability.

Packaging List: Includes 2x Front coil-overs, 2x Rear coil-overs, 2x C spanners, and 2x Allen wrenches.
4. Installation Instructions
This section outlines the general steps for installing the coilovers. For a visual guide, please refer to the official installation video provided below. Note: The video demonstrates installation on a Subaru Impreza WRX (2008-2014), which may have slight differences from the Subaru Crosstrek/XV (2018-2023) models. Always consult your vehicle's specific service manual for precise instructions.
Required Tools:
- Large Electric Impact Wrench (1/2 inch)
- Large Torque Wrench (1/2 inch)
- Small Torque Wrench (3/8 inch)
- 17mm Wrench
- Large Extension Bar (1/2 inch)
- Sockets: 19mm, 17mm, 14mm, 13mm, 15mm, 12mm
- Spanner Wrench (included)
- Hex Keys: 1.5mm, 4mm (included)
Installation Video
Official Installation Video: This video demonstrates the installation process for maXpeedingrods Street Performance T6 Series Coilovers on a 2008-2014 Subaru Impreza. While the vehicle model differs, many steps are similar. Please exercise caution and consult your specific vehicle's service manual.
General Installation Steps:
- Prepare the Vehicle:
- Loosen the lug nuts on the wheels using a 19mm socket and wrench.
- Lift the vehicle securely using a jack and place it on jack stands.
- Remove the wheels.
- Remove Front Struts:
- Remove the lower strut to knuckle bolts using a 19mm end wrench and impact socket.
- Lower the vehicle slightly and open the hood.
- Locate the upper strut nuts in the engine bay.
- Remove the upper strut nuts using a 12mm socket.
- Carefully remove the old front strut assembly.
- Install Front Coilovers:
- Position the new coilover into the upper strut tower and hand-thread the top nuts.
- Tighten the upper hardware to 40 Nm (30 ft-lbs) using a 13mm socket and torque wrench.
- Lift the vehicle again.
- Position the coilover into the knuckle.
- Reinstall the two knuckle bolts and hand-tighten.
- Tighten the knuckle bolts to 130 Nm (95 ft-lbs) using a 19mm end wrench and impact socket.
- Secure the wheel sensor bracket and brake line bracket using a 12mm socket.
- Remove Rear Struts:
- Start by removing the rear wheel.
- Remove the lower strut mounting bolt using a 17mm socket and end wrench.
- Lower the vehicle slightly.
- Open the hatch and remove the spare tire mat to access the upper strut hardware.
- Remove the upper strut hardware using a 14mm socket.
- Carefully remove the old rear strut assembly.
- Install Rear Coilovers:
- Position the new coilover into the upper strut tower and hand-thread the top nuts.
- Tighten the upper nuts to 60 Nm (45 ft-lbs) using a 15mm socket and torque wrench.
- Lift the vehicle again.
- Install the lower bolt and nut.
- Torque the lower nut and bolt to 140 Nm (105 ft-lbs) using a 17mm socket and end wrench.
- Final Steps:
- Reinstall all wheels, hand-starting the lug nuts.
- Use a 19mm socket on an impact to run on the lug nuts, then torque them to 130 Nm (95 ft-lbs) with a torque wrench.
- Lower the vehicle completely.
- Perform a wheel alignment.
5. Operating Instructions (Adjustments)
Your maXpeedingrods T6 Series Coilovers offer adjustable damping and ride height to customize your driving experience.
Damping Adjustment:
The coilovers feature 24 levels of damper adjustment. The adjustment knob is located at the top of the coilover. Turn the knob to select your desired damping force:
- Levels 0-8: Suggested for street use, providing a more comfortable ride.
- Levels 9-16: Suggested for mountain use, offering a balance of comfort and sportiness.
- Levels 17-24: Suggested for race tracks use, providing maximum stiffness for aggressive driving.
You can adjust the damping at any time to suit your needs. Ensure both sides of the vehicle (front or rear) are set to the same damping level for balanced handling.
Height Adjustment:
The thread-type ride height adjustment allows you to lower your vehicle by 1-3 inches. To adjust the height:
- Lift the vehicle to relieve pressure from the suspension.
- Loosen the locking rings on the coilover body using the provided spanner wrench.
- Twist the lower mount or spring perch to adjust the shock suspension to the appropriate height.
- Once the desired height is achieved, tighten the locking rings securely.
- Lower the vehicle and check the ride height. Repeat if necessary.
Important: After any height adjustment, a wheel alignment is highly recommended to ensure proper vehicle handling and tire wear.
6. Maintenance
Regular maintenance will prolong the life and performance of your coilovers:
- Regular Inspection: Periodically inspect coilovers for any signs of damage, leaks, or loose components.
- Cleaning: Keep the coilover bodies and threads clean from dirt, salt, and debris. Use mild soap and water, then rinse thoroughly.
- Lubrication: Apply a thin layer of anti-seize lubricant to the threads of the coilover body and locking rings to prevent seizing and facilitate future adjustments.
- Torque Check: Re-check all mounting bolts and nuts after the first 500 miles of driving and periodically thereafter to ensure they remain at the specified torque settings.
- Dust Boots: Ensure dust boots are intact and properly seated to protect the piston rod from contaminants.
7. Troubleshooting
If you experience issues with your coilovers, consider the following common problems and solutions:
- Noise (Clunking/Squeaking):
- Cause: Loose mounting bolts, worn bushings, or improper preload.
- Solution: Check and re-torque all mounting bolts. Inspect bushings for wear and replace if necessary. Verify spring preload is set correctly (7-10mm).
- Uneven Ride Height:
- Cause: Incorrect height adjustment or uneven spring preload.
- Solution: Re-measure and adjust ride height on all four corners. Ensure spring preload is consistent.
- Poor Handling/Bounciness:
- Cause: Incorrect damping settings or improper spring rates for vehicle weight/driving style.
- Solution: Adjust damping settings (refer to Section 5). If issues persist, consult a professional to verify spring rates are appropriate.
- Leaking Shock Absorber:
- Cause: Damaged seal or internal component.
- Solution: A leaking shock absorber typically requires replacement. Contact customer support for assistance.
If you cannot resolve an issue, please contact maXpeedingrods customer support.
8. Specifications
| Feature | Specification |
|---|---|
| Brand | maXpeedingrods |
| Model Number | CL89XG |
| Vehicle Fitment | Subaru Crosstrek (GT) 2018-2023; Subaru XV (GT) 2018-2023 |
| Series | Street Performance T6 Series |
| Damper Adjustment | 24 Levels (Rebound) |
| Height Adjustment | 1-3 inches lowering (Thread-type) |
| Front Spring Rate | 6 kg/mm (336 lbs/in) |
| Rear Spring Rate | 5 kg/mm (280 lbs/in) |
| Spring Preload | 7-10 mm |
| Front Rod Diameter | 22mm |
| Item Weight | 27800 Grams |
9. Warranty & Support
maXpeedingrods offers a 30-day easy return policy for this product. For specific warranty details, claims, or technical assistance, please contact maXpeedingrods customer support directly. Ensure you have your purchase information and product model number (CL89XG) available when contacting support.
You can visit the official maXpeedingrods store on Amazon for more information: maXpeedingrods Store
10. Additional Product Videos
maXpeedingrods Coilovers Series Overview: This video provides a general overview of the T7, T6, B3, and B2 coilover series, highlighting key features and differences across the product lines.