1. Important Safety Information
Read all instructions carefully before assembling and operating your grill. Failure to follow these instructions could result in fire, explosion, or burn hazard, which could cause property damage, personal injury, or death.
- Outdoor Use Only: Never operate this appliance indoors.
- Gas Leak Check: Always perform a leak test on all gas connections before initial use and after any gas cylinder change. Use a soapy water solution; never use a flame.
- Clearance: Maintain a minimum distance of 36 inches (91 cm) from the back and sides of the grill to any combustible materials.
- Propane Cylinder: Use only a 20 lb (9.1 kg) propane cylinder (LP gas tank) with an OPD (Overfill Protection Device) valve. Ensure the cylinder is securely placed in the designated area.
- Ventilation: Ensure adequate ventilation around the grill. Do not block openings in the grill cart.
- Supervision: Never leave the grill unattended while in use. Keep children and pets away from the grill.
- Hot Surfaces: Grill surfaces become extremely hot. Use heat-resistant gloves and appropriate tools.
- Grease Fires: In case of a grease fire, turn off the gas supply immediately. Do not use water to extinguish a grease fire.
2. Product Overview
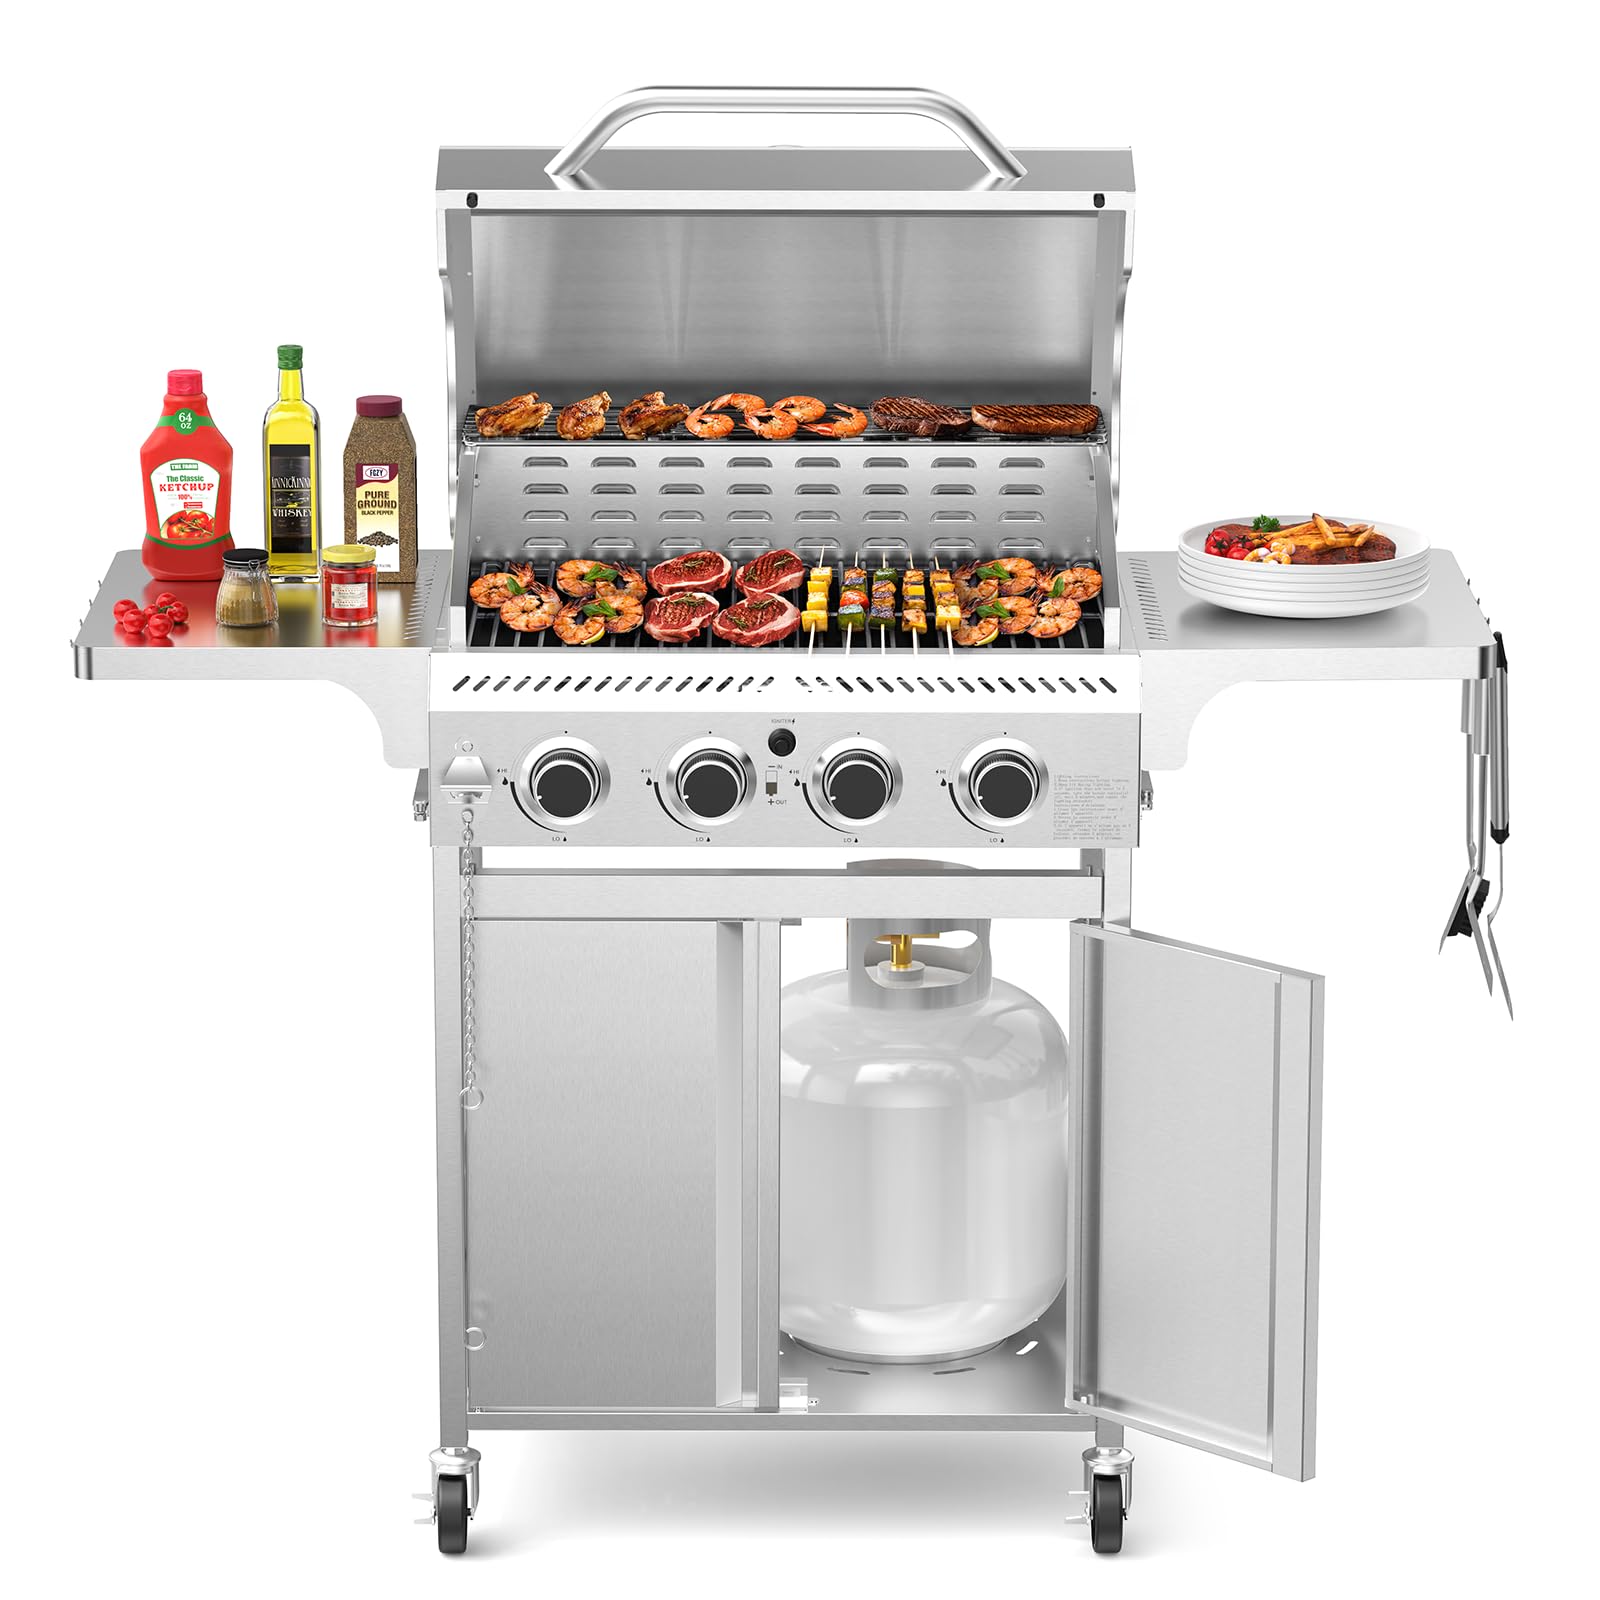
The Electactic 4-Burner Propane Gas Grill (Model JD-4F) is designed for outdoor cooking, offering a robust stainless steel construction and versatile features for an enhanced grilling experience.


Key Features:
- 4 Main Burners: Delivers a total of 32,000 BTU for powerful and consistent heat.
- Stainless Steel Construction: Durable body and heavy-duty 304 stainless steel cooking grates and warming rack.
- Spacious Cooking Area: 370.71 sq. in. primary cooking space and 141.18 sq. in. warming rack.
- Foldable Side Shelves: Provides extra prep space and folds for compact storage, with integrated tool hooks and a bottle opener.
- Built-in Thermometer: For precise temperature monitoring.
- Portable Design: Equipped with four heavy-duty swivel wheels (two locking) for easy movement.
- Easy-Clean Grease Management: Features a slide-out grease tray and removable grease cup.
3. Setup and Assembly
This section guides you through the assembly of your Electactic Propane Gas Grill and initial setup steps.
Assembly Steps:
- Unpacking: Carefully remove all components from the packaging. Ensure all parts listed in the manual are present.
- Base Assembly: Assemble the grill base and attach the four heavy-duty swivel wheels. Two of these wheels are lockable for stability.
- Main Body Attachment: Secure the main grill body to the assembled base.
- Side Shelves: Attach the foldable side shelves to the main body. Ensure they can fold and unfold smoothly.
- Internal Components: Install the heat tents, cooking grates (304 stainless steel), and the warming rack.
- Grease Tray: Insert the slide-out grease tray and removable grease cup into their designated positions.
- Propane Tank Installation: Place a 20 lb (9.1 kg) propane cylinder into the cabinet and connect the regulator hose securely to the tank valve.
Initial Leak Test:
Before first use, and after every tank change, perform a leak test:
- Mix a solution of equal parts liquid dish soap and water.
- Ensure all burner control knobs are in the "OFF" position.
- Turn on the gas supply at the propane cylinder.
- Apply the soapy solution to all gas connections (regulator to tank, hose to manifold).
- If bubbles appear, there is a leak. Turn off the gas, tighten connections, and retest. If the leak persists, do not use the grill and contact customer support.
Pre-Use Burn-Off:
Before cooking food for the first time, operate the grill on high heat for 15 minutes with the lid closed to burn off any manufacturing residues.
4. Operating Instructions
Follow these steps for safe and effective operation of your grill.
Lighting the Burners:
- Open Lid: Always open the grill lid before lighting the burners.
- Turn on Gas: Ensure the propane cylinder valve is fully open.
- Ignition:
- Automatic Ignition: Push and turn one burner control knob to the HIGH position. Immediately press and hold the electronic igniter button until the burner lights. If the burner does not light within 5 seconds, turn the knob to OFF, wait 5 minutes, and repeat the process.
- Manual Ignition: If the automatic igniter fails, use the provided extended match holder. Place a lit match at the end of the holder, insert it through the cooking grate to the burner, then push and turn the control knob to HIGH.
- Additional Burners: Once one burner is lit, you can light other burners by turning their respective control knobs to HIGH.
- Adjust Heat: Adjust burner knobs to achieve desired cooking temperature.

Temperature Control:
- Use the built-in lid thermometer to monitor the internal temperature of the grill.
- Adjust the burner control knobs to increase or decrease heat as needed.
- For indirect cooking, turn off one or more burners and place food over the unlit burners.
Using the Warming Rack:
The upper warming rack is ideal for keeping cooked food warm, toasting buns, or slow-cooking delicate items.

5. Maintenance and Care
Regular cleaning and maintenance will extend the life of your grill and ensure optimal performance.
Cleaning the Cooking Grates:
- After each use, while the grates are still warm, use a grill brush to remove food residue.
- For stubborn residue, allow the grates to cool, then wash with warm soapy water and a non-abrasive sponge. Rinse thoroughly and dry.
Grease Management System:
- The slide-out grease tray and removable grease cup should be emptied and cleaned regularly to prevent grease buildup and potential fires.
- Allow the tray and cup to cool completely before handling. Wash with warm soapy water.

Exterior Cleaning:
- Wipe stainless steel surfaces with a soft cloth and a stainless steel cleaner or mild soapy water. Always wipe in the direction of the grain.
- Avoid abrasive cleaners or scouring pads, which can scratch the surface.
Storage:
- When not in use, store the grill in a dry, protected area.
- If storing indoors, disconnect the propane cylinder and store it outdoors in a well-ventilated area.
- Consider using a grill cover to protect it from the elements.
6. Troubleshooting
Refer to this section for solutions to common operational issues.
| Problem | Possible Cause | Solution |
|---|---|---|
| Burner fails to light with igniter. | No gas flow, igniter not sparking, clogged burner port. | Check propane tank level and connections. Ensure igniter is clicking. Clean burner ports if necessary. Use manual ignition if igniter fails. |
| Uneven heat across cooking surface. | Clogged burner ports, low gas pressure, wind. | Clean burner ports. Check for kinks in gas hose. Position grill away from strong winds. |
| Low flame even on HIGH setting. | Low gas in tank, bypass valve activated, regulator issue. | Replace or refill propane tank. Reset regulator by turning off all gas, disconnecting and reconnecting regulator, then slowly opening tank valve. |
| Grease fire. | Excessive grease buildup. | Turn off gas supply immediately. Close lid. Do NOT use water. Allow fire to burn out. Clean grease tray and cooking area thoroughly after cooling. |
7. Specifications
Detailed technical specifications for the Electactic 4-Burner Propane Gas Grill.
| Feature | Detail |
|---|---|
| Brand | Electactic |
| Model Number | JD-4F |
| Fuel Type | Propane Gas |
| Main Burner Count | 4 |
| Total BTU Output | 32,000 BTU |
| Primary Cooking Area | 370.71 sq. inches |
| Warming Rack Area | 141.18 sq. inches |
| Total Cooking Surface Area | 512.5 sq. inches |
| Material | Stainless Steel (Body, 304 Grill Grates) |
| Product Dimensions (D x W x H) | 21.65" x 50.39" x 42.13" |
| Special Features | Built-in Thermometer, Foldable Side Shelves, Tool Hooks, Bottle Opener, Portable with Wheels |
| Required Assembly | Yes |

8. Warranty and Support
Your Electactic 4-Burner Propane Gas Grill (Model JD-4F) comes with a 1-Year Warranty from the date of purchase, covering manufacturing defects under normal use and service.
For warranty claims, technical assistance, or to order replacement parts, please contact Electactic customer support. Keep your proof of purchase for warranty validation.
Contact information for customer support is typically found in the packaging or on the manufacturer's official website.