
1. Important Safety Information
Please read all safety instructions carefully before using this product. Failure to follow these instructions may result in electric shock, fire, or serious injury.
- Always work in a well-ventilated area to avoid inhaling solder fumes.
- Wear appropriate personal protective equipment, including safety glasses, to protect against splashes of molten solder.
- Do not touch the soldering iron tip or heating element when hot. Temperatures can reach over 400°C (750°F).
- Place the soldering iron in its stand when not in use to prevent accidental burns or damage.
- Keep out of reach of children and pets.
- Do not use the soldering iron near flammable materials or liquids.
- Ensure the device is fully charged before use for optimal performance.
- Disconnect the power source and allow the iron to cool completely before cleaning or storing.
2. Product Overview
The Fenikara Cordless Soldering Iron with LED Light (Model JJXL001) is a portable and efficient tool designed for various soldering tasks. It features a built-in rechargeable battery, rapid heating, precise temperature control, and an integrated LED work light for enhanced visibility.
Key Features:
- Cordless and Portable: Built-in 1400mAh battery provides up to 30 minutes of wireless operation. Can also be used while charging via USB-C.
- Digital Temperature Control: Large HD digital display with 5 adjustable temperature levels (260–420°C / 500–788°F) and °C/°F switching.
- Fast and Stable Heating: Ceramic heating core reaches working temperature in as little as 7 seconds with real-time temperature calibration.
- Integrated LED Light: Bright LED illuminates the workspace for improved visibility in low-light conditions.
- Durable Design: High-quality metal body with a protective cap for safety and tip protection.
- Automatic Sleep Mode: Activates after 10 minutes of inactivity to extend tip life and enhance safety.
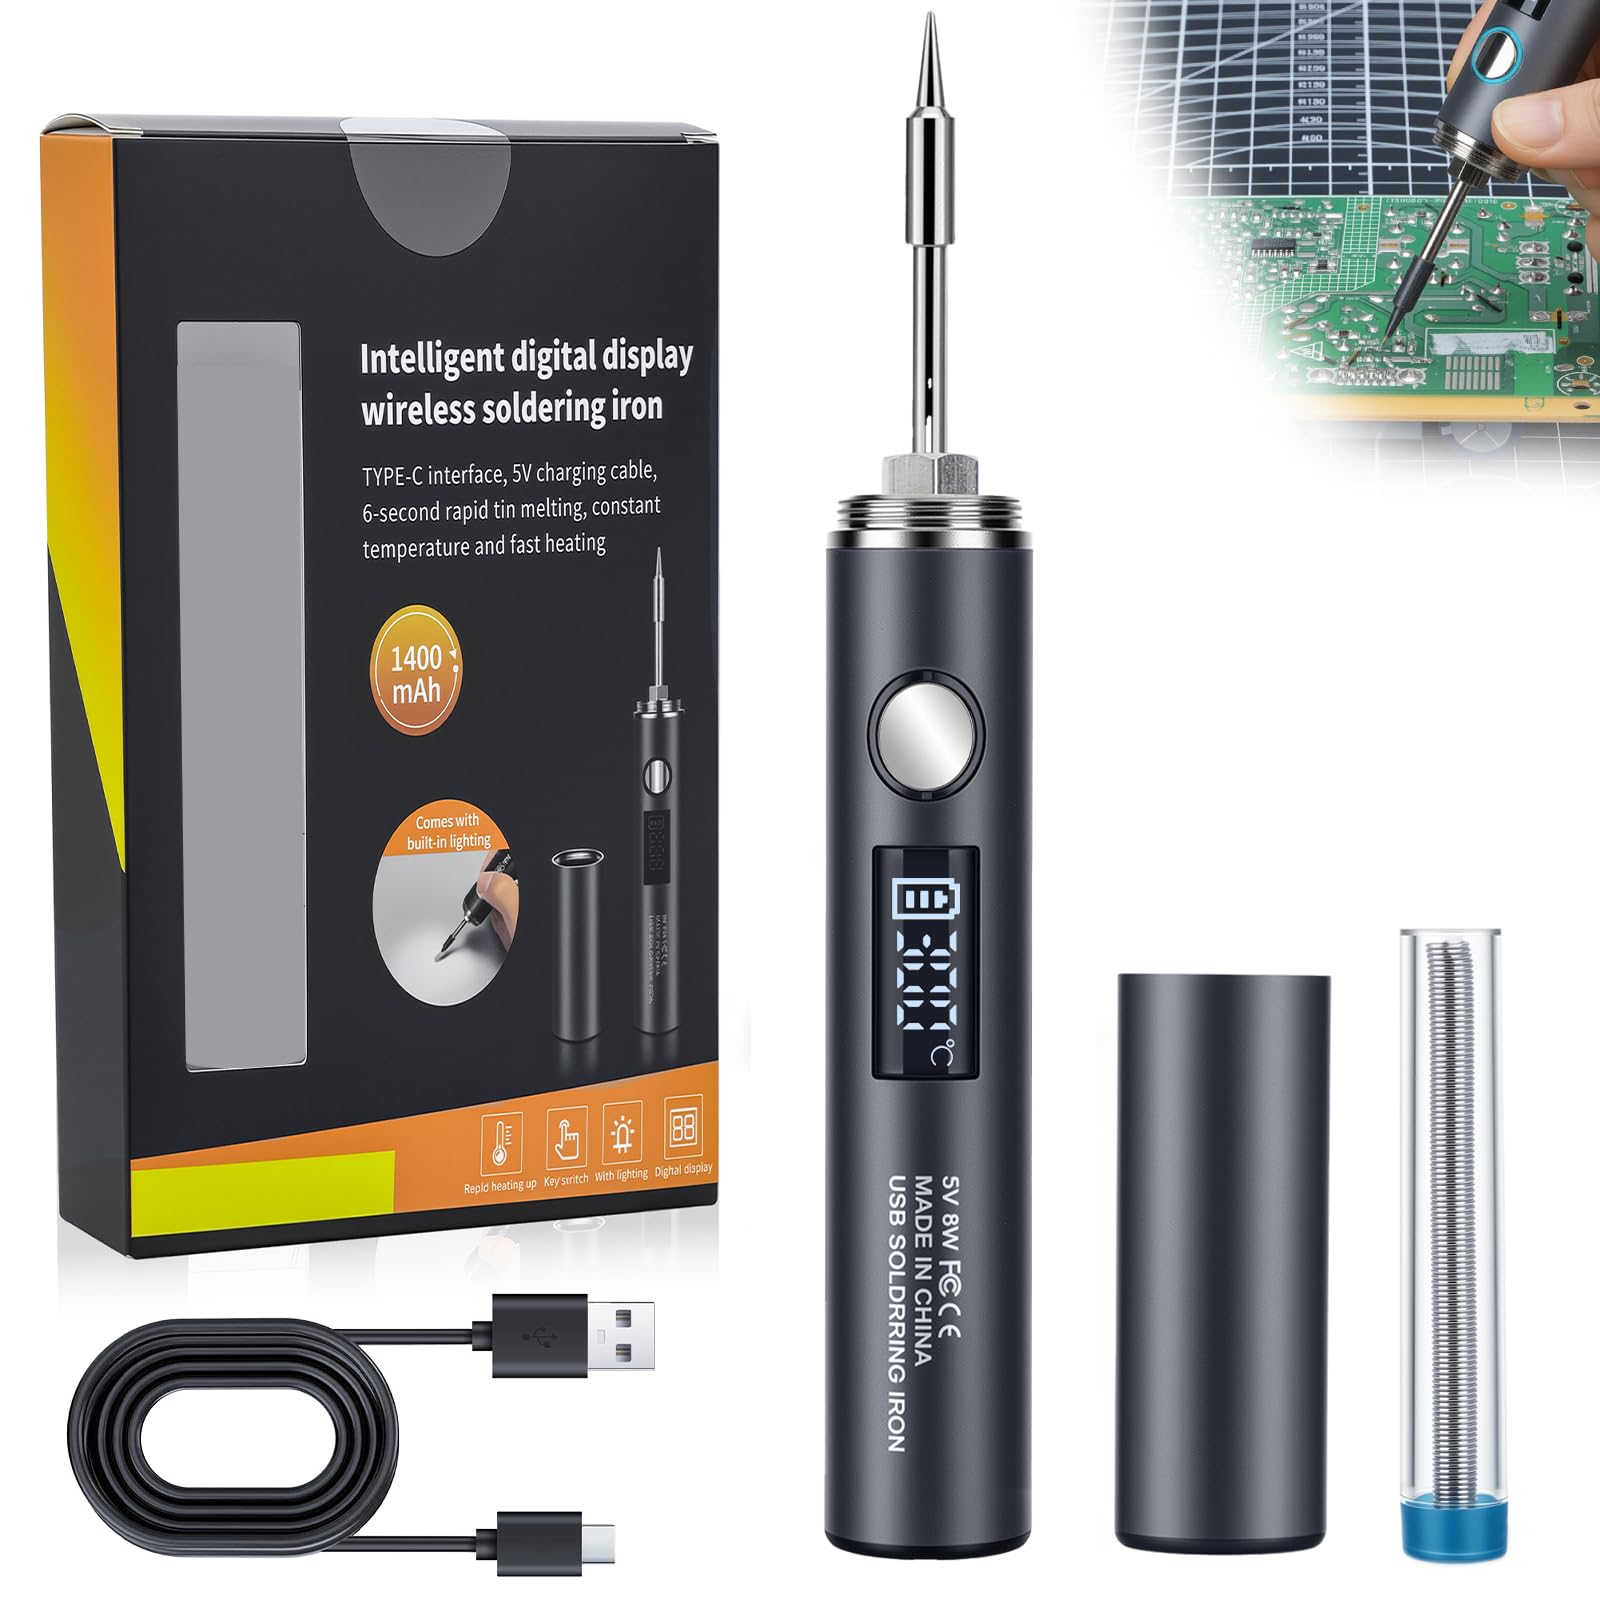
This image displays the complete Fenikara Cordless Soldering Iron Kit, showcasing the main soldering iron unit, various tips, and accessories. The iron features a sleek, ergonomic design with a digital display.
3. What's Included
Your Fenikara Cordless Soldering Iron Kit includes the following components:
- 1 × Soldering Iron
- 1 × Sponge (for tip cleaning)
- Soldering Iron Tips (various types)
- 1 × USB Charging Cable
- 1 × Solder Wire
- 1 × Operation Instruction Manual (this document)

This image shows all the items included in the Fenikara Cordless Soldering Iron Kit, neatly arranged. It features the soldering iron, multiple soldering tips, a cleaning sponge, solder wire, and a USB charging cable.
4. Product Components
Familiarize yourself with the different parts of your Fenikara Cordless Soldering Iron:

This diagram highlights the key components of the Fenikara Cordless Soldering Iron, including the soldering iron tip, protective cap, LED light, power button, LCD screen, and USB-C charging port. It provides a clear visual guide to the device's structure.
- Soldering Iron Tip: The heated element that melts solder. Replaceable.
- Protective Cap: Covers the tip when not in use for safety and protection.
- LED Light: Illuminates the work area.
- Power Button: Used for power on/off, temperature adjustment, and LED control.
- LCD Screen: Displays current temperature, battery level, and temperature unit.
- USB-C Charging Port: For charging the internal battery and for wired operation.
5. Setup
5.1. Charging the Soldering Iron
Before first use, fully charge the soldering iron. The device can also be used while charging.
- Connect the provided USB-C cable to the charging port on the soldering iron.
- Connect the other end of the USB-C cable to a compatible power source (e.g., PD power bank, laptop, or wall adapter).
- The LCD screen will display the charging status. The battery icon will indicate charging progress.
- Once fully charged, the battery icon will show a full charge.
5.2. Attaching/Changing Soldering Tips
Ensure the soldering iron is cool and powered off before handling the tip.
- Carefully unscrew the retaining nut at the base of the soldering tip.
- Gently pull out the current soldering tip.
- Insert the desired soldering tip into the heating element.
- Securely screw the retaining nut back into place, ensuring the tip is firmly seated.
6. Operating Instructions
6.1. Powering On/Off
- To power on: Press and hold the power button for 3 seconds. The display will flash 260°C three times, then begin heating to the last set temperature.
- To power off: Press and hold the power button for 3 seconds.
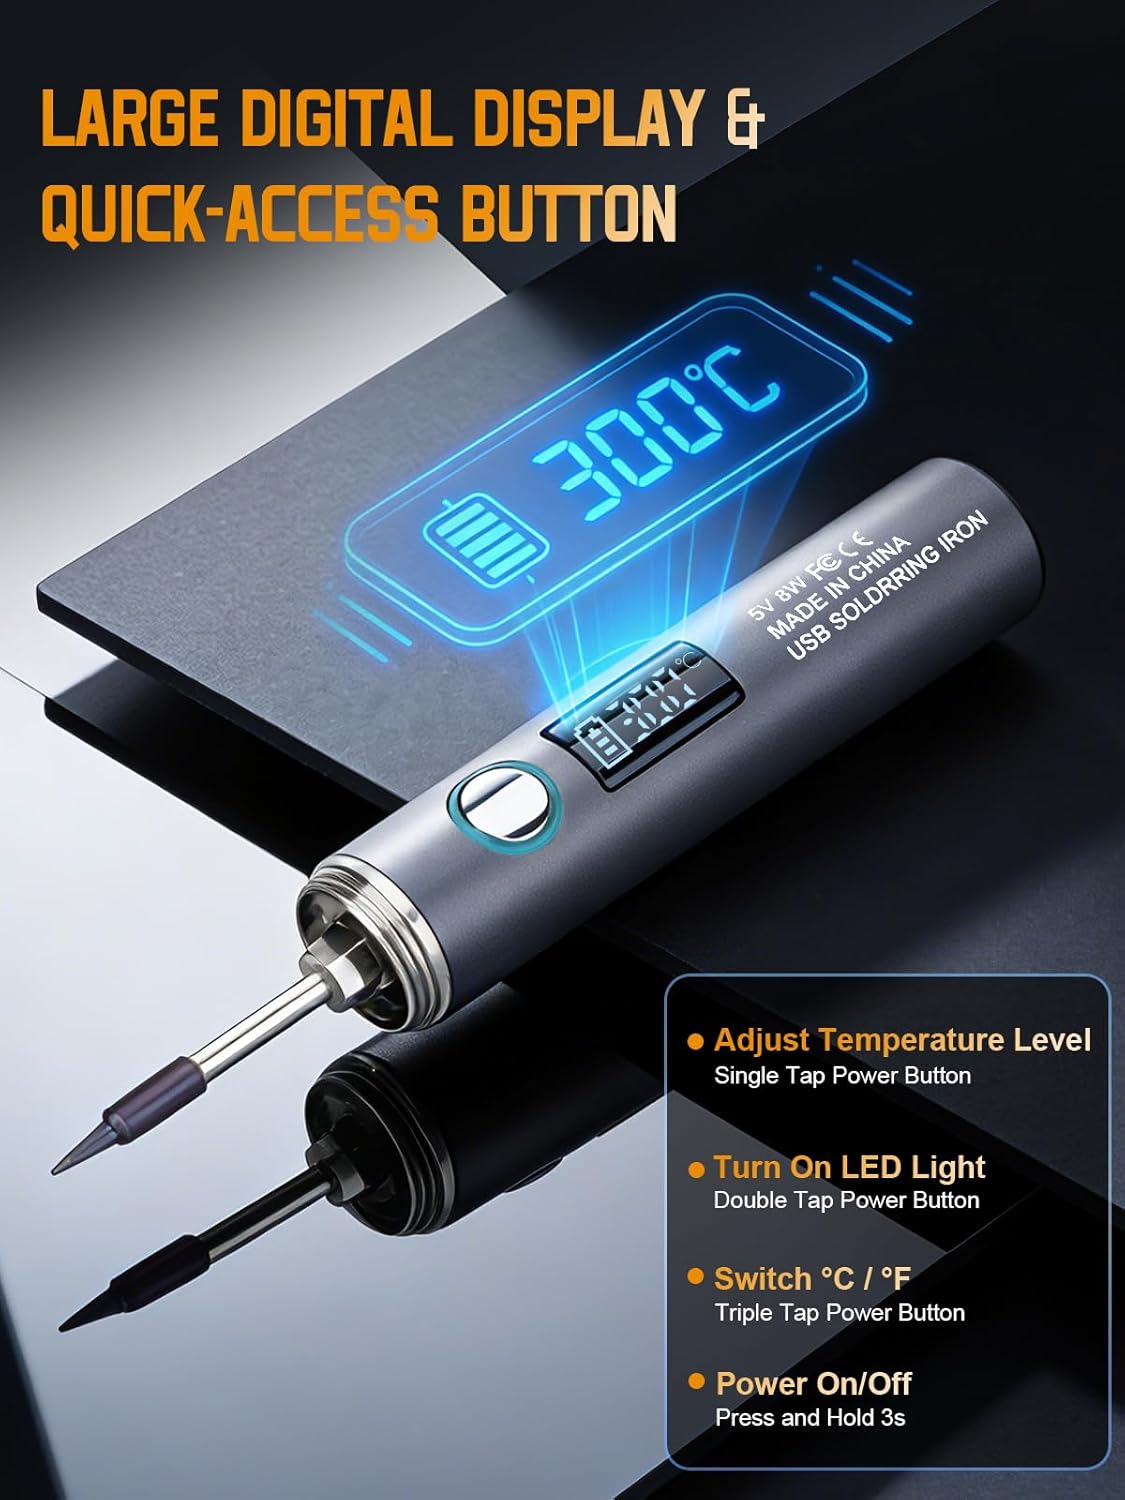
This close-up image illustrates the digital display and control button on the Fenikara Soldering Iron. The display shows the current temperature (e.g., 300°C) and battery level, while the button is used for various functions.
6.2. Adjusting Temperature
The soldering iron offers 5 adjustable temperature levels.
- While the iron is powered on, single-tap the power button to cycle through the 5 temperature levels.
- The LCD screen will display the selected temperature.
Temperature Levels:
- L1: 500°F / 260°C
- L2: 572°F / 300°C
- L3: 644°F / 340°C
- L4: 716°F / 380°C
- L5: 788°F / 420°C

This image visually represents the five distinct temperature levels available on the Fenikara Soldering Iron, ranging from 500°F (260°C) to 788°F (420°C), and indicates how to cycle through them using the power button.
6.3. Switching Temperature Units (°C/°F)
You can switch between Celsius and Fahrenheit display modes.
- While the iron is powered on, triple-tap the power button to toggle between °C and °F.
6.4. Using the LED Work Light
The built-in LED light provides illumination for your work area.
- While the iron is powered on, double-tap the power button to turn the LED light on or off.

This image demonstrates the integrated LED work light on the Fenikara Soldering Iron, illuminating the workspace for better visibility during soldering tasks. The power button is shown with an indication for turning the light on/off.
6.5. Basic Soldering Techniques
For effective soldering, follow these general steps:
- Prepare the Work Area: Ensure a clean, well-ventilated space. Secure components if necessary.
- Tin the Tip: Before first use and periodically during use, melt a small amount of solder onto the tip to coat it. This improves heat transfer and prevents oxidation.
- Heat the Joint: Apply the hot soldering iron tip to both the component lead and the pad/wire simultaneously. Heat both surfaces evenly.
- Apply Solder: Once the joint is hot enough (usually 1-2 seconds), touch the solder wire to the heated joint (not directly to the iron tip). The solder should flow smoothly and quickly around the joint.
- Remove Solder and Iron: Remove the solder wire first, then immediately remove the soldering iron. Allow the joint to cool undisturbed.
- Inspect the Joint: A good solder joint should be shiny, smooth, and concave, resembling a small volcano.

This image shows the Fenikara Cordless Soldering Iron being used to solder components onto a circuit board. The user holds the iron precisely, demonstrating its application in detailed electronic work.
This video, titled "Cordless Soldering Made Easy - Smart Heating, Efficient Work," demonstrates the Fenikara Cordless Soldering Iron in action. It highlights the ease of use, smart heating capabilities, and efficient performance for various soldering tasks, providing a visual guide to its operation.
This video, titled "Fenikara Soldering Iron-Small Tool, Serious Power," showcases the compact size and powerful performance of the Fenikara Soldering Iron. It illustrates how this small tool can handle significant soldering jobs, emphasizing its efficiency and utility.
7. Maintenance
7.1. Cleaning the Soldering Tip
Regular cleaning extends the life of your soldering tip and ensures optimal performance.
- While the tip is hot, gently wipe it on a damp sponge or brass wool to remove excess solder and oxidation.
- Re-tin the tip with a small amount of fresh solder after cleaning and before storing.
- Never file or sand the tip, as this can damage the protective plating.
7.2. Storage
Proper storage helps maintain the condition of your soldering iron.
- Ensure the soldering iron is completely cool before attaching the protective cap and storing.
- Store the iron in a dry, safe place, away from dust and moisture.
- Keep the iron and its accessories in the original packaging or a suitable storage case to prevent damage.
8. Troubleshooting
If you encounter issues with your Fenikara Cordless Soldering Iron, refer to the following common problems and solutions:
| Problem | Possible Cause | Solution |
|---|---|---|
| Iron not heating up | Low battery; Not powered on; Loose tip connection | Charge the battery; Press and hold power button for 3 seconds; Ensure tip is securely fastened. |
| Solder not melting easily | Incorrect temperature setting; Oxidized tip; Insufficient heat transfer | Increase temperature; Clean and re-tin the tip; Ensure tip makes good contact with both surfaces. |
| Battery drains quickly | High temperature setting; Continuous use; Battery degradation | Use a lower temperature if possible; Allow cool-down periods; Ensure full charge before use. |
| LED light not working | Light turned off; Malfunction | Double-tap power button to toggle light; Contact customer support if issue persists. |
| Iron enters sleep mode too soon | Inactivity | This is a safety feature. Briefly touch the power button or move the iron to reactivate. |
9. Specifications
Technical specifications for the Fenikara Cordless Soldering Iron (Model JJXL001):
| Feature | Detail |
|---|---|
| Brand | Fenikara |
| Model Number | JJXL001 |
| Power Source | Battery Powered (1400mAh) |
| Rated Voltage | Max 5V DC |
| Wattage | 8 watts (Max 12W AC Output) |
| Heating Element | Ceramic |
| Temperature Range | 260°C – 420°C (500°F – 788°F) |
| Fast Heating | 7 seconds to tinning temp |
| Runtime | Up to 30-45 minutes (depending on usage) |
| Special Features | Portable, LED Work Light, Digital Display, Automatic Sleep Mode |
| Item Length | 5.79 inches |
| Weight | Approximately 0.14 lb |
10. Warranty and Support
The Fenikara Cordless Soldering Iron (Model JJXL001) comes with a 2-year manufacturer's warranty. This warranty covers defects in materials and workmanship under normal use.
For technical support, warranty claims, or any questions regarding your product, please contact Fenikara customer service through the retailer where you purchased the product or visit the official Fenikara website for contact information.