1. Introduction
Thank you for choosing the Conciseer 60-inch Ceiling Fan with Light and Remote. This manual provides detailed instructions for the safe installation, operation, and maintenance of your new ceiling fan. Please read this manual thoroughly before installation and keep it for future reference.
2. Safety Information
WARNING: To reduce the risk of fire, electric shock, or personal injury, always follow these basic precautions:
- Read all instructions carefully before installing and operating the fan.
- Ensure the power is turned off at the circuit breaker before installation or servicing.
- All wiring must be in accordance with national and local electrical codes. If you are unfamiliar with wiring, consult a qualified electrician.
- The fan must be mounted to a structural ceiling joist or outlet box marked 'Acceptable for Fan Support of 35 lbs (15.9 kg)'.
- Do not operate the fan with a damaged power cord or plug.
- Keep hands, clothing, and other objects away from fan blades when the fan is operating.
- This fan is suitable for indoor and covered outdoor use. Do not expose directly to rain.
3. Package Contents
Verify that all components are present before beginning installation. If any parts are missing or damaged, contact customer support.
- Ceiling Fan Motor Housing
- Fan Blades (6 pieces, White/Wood Grain)
- Light Kit
- Remote Control with Wall Mount
- Downrods (5.91-inch and 15.75-inch)
- Mounting Bracket
- Hardware Pack (screws, wire nuts, washers)
- Instruction Manual
4. Specifications
| Feature | Specification |
|---|---|
| Brand | Conciseer |
| Model | MWH-WD 60inch (Conciseer-60-6-Remote) |
| Fan Size | 60 inches |
| Number of Blades | 6 |
| Blade Material | Wood |
| Motor Type | DC Motor |
| Number of Speeds | 6 |
| Light Wattage | 3.5W-18W (Dimmable) |
| Color Temperature | 2700K, 3500K, 4500K, 5000K, 6500K (5 CCT) |
| Control Method | Remote Control |
| Indoor/Outdoor Usage | Indoor, Covered Outdoor |
| Product Dimensions | 17"D x 13.4"W x 7.4"H (Fan body) |
| Blade Length | 30 Inches |
5. Installation Instructions
This section outlines the general steps for installing your ceiling fan. For detailed diagrams, refer to the included printed manual.
- Prepare for Installation:
- Turn off power at the main circuit breaker.
- Ensure the mounting location is suitable and can support the fan's weight.
- Install Mounting Bracket:
- Secure the mounting bracket to the ceiling outlet box or structural joist using appropriate hardware.
- Assemble Downrod and Fan Motor:
- Select the desired downrod length (5.91-inch or 15.75-inch).
- Feed the electrical wires from the fan motor through the downrod.
- Attach the downrod to the fan motor housing.

Image: Illustration showing the two adjustable downrod lengths (5.91 inches and 15.75 inches) and how they affect the fan's height from the ceiling.
- Hang the Fan:
- Carefully lift the fan assembly and place the downrod ball into the mounting bracket.
- Electrical Wiring:
- Connect the fan's electrical wires to the household wiring according to the wiring diagram in the printed manual. Use wire nuts to secure connections.
- Attach Fan Blades:
- Attach the 6 fan blades to the motor housing using the provided screws. Ensure they are securely fastened. The blades feature a dual-sided design (White/Wood Grain) for aesthetic versatility.
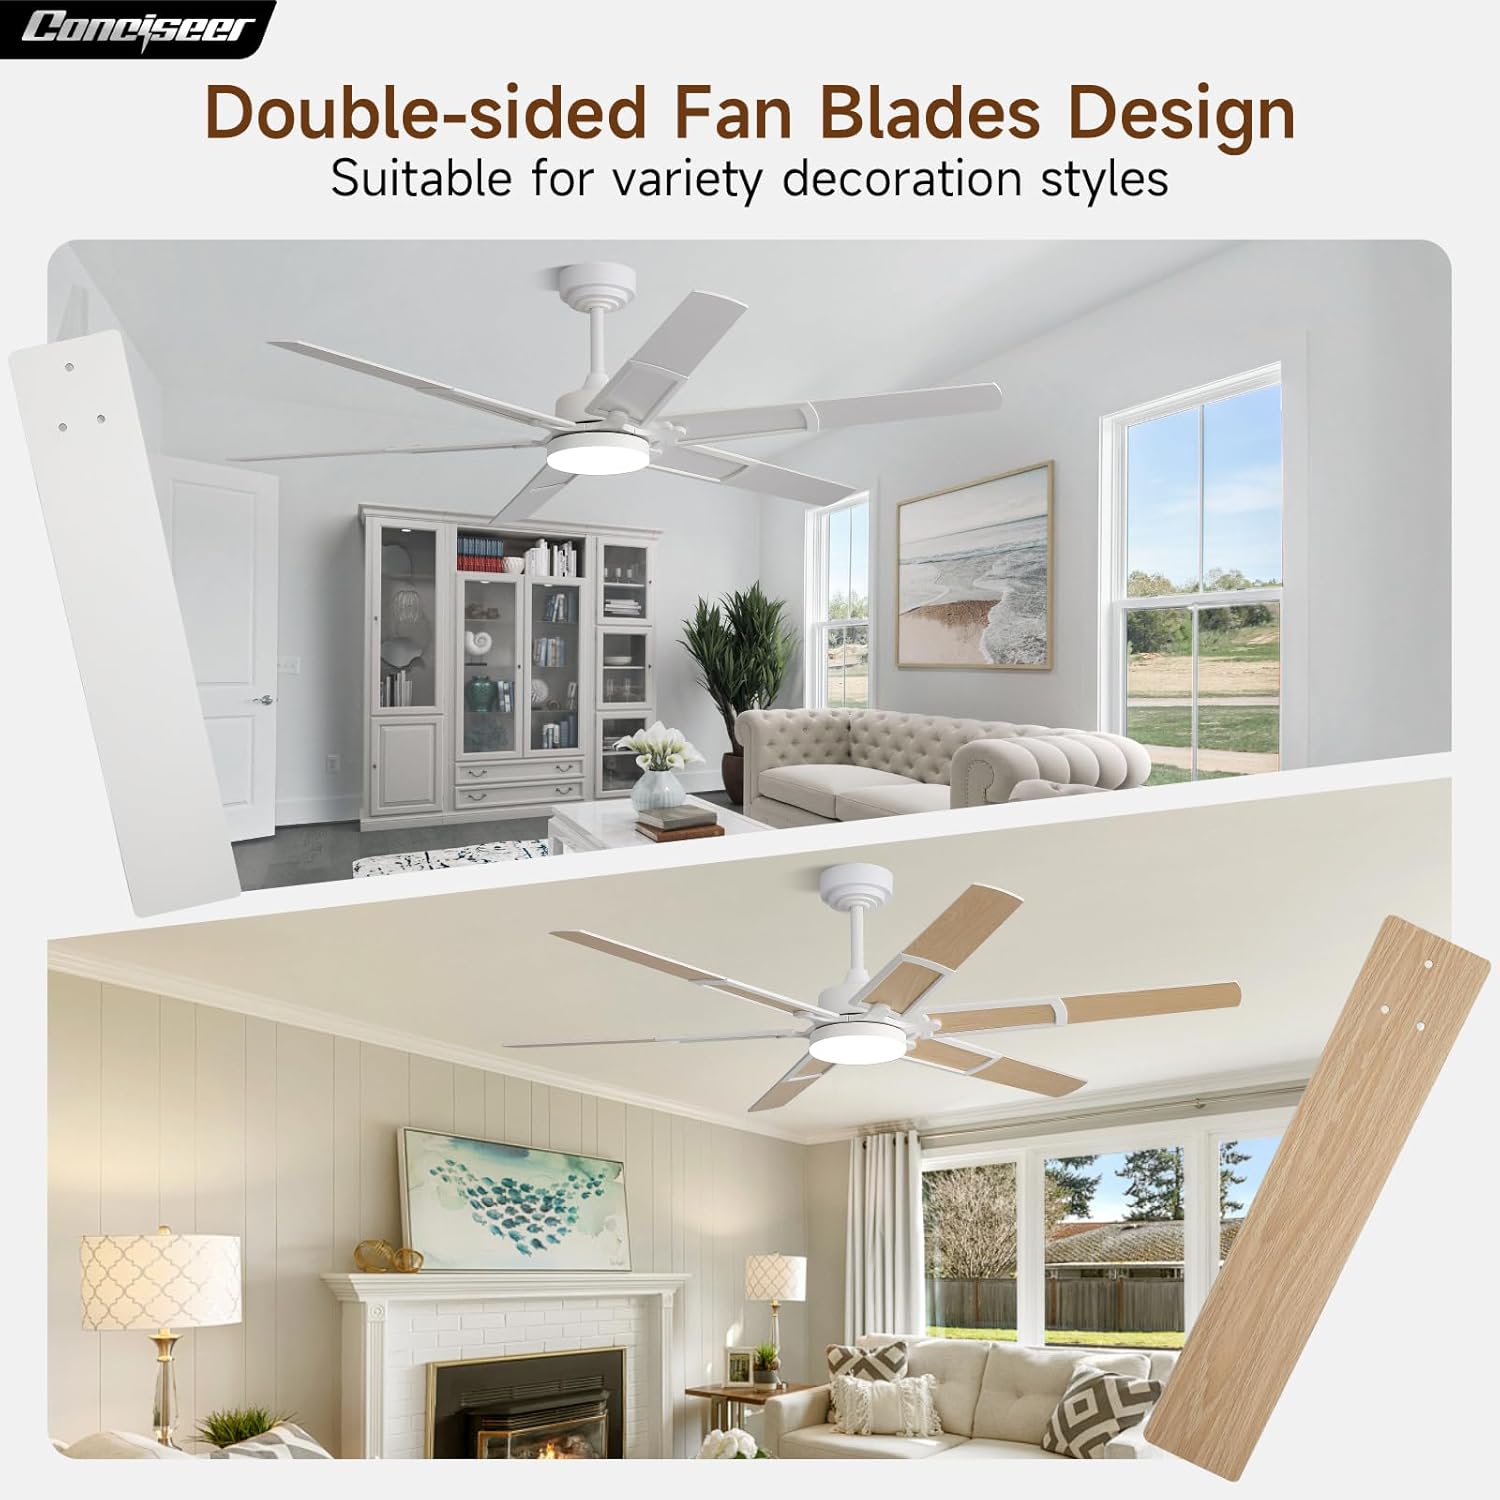
Image: Depicts the ceiling fan with its double-sided blades, showcasing both the white and wood grain finishes, suitable for various decor styles.
- Install Light Kit:
- Connect the light kit wires to the fan motor wires as instructed.
- Secure the light kit to the bottom of the fan motor housing.
- Restore Power:
- Once all connections are secure and the fan is fully assembled, restore power at the circuit breaker.
6. Operation Guide
Your Conciseer ceiling fan is operated using the included remote control. Ensure the remote has fresh batteries installed.
6.1 Remote Control Functions

Image: Diagram illustrating the remote control layout with numbered buttons and their corresponding functions, including fan speed, light control, timer, and reverse.
- (1) All OFF: Turns off both the fan and the light.
- (2) Fan ON/OFF: Turns the fan on or off.
- (3) Light ON/OFF (Matching Code): Turns the light on or off. Press and hold to pair the remote if needed.
- (4) Speed Control (+/-): Adjusts fan speed from 1 to 6.
- (5) Dimmer Control (+/-): Adjusts light brightness from 10% to 100%.
- (6) Fan Forward: Sets the fan to forward rotation (summer mode).
- (7) Fan Reverse: Sets the fan to reverse rotation (winter mode).
- (8) Temperature Color Downwards: Decreases the light color temperature (e.g., from 6500K to 2700K).
- (9) Temperature Color Change: Cycles through the 5 CCT options.
- (10) Temperature Color Upwards: Increases the light color temperature (e.g., from 2700K to 6500K).
- (11) Timer (2H/4H/6H): Sets the fan to turn off automatically after 2, 4, or 6 hours.
- (12) Mute: Mutes remote control beeps or fan sounds (if applicable).
6.2 Fan Speed Control
The fan offers 6 adjustable wind speeds for personalized comfort. Use the Speed Control buttons on the remote to cycle through the settings.
- Speed 1-2: Soft and comfortable wind, ideal for sleeping.
- Speed 3-4: Medium and natural wind, suitable for reading or light activity.
- Speed 5-6: Stronger wind, providing maximum airflow for cooling.

Image: Illustrates the 6 wind speed settings, categorizing them into soft, medium, and strong airflow, with suggested activities for each level.
6.3 Light Control (CCT and Dimming)
The integrated LED light offers 5 color temperature options and stepless dimming.
- Color Temperature: Cycle through 2700K (Warm White), 3500K (Neutral White), 4500K (Cool White), 5000K (Daylight White), and 6500K (Cold White) using the 'Temperature Color Change' or 'Temperature Color Upwards/Downwards' buttons.
- Dimming: Adjust brightness smoothly from 10% to 100% using the 'Dimmer Control' buttons.

Image: Shows the fan's light changing through different color temperatures (2700K to 6500K) and demonstrates the stepless dimming capability from 10% to 100% brightness.
6.4 Reversible Motor Function
The fan features a reversible DC motor, allowing for year-round use to optimize air circulation.
- Summer Mode (Fan Forward): Blades rotate counter-clockwise, pushing air downwards to create a cooling breeze.
- Winter Mode (Fan Reverse): Blades rotate clockwise, drawing air upwards to circulate warm air trapped near the ceiling.

Image: Illustrates the reversible motor function, showing airflow patterns for both summer (downward) and winter (upward) modes in a living room setting.
6.5 Timer Function
Use the timer function to automatically turn off the fan after a set period.
- Press the 'Timer' button on the remote to select 2, 4, or 6 hours. The fan will operate for the selected duration and then turn off.

Image: A person sleeping peacefully, with icons indicating the 2-hour, 4-hour, and 6-hour timer settings for the ceiling fan.
7. Maintenance
Regular maintenance ensures optimal performance and longevity of your ceiling fan.
- Cleaning: Periodically wipe the fan blades and motor housing with a soft, damp cloth. Do not use abrasive cleaners or solvents, as these can damage the finish.
- Blade Balance: If the fan wobbles, check that all blade screws are tight and that the blades are evenly balanced. A balancing kit (not included) may be used if necessary.
- Light Source: The integrated LED light source is designed for long life and is not user-replaceable. If the light fails, contact customer support.
- Motor: The DC motor is designed for quiet operation and requires no lubrication.
8. Troubleshooting
If you experience issues with your fan, refer to the following common problems and solutions:
| Problem | Possible Cause | Solution |
|---|---|---|
| Fan does not start | No power to the fan; Loose wire connections; Remote control battery low or not paired. | Check circuit breaker; Ensure all wiring is secure; Replace remote battery or re-pair remote. |
| Fan wobbles | Loose blade screws; Unbalanced blades; Loose mounting bracket. | Tighten all blade screws; Use a balancing kit; Ensure mounting bracket is securely fastened. |
| Light does not work | Loose wire connection to light kit; Light kit failure; Remote control battery low or not paired. | Check light kit wiring; Contact customer support if light kit is faulty; Replace remote battery or re-pair remote. |
| Fan is noisy | Loose screws; Blades hitting an obstruction; Motor hum. | Tighten all screws; Ensure no obstructions are near blades; DC motor is designed for quiet operation, slight hum is normal. |

Image: Illustrates the low noise level of the DC motor, showing a child sleeping peacefully with noise levels indicated at various distances, emphasizing quiet operation.
9. Warranty and Support
Conciseer is committed to providing high-quality products and excellent customer service. Your ceiling fan is backed by our professional after-sales support team.
If you have any questions during the installation or usage of your Conciseer ceiling fan, please feel free to contact us. Our team is ready to assist you in a timely manner.
For warranty information or to contact support, please refer to the contact details provided with your purchase documentation or visit the official Conciseer website.