Flyrivergo WYS-14-2
Flyrivergo Pro Lapidary Saw WYS-14-2 Instruction Manual
Model: WYS-14-2 | Brand: Flyrivergo
1. Introduction
The Flyrivergo Pro Lapidary Saw WYS-14-2 is a versatile and compact tool designed for cutting, grinding, and polishing various materials, including jade, wood, and beeswax. Equipped with a 1380W motor and adjustable speed up to 15,000 RPM, it offers robust cutting power with low vibration. This equipment features an advanced water-cooling system and a flexible shaft for detailed work. It is primarily intended for gemstone cutting and lapidary applications, not as a substitute for a dedicated woodworking table saw.
2. Safety Instructions
Always prioritize safety when operating power tools. Failure to follow these instructions may result in injury or damage to the equipment.
- Read the Manual: Thoroughly read and understand all instructions before operation.
- Personal Protective Equipment (PPE): Always wear safety goggles to protect your eyes from flying debris. A dust mask is recommended when cutting wood or dry materials.
- Power Disconnection: Disconnect the power cord from the outlet before making any adjustments, changing blades, or performing maintenance.
- Stable Work Surface: Ensure the saw is placed on a stable, level, and secure workbench to prevent tipping or movement during operation.
- Accidental Start Prevention: Utilize the separate on/off button to prevent unintended machine activation.
- Blade Guard: Always use the blade protector to block partial flying debris and dust.
- Water Cooling: When using the diamond blade, ensure the water-cooling system is active and the blade is never operated dry.
- Overload Protection: The built-in overload protection automatically reduces rotation speed if excessive load is detected. If RPM decreases suddenly, reduce the feed speed to prevent motor damage.
- Material Compatibility: This saw is primarily for gemstones. While it can cut wood, it lacks anti-kickback protection and other safety features found on dedicated woodworking saws. Exercise extreme caution when cutting wood.
- Keep Clear: Keep hands, hair, loose clothing, and other objects away from moving parts and blades.
3. Package Contents
Verify that all items listed below are included in your package. If any parts are missing or damaged, contact customer support.

Figure 3.1: All included accessories and components.
- Rock Saw Machine
- Saw Blades (Diamond-coated Steel Blade, Tungsten Carbide Tipped Blade)
- PTFE Tape
- Plastic Sink
- Push Tool
- Blade Guard
- Angle Cutting Ruler (Fence)
- Flexible Shaft Head
- Drill Chuck
- Grinding Wheel Set
- Tapered Shaft
- Carbon Brushes
- Chuck Keys
- Hex Wrenches
- Rubber Adapter
- Hose
- Mini Dust Bag
- Connector
- Water Valve Kit
- Drainpipe
- Small Wrenches
- Cotton Polishing Wheel
- Fiber Polishing Wheel
- Goggles
- Screwdriver
- Flexible Shaft
- Spare Drive Belt
4. Setup Instructions
Follow these steps to set up your Flyrivergo Pro Lapidary Saw.
- Unpack and Inspect: Carefully remove all components from the packaging. Inspect for any damage during transit.
- Position the Saw: Place the main saw unit on a stable, level, and clean work surface.
- Install Blade Guard: Secure the transparent blade guard over the saw blade using the provided screws. Ensure it is firmly attached for safety.
- Attach Water Supply System: Connect the water hose to the dust cover. Attach the other end of the hose to a water source (e.g., faucet with 1/2" NPS threaded connector) or a submersible pump (not included). Ensure the adjustable flow valve beneath the worktable is accessible.
- Set up Drainage: Connect the drainpipe to the saw's drainage outlet. Use the dual-ended rubber adapter to fit it into a sink outlet.
- Install Desired Blade/Attachment:
- For Saw Blades: Ensure the correct blade (diamond for rock, tungsten carbide for wood) is securely mounted.
- For Flexible Shaft: Attach the flexible shaft to the designated port on the side of the saw. Securely fasten the flexible shaft head or drill chuck with the desired accessory (e.g., grinding wheel, polishing wheel).
- Power Connection: Once all components are securely installed, connect the power cord to a 110V power outlet.

Figure 4.1: Adjusting the angle cutting fence during setup.

Figure 4.2: Water supply and drainage system connections.
Video 4.1: Official guide on how to install the lapidary saw.
Video 4.2: Official guide on how to remove the lock pin of the spindle.
5. Operating Instructions
Before operating, ensure all safety precautions are understood and followed.
- Power On: Press the 'ON' button to start the machine. The speed knob should be at the minimum setting (zero RPM) before starting.
- Adjust Speed: Slowly turn the adjustable speed knob to achieve the desired RPM (up to 15,000 RPM). Start with lower speeds and gradually increase as needed for your material and task.
- Activate Water Cooling (for Diamond Blade): If using the diamond blade for cutting rocks or gemstones, open the adjustable flow valve to ensure a steady stream of water cools the blade. Never operate the diamond blade dry.
- Cutting with Diamond Blade (Rocks/Gemstones):
- Position the rock or gemstone against the fence (if used) and slowly feed it into the rotating diamond blade with steady, light pressure.
- Avoid forcing the material, as this can cause the motor to overload or damage the blade.
- The maximum cutting depth is approximately 42mm.
- Cutting with Tungsten Carbide Tipped Blade (Wood):
- For wood, laminate, MDF, and other wood-based materials, use the tungsten carbide tipped blade.
- Maintain steady and moderate pressure. Always wear goggles and a dust mask.
- Be aware that this saw lacks anti-kickback protection; exercise caution.
- Using the Flexible Shaft:
- The flexible shaft allows for precise, detailed work or reaching hard-to-access areas.
- Attach the desired accessory (e.g., drill bit, grinding stone, polishing head) to the flexible shaft head.
- Use the speed control knob to adjust the rotation speed for the flexible shaft.
- Overload Protection: If you notice a sudden decrease in RPM or the motor struggling, it indicates overloading. Immediately reduce the feed speed or the pressure applied to the material.
- Power Off: Once finished, turn the speed knob to the minimum setting (zero RPM) and press the 'OFF' button. Disconnect the power cord.

Figure 5.1: Cutting a rock with the diamond saw blade.

Figure 5.2: Close-up of diamond blade in action, ideal for jade, marble, agate.

Figure 5.3: Tungsten carbide tipped blade cutting wood, suitable for wood-based materials.

Figure 5.4: Using the flexible shaft for detailed work.
6. Maintenance
Regular maintenance ensures optimal performance and extends the lifespan of your lapidary saw.
- Cleaning: After each use, especially when wet cutting, clean the saw thoroughly to prevent mineral buildup and corrosion. Disconnect power before cleaning.
- Water System: Flush the water-cooling and drainage systems regularly to prevent clogs from debris.
- Blade Inspection: Periodically inspect blades for wear, damage, or dullness. Replace worn blades to maintain cutting efficiency and safety.
- Flexible Shaft: Keep the flexible shaft clean and free of kinks. Lubricate as per manufacturer recommendations if applicable.
- General Inspection: Check all screws and fasteners for tightness. Ensure all guards and safety features are in place and functioning correctly.
7. Troubleshooting
This section addresses common issues you might encounter.
| Problem | Possible Cause | Solution |
|---|---|---|
| Saw does not power on. | No power supply; loose connection; faulty switch. | Check power cord connection; ensure outlet is functional; verify switch position. |
| Motor RPM decreases suddenly during cutting. | Overloading due to excessive feed pressure or hard material. | Reduce feed speed and pressure on the material. Allow the saw to work at its own pace. |
| Blade not cutting effectively. | Dull or damaged blade; incorrect blade for material; insufficient water cooling (diamond blade). | Replace blade; ensure correct blade type is used; verify water flow for diamond blade. |
| Excessive vibration or noise. | Loose components; unbalanced blade; unstable work surface. | Check all fasteners for tightness; inspect blade for damage; ensure saw is on a stable surface. |
| Water system not flowing or draining properly. | Clogged hose or drainpipe; water valve closed. | Check for clogs in hoses and drainpipe; ensure water valve is open. |
8. Specifications
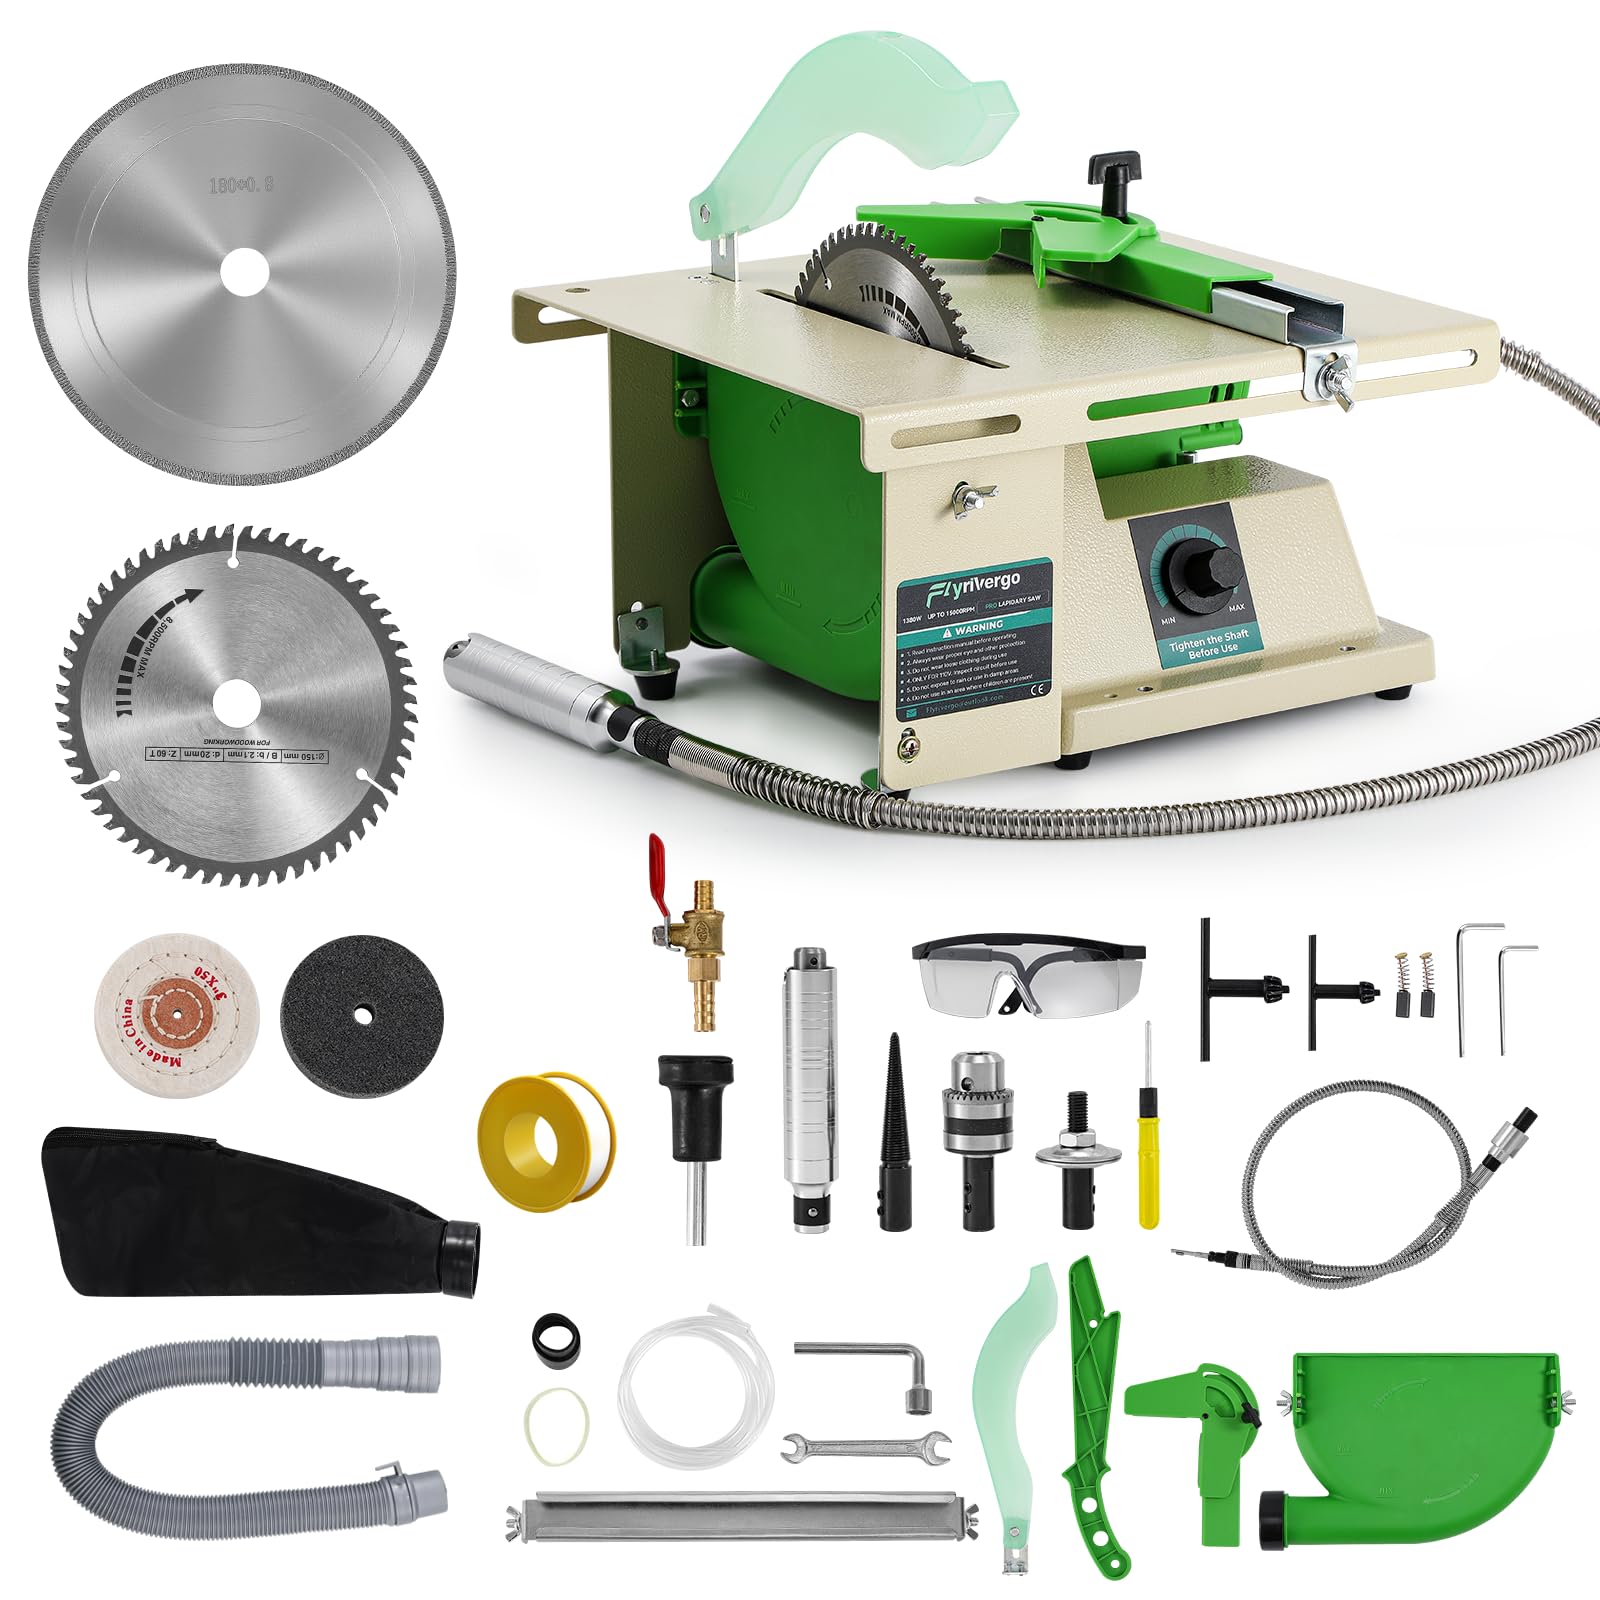
Figure 8.1: Product Parameters.
| Feature | Detail |
|---|---|
| Brand | Flyrivergo |
| Model Number | WYS-14-2 |
| Power Source | Corded Electric |
| Voltage | 110 Volts |
| Wattage | 1380 Watts |
| Speed | Up to 15,000 RPM |
| Blade Material | Diamond-coated Steel Blade, Tungsten Carbide Tipped Blade |
| Cutting Depth | 42mm (approx. 1.65 inches) |
| Item Dimensions (L x W x H) | 11.81" x 10.63" x 6.5" |
| Special Features | Dust Collection, Upgraded Motor, Adjustable Speed, Water Cooling System, Flexible Shaft |
| Surface Recommendation | Wood, Stone, Gemstones, Jade, Agate, Beeswax |
9. Warranty Information
This Flyrivergo Pro Lapidary Saw WYS-14-2 comes with a 1-Year Manufacturer Warranty. Please retain your proof of purchase for warranty claims. The warranty covers defects in materials and workmanship under normal use. It does not cover damage resulting from misuse, abuse, unauthorized modifications, or normal wear and tear.
10. Customer Support
For technical assistance, troubleshooting not covered in this manual, or warranty claims, please contact Flyrivergo customer support. Refer to the product packaging or the official Flyrivergo website for the most current contact information.
Related Documents - WYS-14-2
 |
Flyrivergo Leather Burnishing Machine Assembly and Usage Guide A comprehensive guide to assembling and using the Flyrivergo Leather Burnishing Machine, including safety precautions and usage tips. |
 |
LFY1 Smart Toilet by Los Flexi: Features, Specifications, and Package Contents Explore the LFY1 Smart Toilet from Los Flexi. Detailed features, technical specifications, dimensions, and package contents for this advanced bidet toilet. |
 |
Los Flexi LFE5 Smart Toilet: Features, Specifications, and Dimensions Detailed information on the Los Flexi LFE5 Smart Toilet, including its advanced features, technical specifications, dimensions, and package contents. Discover intelligent bathroom technology. |
 |
Los Flexi LFE6 Smart Toilet: Features, Specifications, and Dimensions Detailed overview of the Los Flexi LFE6 Smart Toilet, including its key features, comprehensive specifications, dimensions, and package contents. Learn about its intelligent functions, design, and installation requirements. |
 |
WYS-2306BT Wireless Speaker User Manual User manual for the WYS-2306BT Wireless Speaker, detailing its functions, technical specifications, and FCC compliance information. |
 |
Pioneer HVAC Systems Product Catalog 2024 Comprehensive catalog detailing Pioneer's high-efficiency DC Inverter air conditioning and heating systems, including single-zone, multi-zone, ductless, and ducted units. Features detailed specifications, capacities, and energy efficiency ratings for various models. |
Ask a question about this manual
Ask about setup, troubleshooting, compatibility, parts, safety, or missing instructions. Manuals+ will review the question and use this page’s manual context to help answer it.