1. Introduction
The Thermalright ARGB and Fan HUB X8 IR Black is a versatile controller designed to manage up to eight Addressable RGB (ARGB) devices and eight Pulse Width Modulation (PWM) fans simultaneously. This hub allows for synchronized lighting effects and fan speed monitoring, enhancing your PC's aesthetics and cooling performance. It features a wireless remote control for convenient adjustments and is powered directly via SATA for stable output.

Image 1.1: The Thermalright ARGB and Fan HUB X8 IR Black, showcasing its design and connectivity capabilities for eight PWM and 3PIN ARGB ports.
2. Product Overview
This hub is engineered for efficient cable management and robust performance. It supports the synchronization of both ARGB lighting effects and fan speeds, providing a cohesive look and optimized cooling for your system. The compact design allows for easy integration into most PC cases.
- ARGB and PWM Support: Connects up to 8 ARGB devices (3-pin 5V) and 8 PWM fans (4-pin).
- Motherboard Synchronization: Achieves lighting effect synchronization and fan speed monitoring through motherboard connections.
- Stable Power Output: Utilizes SATA direct power input for continuous and stable operation, even under high load.
- Wireless Remote Control: Offers convenient control over lighting modes, brightness, and color.
- Fan Speed Monitoring: A dedicated red port allows the motherboard to read the speed of a single fan.

Image 2.1: The ARGB and Fan HUB X8 IR Black, illustrating its capacity to connect up to eight PC fans or ARGB devices simultaneously for effective wire management.

Image 2.2: The hub's design for exquisite craftsmanship and efficient cable management, supporting eight groups of ARGB lighting fans.
3. Package Contents
Please verify that all items are present in the package:
- Thermalright ARGB and Fan HUB X8 IR Black Unit
- Wireless Remote Control
- Connection Cable(s)
- Double-sided adhesive stickers (for mounting)

Image 3.1: Contents of the package, including the hub unit, wireless remote control, and necessary cables.
4. Installation Guide
Follow these steps to properly install your Thermalright ARGB and Fan HUB X8 IR Black:
- Mount the Hub: Choose a suitable location inside your PC case. Use the provided double-sided adhesive stickers to securely mount the hub. Ensure the IR receiver on the hub is not obstructed if you plan to use the remote control.
- Connect SATA Power: Connect a SATA power cable from your power supply unit (PSU) to the SATA power input port on the hub. This provides stable power to all connected fans and ARGB devices. Note: A SATA cable is not included with the hub.

Image 4.1: Close-up of the SATA power input on the hub, which provides power for up to eight fans.
- Connect Fans: Connect your PWM fans to the 4-pin fan headers on the hub. The hub supports up to eight fans. For fan speed monitoring, connect one fan to the red PWM port. This specific port is used by the motherboard to read a single fan's speed.

Image 4.2: Diagram showing the SATA direct power input, 8 PWM fan ports, and 8 ARGB 3-pin ports. The red port is highlighted for fan speed recognition.
- Connect ARGB Devices: Connect your 3-pin 5V ARGB devices (fans, LED strips, etc.) to the ARGB headers on the hub. The hub supports up to eight ARGB devices.
- Connect to Motherboard (Optional for Sync): To synchronize lighting effects and enable fan speed monitoring via your motherboard, connect the appropriate 3-pin 5V ARGB header cable and 4-pin PWM cable from the hub to your motherboard's corresponding headers.
- Cable Management: Route all cables neatly to ensure proper airflow and a clean build. The hub's design facilitates organized wiring.

Image 4.3: Illustration of easy cable management with the hub, promoting neat wiring for ARGB cooling fans.
5. Operating Instructions
The Thermalright ARGB and Fan HUB X8 IR Black can be controlled via the included wireless remote control or synchronized with your motherboard's software.
5.1. Using the Wireless Remote Control
Before first use, ensure you remove the plastic film from the remote control's battery compartment to activate it.

Image 5.1: Reminder to remove the plastic film from the IR remote control before use.
The remote control provides direct access to various lighting effects and brightness settings. Point the remote towards the hub's IR receiver for optimal functionality.

Image 5.2: Detailed diagram of the wireless remote control, indicating the function of each button for lighting effects, brightness, and color selection.
- Power Button: Turn ARGB lighting ON/OFF.
- R/M Button: Switch between motherboard control and remote control modes.
- Indicator Light: Shows remote activity.
- Auto Lighting Effect Loop: Cycles through various lighting effects automatically.
- Speed +/-: Adjust the speed of dynamic lighting effects.
- Mode: Cycle through different lighting modes.
- Brightness +/-: Increase or decrease the brightness of the ARGB lighting.
- R, G, B Buttons: Select Red, Green, or Blue static colors.
- Color Shortcut Buttons: Directly select various preset colors.
- Previous/Next Light Mode: Navigate through available lighting effects.
5.2. Motherboard Synchronization
If connected to your motherboard's ARGB (3-pin 5V) and PWM headers, the hub will synchronize with your motherboard's software (e.g., ASUS Aura Sync, MSI Mystic Light, Gigabyte RGB Fusion, ASRock Polychrome Sync). This allows for centralized control of lighting and fan speed monitoring through your PC's operating system.
6. Important Notes
- Fan Speed Regulation: This hub does not have the function to regulate fan speed directly. Fan speed regulation must be managed through your motherboard's BIOS settings or compatible software if the hub is connected to the motherboard's PWM header.
- PWM Speed Recognition: Due to the design of motherboard ICs, the motherboard can only recognize the speed of a single fan. Ensure the fan you wish to monitor is connected to the designated red PWM interface on the hub.

Image 6.1: The red fan socket on the hub, which is specifically designed for the motherboard to read a single fan's speed signal.
- SATA Cable: A SATA power cable is required for operation but is not included with the hub. Please use a SATA power cable from your power supply unit.
- ARGB Voltage: Ensure your ARGB devices are 3-pin 5V. This hub is not compatible with 4-pin 12V RGB devices.
7. Specifications
| Feature | Detail |
|---|---|
| Model | ARGB and Fan HUB X8 IR BLACK |
| Dimensions (L x W x H) | 5.51" x 2.48" x 0.63" (140mm x 63mm x 16mm) |
| Fan Ports | 8 x 4-pin PWM |
| ARGB Ports | 8 x 3-pin 5V ARGB |
| Power Connector | SATA |
| Voltage | 12 Volts (DC) |
| Control Method | Wireless IR Remote Control / Motherboard Sync |
| Material | Plastic |
| Compatible Devices | Desktop PCs |
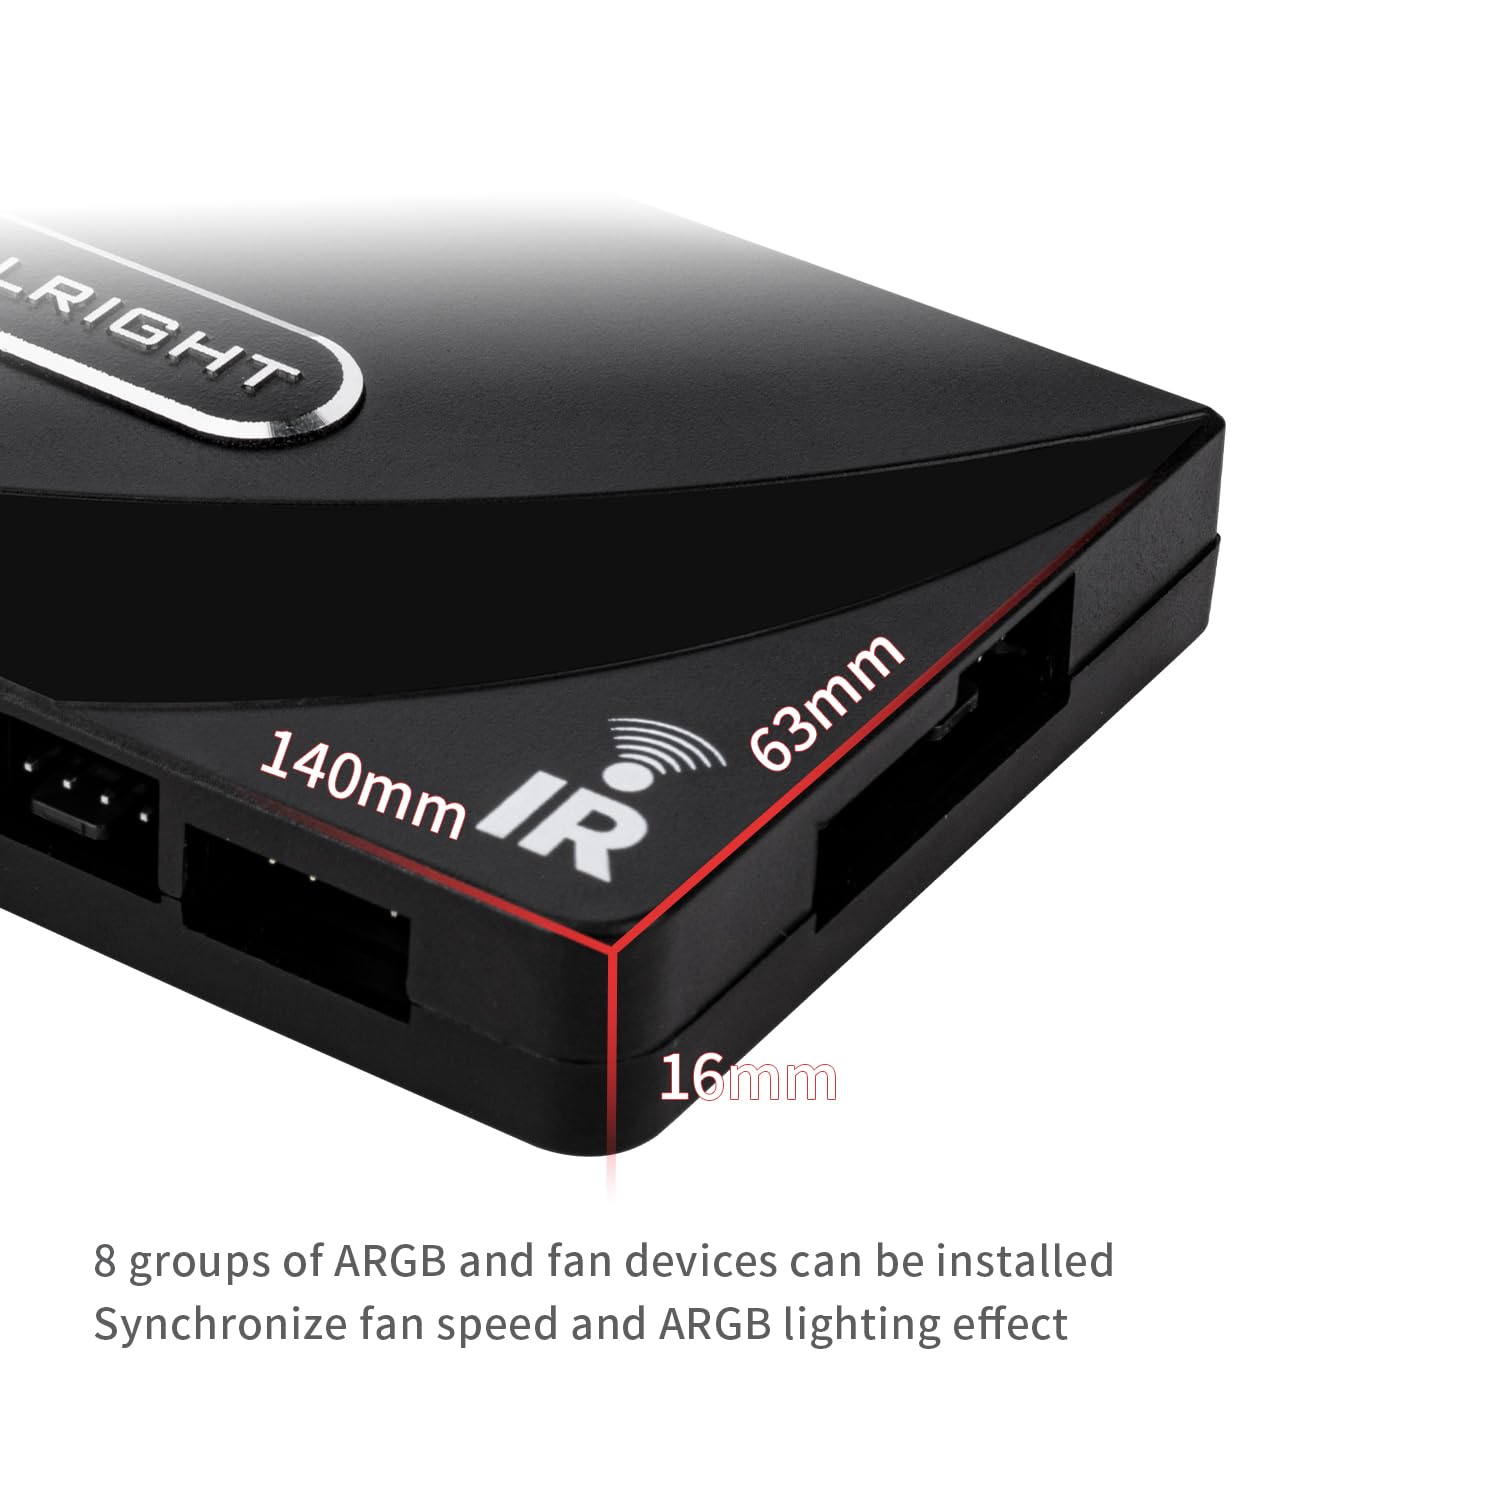
Image 7.1: Dimensions of the Thermalright ARGB and Fan HUB X8 IR Black, measuring 140mm x 63mm x 16mm.
8. Troubleshooting
- No Power to Hub/Fans/ARGB:
- Ensure the SATA power cable is securely connected from your PSU to the hub.
- Check your PSU connections and ensure it is powered on.
- ARGB Lighting Not Working:
- Verify that ARGB devices are 3-pin 5V and correctly plugged into the hub.
- If using motherboard sync, ensure the hub's ARGB cable is connected to the correct 3-pin 5V header on your motherboard and that the motherboard software is configured correctly.
- If using the remote, ensure the plastic film is removed and the remote is pointed at the hub's IR receiver. Try changing modes or colors.
- Fans Not Spinning or Incorrect Speed:
- Ensure fans are 4-pin PWM and correctly plugged into the hub.
- Remember, the hub does not regulate fan speed. If connected to the motherboard, adjust fan curves in your motherboard's BIOS or software.
- If a fan is connected to the red port, ensure it is functioning correctly for speed monitoring.
- Remote Control Not Responding:
- Check if the plastic film has been removed from the battery compartment.
- Ensure there are no obstructions between the remote and the hub's IR receiver.
- Replace the remote control battery if necessary.
9. Maintenance
To ensure the longevity and optimal performance of your Thermalright ARGB and Fan HUB X8 IR Black:
- Keep the hub clean and free from dust. Use a soft, dry cloth for cleaning.
- Avoid exposing the hub to extreme temperatures or humidity.
- Ensure all cable connections are secure and not under strain.
- Do not attempt to disassemble the hub, as this may void any potential warranty.
10. Warranty Information
Specific warranty details for the Thermalright ARGB and Fan HUB X8 IR Black are not provided within this manual. For information regarding warranty coverage, duration, and claims, please refer to the official Thermalright website or contact your retailer directly. Keep your proof of purchase for any warranty-related inquiries.
11. Customer Support
If you encounter any issues or have questions not covered in this manual, please visit the official Thermalright website for support resources, FAQs, and contact information. You may also reach out to your point of purchase for assistance.