1. Introduction and Overview
The CooSpo S10 Power Meter Spider is a precision cycling power meter designed to provide accurate and reliable power, cadence, and torque effectiveness data. This dual-sided power meter is specifically engineered for Easton 110 BCD 4-bolt cranksets, ensuring seamless integration and optimal performance for both road and mountain bikes. With Bluetooth and ANT+ dual connectivity, it pairs effortlessly with various cycling computers and apps, helping you train smarter and perform better.

Image 1: CooSpo S10 Power Meter Spider for Easton 110 BCD 4-Bolt Crankset.
2. What's in the Box
Please verify that all components are present in the package:
- S10-Easton 110 BCD 4-Bolt Bike power meter spider x 1
Note: Other tools and components like cranks, chainrings, and specific installation tools are typically sold separately or are part of your existing bike setup.
3. Setup and Installation
Proper installation is crucial for accurate data and safe operation. It is recommended to consult a professional bike mechanic if you are unsure about any steps.
3.1 Tools Needed
- 5 mm hex wrench
- 6 mm hex wrench
- Torque wrench (for precise tightening)
- 44 mm - 16T lockring tool
- Crankset removal tool (specific to your crankset, e.g., Shimano or SRAM)
3.2 Power Meter Spider Installation
- Remove Crankset: Carefully remove your existing crankset from your bike using the appropriate crankset removal tool.
- Prepare Easton Crankset: Ensure your Easton crankset is clean and ready for the power meter installation.
- Align Power Meter: Align the CooSpo S10 Power Meter Spider with the right crank interface. Ensure it sits correctly in position.
- Install Lockring: Fit the lockring over the spider, aligning it with the indicated direction.
- Tighten Lockring: Use a 44 mm - 16T lockring tool along with a torque wrench to tighten the lockring clockwise. Apply a torque of 35-40 N·m.
3.3 Chainring Installation
This product package does not provide a chainring. Please refer to your chainring's manual for installation instructions. Ensure your chainrings are 110 BCD compatible with the power meter. Make sure the chainring is installed in the correct direction.
3.4 Crankset Installation
- Check Bottom Bracket: Confirm that your bike's bottom bracket is Shimano standard 24mm. If not, replace the bottom bracket before proceeding.
- Apply Grease: Apply a small amount of grease to the bottom bracket shell.
- Insert Drive-Side Crank: Insert the drive-side crank (with the power meter and chainrings installed) into the bottom bracket. You may need to gently tap it to ensure the crank is fully seated.
- Slide Left Crank Arm: Slide the left crank arm onto the spindle of the right crank assembly. Ensure the left crank is positioned 180 degrees opposite the right crank.
- Thread Spindle Bolt: Thread the spindle bolt into the left end of the spindle (clockwise thread). Note that the slot on the left crank should be at its widest position.
- Tighten Spindle Bolt: Use the supplied preload tool to tighten the spindle bolt (clockwise thread). Confirm the tightening torque with a torque wrench to 1-1.5 N·m. Do not overtighten, as this may cause poor rotation.
- Tighten Left-Crank Fixing Bolts: Tighten the two left-crank fixing bolts using a 5 mm hex wrench. Do not tighten one bolt fully at once; instead, tighten both alternately in small increments. Confirm the final torque with a torque wrench to 12-15 N·m.
- Reinstall Chain: After installation, reinstall the chain.
Video 1: CooSpo S10 Bike Spider Power Meter Installation Guide. This video demonstrates the step-by-step process of installing the CooSpo S10 power meter onto your bike's crankset.
4. Pairing with the Device
The CooSpo S10 Power Meter supports both Bluetooth and ANT+ connectivity for seamless pairing with your cycling computer or smartphone app.
- Wake Up Power Meter: Before pairing, ensure the power meter is awake. Rotate the crank several times to activate it.
- Search for Device: On your cycling computer or smartphone app (e.g., CooSpoRide, Zwift, Garmin Connect), navigate to the sensor pairing menu. Search for new power meter devices.
- Connect: Select the CooSpo S10 from the list of available devices. It will typically appear with a unique ANT ID or Bluetooth name.
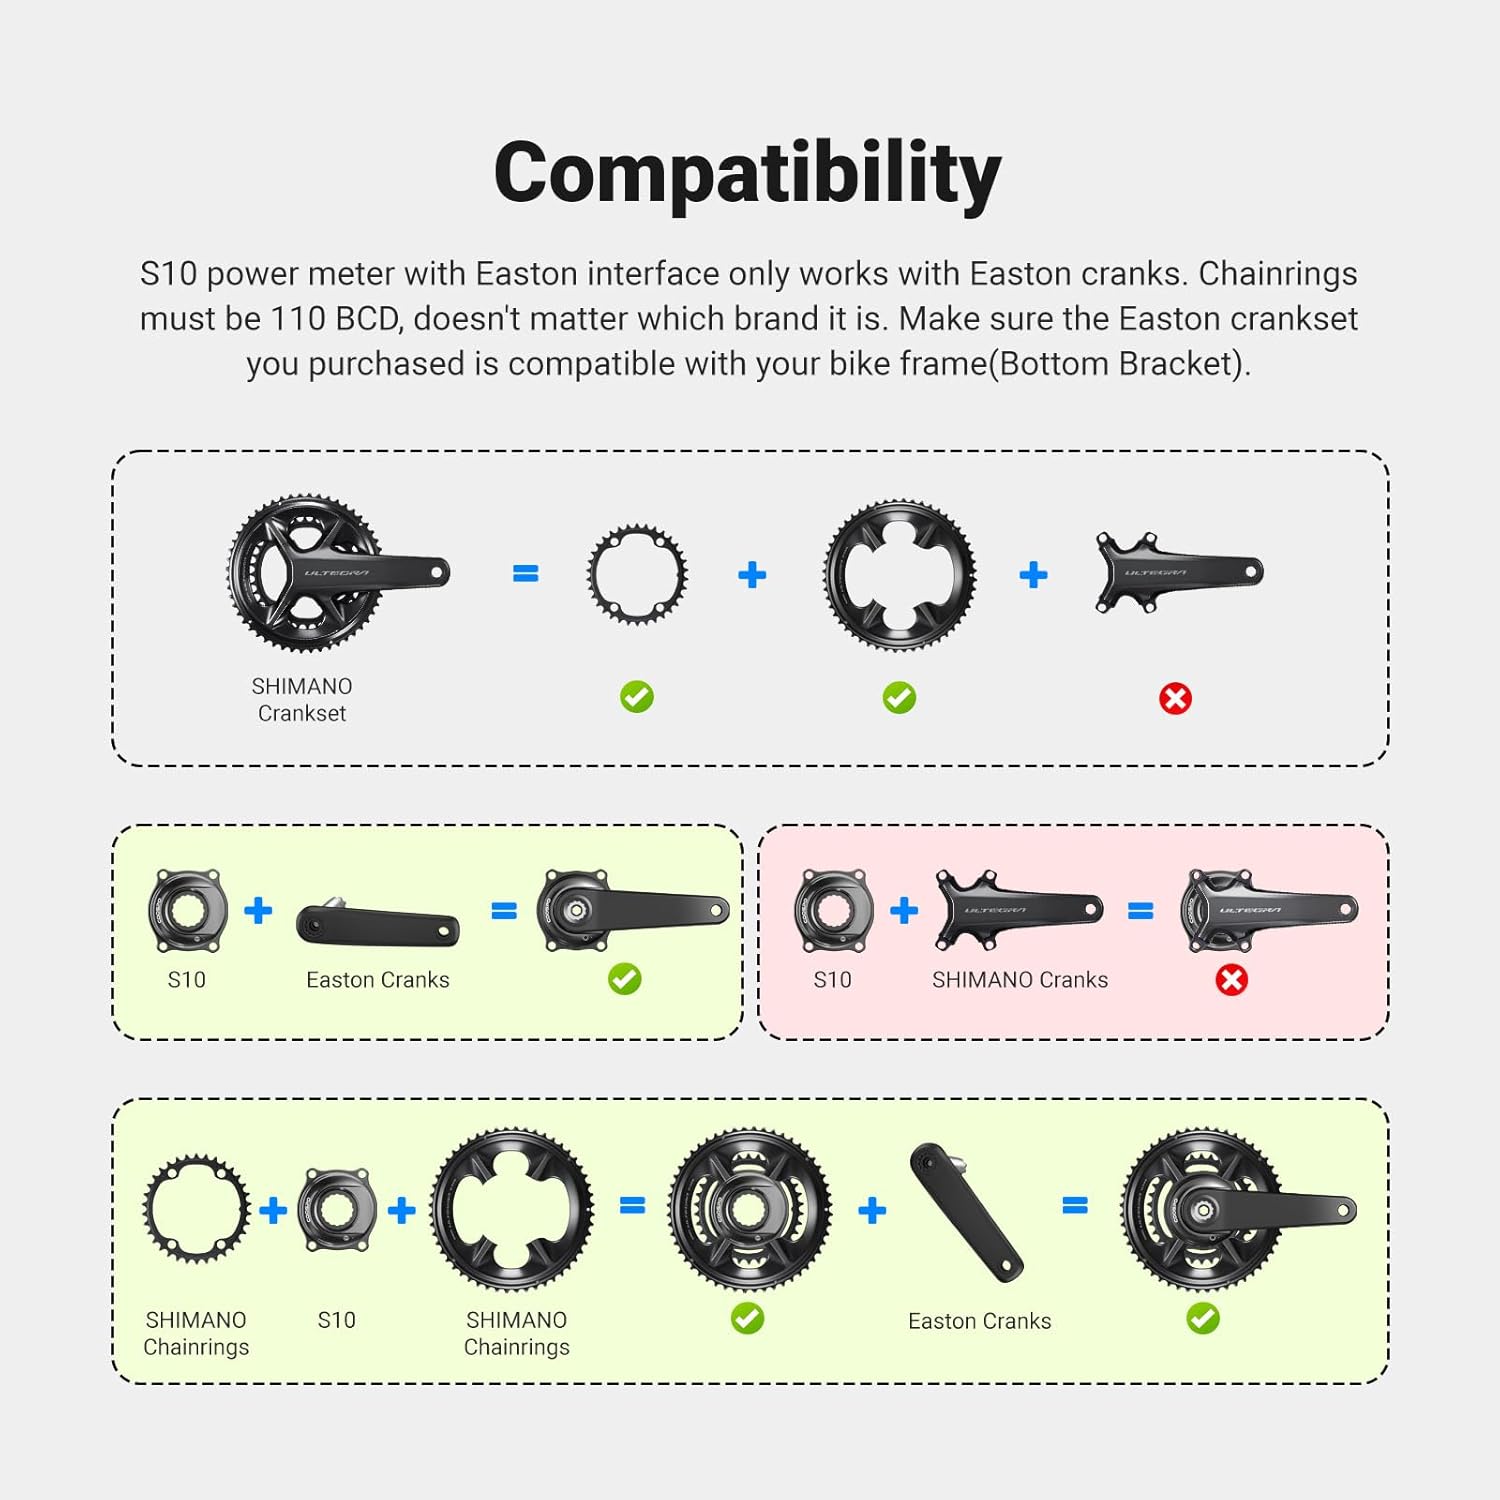
Image 2: The CooSpo S10 Power Meter offers instant connectivity via Bluetooth and ANT+ to various cycling computers and apps.
5. Zero Point Calibration
To ensure accurate power measurement, perform a zero point calibration after each installation or a long ride. This compensates for any environmental or mechanical changes.
- Position Crank: Ensure the crank arm is in a vertical position (6 or 12 o'clock) and there is no weight on the pedals.
- Access Calibration: On your paired cycling computer or app, find the 'Calibrate' or 'Zero Offset' function for the power meter.
- Perform Calibration: Initiate the calibration process. The device will typically display a success message and a zero offset value upon completion.
6. Operating Instructions
The CooSpo S10 Power Meter automatically activates when you start pedaling and transmits data to your paired device.
- Data Tracking: The S10 provides real-time data for power output, cadence, and torque effectiveness. Dual-sided measurement accurately tracks total, left/right leg power and cadence for balanced training analysis.
- Pedal Smoothness: Advanced dual-sided sensing analyzes left and right Pedal Smoothness (Torque Effectiveness), providing actionable data to eliminate dead spots, improve pedal circularity, and boost overall power transfer.
- Connectivity: Seamlessly connects with Garmin/Wahoo cycling computers and supports pairing with most cycling apps via Bluetooth and ANT+.

Image 3: Smarter Training Insights provided by the CooSpo S10 Power Meter, including power, cadence, left-right balance, and pedal smoothness.
7. Maintenance
To ensure the longevity and optimal performance of your CooSpo S10 Power Meter, follow these maintenance guidelines:
- Cleaning: Clean the power meter regularly with a damp cloth. Avoid using harsh chemicals or abrasive materials.
- Charging: The integrated rechargeable battery provides up to 300 hours of use. Charge the device using the magnetic charging cable when the battery is low.
- Water Resistance: The S10 has an IPX7 waterproof rating, protecting it from rain, mud, and dust. However, avoid submerging it in water for extended periods.
- Storage: Store the power meter in a cool, dry place when not in use.

Image 4: The CooSpo S10 Power Meter features a rechargeable battery offering up to 300 hours of use on a single charge.

Image 5: The CooSpo S10 Power Meter is waterproof with an IPX7 rating, making it suitable for all-weather riding conditions.
8. Troubleshooting
If you encounter issues with your CooSpo S10 Power Meter, try the following steps:
- No Power/Connectivity:
- Ensure the battery is charged.
- Rotate the crank several times to wake up the power meter.
- Check that Bluetooth/ANT+ is enabled on your receiving device.
- Try re-pairing the device.
- Inaccurate Readings:
- Perform a zero point calibration.
- Ensure the power meter is securely installed and all bolts are torqued to specification.
- Check for any physical damage to the power meter or crankset.
- App/Computer Issues:
- Update your cycling computer's firmware or smartphone app to the latest version.
- Restart your cycling computer or smartphone.
9. Specifications
| Feature | Detail |
|---|---|
| Accuracy | ±1% |
| Compatibility | Easton 110 BCD 4-Bolt Cranksets |
| Measurement Type | Dual-Sided Power, Cadence, Torque Effectiveness |
| Connectivity | Bluetooth & ANT+ |
| Battery Life | Up to 300 hours (rechargeable) |
| Water Resistance | IPX7 |
| Material | Aluminum Alloy |
| Weight | Approx. 100g |
| Item Package Dimensions | 5.24 x 5.2 x 1.54 inches |
| Package Weight | 0.25 Kilograms |
10. Warranty and Support
The CooSpo S10 Power Meter Spider comes with a 12-month warranty from the date of purchase. For warranty claims, technical support, or any inquiries, please contact CooSpo customer service through their official website or the retailer where the product was purchased.
Please retain your proof of purchase for warranty validation.