1. Introduction and Safety Information
Thank you for choosing the LANCHEZ 1.6HP Shallow Well Pump with Pressure Tank. This manual provides essential information for the safe installation, operation, and maintenance of your pump. Please read this manual thoroughly before installation and operation to ensure proper function and to prevent injury or damage.
Important Safety Instructions
- Always disconnect power before performing any service or maintenance on the pump.
- Ensure all electrical connections comply with local codes and standards. A qualified electrician should perform electrical wiring.
- Do not operate the pump dry. Running the pump without water will cause severe damage and void the warranty.
- Protect the pump from freezing temperatures.
- Keep children and unauthorized persons away from the pump during operation.
- Wear appropriate personal protective equipment (PPE) during installation and maintenance.
2. Product Overview
The LANCHEZ 1.6HP Shallow Well Pump with Pressure Tank is designed for residential water supply from shallow wells, cisterns, or other water sources. It features a powerful 1.6 horsepower motor and an integrated pressure tank to maintain consistent water pressure and reduce pump cycling.
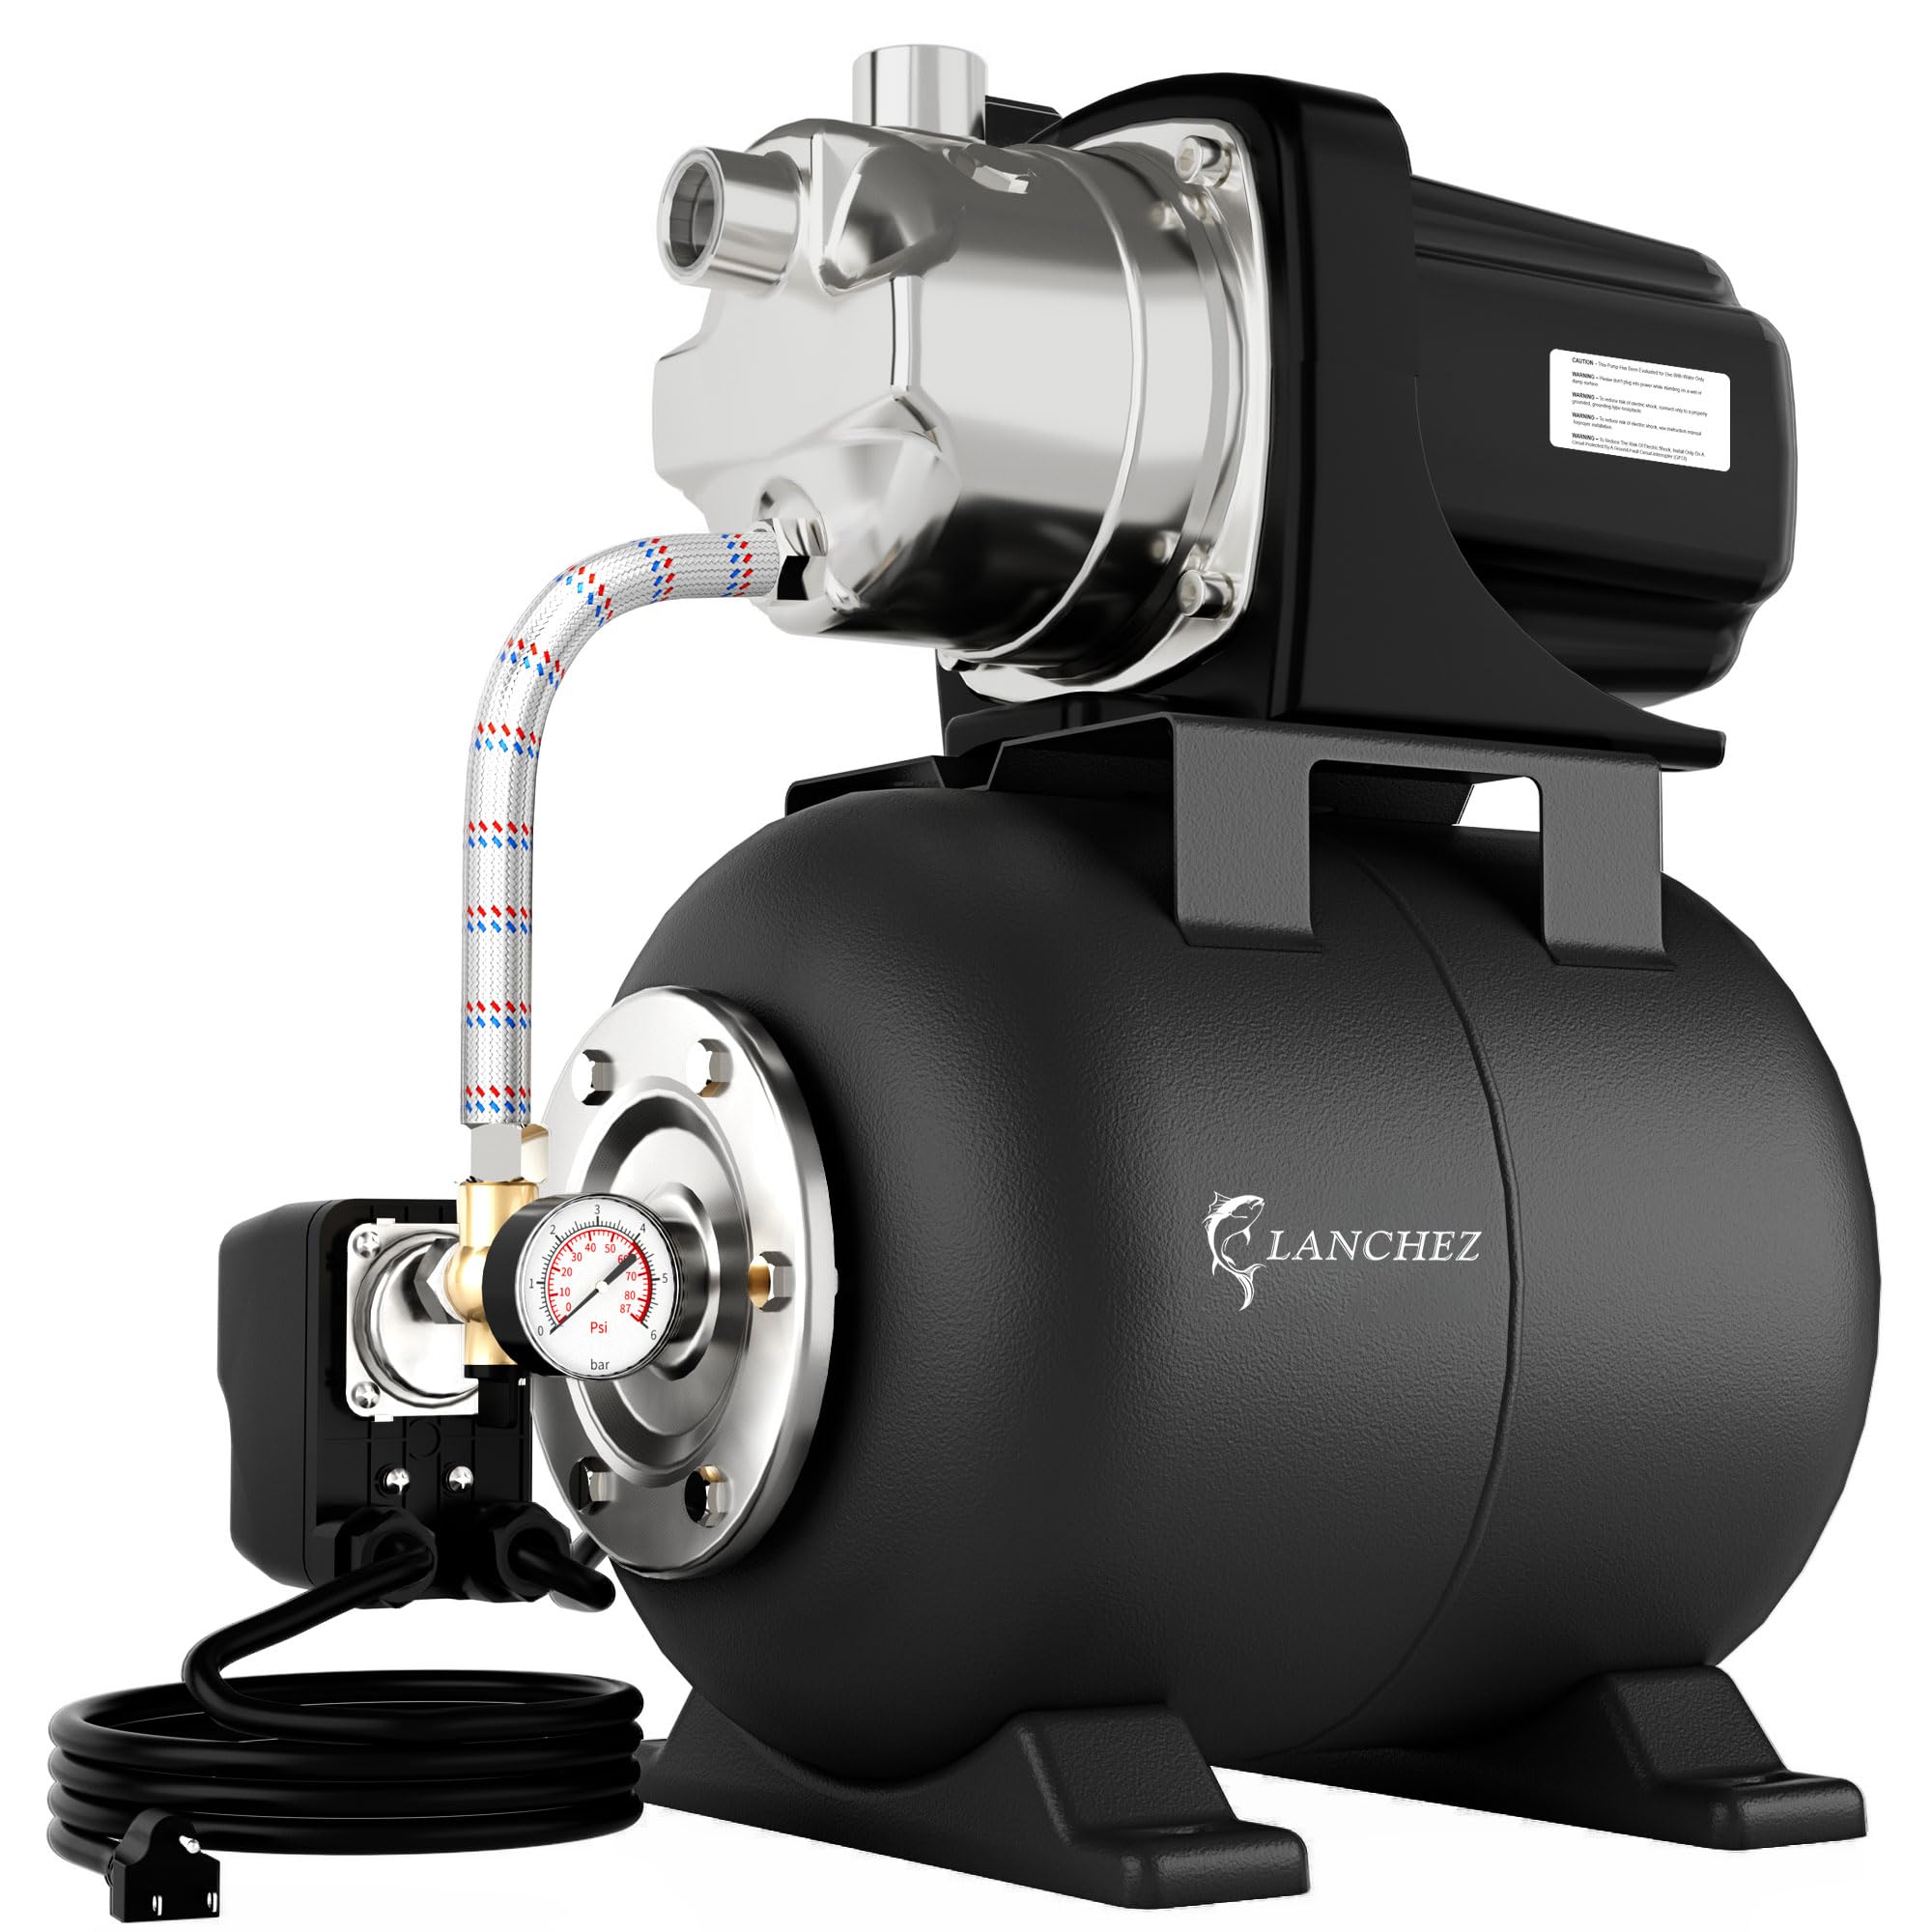
Figure 1: LANCHEZ 1.6HP Shallow Well Pump with Pressure Tank. This image shows the complete pump assembly, including the motor, pump housing, and the blue pressure tank.
Key Components:
- Pump Housing: Contains the impeller and other pumping mechanisms.
- Electric Motor: Provides the power to drive the pump.
- Pressure Tank: Stores pressurized water, reducing pump starts and maintaining system pressure.
- Pressure Switch: Automatically turns the pump on and off based on system pressure.
- Pressure Gauge: Displays the current system pressure.
- Inlet/Outlet Ports: Connections for suction and discharge plumbing.
3. Setup and Installation
3.1 Pre-Installation Checklist
- Verify the power supply matches the pump's requirements (voltage, amperage).
- Ensure the installation location is dry, well-ventilated, and protected from freezing.
- Confirm the well or water source provides sufficient water flow.
- Gather necessary tools and materials: pipe wrenches, thread sealant, appropriate piping, electrical connectors.
3.2 Mounting the Pump
Mount the pump on a solid, level surface to minimize vibration and noise. Use bolts to secure the pump base to the foundation. Ensure there is adequate space around the pump for ventilation and future maintenance.
3.3 Plumbing Connections
- Suction Line: Connect the suction pipe from the water source to the pump's inlet port. Use a foot valve with a strainer at the end of the suction pipe in the well to prevent debris entry and maintain prime. Ensure all connections are airtight to prevent air leaks.
- Discharge Line: Connect the discharge pipe from the pump's outlet port to your household plumbing system. Install a shut-off valve on the discharge side for isolation during maintenance.
- Use appropriate pipe fittings and thread sealant to ensure leak-free connections. Avoid overtightening plastic fittings.
3.4 Electrical Connections
WARNING: Electrical work should only be performed by a qualified electrician. Ensure power is disconnected at the main breaker before starting any electrical work.
- Connect the pump to a dedicated, properly grounded electrical circuit.
- Install a circuit breaker or fuse with the correct amperage rating.
- Follow the wiring diagram provided with the pump or on the motor label for correct connections (Line, Neutral, Ground).
3.5 Priming the Pump
Before initial operation, the pump must be primed. This involves filling the pump casing and suction line with water to remove all air.
- Remove the priming plug located on top of the pump casing.
- Slowly fill the pump casing with clean water until it overflows.
- Replace the priming plug securely.
- Open a faucet in the house to allow air to escape the system during startup.
4. Operating Instructions
4.1 Initial Startup
- Ensure the pump is properly primed (Section 3.5).
- Open a faucet in the house.
- Restore power to the pump. The pump should start running.
- Allow the pump to run until a steady stream of water flows from the open faucet and all air is expelled from the system.
- Close the faucet. The pump will continue to run until the pressure tank is filled and the pressure switch reaches its cut-off pressure, then it will shut off.
4.2 Normal Operation
The pump system is designed to operate automatically. When water is drawn from the system (e.g., opening a faucet), the pressure in the tank drops. When it reaches the cut-in pressure, the pressure switch activates the pump. The pump runs until the system reaches the cut-off pressure, then it shuts off. This cycle repeats as needed.
4.3 Shutting Down
To temporarily shut down the pump, simply turn off the power at the circuit breaker. For extended periods of non-use, especially in freezing conditions, follow the winterization procedures in the Maintenance section.
5. Maintenance
Regular maintenance ensures the longevity and efficient operation of your LANCHEZ well pump. Always disconnect power before performing any maintenance.
5.1 Regular Checks (Monthly)
- Check for Leaks: Inspect all plumbing connections for any signs of water leaks. Tighten connections as needed.
- Monitor Pressure: Observe the pressure gauge during pump cycles to ensure it operates within expected cut-in and cut-off pressures.
- Listen for Unusual Noises: Any new or unusual sounds may indicate a problem.
5.2 Pressure Tank Air Charge (Annually or as needed)
The pressure tank contains an air bladder that needs to be properly charged. If the pump cycles too frequently, the air charge may be low.
- Turn off power to the pump.
- Drain all water from the system by opening a faucet.
- Check the air pressure in the tank's Schrader valve (usually on top) using a tire pressure gauge. The pressure should be 2 PSI below the pump's cut-in pressure.
- Add or release air as necessary using an air compressor or bicycle pump.
- Close the faucet, restore power, and re-prime the pump if necessary.
5.3 Winterization (For cold climates)
If the pump will be exposed to freezing temperatures and not in use, it must be drained to prevent damage.
- Disconnect power to the pump.
- Open a faucet in the house to relieve system pressure.
- Remove the drain plug(s) from the pump casing and pressure tank to allow all water to drain out.
- Store the drain plugs in a safe place.
- Once drained, replace the plugs loosely or leave them out until spring.
6. Troubleshooting
Before attempting any repairs, always disconnect power to the pump. Consult a qualified technician for complex issues.
| Problem | Possible Cause | Solution |
|---|---|---|
| Pump does not start or run. | No power; tripped circuit breaker; faulty pressure switch; motor overload. | Check power supply and circuit breaker; inspect pressure switch wiring; allow motor to cool and reset overload if applicable. |
| Pump runs but no water. | Pump not primed; air leak in suction line; low water level in well; clogged foot valve/strainer. | Re-prime the pump; check suction line for leaks and tighten connections; verify well water level; clean foot valve/strainer. |
| Low water pressure. | Partially clogged pipes; faulty pressure switch; low air charge in pressure tank; worn pump components. | Inspect and clear plumbing; adjust/replace pressure switch; check and adjust pressure tank air charge (Section 5.2); consult service technician. |
| Pump cycles too frequently. | Low air charge in pressure tank; waterlogged pressure tank; small leak in system. | Check and adjust pressure tank air charge (Section 5.2); inspect system for leaks and repair. |
7. Specifications
| Brand | LANCHEZ |
| Model | LZ-JGP12002CINOX-MS-BY2 |
| Horsepower (HP) | 1.6 HP |
| Type | Shallow Well Pump with Pressure Tank |
| UPC | 747721090674 |
| ASIN | B0GKLWF887 |
8. Warranty and Support
For warranty information and technical support, please refer to the warranty card included with your product or visit the official LANCHEZ website. Keep your purchase receipt as proof of purchase for warranty claims.
If you encounter issues not covered in the troubleshooting section, please contact LANCHEZ customer service for assistance. Provide your model number (LZ-JGP12002CINOX-MS-BY2) and purchase date when contacting support.
LANCHEZ Official Store: Visit the LANCHEZ Store on Amazon