1. Introduction
Thank you for choosing the XURUYI ZYX012 3D Metal Dragon Model DIY Assembly Kit. This kit provides a challenging and rewarding experience for enthusiasts of mechanical models and steampunk aesthetics. Inspired by the mythical dragon, this intricate sculpture is crafted from over 2030 precision-cut metal parts, offering a high-level assembly challenge and resulting in a unique collectible ornament.
This manual will guide you through the assembly process, provide important safety information, and offer tips for maintaining your finished model. Please read all instructions carefully before beginning assembly.

Image 1.1: The fully assembled XURUYI ZYX012 3D Metal Dragon Model, showcasing its intricate design and metallic finish.
2. Safety Information
Please observe the following safety precautions during assembly:
- Age Recommendation: This kit is recommended for individuals aged 16 and above due to the complexity and small parts involved.
- Small Parts Hazard: The kit contains many small parts. Keep them out of reach of young children to prevent choking hazards.
- Sharp Edges: Some metal parts may have sharp edges. Handle all components with care to avoid cuts or injuries.
- Use Tools Safely: The kit includes an assembled tool kit. Use these tools as instructed and with caution. Always ensure a stable grip on parts and tools.
- Ventilation: Work in a well-ventilated area.
- Eye Protection: Consider wearing eye protection during assembly to guard against small flying debris.
- Clean Workspace: Maintain a clean and organized workspace to prevent losing small components.
3. Package Contents
Before starting assembly, please verify that all components are present in your kit:
- Assembled Tools Kit (1 set)
- Metal Parts Kit (1 set, containing over 2030 individual pieces)
- Instruction Manual (1 copy)
If any parts are missing or damaged, please contact XURUYI customer support for assistance.
4. Assembly Instructions
The assembly of the ZYX012 3D Metal Dragon Model is an immersive process designed to take approximately 20 hours. Patience and attention to detail are key. Follow the detailed step-by-step instructions provided in the included manual carefully.
4.1. Preparation
- Unpack Components: Carefully unpack all parts from the Metal Parts Kit. Organize them by type or size as suggested in your detailed assembly manual.
- Review Instructions: Thoroughly read through the entire assembly manual before starting. Familiarize yourself with the diagrams and part identification.
- Prepare Tools: Ensure all tools from the Assembled Tools Kit are accessible and in good condition.
4.2. Core Body Assembly
Begin by constructing the central body frame of the dragon. This typically involves connecting larger structural pieces that form the torso and spine. Pay close attention to the orientation of each part.

Image 4.1: Design concept illustration, showing the intricate mechanical details and steampunk elements of the dragon model.
4.3. Limb and Head Assembly
Proceed to assemble the four limbs (legs) and the head section. These often involve smaller, more intricate mechanisms. Ensure all joints are correctly aligned and secured according to the diagrams.

Image 4.2: A detailed view of the dragon's head, highlighting the complex gears, pipes, and metallic horns.
4.4. Tail and Wing (if applicable) Assembly
Assemble the tail section, which may include flexible segments or decorative elements. If your model includes wings, follow the specific instructions for their construction and attachment.

Image 4.3: Side profile of the dragon model, revealing the layered metal plates and internal mechanical components.
4.5. Finishing Touches
Once the main structure is complete, attach any remaining decorative elements, small pipes, wires, or other details that bring the steampunk aesthetic to life. Double-check all connections for stability.
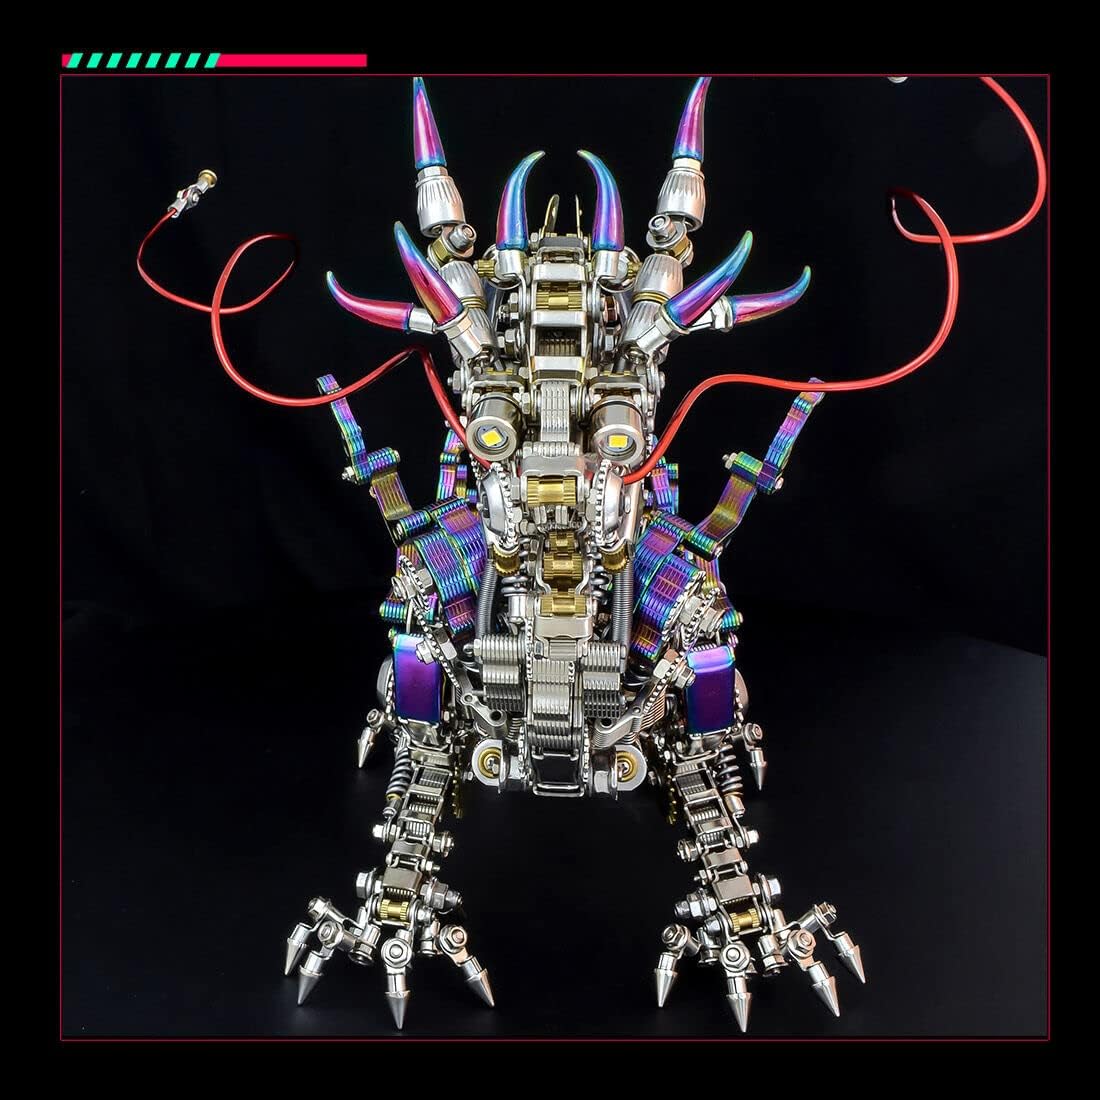
Image 4.4: The dragon model with a clear, spherical element in its mouth, adding to its mystical and mechanical presence.
5. Operating (Display and Handling)
This 3D metal model is designed as a static display piece. While some joints may be articulated for posing, it is not intended for active play or rough handling.
- Display: Place your assembled dragon on a stable, flat surface away from direct sunlight, excessive heat, or moisture.
- Handling: When moving the model, always lift it from its base or main body to avoid stressing delicate parts. Avoid dropping or applying excessive force.
- Posing: If parts are designed to be articulated, move them gently and within their intended range of motion to prevent damage.
6. Maintenance
To ensure your XURUYI ZYX012 model remains in pristine condition:
- Cleaning: Dust the model regularly with a soft, dry brush or a microfiber cloth. For more stubborn dirt, a slightly damp cloth can be used, but ensure the model is thoroughly dried immediately afterward to prevent water spots or corrosion.
- Avoid Chemicals: Do not use abrasive cleaners, solvents, or harsh chemicals, as these can damage the metal finish.
- Inspection: Periodically inspect the model for any loose parts. If found, gently tighten them using the appropriate tools.
7. Troubleshooting
Here are solutions to common issues you might encounter during assembly:
| Problem | Possible Cause | Solution |
|---|---|---|
| Part does not fit | Incorrect part or incorrect orientation. | Double-check the part number and diagram in the manual. Ensure the part is oriented correctly. Do not force parts together. |
| Loose connection | Screw not tightened sufficiently or part not fully seated. | Gently tighten screws. Ensure all tabs and slots are fully engaged. |
| Missing part | Part misplaced or not included in the kit. | Thoroughly search your workspace. If still missing, contact customer support with the part number. |
| Difficulty with small parts | Lack of dexterity or appropriate tools. | Use tweezers or needle-nose pliers from the tool kit. Take breaks if hands become fatigued. |
8. Specifications
- Brand: XURUYI
- Model: ZYX012 (Ty4)
- Manufacturer Part Number: 1121P2742CU
- Material Type: Aluminium Alloy, Stainless Steel
- Number of Pieces: 2030+
- Approximate Assembly Time: 20 Hours
- Product Weight: 2100g
- Product Dimensions (Assembled): 50 x 10 x 18 cm (19.5"L x 3.9"W x 7.1"H approx.)
- Recommended Age: 16+ years
9. Customer Support
For any questions, missing parts, or technical assistance, please contact XURUYI customer support through the retailer where you purchased the product or visit the official XURUYI website for contact information.
Please have your model number (ZYX012) and purchase details ready when contacting support.