Introduction
Thank you for choosing the CHiQ CW8728X Front Load Washing Machine. This manual provides essential information for the safe installation, operation, and maintenance of your appliance. Please read it thoroughly before use and keep it for future reference.
Safety Information
Always follow basic safety precautions when using electrical appliances to reduce the risk of fire, electric shock, or injury.
- Ensure the appliance is properly grounded.
- Do not allow children to play with or operate the washing machine.
- Keep packaging materials out of reach of children.
- Do not wash items that have been cleaned in, washed in, soaked in, or spotted with combustible or explosive substances.
- Never force the door open during operation.
- Unplug the appliance before cleaning or performing any maintenance.
- Do not install or store the appliance where it will be exposed to the weather or freezing temperatures.
Product Overview
The CHiQ CW8728X is an 8 KG front load washing machine designed for efficiency and convenience. It features a Pure Flat Design for seamless integration into modern living spaces.

Image: CHiQ CW8728X 8 KG Front Load Washing Machine in a modern setting, highlighting its Pure Flat Design.

Image: CHiQ CW8728X Washing Machine with its key dimensions: 850mm height, 600mm width, and 513mm depth.
Setup and Installation
1. Unpacking and Removing Transport Bolts
Before using the washing machine, it is crucial to remove all transport bolts and brackets from the rear panel. Failure to do so can cause excessive vibrations and noise during operation, potentially damaging the appliance.
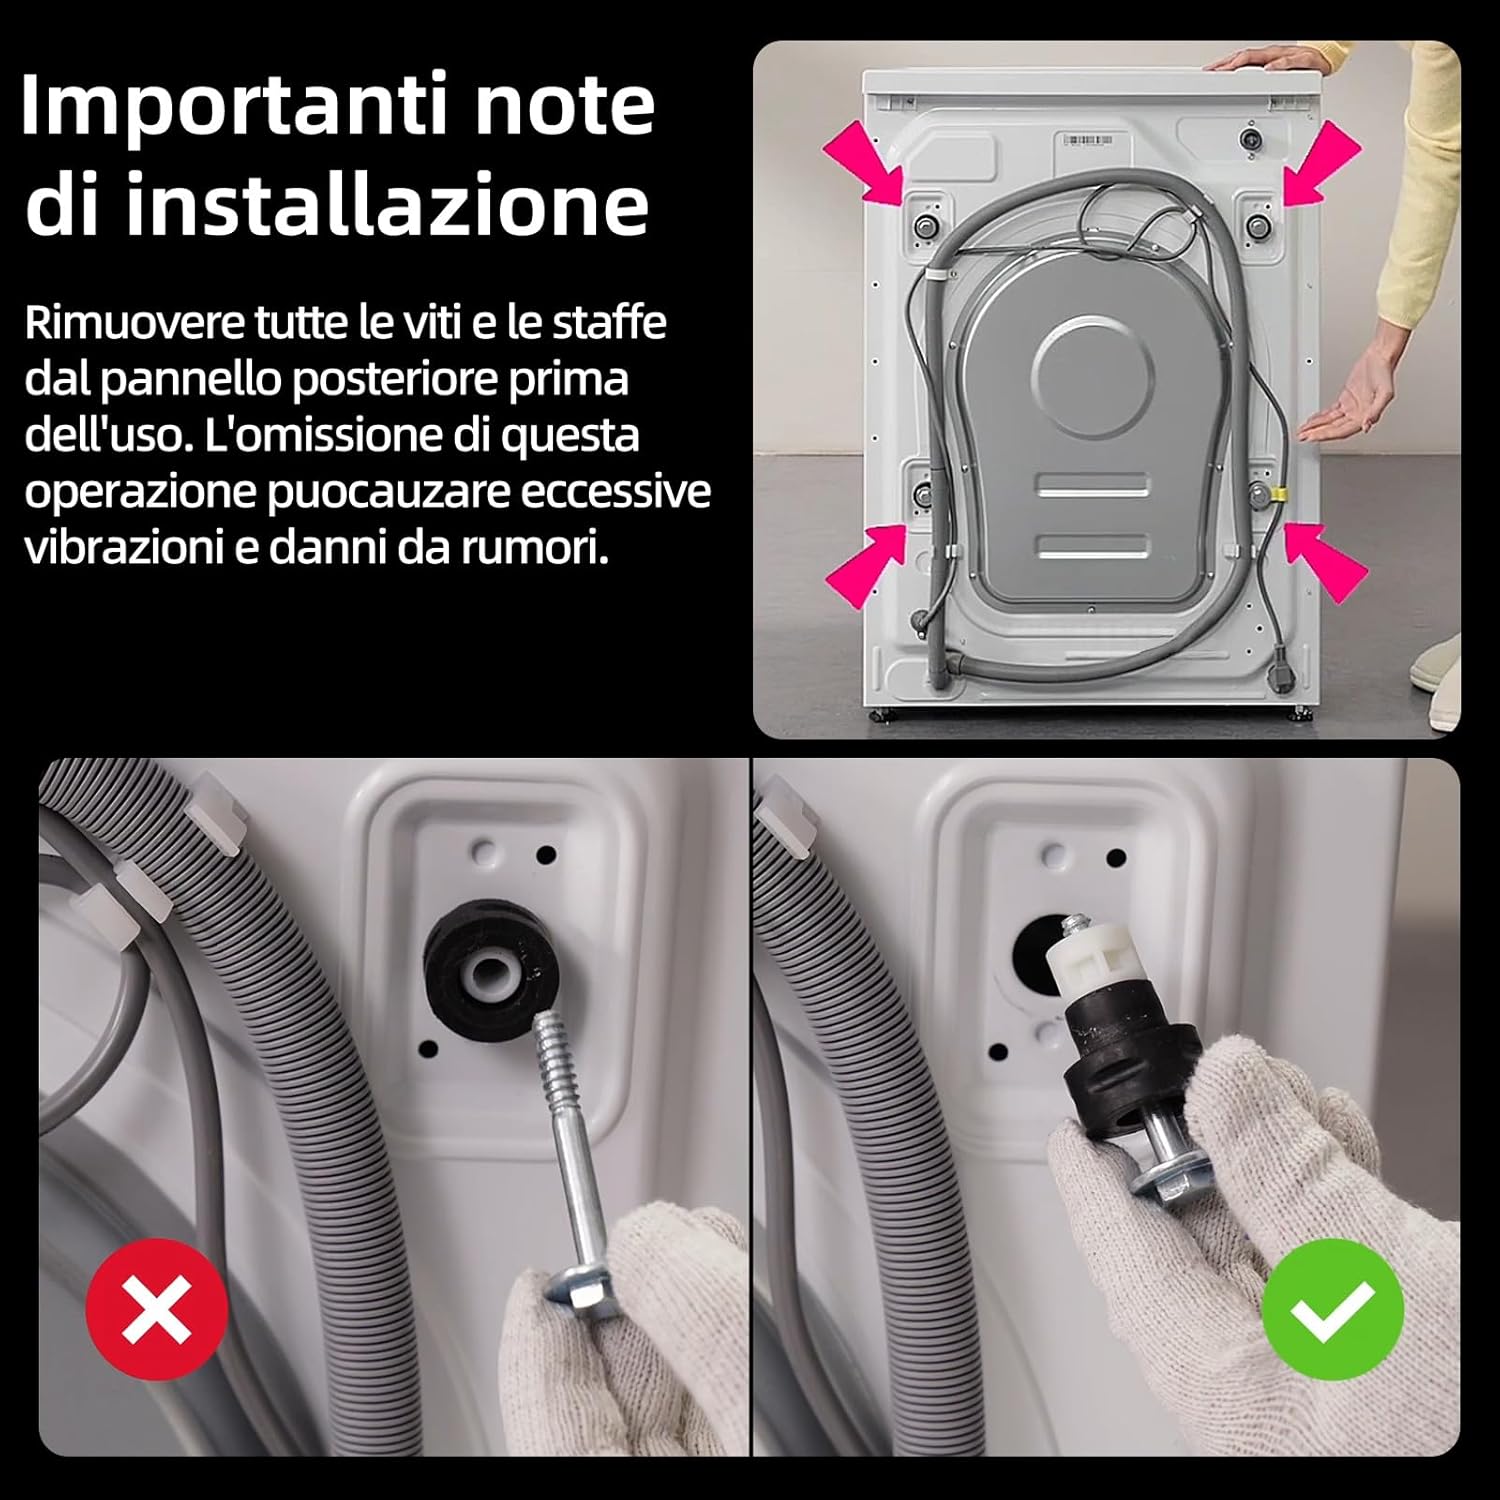
Image: Illustration showing the location of transport bolts on the rear of the washing machine and the correct method for removal.
- Locate the transport bolts on the rear of the machine.
- Using an appropriate wrench, loosen and remove all bolts.
- Remove any plastic spacers or brackets.
- Insert the plastic caps provided into the holes.
2. Leveling the Machine
Proper leveling prevents excessive vibration and ensures stable operation. Adjust the leveling feet at the bottom of the machine until it is perfectly stable on the floor.
3. Water Connection
Connect the water inlet hose to a cold water tap with a 3/4-inch thread. Ensure all connections are tight to prevent leaks.
4. Drain Hose Installation
Position the drain hose correctly into a standpipe or over the edge of a sink, ensuring it is securely fastened to prevent dislodgement during the wash cycle.
5. Electrical Connection
Plug the power cord into a grounded electrical outlet. Do not use extension cords or adapters.
Operating Instructions
1. Control Panel Overview
The washing machine features an intuitive control panel with an ergonomic dial and touch buttons for program selection and settings adjustment.

Image: Close-up of the washing machine's control panel, showing the program dial, digital display, and touch-sensitive buttons.
2. Loading Laundry
Open the door and load laundry into the drum. Do not overload the machine; ensure there is enough space for clothes to move freely. The extra-large 530mm drum is designed for optimal movement.

Image: Diagram illustrating the spacious 530mm drum interior, designed for effective stain removal and gentle fabric care.
3. Adding Detergent
Pull out the detergent drawer and add the appropriate amount of detergent and fabric softener to the designated compartments. Refer to detergent packaging for dosage recommendations.
4. Program Selection
Turn the program dial to select one of the 16 available wash programs. The display will show the default settings for the chosen program. You can adjust temperature and spin speed as needed.

Image: The control panel showing various wash programs and options, including Cotton, Mix, Anti-allergy, Wool, Baby Care, and Steam.
5. Special Functions
- Steam Care SPA: This function uses high-temperature steam to penetrate fabric fibers, effectively removing odors and keeping garments soft and pleasant to the touch. It provides gentle care without direct water usage.

Image: Visual representation of the Steam Care SPA feature, showing steam enveloping a white shirt inside the drum.
- One-Touch Smart Wash: The washing machine automatically detects the load size and optimizes water consumption and cycle duration for efficient cleaning. This simplifies program selection.

Image: The washing machine in a laundry room with an 'AI One Touch' icon, indicating the smart wash feature.
- Smart Delay Start: Program your wash cycle to start up to 24 hours in advance, allowing you to take advantage of off-peak electricity rates or have laundry ready at a convenient time.

Image: The washing machine at night with a '24h' overlay, illustrating the delay start function.
- 15-Minute Quick Wash: Ideal for small loads of lightly soiled items or for when you need clothes quickly. This program completes a wash and rinse cycle in just 15 minutes.

Image: Dynamic graphic showing water and clothes inside the drum with a '15 MIN' timer, representing the quick wash cycle.
- Multi-Temperature Options: Select the ideal temperature for each fabric type or stain, from cold washes for delicate items to high temperatures for deep hygiene.

Image: A graph illustrating temperature progression during a wash cycle, highlighting multi-temperature capabilities.
- PureDrum Technology: Features plasma welding and a special droplet texture to significantly reduce fabric wear and fiber snagging, protecting garments with delicacy.

Image: Stylized representation of the PureDrum interior with water droplets, emphasizing its gentle washing action.
6. Starting a Wash Cycle
Press the 'Start/Pause' button to begin the selected wash cycle. The machine will automatically proceed through the washing, rinsing, and spinning phases.
Maintenance
Regular maintenance ensures optimal performance and extends the lifespan of your washing machine.
1. Cleaning the Detergent Drawer
Remove the detergent drawer and rinse it under running water to remove any detergent residue. Clean the housing of the drawer with a brush if necessary.
2. Dual Self-Cleaning
The machine features a dual self-cleaning function for both the drum and the door gasket. High-temperature, high-velocity water jets clean the inner and outer drum, preventing recontamination. High-pressure rinses during the cycle prevent mold formation on the door gasket.

Image: Diagram illustrating the dual self-cleaning process, showing water jets cleaning the drum and the door gasket.
3. Cleaning the Pump Filter
Periodically clean the pump filter, usually located at the bottom front of the machine, to remove lint, coins, or other small objects that may have accumulated.
4. Cleaning the Exterior
Wipe the exterior of the washing machine with a soft, damp cloth. Do not use abrasive cleaners or solvents.
Troubleshooting
If you encounter any issues, refer to the table below for common problems and their solutions.
| Problem | Possible Cause | Solution |
|---|---|---|
| Machine does not start | Power cord unplugged; Door not closed properly; Program not selected; Start/Pause button not pressed. | Check power connection; Close door firmly; Select a program; Press Start/Pause. |
| Excessive vibration/noise | Transport bolts not removed; Machine not level; Overloaded drum; Laundry unevenly distributed. | Remove transport bolts; Adjust leveling feet; Reduce load size; Redistribute laundry. |
| Water leakage | Inlet/drain hose loose; Detergent drawer clogged; Too much detergent. | Tighten hose connections; Clean detergent drawer; Use less detergent. |
| Water not draining | Drain hose kinked/blocked; Pump filter clogged. | Straighten drain hose; Clean pump filter. |
| Door will not open | Cycle still running; Water in drum; Child lock activated. | Wait for cycle to finish; Select drain program; Deactivate child lock. |
Specifications
Technical details for the CHiQ CW8728X Washing Machine.
| Feature | Detail |
|---|---|
| Model Name | CW8728X |
| Brand | CHiQ |
| Capacity | 8 Kilograms |
| Dimensions (DxWxH) | 51.3P x 60l x 85H cm |
| Max Spin Speed | 1400 Revolutions per minute |
| Energy Efficiency Class | A-15% |
| Motor Type | BLDC Inverter Motor |
| Drum Material | Stainless Steel |
| Weight | 60 Kilograms |
| Special Features | Delay Start, Child Lock, Steam Care, One-Touch Wash |
| Installation Type | Free-standing |

Image: The official EU Energy Label for the CHiQ CW8728X, detailing its energy consumption, water usage, capacity, and noise levels.

Image: An illustration of the BLDC Inverter Motor, highlighting its internal components and emphasizing its quiet and efficient operation.
Warranty and Support
Warranty Information
This CHiQ CW8728X Washing Machine comes with a 2-year manufacturer warranty. Please retain your proof of purchase for any warranty claims. The motor is covered by a 12-year warranty.

Image: The CHiQ CW8728X washing machine displayed with a prominent '12 years motor warranty' emblem.
Customer Support
For technical assistance, spare parts, or service requests, please contact CHiQ customer support. You can find contact details on the official CHiQ website or through your retailer.
Visit the official CHiQ store for more information: CHiQ Store