1. Introduction
Thank you for choosing the VEVOR 4-Channel Class A/B Car Audio Amplifier. This manual provides essential information for the safe installation, operation, and maintenance of your amplifier. Please read it thoroughly before use and retain it for future reference.
Safety Information
- Always disconnect the vehicle's battery before installing or servicing the amplifier.
- Ensure proper grounding to prevent electrical hazards.
- Use appropriate gauge wiring for power and speaker connections as specified.
- Avoid mounting the amplifier in areas exposed to direct sunlight, excessive heat, moisture, or dust.
- Do not operate the amplifier if it is damaged or malfunctioning.
2. Package Contents
Verify that all items are present in the package:
- 1 x Car Audio Amplifier (Model: MXAB400.4)
- 1 x User Manual
- 2 x 25A Fuse
- 4 x PA4 x 16 Screws
3. Product Features
The VEVOR 4-Channel Class A/B Car Audio Amplifier is designed to deliver robust and clear audio performance for your vehicle's sound system.
- High Power Output: Delivers up to 4 x 200W at 4 Ohms or 4 x 400W at 2 Ohms (max) for stable audio output.
- Bridgeable Channels: Allows combining power output for subwoofers, providing enhanced bass without requiring an additional amplifier.
- Clear Audio Quality: Features low distortion (THD 0.1–0.15%) and a Signal-to-Noise Ratio (SNR) above 92 dB for accurate sound reproduction.
- Efficient Heat Dissipation: Constructed with an aluminum alloy shell to quickly dissipate heat, ensuring cooler operation and extended lifespan.
- Integrated Protection: Includes a built-in fuse for reliable current control and protection against short-circuits.
- Wide Compatibility: Suitable for various 12V automotive systems, including sedans, SUVs, pickup trucks, and off-road vehicles.

Image: Amplifier highlighting its continuous output capabilities and key performance metrics.
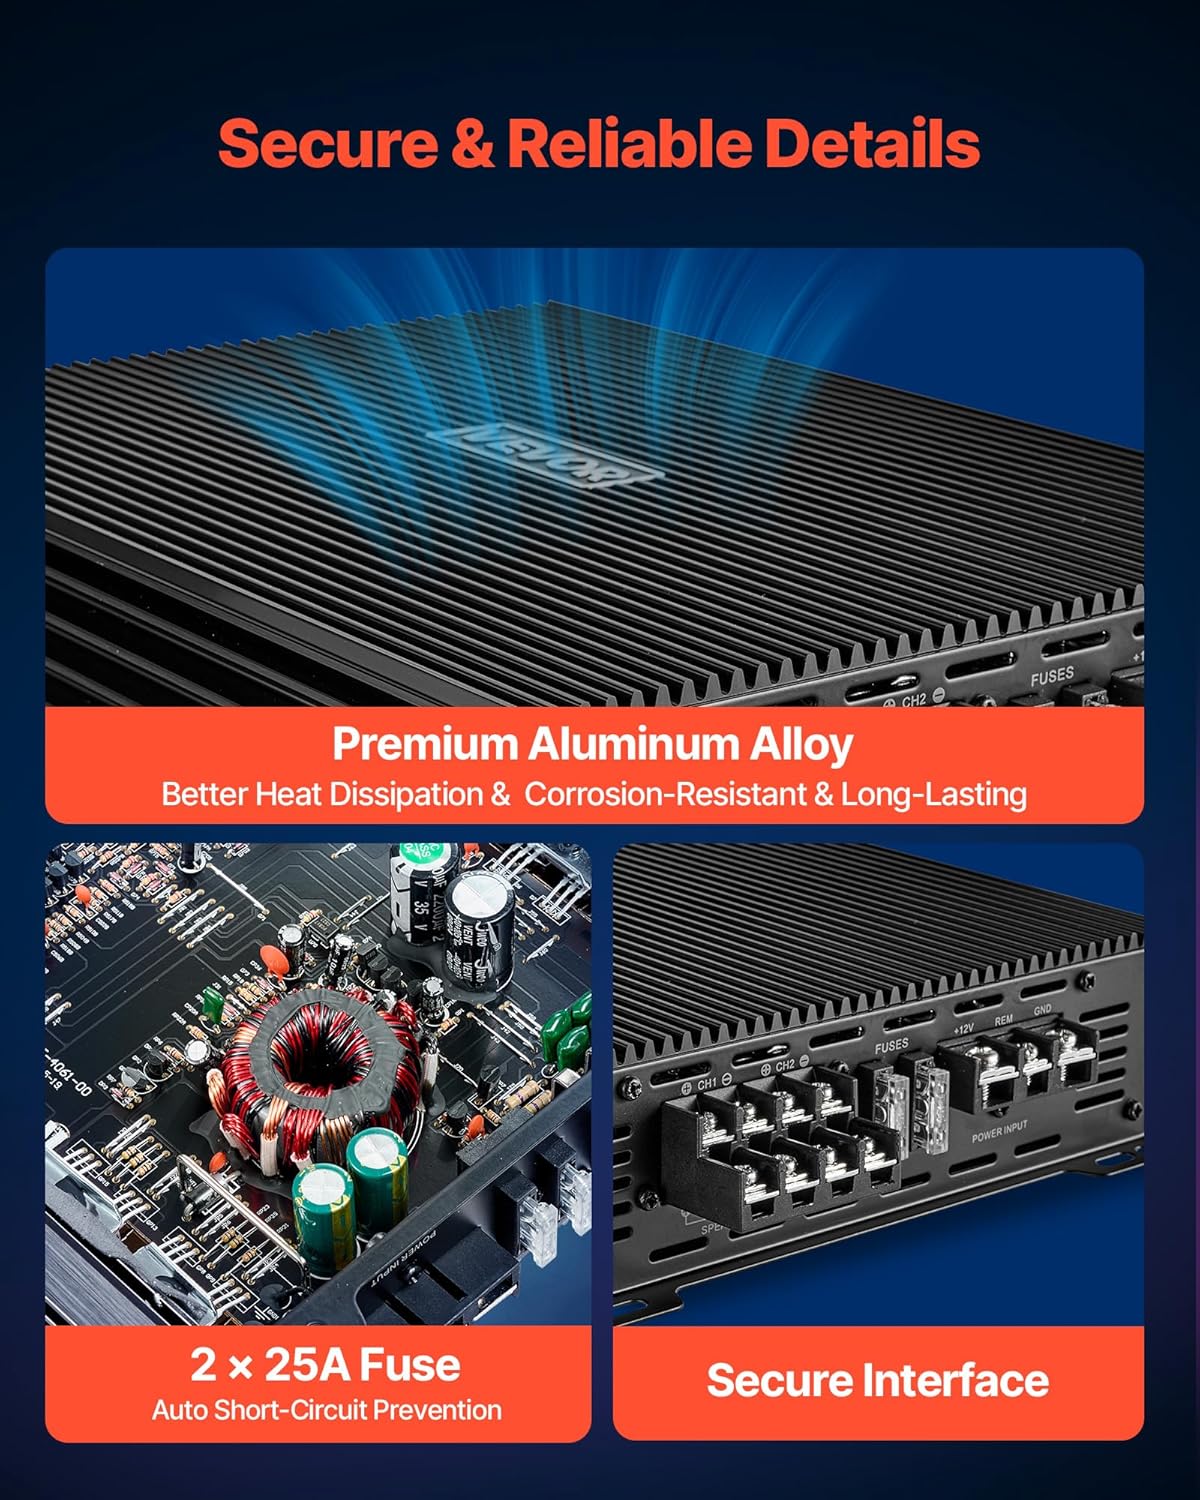
Image: Detailed view of the amplifier's construction, emphasizing heat dissipation and secure connections.
4. Installation
Proper installation is crucial for optimal performance and safety. If you are unsure about any steps, consult a professional car audio installer.
Mounting Location
Choose a mounting location that is dry, well-ventilated, and protected from direct sunlight, excessive heat, and moisture. The compact design of this amplifier allows for flexible placement, such as under seats or in the trunk.
Wiring Connections
- Power Wiring: Connect the +12V terminal to the positive terminal of the car battery using an 8-gauge power wire. Install an appropriate fuse (e.g., 25A) within 18 inches of the battery.
- Ground Wiring: Connect the GND terminal to a clean, unpainted metal surface on the vehicle chassis using an 8-gauge ground wire. Ensure a secure connection.
- Remote Turn-On: Connect the REM terminal to the remote output of your head unit. This wire turns the amplifier on and off with your car stereo.
- RCA Inputs: Connect the RCA input cables from your head unit's pre-amp outputs to the amplifier's CH1/CH2 and CH3/CH4 RCA inputs.
- Speaker Outputs: Connect your speakers to the amplifier's speaker output terminals. Ensure correct polarity (+ to + and - to -). For bridged mode, refer to the diagram on the amplifier's terminal block.

Image: Amplifier's rear panel detailing input, output, and control connections.
5. Operating Instructions
After installation, follow these steps to configure and operate your amplifier:
Initial Setup
- Gain Adjustment: Set the GAIN controls for CH1/CH2 and CH3/CH4 to their minimum position. Gradually increase the gain until the desired volume is achieved without distortion. Avoid setting the gain too high, as this can lead to clipping and speaker damage.
- Crossover Settings: Use the X-OVER switches to select the desired filter mode for each channel pair:
- HPF (High Pass Filter): Allows frequencies above the set frequency to pass. Ideal for full-range speakers.
- LPF (Low Pass Filter): Allows frequencies below the set frequency to pass. Ideal for subwoofers.
- FULL: Allows all frequencies to pass.
- Frequency Adjustment: If HPF or LPF is selected, use the FREQ knob to adjust the cutoff frequency (typically 40Hz to 4kHz).
Bridged Mode Operation
To operate the amplifier in bridged mode for increased power to a single speaker (e.g., a subwoofer), connect the speaker to the designated BRIDGE terminals as indicated on the amplifier. Ensure the speaker's impedance is compatible with bridged operation (typically 4 Ohms minimum).
6. Maintenance
Regular maintenance helps ensure the longevity and performance of your amplifier.
- Cleaning: Periodically clean the amplifier's exterior with a soft, dry cloth. Do not use harsh chemicals or abrasive cleaners.
- Ventilation: Ensure that the amplifier's cooling fins are free from obstructions to allow for proper heat dissipation.
- Connections: Periodically check all wiring connections for tightness and corrosion. Loose connections can cause poor performance or damage.
7. Troubleshooting
If you experience issues with your amplifier, refer to the following common problems and solutions:
| Problem | Possible Cause | Solution |
|---|---|---|
| No Power | Blown fuse, loose power/ground wire, no remote signal. | Check and replace fuses. Verify all power, ground, and remote connections are secure. |
| No Sound Output | No input signal, incorrect gain settings, speaker wires disconnected. | Check RCA input connections. Adjust gain. Verify speaker wiring. |
| Distorted Sound | Gain set too high, incorrect crossover settings, poor speaker impedance match. | Reduce gain. Adjust crossover settings. Ensure speakers are compatible with amplifier's impedance. |
| Amplifier Overheats | Insufficient ventilation, impedance too low, prolonged high volume. | Ensure proper airflow around the amplifier. Check speaker impedance. Reduce volume or allow cooling time. |
8. Specifications
Detailed technical specifications for the VEVOR 4-Channel Class A/B Car Audio Amplifier (Model: MXAB400.4):
- Item Model Number: MXAB400.4
- Material: Aluminum Alloy
- Product Weight: 4.94 lbs / 2.24 kg
- Product Type: 4-Channel Amplifier
- Bandwidth: 10Hz–30kHz (-3dB)
- Distortion Rate (THD): 0.1–0.15%
- Product Size: 13.4 x 8.3 x 2.1 inches / 340 x 210 x 54 mm
- Max. Power: 4 x 200W @ 4 Ohms / 4 x 400W @ 2 Ohms
- SNR: >92dB
- Bridgeable: Yes
- Rated Voltage: DC 14.4V
- Working Type: Class A/B

Image: Amplifier dimensions and a summary of technical specifications.
9. Warranty and Support
For warranty information and technical support, please refer to the official VEVOR website or contact VEVOR customer service directly. Keep your purchase receipt as proof of purchase for any warranty claims.