
Introduction
This manual provides detailed instructions for the setup, operation, and maintenance of your TONOR TD510 AIR H+ Dynamic Gaming Microphone. Please read this guide thoroughly before using the product to ensure proper functionality and to maximize your audio experience. This microphone is designed for high-quality audio capture in gaming, streaming, and podcasting environments, featuring dual USB and XLR connectivity, AI noise cancellation, and customizable RGB lighting.
Package Contents
Verify that all items listed below are present in your package:
- 1 x TD510 AIR H+ Dynamic Microphone
- 1 x Boom Arm
- 1 x Desk Clamp Base
- 1 x 2m USB Cable
- 1 x USB to Type-C Adapter
- 4 x Cable Ties

Figure 1: Package Contents
Setup
1. Boom Arm Assembly
- Attach the desk clamp base to a sturdy desk or table edge. Ensure it is securely tightened.
- Insert the boom arm into the hole on the desk clamp base. Adjust the arm's position and tighten the knob to secure it.
2. Microphone Attachment
Screw the microphone onto the threaded end of the boom arm. Ensure it is firmly attached but do not overtighten.
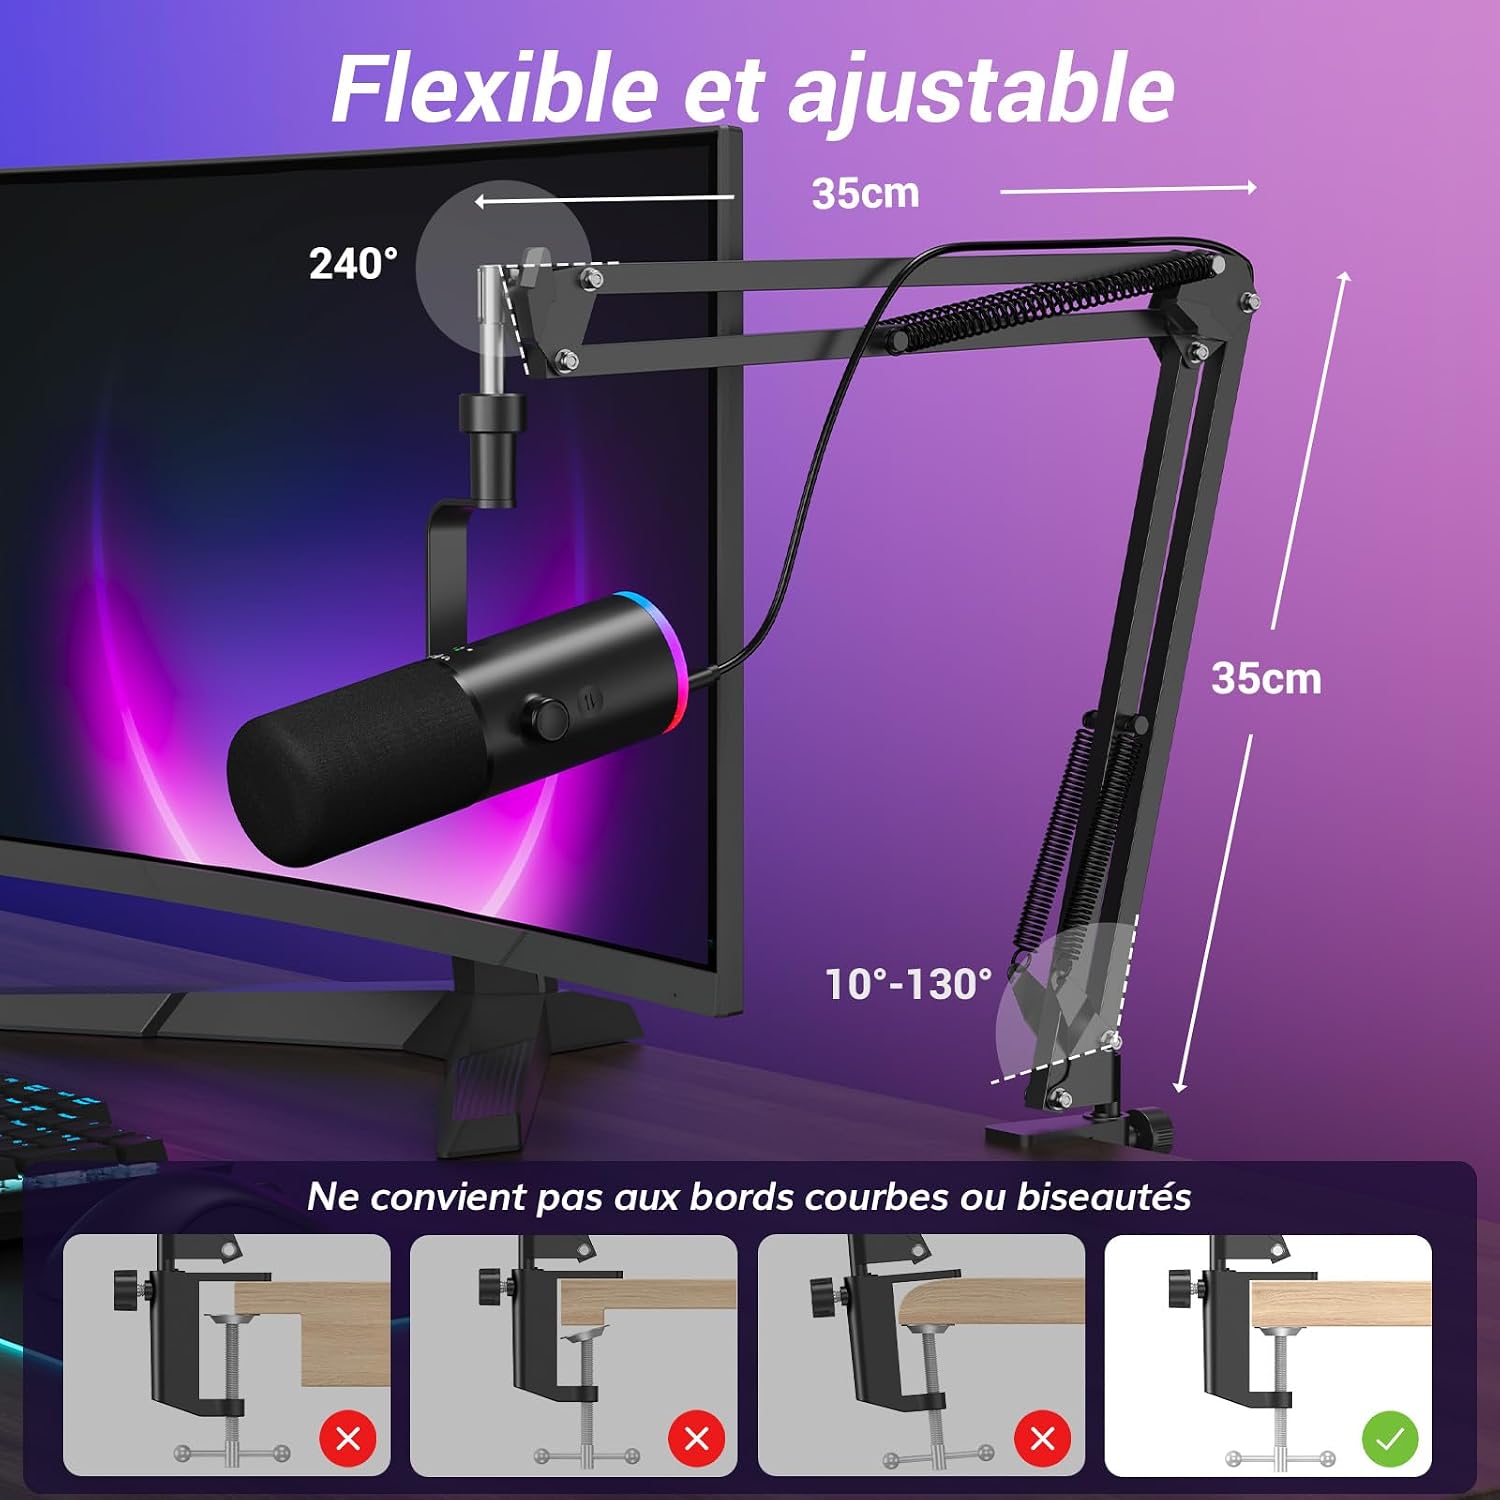
Figure 2: Boom Arm Adjustment and Desk Clamp Compatibility
3. Connectivity
The TD510 AIR H+ offers dual connectivity options: USB and XLR.
- USB Connection: Connect the provided USB cable from the microphone's USB-C port to a USB port on your computer (PC/Mac) or gaming console (PS4/PS5). Use the USB to Type-C adapter if necessary. This is a plug-and-play connection.
- XLR Connection: For professional audio setups, connect an XLR cable (not included) from the microphone's XLR port to an audio interface or mixing console.
Note: The microphone is not compatible with Xbox consoles.

Figure 3: Connectivity Options and Compatibility
Operating Instructions
1. Optimal Microphone Placement
For the best audio quality, position the microphone 5-10 cm (2-4 inches) from your mouth. The cardioid pickup pattern is designed to capture sound directly in front of the microphone while minimizing background noise.

Figure 4: Optimal Microphone Distance and Directivity
2. AI Noise Cancellation
The microphone features three levels of AI-powered noise reduction to filter out ambient sounds like keyboard clicks, fan noise, or air conditioning.
- Activation: Press and hold the multifunction button (indicated by a hand icon) to cycle through the noise reduction levels.
- Levels:
- Level I: Light (50% reduction)
- Level II: Moderate (70% reduction)
- Level III: Enhanced (95% reduction)
- Off: No noise reduction

Figure 5: AI Noise Cancellation Levels
3. RGB Lighting Control
Customize your microphone's aesthetic with 11 dynamic RGB lighting modes.
- Mode Selection: Tap the dedicated RGB button (indicated by a light bulb icon) to cycle through the available lighting effects.

Figure 6: RGB Lighting Modes
4. Microphone Gain and Headphone Monitoring
The microphone features a multi-functional knob for quick adjustments.
- Microphone Gain Control: Tap the knob to enter Microphone Gain adjustment mode (Mode 2). Rotate the knob to increase or decrease the microphone input sensitivity.
- Headphone Monitoring Volume: Tap the knob again to enter Headphone Monitoring Volume adjustment mode (Mode 3). Rotate the knob to adjust the volume of your connected headphones.
- Real-time Monitoring: Connect 3.5mm headphones to the microphone's headphone jack for real-time audio monitoring.

Figure 7: Gain and Monitoring Controls
5. Mute Function
Quickly mute or unmute the microphone as needed.
- Instant Mute: Tap the multifunction button (indicated by a microphone icon) to instantly mute or unmute the microphone. A red indicator light signifies mute, while blue indicates active audio.

Figure 8: Mute Function and Noise Reduction Activation
Maintenance
To ensure the longevity and optimal performance of your TONOR TD510 AIR H+ microphone, follow these maintenance guidelines:
- Cleaning: Use a soft, dry cloth to wipe the microphone body and boom arm. Avoid using abrasive cleaners, solvents, or excessive moisture, which can damage the finish or internal components.
- Storage: When not in use, store the microphone in a clean, dry environment away from extreme temperatures and humidity.
- Handling: Handle the microphone and boom arm with care. Avoid dropping or subjecting them to strong impacts, which can affect performance or cause damage.
Troubleshooting
If you encounter issues with your microphone, refer to the following common problems and solutions:
- No Sound Output:
- Ensure the USB or XLR cable is securely connected to both the microphone and your device/interface.
- Check your computer's sound settings to confirm the TONOR TD510 AIR H+ is selected as the input device.
- Verify the microphone is not muted (blue indicator light should be on).
- Adjust the microphone gain using the control knob.
- Poor Sound Quality / Distortion:
- Adjust the microphone gain to an appropriate level; too high can cause distortion.
- Ensure the microphone is positioned at the optimal distance (5-10 cm) from your mouth.
- Check for any physical obstructions or damage to the microphone capsule.
- Noise / Hum in Audio:
- Activate or adjust the AI noise cancellation feature to a higher level.
- Ensure all cables are properly shielded and away from power sources that might cause interference.
- If using XLR, ensure your audio interface provides adequate phantom power if required (though this is a dynamic mic, some setups might introduce noise).
- RGB Lights Not Working:
- Ensure the microphone is properly powered via USB.
- Tap the RGB button to cycle through modes; it might be set to an off mode or a static color that blends in.
Specifications
| Feature | Specification |
|---|---|
| Model Name | TD510 AIR H+ |
| Connectivity Technology | USB, XLR |
| Special Feature | AI DeNoise |
| Compatible Devices | Personal Computer (Windows, Mac OS), PS4, PS5 |
| Color | Black |
| Item Weight | 850 Grams |
| Item Dimensions | 42.3 x 13.7 x 11.4 cm |
| Power Source | Cable Electric |
| Microphone Features | Gooseneck (referring to boom arm flexibility) |
| Sensitivity | -48dB ± 1.5dB |
| Frequency Response | 60Hz - 17kHz |
| Signal/Noise Ratio | 95dB |
Safety Information
Please observe the following safety precautions:
- Do not expose the microphone to water or excessive humidity.
- Avoid disassembling the microphone, as this may void the warranty and cause damage.
- Keep the microphone away from strong magnetic fields.
- Use only the provided cables and accessories.
Warranty and Support
TONOR products are designed for reliability and performance. For warranty information, technical support, or service inquiries, please refer to the official TONOR website or contact their customer service directly. Keep your purchase receipt as proof of purchase for warranty claims.