1. Introduction
Thank you for choosing the CABIHOME Large Metal Chicken Coop. This manual provides essential information for the safe assembly, operation, and maintenance of your new poultry enclosure. Please read these instructions thoroughly before beginning assembly and retain them for future reference. This coop is designed to provide a secure and spacious outdoor habitat for various small animals, including chickens, ducks, geese, rabbits, and small dogs.

Image 1.1: The CABIHOME Large Metal Chicken Coop providing a spacious outdoor environment for poultry.
2. Safety Information
- Adult Assembly Required: This product must be assembled by adults. Keep children and pets away during assembly.
- Check Connections: Regularly inspect all bolts, screws, and connections to ensure they remain tight and secure. Loose connections can compromise the structural integrity of the coop.
- Proper Placement: Place the coop on a level, stable surface to prevent tipping. Ensure adequate drainage around the coop to avoid water accumulation.
- Predator Protection: While designed to be robust, no enclosure is entirely predator-proof. Regularly check for signs of digging or tampering around the base and reinforce as necessary.
- Ventilation: Ensure proper ventilation within the coop, especially during warmer weather, to prevent overheating of animals.
- Weather Conditions: In extreme weather conditions (heavy snow, strong winds), take additional precautions to secure the coop and protect your animals.

Image 2.1: The coop is designed to provide a safe habitat, protecting poultry from common predators.
3. Package Contents
Before assembly, please verify that all components listed below are present and undamaged. If any parts are missing or damaged, do not proceed with assembly and contact customer support.
- Metal Frame Pipes (various lengths and shapes)
- Hexagonal Wire Mesh Rolls
- Waterproof and Anti-UV Cover
- Lockable Door Assemblies (3 units)
- Connection Hardware (bolts, nuts, washers, clips)
- Assembly Tools (e.g., wrench, screwdriver - may not be included, prepare your own)
4. Setup and Assembly Instructions
Follow these steps carefully to assemble your chicken coop. It is recommended to have at least two adults for assembly.
- Prepare the Area: Choose a level, clear outdoor space for the coop. Ensure there is enough room for the full dimensions of the coop (120"L x 40"W x 40"H).
- Assemble the Base Frame: Connect the longest metal pipes to form the rectangular base of the coop. Use the provided connection hardware, ensuring all bolts are tightened securely.
- Erect the Side and Roof Frames: Attach the vertical and angled pipes to the base frame to form the side walls and roof structure. Pay attention to the strong connection points and reinforced metal pipes for stability.
- Attach Wire Mesh: Unroll the hexagonal wire mesh and secure it to the metal frame using the provided clips or ties. Ensure the mesh is taut and covers all open sides and the roof completely to prevent escapes and deter predators.
- Install Doors: Integrate the three lockable door assemblies into the designated openings in the frame. Ensure the doorlock mechanisms function smoothly and securely.
- Install Waterproof and Anti-UV Cover: Drape the cover over the designated section of the roof. Secure it firmly to the frame using the attached straps or ties. The sloped design helps shed water and provides protection from sun and rain.
- Final Inspection: Double-check all connections, mesh attachments, and door locks to ensure everything is secure and stable before introducing animals.

Image 4.1: Key structural details including strong connections, reinforced metal pipes, durable wire mesh, and a secure doorlock.

Image 4.2: The waterproof and anti-UV cover provides protection against various weather elements.
5. Operating Instructions
- Animal Introduction: Once fully assembled and secured, you may introduce your animals. The coop is suitable for chickens, ducks, geese, rabbits, and small dogs. Ensure the number of animals is appropriate for the coop's size to prevent overcrowding.
- Door Usage: Use the three lockable doors for convenient access for feeding, watering, cleaning, and inspecting your animals. Always ensure doors are securely latched after use to prevent escapes and predator entry.
- Environmental Considerations: While the cover provides protection, consider additional shade or shelter during extreme heat and ensure animals have access to fresh water at all times.

Image 5.1: The coop is designed for multi-animal use, accommodating various poultry and small pets.
6. Maintenance
- Regular Cleaning: Clean the coop regularly to maintain a hygienic environment for your animals. Remove waste and soiled bedding as needed.
- Inspect for Wear: Periodically inspect the metal frame, wire mesh, and cover for any signs of wear, damage, or corrosion. Address any issues promptly to ensure the coop's integrity.
- Cover Care: Clean the waterproof cover with mild soap and water. Ensure it is securely attached, especially before anticipated strong winds or heavy rainfall.
- Hardware Check: Re-tighten all bolts and connections annually, or more frequently if the coop is moved or subjected to harsh weather.
7. Troubleshooting
- Coop Feels Unstable: Ensure all frame connections are fully tightened. Verify the coop is on a level surface. If on uneven ground, consider shimming or leveling the area.
- Wire Mesh Sagging: Check if the mesh is properly secured with all clips or ties. Add more attachment points if necessary to keep it taut.
- Water Accumulation on Cover: Ensure the cover is installed correctly with the sloped side facing downwards to allow water runoff. Clear any debris that might be pooling water.
- Doors Not Latching Securely: Inspect the latch mechanism for obstructions or damage. Ensure the door frame is aligned correctly. Adjust hinges if needed.
- Predator Concerns: Reinforce the base of the coop with additional mesh or bury the bottom edge slightly to deter digging predators. Ensure all doors are locked at night.
8. Specifications
| Model Number | SZY-PPG_33EVARQG-XLSs2p5f |
| Product Dimensions (L x W x H) | 120" x 39.37" x 39.37" (304.8 cm x 100 cm x 100 cm) |
| Item Weight | 36.2 Pounds (16.4 kg) |
| Material | Metal Frame, Hexagonal Wire Mesh, PE Cover |
| Color | Black |
| Number of Doors | 3 (Lockable) |
| Special Features | Waterproof and Anti-UV Cover, Sloped Roof, Heavy-Duty Metal Build |
| Recommended Breeds | Chicken, Duck, Goose, Rabbit, Small Dogs |
| UPC | 822200674870 |
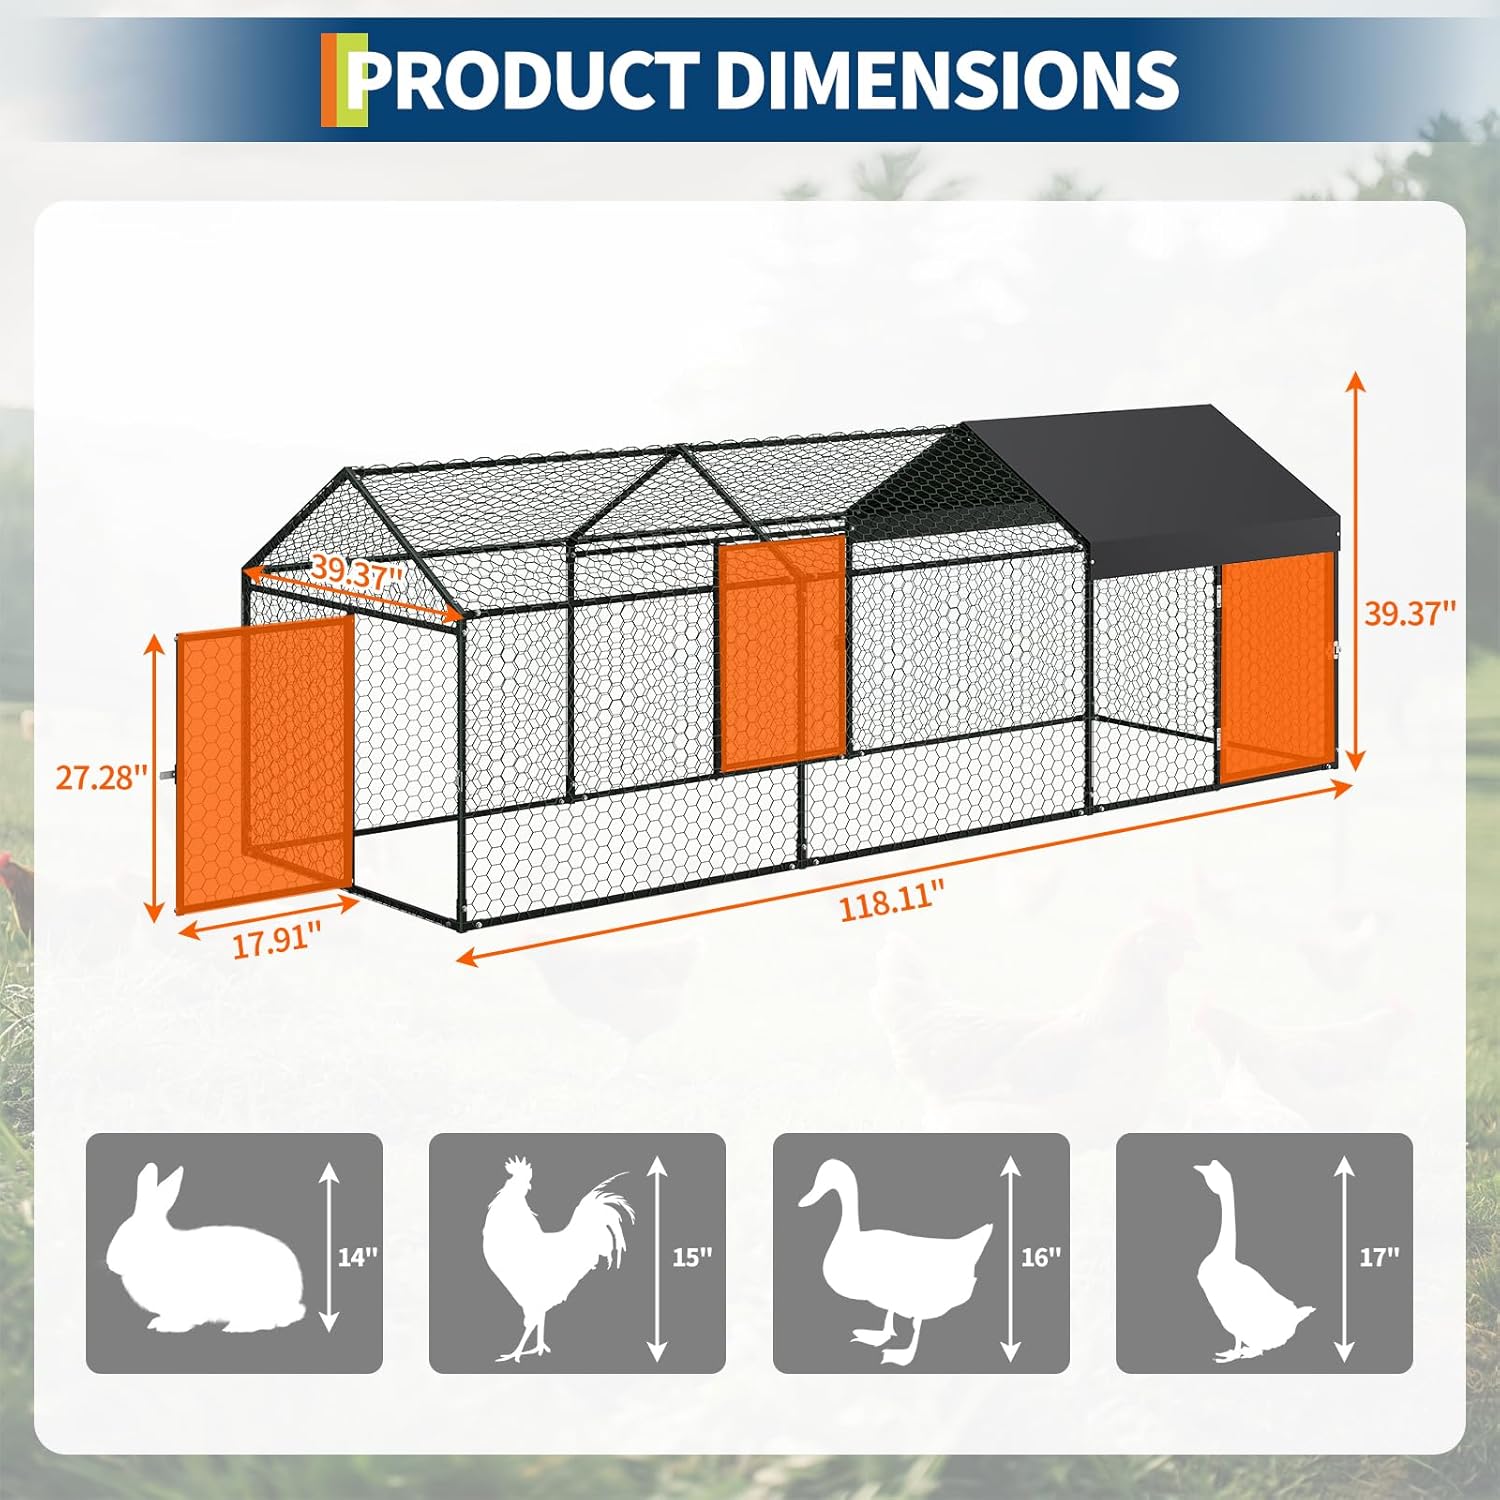
Image 8.1: Detailed product dimensions and animal size references.
9. Warranty and Support
Specific warranty information for this product is not provided in the available documentation. For any questions regarding warranty coverage, missing parts, or technical support, please contact CABIHOME customer service directly through their official channels or the retailer from whom the product was purchased. Please have your model number (SZY-PPG_33EVARQG-XLSs2p5f) and proof of purchase ready when contacting support.