1. Product Overview
The Eurannit XC20E Industrial Inkjet Printer System is an all-in-one integrated solution designed for efficient coding and marking on various surfaces. It features a built-in conveyor belt with an aerospace aluminum frame and a dual-core processor, ensuring stable and precise printing for small packaging and micro production lines. This system delivers high-resolution 600 DPI prints for text, dates, images, QR codes, and dynamic barcodes.

Figure 1: Overview of the XC20E Industrial Inkjet Printer System, highlighting the conveyor drive center and 5-inch touchscreen control panel.
2. Setup and Installation
Follow these steps to correctly set up your XC20E Industrial Inkjet Printer System. Ensure all components are present before beginning installation.
2.1 Unpacking and Component Identification
Carefully unpack all items from the box. Refer to the packing list below to identify each component.

Figure 2: Detailed view of all components included in the XC20E package.
2.2 Assembly Steps
For a visual guide, please refer to the assembly video below. The video demonstrates the complete installation process.
Video 1: Step-by-step assembly tutorial for the XC20E Industrial Inkjet Printer System.
- Install the Print Head Unit: Securely attach the print head unit to the designated mounting points on the conveyor system. Ensure all screws are tightened.
- Attach the Photoelectric Sensor: Mount the photoelectric sensor to the system, ensuring it is positioned to accurately detect items on the conveyor belt.
- Install the Adjustable Limit Baffle: Position the limit baffle to guide products accurately under the print head. This can be adjusted later based on product size.
- Connect Cables: Connect all necessary cables, including power, print head, and sensor cables, to their respective ports. Ensure connections are secure.
- Grounding: Connect the ground wire to an appropriate grounding point on the system to ensure electrical safety.

Figure 3: Detailed anatomy of the XC20E system, identifying key components.
2.3 Adjusting Print Head and Baffle
The print head height and limit baffle position are adjustable to accommodate various product sizes and ensure precise printing. Use the provided tools to make these adjustments.
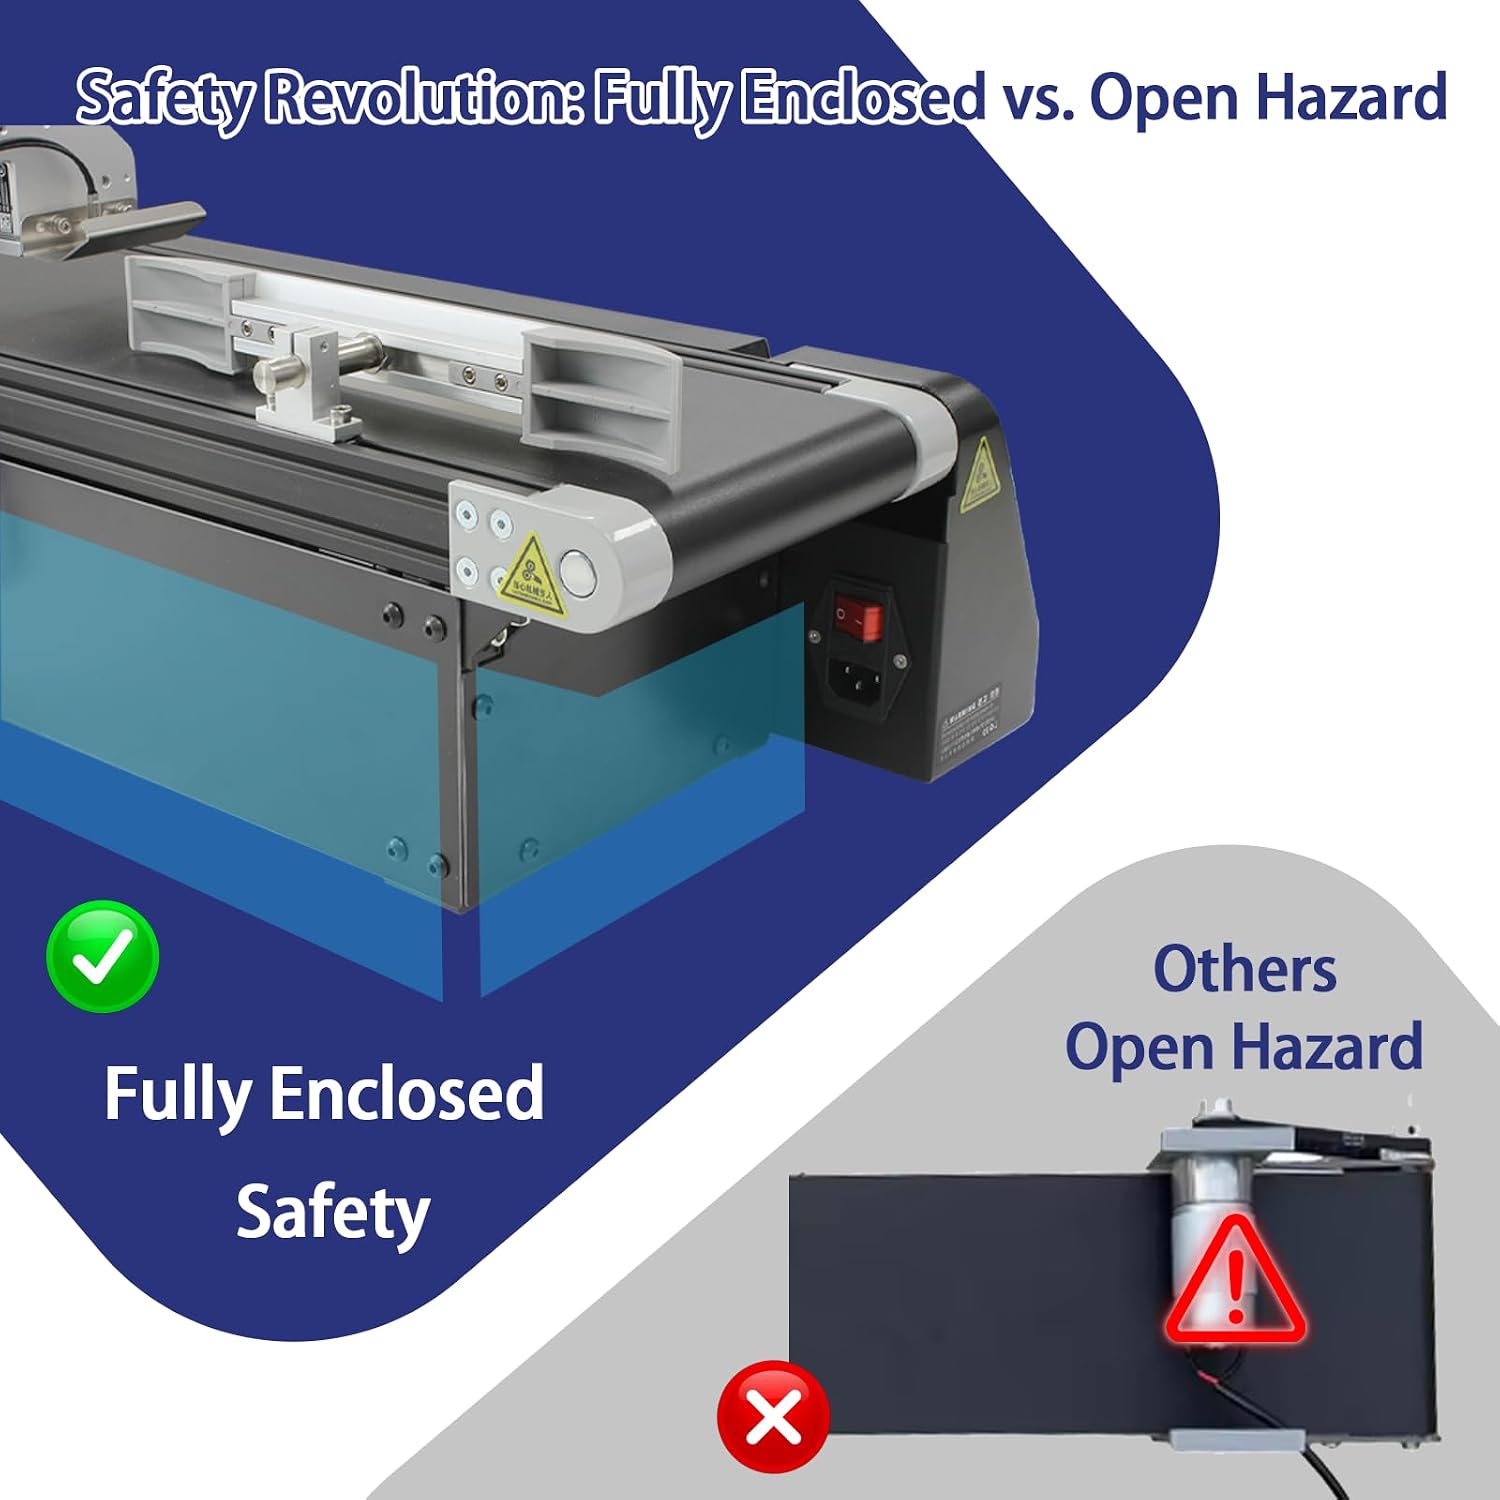
Figure 4: Adjustments for print head height and limit baffle for optimal printing.
3. Operating Instructions
This section provides guidance on operating your XC20E printer system for effective coding and marking.
3.1 Power On and Conveyor Operation
After completing the setup, turn on the power. The conveyor belt speed can be adjusted using the knob and digital display on the control panel. The system supports both forward and reverse operation.

Figure 5: Control panel and touchscreen interface for conveyor speed and print content management.
Video 2: Demonstration of the conveyor printer in operation, showing items being printed with codes.
3.2 Printing Content and Versatility
The XC20E allows for high-resolution printing of various content types, including text, dates, QR codes, barcodes, and images. Content can be edited directly on the touchscreen or imported via USB. The system supports multi-line printing with flexible font, size, and layout customization.

Figure 6: Examples of versatile coding and flexible import options.
3.3 Applicable Materials
The printer is designed to work on a wide range of materials, including cardboard, metal, stone, fabric, glass, plastic, bottles, cans, and pouches.

Figure 7: Various materials compatible with the XC20E printer.
4. Maintenance and Care
Proper maintenance ensures the longevity and optimal performance of your XC20E printer system.
4.1 Ink Cartridge Handling
The system uses ER520 quick-dry black ink cartridges. Ensure the cartridge is properly installed and sealed when not in use to prevent drying. Use the provided maintenance tool kit for cleaning and care.

Figure 8: Ink cartridge maintenance tool kit.
4.2 General Cleaning
Regularly clean the print head and conveyor belt to prevent ink buildup and ensure smooth operation. Use a soft, lint-free cloth and appropriate cleaning solutions as recommended by Eurannit.
5. Troubleshooting Common Issues
This section provides solutions for common operational problems.
- Poor Print Quality: Check ink cartridge levels, ensure the print head is clean, and verify print head height adjustment.
- Conveyor Belt Not Moving: Ensure the power is connected, the power switch is on, and the speed setting is not at zero. Check for any obstructions on the belt.
- Error Messages on Screen: Refer to the on-screen error codes for specific instructions. Often, these relate to ink levels, print head status, or sensor issues.
- Product Not Detected: Verify the photoelectric sensor's position and ensure it is clean and unobstructed.
6. Technical Specifications
| Feature | Specification |
|---|---|
| Brand | Eurannit |
| Model Name | XC20E |
| Printing Technology | Inkjet (TIJ) |
| Print Height | 12.7mm (0.5 inch) or 1 inch nozzle options |
| Resolution | 600 DPI |
| Conveyor Belt Width | 15cm |
| Conveyor Speed | 0–15 m/min (adjustable) |
| Ink Drying Time | 3–5 seconds (quick-dry ink) |
| Connectivity Technology | Ethernet, USB |
| Product Dimensions (D x W x H) | 8.6"D x 13"W x 26"H (21.8cm x 33cm x 66cm) |
| Max Printspeed Monochrome | 23.84 ppm |
| Printer Output Type | Color (with appropriate ink cartridge) |
| Built-In Media | Inkjet Cartridges |
Figure 9: Eurannit XC20E Industrial Inkjet Printer System dimensions.

7. Warranty and Customer Support
The Eurannit XC20E Industrial Inkjet Printer System comes with a 1-Year Manufacturer Warranty. For any technical assistance, troubleshooting, or warranty claims, please contact Eurannit customer support through their official channels. You can also visit the Eurannit Store on Amazon for more product information and support resources.