1. Introduction
The Beelink ME Pro N150 is a versatile Mini PC designed for Network Attached Storage (NAS) applications, private cloud solutions, 4K media libraries, and soft routing. It features an Intel N150 CPU, 16GB LPDDR5 RAM, and a 1TB SSD, with extensive expansion capabilities for up to 72TB of storage. This manual provides detailed instructions for setup, installation, maintenance, and troubleshooting to ensure optimal performance and longevity of your device.

Image: Beelink ME Pro N150 Mini PC NAS overview.
2. Package Contents
Verify that all items listed below are included in your package. If any items are missing or damaged, please contact customer support.
- 1 x Beelink ME Pro N150 Unit
- 1 x US Power Adapter
- 1 x 100cm HDMI Cable
- 1 x 100cm Network Cable
- 2 Packs M3 Screws
Video: Beelink ME Pro Unboxing. This video demonstrates the unboxing process and shows all included accessories.
3. Product Overview
3.1 Dimensions and Design
The Beelink ME Pro N150 features a revolutionary ultra-compact metal design, measuring 6.5 x 4.8 x 4.4 inches. Its sleek, space-saving footprint is 50% smaller than traditional 2-bay NAS units, making it ideal for any desktop environment.

Image: Front and rear view of the Beelink ME Pro N150, highlighting its compact dimensions and port layout.
3.2 Ports and Interfaces
The device is equipped with a variety of ports for versatile connectivity:
- Front Port: Reset Hole, CLR CMOS, USB-A (10Gbps), Power Button (ON/OFF)
- Back Ports: DC Input, 2.5GbE LAN, 5GbE LAN, HDMI (4K 60Hz), USB-A*2 (480Mbps), USB-C (10Gbps data&video), 3.5mm Audio Jack

Image: Detailed view of the front and back ports of the Beelink ME Pro N150.
4. Initial Setup
Follow these steps to set up your Beelink ME Pro N150:
- Connect the power adapter to the DC Input port and a power outlet.
- Connect your monitor(s) to the HDMI or USB-C (Type-C) ports. The device supports dual 4K@60Hz displays.
- Connect your keyboard and mouse to the available USB-A ports.
- For wired network access, connect an Ethernet cable to either the 2.5GbE or 5GbE LAN ports.
- Press the Power Button on the front of the device to turn it on.
- Follow the on-screen instructions to complete the initial setup of the pre-installed operating system (Windows 11 Home).

Image: Beelink ME Pro N150 in a typical office setup with a monitor, keyboard, and mouse.
5. Storage Installation and Expansion
The Beelink ME Pro N150 supports extensive storage expansion with two 3.5"/2.5" SATA HDD slots and three M.2 PCIe3.0 SSD slots (one pre-installed with a 1TB system drive), supporting up to 72TB total capacity.
5.1 Installing 3.5-inch / 2.5-inch HDDs
To install additional 3.5-inch or 2.5-inch HDDs:
- Remove the magnetic heat dissipation cover from the top of the device.
- Unscrew and pull out the hard drive bracket(s).
- Install your prepared 3.5-inch HDD into the bracket. Ensure the side with the gold finger faces down. Tighten the black screws to secure the hard drive.
- Alternatively, for a 2.5-inch HDD/SSD, remove the thermal silicone pad from the bracket. Install the 2.5-inch HDD/SSD, ensuring the side with the gold finger faces down. Tighten the silver screws to secure it.
- Place the hard drive(s) into the ME Pro unit and tighten the screws.
- Reinstall the magnetic heat dissipation cover.
Video: Tutorial on installing HDD and SSD. This video guides you through the process of installing both 3.5-inch HDDs and 2.5-inch SSDs into the device's brackets.

Image: Internal view of the Beelink ME Pro N150, showing the two 3.5-inch/2.5-inch HDD bays.
5.2 Installing M.2 SSDs
The device has three M.2 PCIe3.0 SSD slots. To install or replace an M.2 SSD:
- Remove the bottom silicone pad and unscrew the screws to remove the bottom cover.
- Locate the M.2 SSD slot(s). Remove the screws corresponding to the SSD slot you wish to use.
- Insert the M.2 SSD into the slot at an angle and then gently push it down. Tighten the screw to secure it.
- Align the raised part on the hard drive's edge with the raised part on the machine.
- Reinstall the bottom cover and silicone pad, tightening the screws.
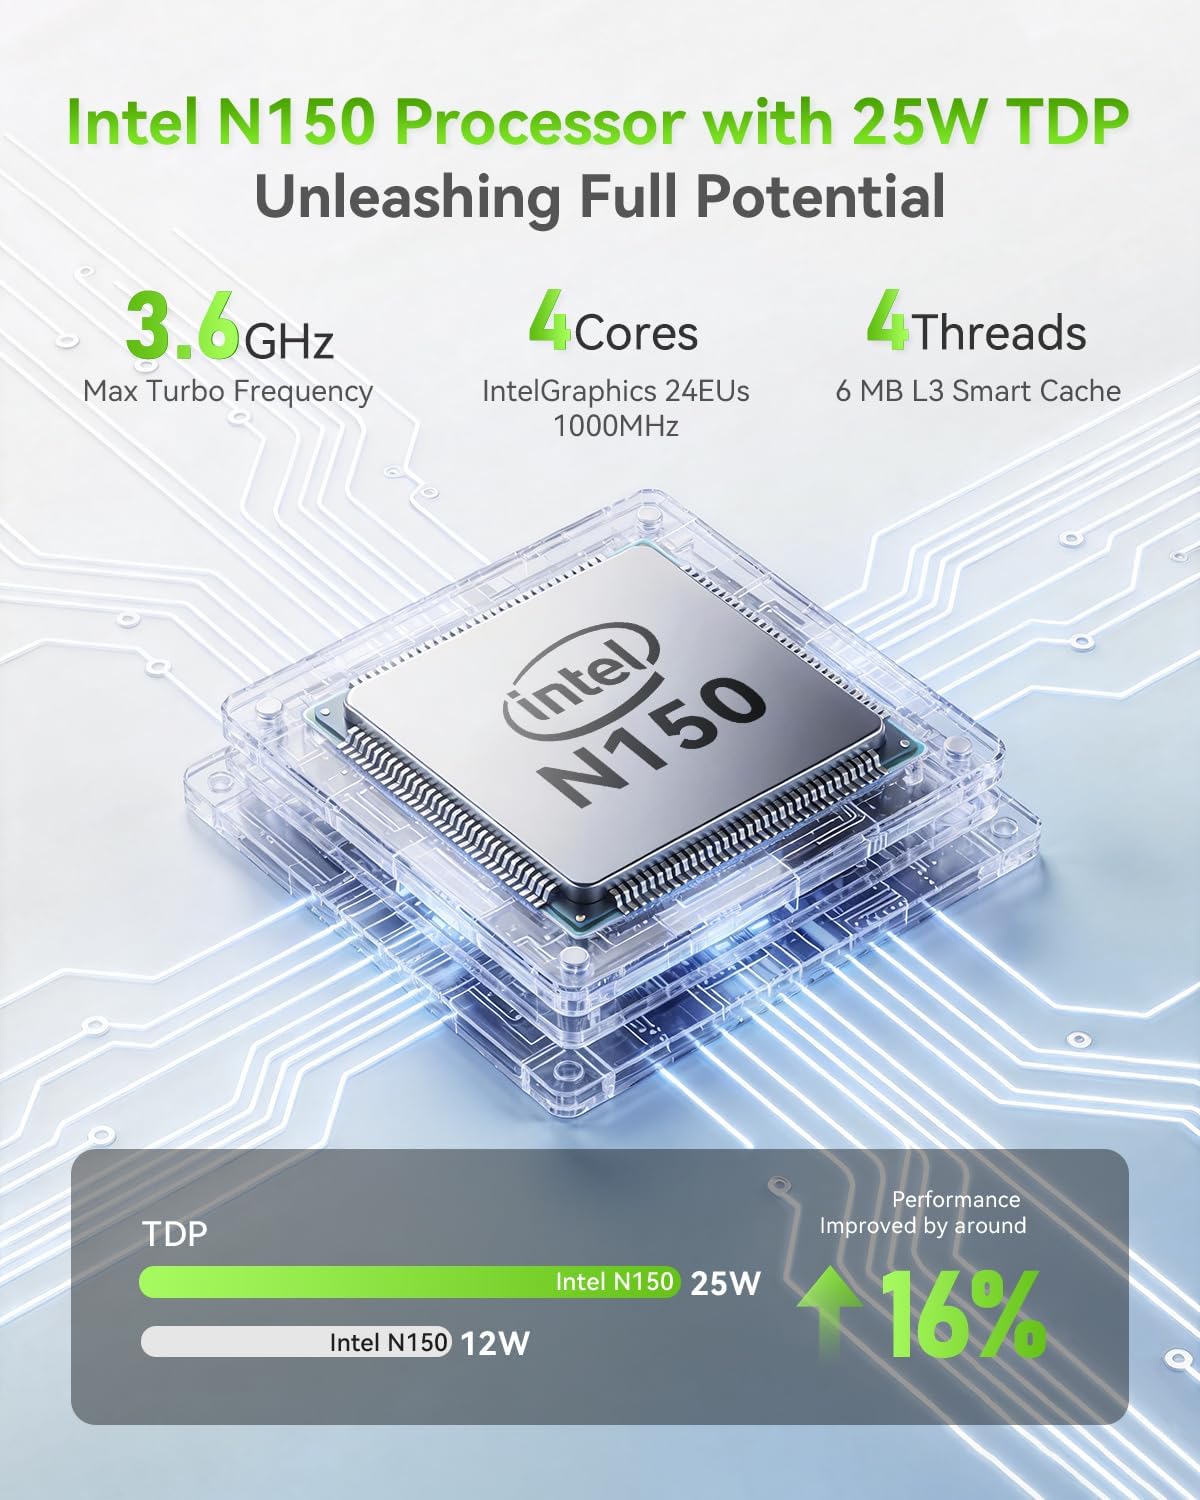
Image: Close-up view of M.2 SSD installation in the Beelink ME Pro N150.
6. Modular Motherboard Upgrade
The Beelink ME Pro features an innovative DIY drawer-style design that supports easy motherboard upgrades, compatible with Intel N-series, Intel 12th/13th/14th/15th Gen, AMD FP8 series, and ARM architectures. This allows for future-proofing and customization.
- Remove the magnetic heat dissipation cover.
- Remove the four screws securing the motherboard.
- Remove the bottom cover. Important: The SSD must be removed before the motherboard can be removed; otherwise, there is a risk of damage.
- Gently slide out the existing motherboard.
- Insert the new Intel N150 motherboard (or other compatible modular motherboard) into the slot.
- Reinstall the SSD on the new motherboard.
- Reinstall the bottom cover and tighten the screws.
- Tighten the screws securing the motherboard and replace the magnetic heat dissipation cover.
Video: Beelink ME Pro: N150 Modular Motherboard (Upgrade from N95). This video demonstrates the process of upgrading the motherboard.

Image: Diagram illustrating the modular motherboard design of the Beelink ME Pro N150.
7. Operating System and Software
The Beelink ME Pro N150 comes with Windows 11 Home pre-installed. It is also compatible with a wide range of operating systems and software for various applications:
- Mainstream Systems: Windows, Linux
- Virtual Machine: Proxmox (PVE), ESXi
- NAS Systems: FNOS, UNRAID, TrueNAS
- Media Systems: Kodi, JellyFin, Plex, Emby
For optimal performance, it is recommended to use the SSD1 for system installation.

Image: Visual representation of the Beelink ME Pro N150's compatibility with various operating systems and applications.
8. Connectivity
The Beelink ME Pro N150 offers robust connectivity options:
- High-Speed Dual LAN: Equipped with 5GbE and 2.5GbE Ethernet ports, supporting network aggregation for fast backup and data transfers. Ideal for soft routing and advanced networking.
- Wireless Connectivity: Features WiFi 6 for fast wireless speeds and Bluetooth 5.4 for connecting peripherals.
- Dual 4K Display: Supports dual 4K@60Hz display output via HDMI and Type-C, perfect for multi-monitor workstations or a media hub.

Image: Close-up of the dual LAN ports and a speed comparison chart for different Ethernet speeds.

Image: Beelink ME Pro N150 connected to two 4K monitors, demonstrating dual display capability.
9. Cooling and Maintenance
The Beelink ME Pro N150 is designed for 24/7 operation with whisper-quiet cooling and easy maintenance features.
9.1 Innovative Cooling System
Combining a specialized internal blower with high-conductivity silicone thermal pads, heat is efficiently dissipated through the aluminum frame. Dual-side silicone dampeners and precision-fit screws minimize HDD vibration noise, ensuring a quiet environment.
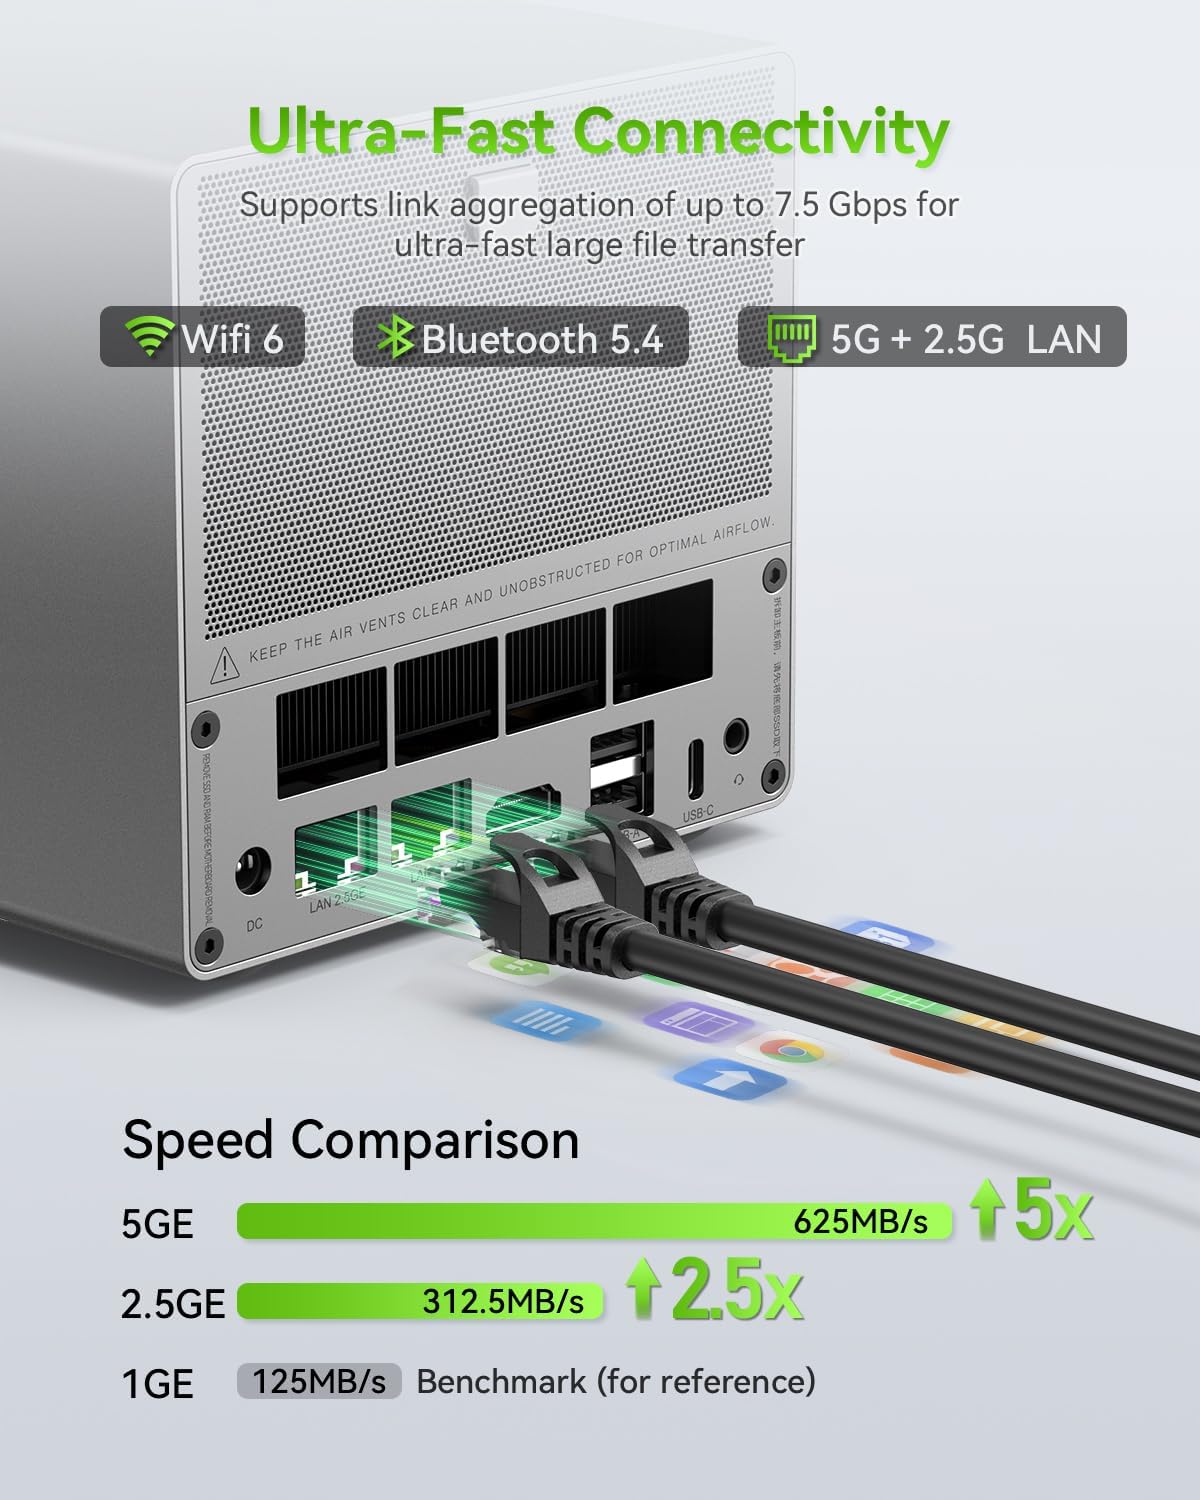
Image: Diagram illustrating the internal cooling components, including HDD cooling, blower fan, CPU/DDR cooling, and SSD cooling.
9.2 Easy Dust Cleaning
The DIY drawer-style design allows for quick and convenient dust removal. Simply slide out the motherboard for easy access and cleaning, ensuring optimal airflow and preventing overheating.
Video: Easy Dust-Removal Design. This video demonstrates how to easily remove dust from the device.
10. Specifications
| Feature | Specification |
|---|---|
| Dimensions | 166x121x112mm (excluding feet) |
| Color | Deep Space Gray |
| CPU | Intel® Twin Lake Processor N150, Max Turbo Frequency 3.6GHz (4C/4T), 6MB Intel® Smart Cache |
| GPU | Intel® Graphics 1.0GHz |
| System Drive | SSD1: M.2 2280 PCIe 3.0 x2 (maximum 4TB) *1 |
| SSD Storage Drive | M.2 2280 PCIe 3.0 x1 (maximum 4TB) *1 |
| HDD Storage Drive | 2.5/3.5-inch SATA hard drive *2 |
| Ports | USB3.2 (10Gbps) *1 + LAN 5GE *1 + LAN 2.5GE *1 + 3.5mm Audio Jack *1 + USB2.0 (480Mbps) *2 + USB-C (10Gbps data&video) *1 + HDMI (4K 60Hz) *1 + CLR CMOS *1 + Reset hole *1 + DC *1 |
| Wireless Network | WiFi6 (MT7920) ; Bluetooth 5.4 |
| Power LED Indicator | 1 |
| Power Button | 1 |
| Adapter | Input: 100~240V, 50~60Hz; Output: 19V/5.26A |
| Operating Environment | Temperature: -10°C to 40°C; Humidity: 30% to 90% |
| Storage Environment | Temperature: -20°C to 60°C; Humidity: 10% to 90% |
| Accessories | Power Adapter, 100cm HDMI Cable, 100cm Network Cable, Manual, Hard Drive Mounting Screws (2 packs) |

Image: Detailed product specifications table for the Beelink ME Pro N150.
11. Troubleshooting
If you encounter issues with your Beelink ME Pro N150, consider the following general troubleshooting steps:
- No Power: Ensure the power adapter is securely connected to both the device and a working power outlet. Check if the power LED indicator is on.
- No Display: Verify that the HDMI or USB-C cable is securely connected to both the device and the monitor. Try a different cable or monitor if possible. Ensure the monitor is set to the correct input source.
- Network Issues: For wired connections, check Ethernet cable connections and router status. For wireless, ensure WiFi is enabled and connected to the correct network.
- Device Not Responding: Press and hold the power button for 5-10 seconds to force a shutdown, then restart the device. If issues persist, use the CLR CMOS button (requires a paperclip or similar tool) to reset BIOS settings.
- Storage Not Detected: Ensure HDDs/SSDs are correctly installed and secured. Check cable connections for SATA drives. For M.2 SSDs, ensure they are fully seated and screwed down.
For more specific issues, refer to the online support resources or contact customer service.
12. Warranty and Support
Beelink is committed to providing excellent customer service and product support:
- Warranty: The Beelink ME Pro N150 comes with a 12-month warranty.
- Technical Support: Lifetime technical support is provided for your device.
- Customer Service: For any product-related questions or issues, you can contact customer service through Amazon by logging into your account, navigating to "Your Account" → "Your Orders", and selecting "Ask Product Question" for the relevant order.

Image: Information regarding Beelink's customer support, including warranty and technical assistance.


