1. Introduction
This manual provides essential information for the safe and efficient operation, installation, and maintenance of your Sunvivi 24-inch Built-in Dishwasher, Model ZDW001. Please read all instructions carefully before using the appliance and retain this manual for future reference.

Image 1.1: Sunvivi 24-inch Built-in Dishwasher (Model ZDW001).
2. Safety Information
Always follow basic safety precautions when using electrical appliances to reduce the risk of fire, electric shock, or injury. This dishwasher is designed for household use only.
- Electrical Safety: Ensure the dishwasher is properly grounded. Do not operate with a damaged power cord.
- Water Safety: Connect to a cold water supply. Check for leaks after installation.
- Child Safety: Keep children away from the dishwasher, especially when it is operating. The control panel features hidden buttons to prevent accidental touches.
- Loading Safety: Load sharp items with points down to prevent injury. Do not overload the dishwasher.
- Detergent Safety: Use only detergents and rinse aids specifically designed for automatic dishwashers. Keep these products out of reach of children.
- Hot Surfaces: The interior of the dishwasher can be hot after a wash cycle. Allow time for cooling before unloading.
3. Setup and Installation
The Sunvivi Built-in Dishwasher is designed for seamless integration into your kitchen cabinetry. Professional installation is recommended.
3.1 Dimensions
Before installation, ensure your cabinet opening meets the following dimensions:
- Depth: 23.74 inches (60.3 cm)
- Width: 26.1 inches (66.3 cm)
- Height: 33.66 inches (85.5 cm)
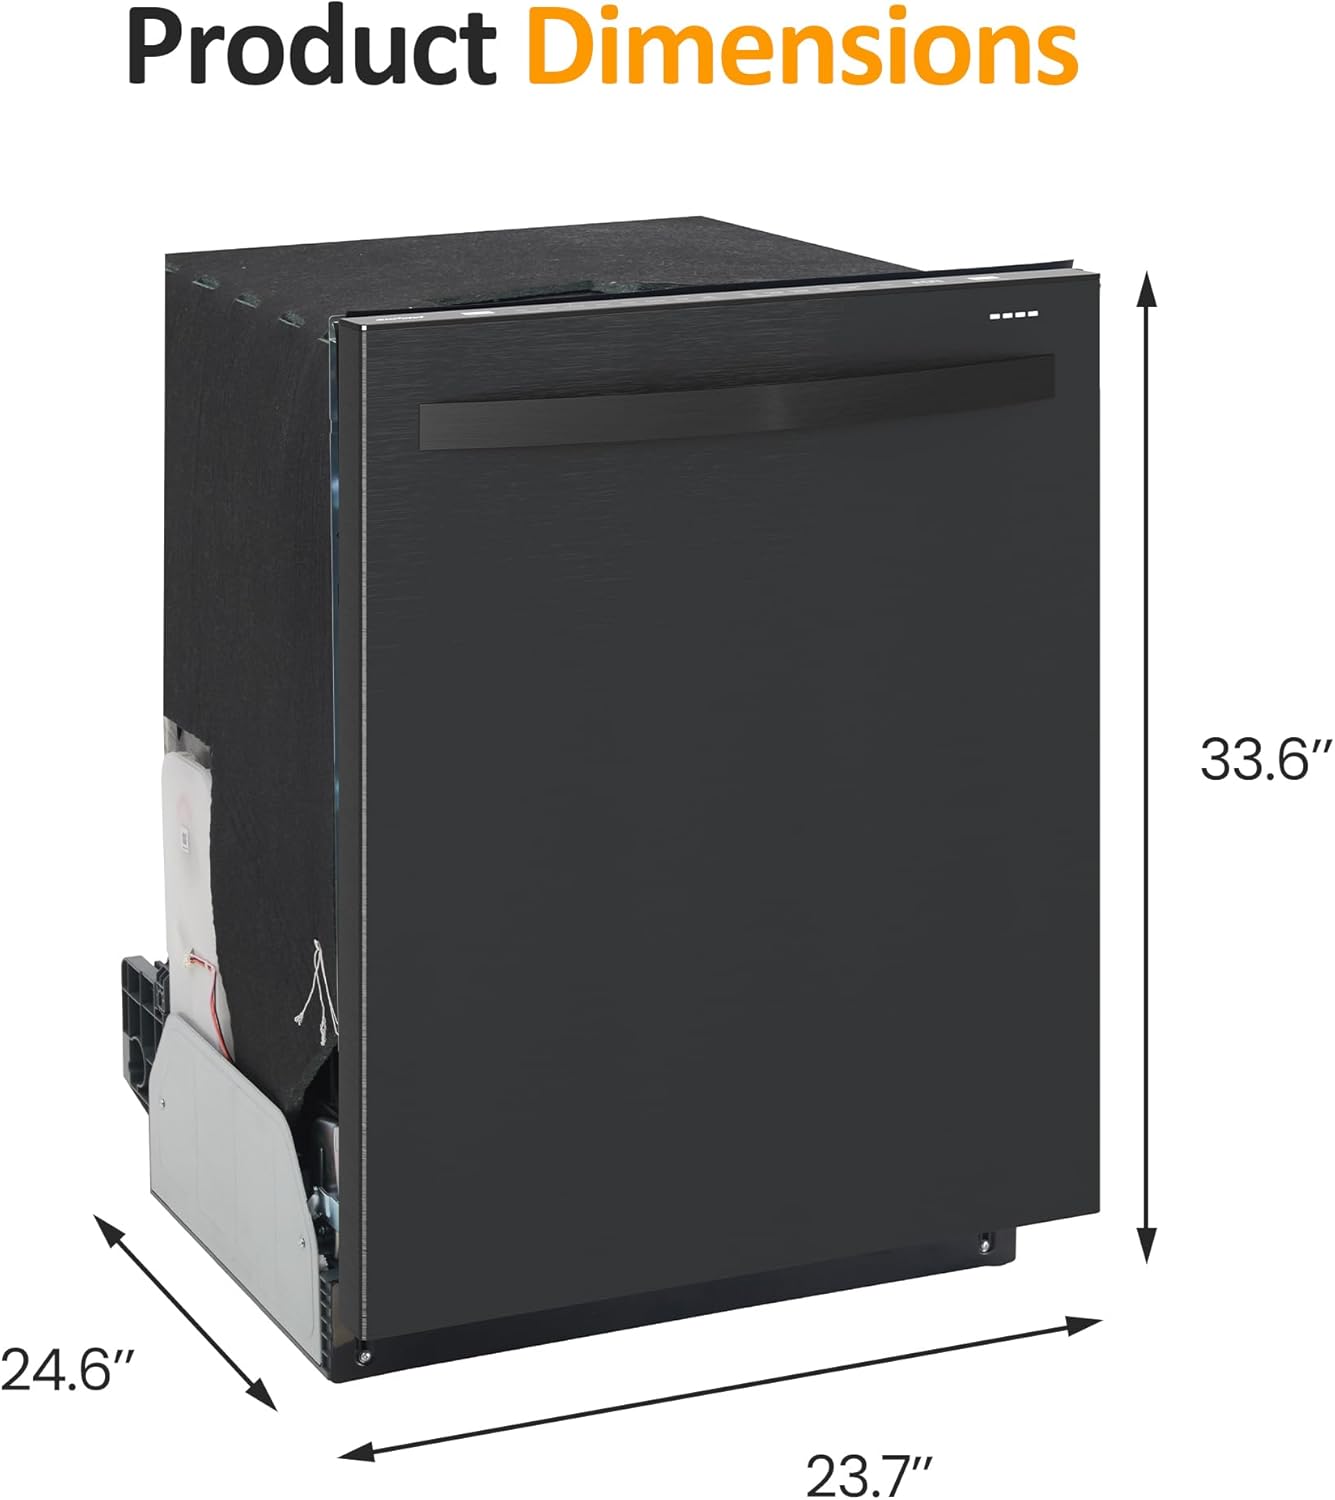
Image 3.1: Product Dimensions.
3.2 Installation Steps (Overview)
- Prepare the Opening: Ensure the cabinet opening is clear and correctly sized.
- Electrical Connection: Connect the dishwasher to a dedicated, grounded 120V electrical outlet.
- Water Supply Connection: Connect the water inlet hose to a cold water supply line.
- Drain Connection: Connect the drain hose to your sink drain or garbage disposal.
- Positioning: Slide the dishwasher into the cabinet opening, ensuring it is level.
- Securing: Secure the dishwasher to the countertop or side cabinets.
Refer to the detailed installation guide provided with your appliance for complete instructions.

Image 3.2: Dishwasher installed in a kitchen setting.
4. Operating Instructions
Your Sunvivi dishwasher offers a variety of programs and features for optimal cleaning performance.
4.1 Control Panel and Programs
The dishwasher features a touch control panel with hidden buttons to prevent accidental activation. It offers 8 wash programs and several enhanced settings.
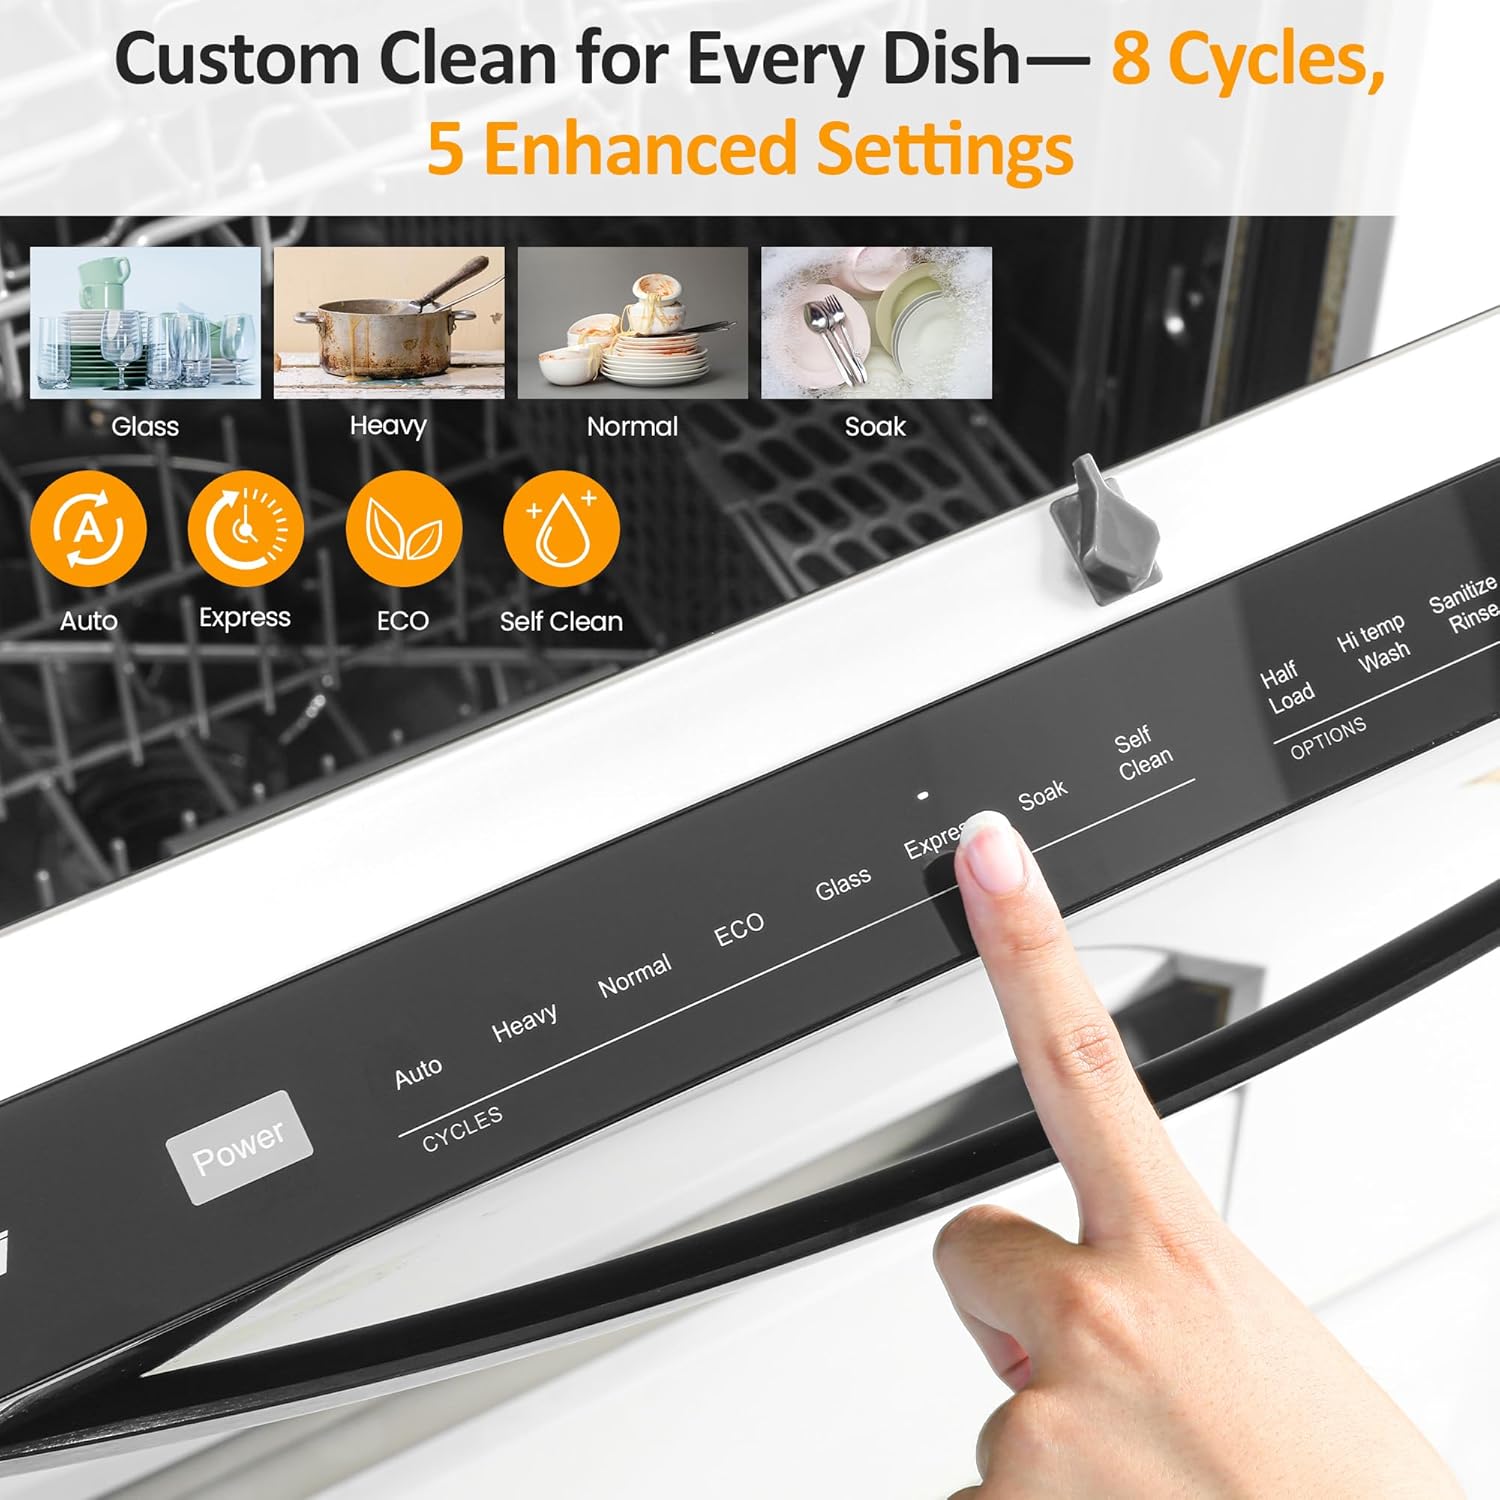
Image 4.1: Control Panel and Wash Programs.
Wash Programs:
- Auto: Automatically detects soil level and adjusts wash cycle.
- Heavy: For heavily soiled dishes, pots, and pans.
- Normal: Standard cycle for everyday dishware.
- ECO: Energy-efficient cycle for normally soiled dishes.
- Glass: Gentle cycle for delicate glassware.
- Express (35 min): Quick wash for lightly soiled dishes.
- Soak: Pre-soak cycle for dried-on food.
- Self-Clean: For cleaning the dishwasher interior.
Enhanced Settings:
- High-Temp Wash: Increases wash temperature for improved cleaning.
- Rinse: Adds an extra rinse cycle.
- Heat/Extended Dry: Enhances drying performance.
- Sanitization: Reaches temperatures up to 149°F (65°C) to reduce contaminants, suitable for items like baby bottles.
- Half-Load: Optimizes water and energy usage for smaller loads.
- Delay Start: Allows you to delay the start of a wash cycle for up to 24 hours.
4.2 Loading the Dishwasher
The dishwasher features adjustable and removable racks, accommodating 14-16 standard place settings, including pots, pans, and oversized dishes.

Image 4.2: Adjustable and Removable Racks.
- Upper Rack: Ideal for glasses, cups, and smaller bowls. The height can be adjusted to accommodate taller items in the lower rack.
- Lower Rack: Best for plates, larger bowls, and serving dishes.
- Cutlery Basket: Use for forks, spoons, and knives. Place sharp ends down.
- Loading Tips: Ensure dishes do not block the spray arms. Scrape off large food particles before loading.
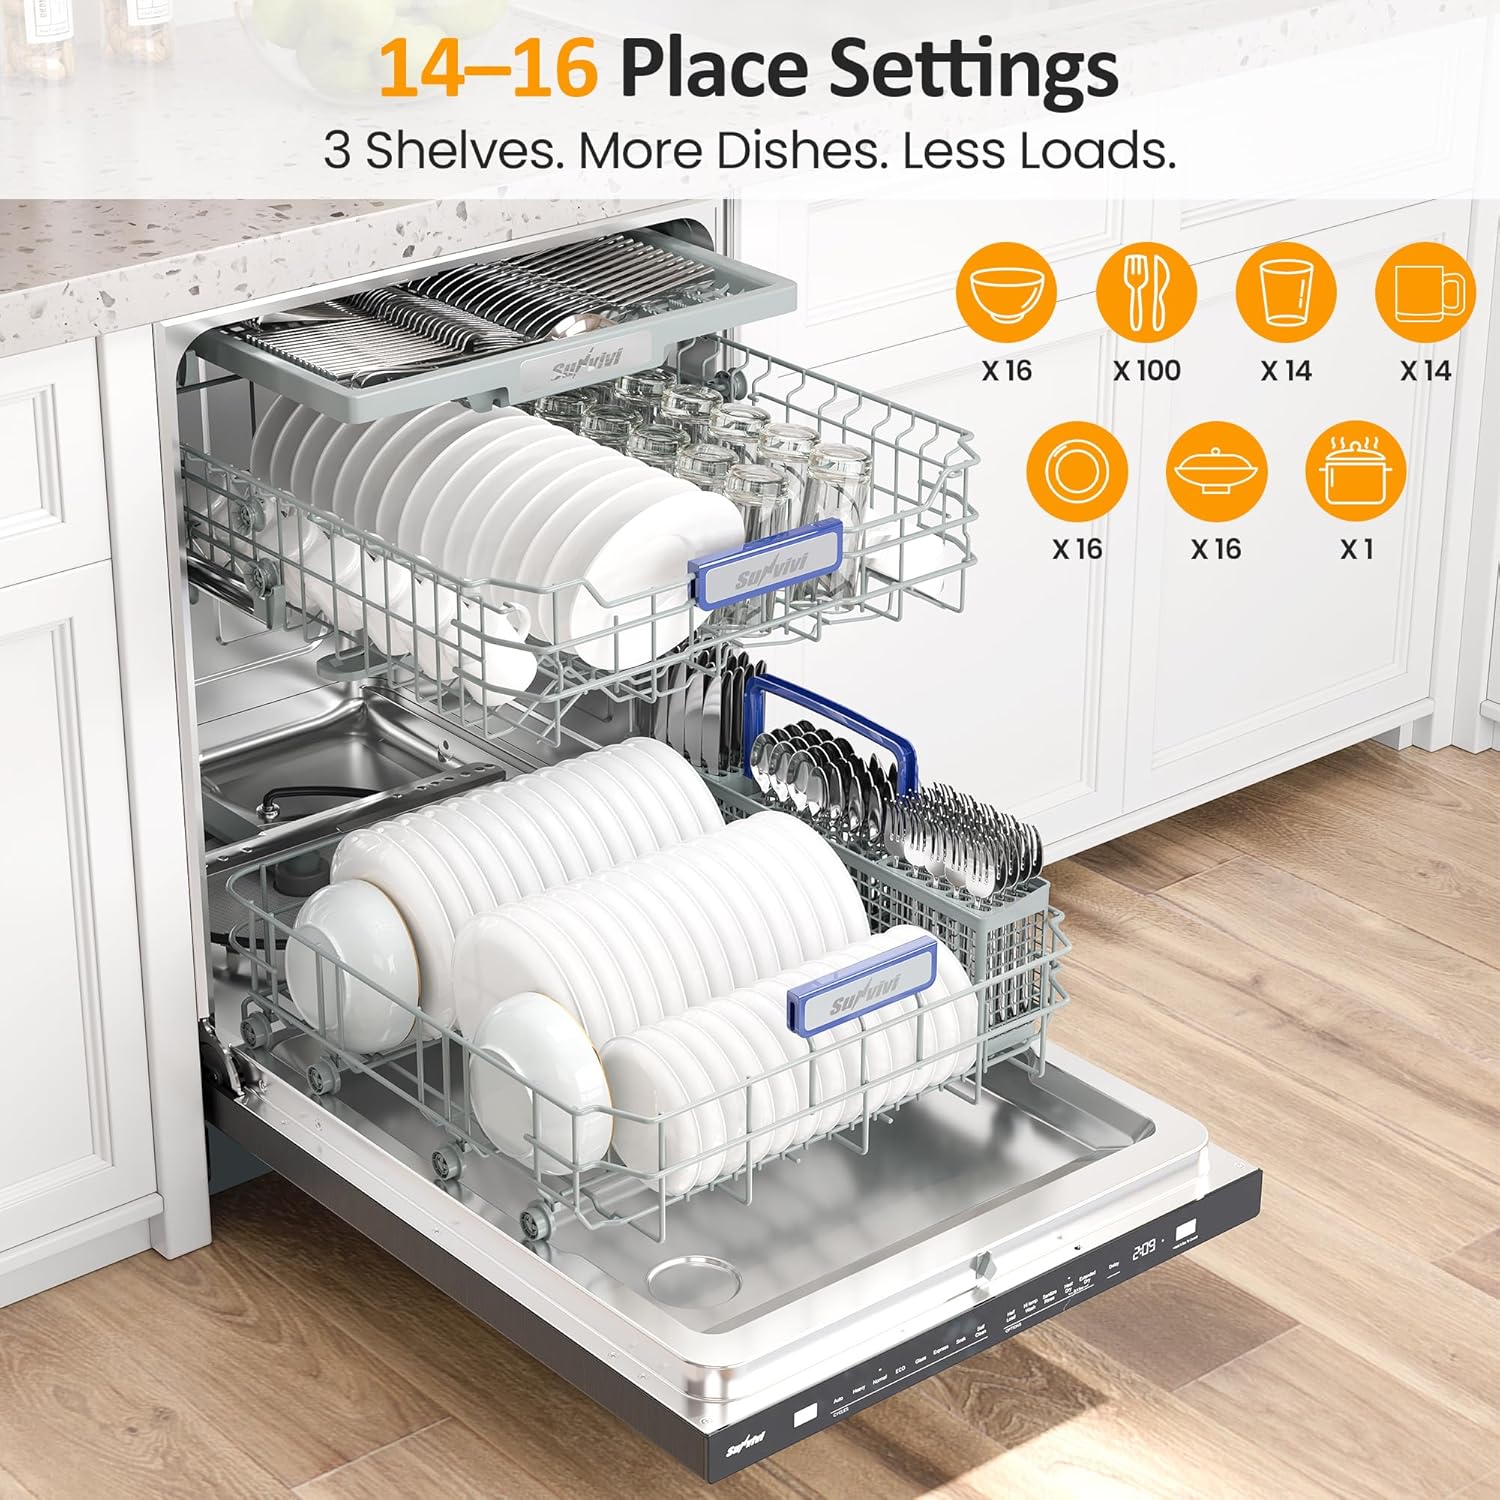
Image 4.3: Example of a fully loaded dishwasher.
4.3 Detergent and Rinse Aid
Use appropriate amounts of dishwasher detergent and rinse aid for optimal cleaning and drying results.
- Detergent Dispenser: Fill the main wash compartment with the recommended amount of dishwasher detergent.
- Rinse Aid Dispenser: Fill the rinse aid dispenser with liquid rinse aid. This helps prevent water spots and improves drying.
4.4 Washing Process
The dishwasher utilizes high-efficiency spray arms and a circulation system for thorough cleaning.
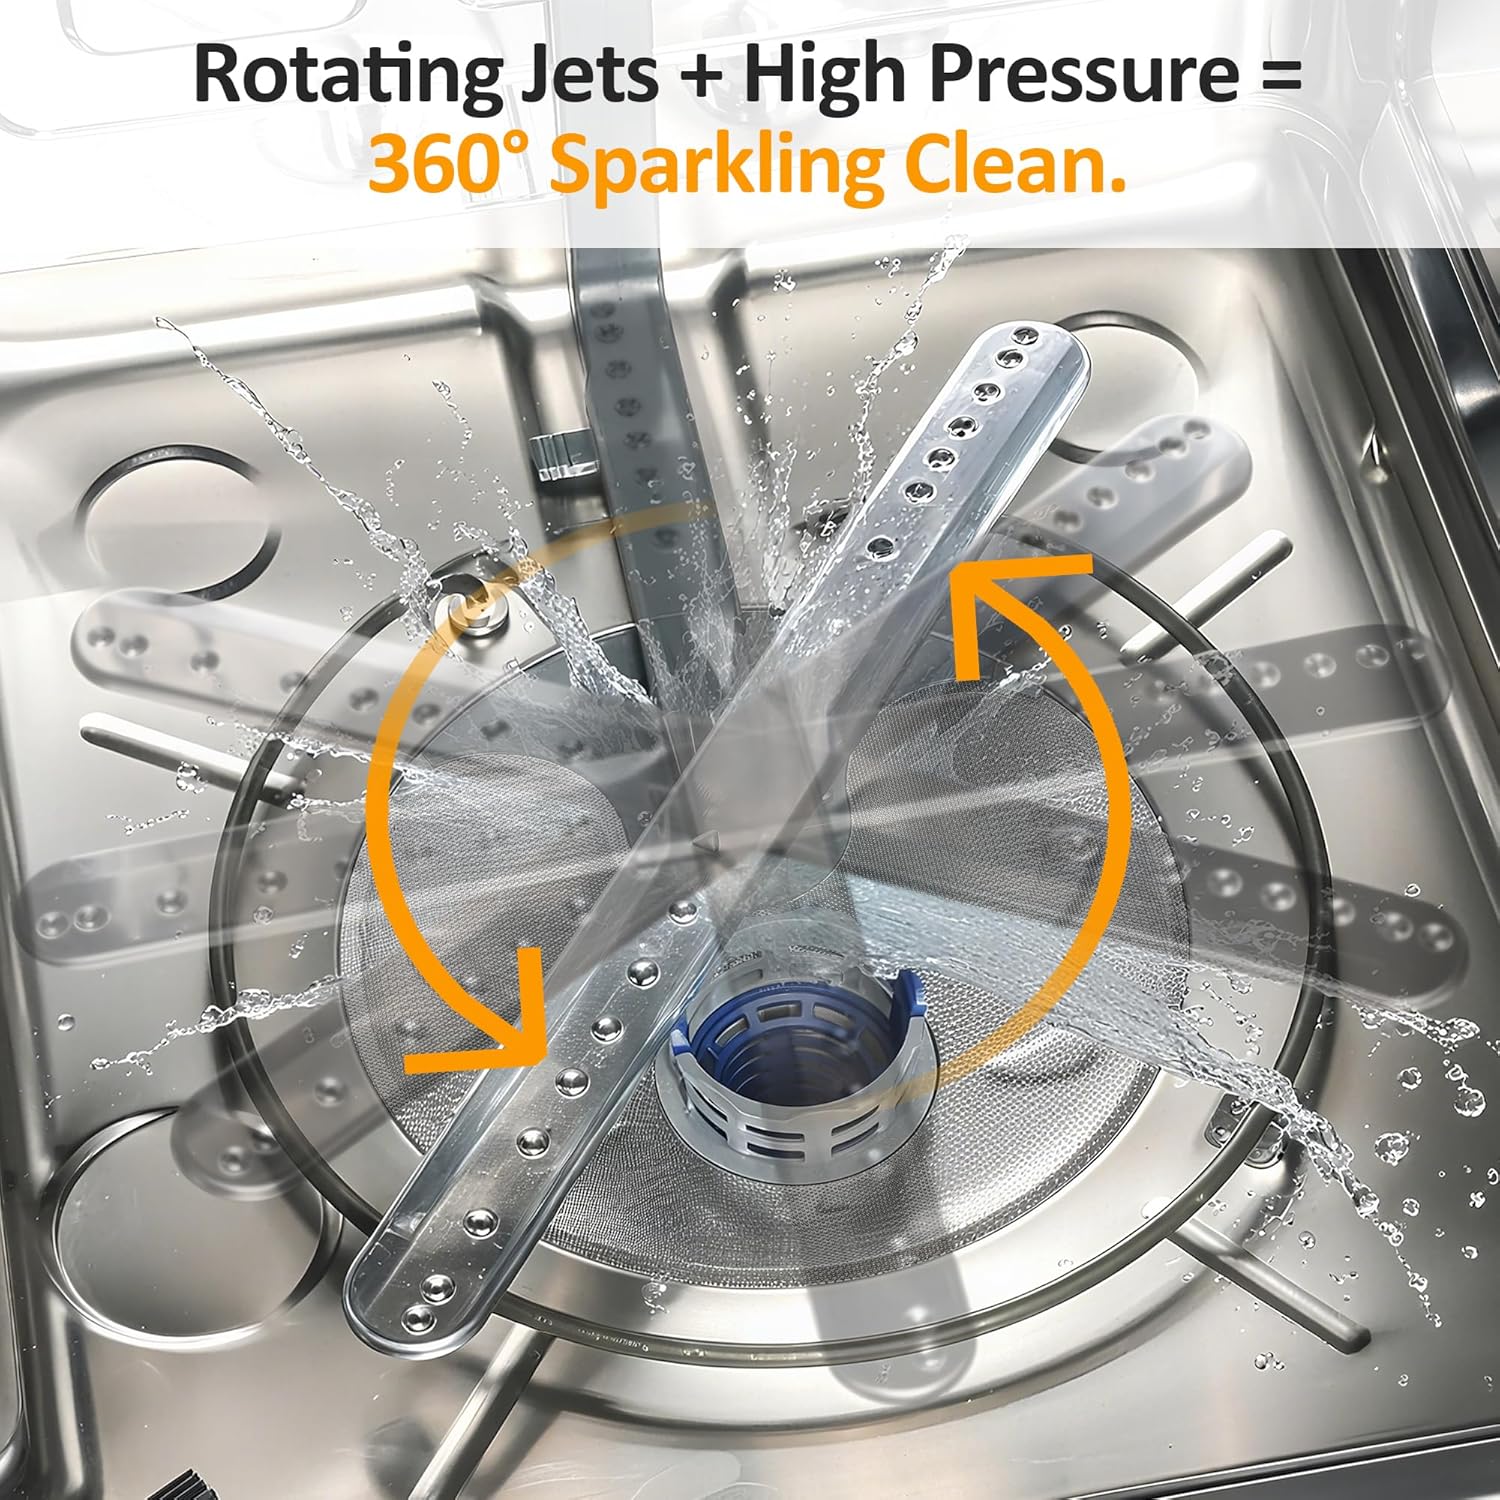
Image 4.4: Rotating spray arms for 360-degree cleaning.
During operation, the dishwasher maintains a quiet noise level of 49 dB, comparable to a quiet conversation.
5. Maintenance
Regular maintenance ensures the longevity and optimal performance of your dishwasher.
- Filter Cleaning: Periodically clean the filter system at the bottom of the dishwasher to remove food particles and debris. Refer to the detailed manual for instructions on how to remove and clean the filters.
- Spray Arm Cleaning: Check the spray arm nozzles for blockages and clean as needed.
- Exterior Cleaning: Wipe down the exterior stainless steel surface with a soft, damp cloth. Avoid abrasive cleaners.
- Interior Cleaning: Use the Self-Clean program regularly to maintain a fresh and hygienic interior.
6. Troubleshooting
If you encounter issues with your dishwasher, refer to the following common troubleshooting tips before contacting service.
| Problem | Possible Cause | Solution |
|---|---|---|
| Dishes not clean | Improper loading, clogged spray arms, insufficient detergent, low water temperature. | Reload dishes correctly, clean spray arm nozzles, use correct detergent amount, select a hotter wash program. |
| Water spots on dishes | No rinse aid, low rinse aid level, hard water. | Refill rinse aid dispenser, consider a water softener if water is very hard. |
| Dishwasher not starting | Door not closed properly, power supply issue, cycle not selected. | Ensure door is latched, check power connection, select a wash program and press start. |
| Leak detected | Hose connection loose, seal issue. | The built-in leak detection system will automatically drain and stop water flow with an audible alert. Check hose connections and seals. Contact support if the issue persists. |
7. Specifications
| Feature | Specification |
|---|---|
| Brand | SUNVIVI |
| Model Number | ZDW001 |
| Installation Type | Built-In |
| Product Dimensions (D x W x H) | 23.74" x 26.1" x 33.66" |
| Capacity | 14-16 Place Settings |
| Wash Programs | 8 (Auto, Heavy, Normal, ECO, Glass, Express, Soak, Self-Clean) |
| Noise Level | 49 Decibels |
| Voltage | 120 Volts |
| Special Features | Automatic sensing, High-temp wash, Rinse, Heat/Extended Dry, Sanitization, Half-load mode, Interior light, Leak detection system, Hidden buttons, Delay start |
| Item Weight | 79.2 Pounds |
8. Warranty and Support
Your Sunvivi Built-in Dishwasher is covered by an 18-month manufacturer's warranty from the date of purchase, ensuring quality assurance against defects in materials and workmanship under normal use.
8.1 How to Obtain Service
If you require service under warranty or have questions about your product, please contact Sunvivi customer support. Have your model number (ZDW001) and proof of purchase readily available.
- Customer Support: Refer to the contact information provided with your purchase documentation or visit the official Sunvivi website.