1. Safety Information
Read all instructions carefully before using the Trisomy Walking Pad Treadmill. Keep this manual for future reference.
- Ensure the treadmill is placed on a flat, stable surface.
- Keep children and pets away from the treadmill during operation.
- Always use the safety key. Attach the clip to your clothing before starting.
- Do not operate the treadmill if it is damaged or malfunctioning.
- Wear appropriate athletic footwear.
- Consult a physician before starting any new exercise program.
- Maximum user weight capacity: 350 lbs (158 kg).
- Ensure adequate clearance around the treadmill (at least 2 feet on sides and rear).
2. Package Contents
Verify that all items are present in the box:
- Trisomy Walking Pad Treadmill (main unit)
- User Manual
- Quick Installation Guide
- Remote Control
- Lubricant Oil
- Hex Screw for belt adjustment
- Magnetic Safety Key with clip
- Tablet Holder
- Handlebar Fixing Nuts (x2)
- Tablet Holder Nuts (x2)

Figure 2.1: All included components of the Trisomy Walking Pad Treadmill.
3. Setup Guide
3.1 Unpacking and Initial Placement
Carefully remove the treadmill from its packaging. Place it on a level surface in your desired exercise area. The treadmill is designed for easy mobility with built-in wheels.

Figure 3.1: The treadmill features smooth-rolling wheels for easy movement and storage.
3.2 Handlebar Assembly and Adjustment
The handlebar is adjustable to 6 different height levels (35" to 47") to accommodate various user heights. To adjust:
- Lift the handlebar to the upright position.
- Locate the handlebar fixing screws on each side.
- Rotate the screws counter-clockwise to loosen.
- Adjust the handlebar to your desired height, aligning the holes.
- Rotate the screws clockwise to secure the handlebar firmly in place.
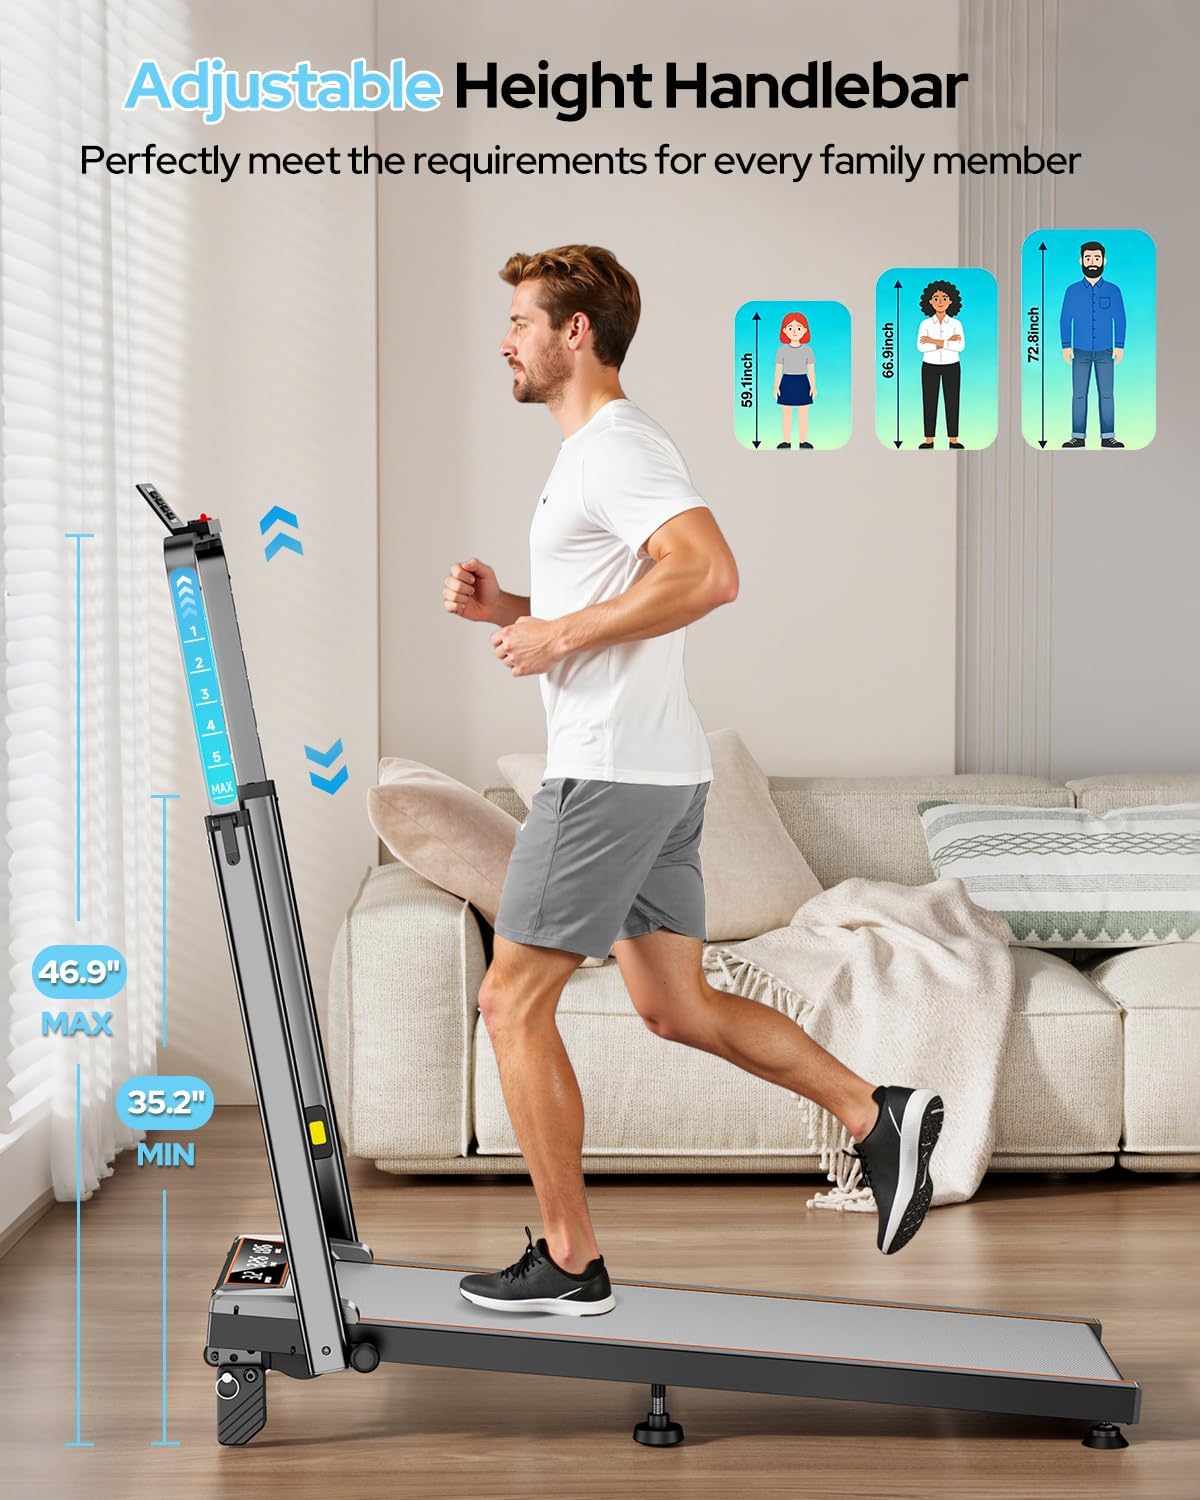
Figure 3.2: Adjusting the handlebar height for comfortable use.

Figure 3.3: The adjustable handlebar accommodates users from 35 to 47 inches in height.
3.3 Tablet Holder Installation
Attach the tablet holder to the top of the handlebar for convenient device placement during workouts.
- Align the tablet holder with the designated slots on the handlebar.
- Secure it using the provided tablet holder screws and nuts.
Figure 3.4: The tablet holder is easily attached to the handlebar.
3.4 Manual Incline Adjustment
The treadmill offers 3 manual incline levels: 0%, 6%, and 12%. To adjust the incline:
- Ensure the treadmill is powered off and unplugged.
- Carefully lift the rear of the treadmill.
- Adjust the support feet to the desired incline level (0%, 6%, or 12%).
- Ensure both sides are set to the same level for stability.
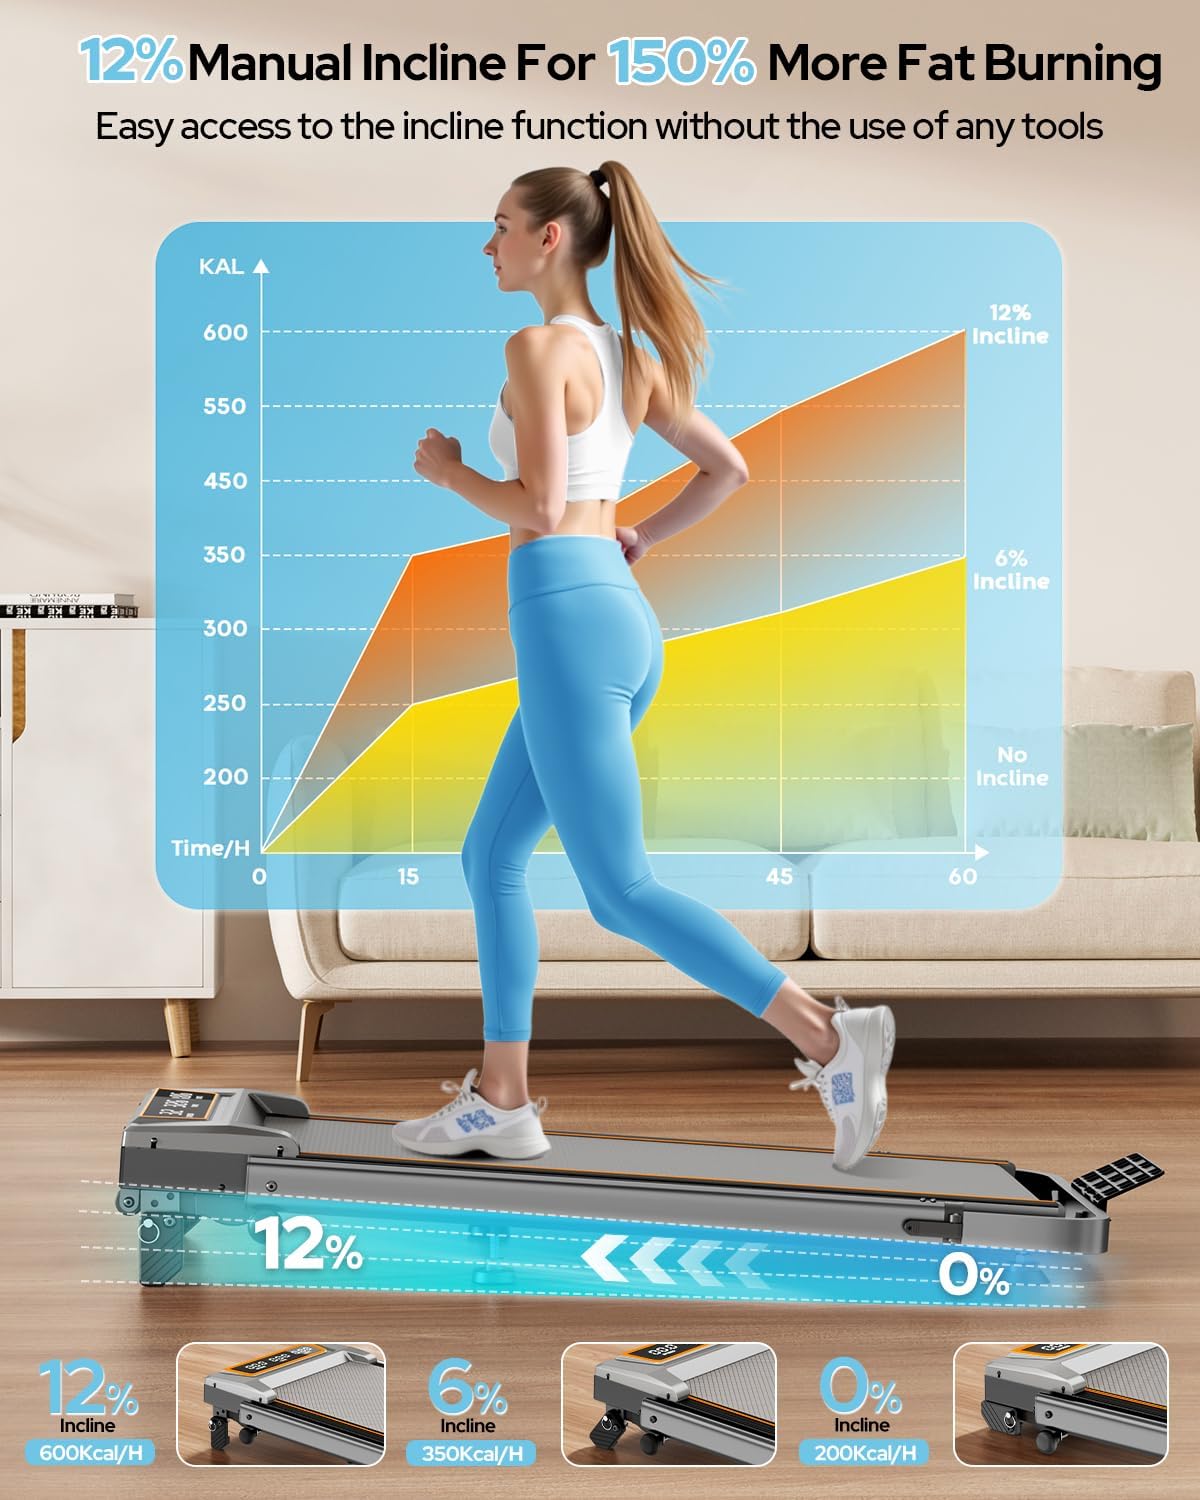
Figure 3.5: Manual adjustment of the treadmill's incline to 0%, 6%, or 12%.

Figure 3.6: The 12% incline setting can enhance calorie burn during workouts.
3.5 Running Belt Adjustment
The running belt may require adjustment over time to ensure proper alignment and tension. Use the provided hex screw for this purpose.
- If the belt drifts to the right: Tighten the right screw slightly or loosen the left.
- If the belt drifts to the left: Tighten the left screw slightly or loosen the right.
- Self-Centering Function: The treadmill corrects slight belt misalignment during low-speed operation without a load.
Figure 3.7: Adjusting the running belt ensures smooth and safe operation.
3.6 Assembly Video Guide
Video 3.1: This video demonstrates the assembly process and key features of the Trisomy walking pad with handle bar.
4. Operating Instructions
4.1 Powering On/Off and Safety Key
To power on, plug the treadmill into a grounded outlet and flip the power switch located at the rear of the motor housing. Before starting any exercise, attach the magnetic safety key to the designated area on the console and clip the other end to your clothing. The treadmill will not operate without the safety key in place. Removing the safety key will immediately stop the treadmill.
4.2 Using the Remote Control
The remote control allows you to adjust speed, start/stop the treadmill, and activate the one-click MUTE function. The MUTE function turns off alert sounds, ideal for quiet environments like offices or when others are resting.

Figure 4.1: The remote control provides convenient access to speed and mute functions.
4.3 LED Display
The clear LED display shows real-time workout data, including:
- Speed: Current speed in MPH.
- Time: Duration of your workout.
- Distance: Total distance traveled in miles.
- Calories: Estimated calories burned.

Figure 4.2: The LED display provides essential workout metrics.
4.4 APP Control (FitShow)
Connect your smartphone to the treadmill via Bluetooth and use the FitShow APP to control settings and track your progress. The app offers various training modes and allows you to monitor your workout data.

Figure 4.3: Control the treadmill and track progress using the FitShow APP.
5. Key Features
- Adjustable Handlebar: 6-level height adjustment from 35 to 47 inches for comfortable use by various users.
- 12% Manual Incline: Three adjustable incline levels (0%, 6%, 12%) to vary workout intensity and target different muscle groups.
- Powerful & Quiet Motor: Equipped with a 3.5HP motor, operating at less than 40dB, offering a speed range of 0.6-6.0 MPH. Supports users up to 350 lbs.
- Advanced Shock Absorption: Features a 7-layer anti-slip running belt and multi-structure shock absorption system to protect joints and reduce impact.
- Foldable & Space-Saving Design: Folds to a compact 4.72 inches thick for easy storage under furniture or in small spaces. Built-in wheels facilitate effortless movement.
- Dual Control System: Operate the treadmill via the intuitive LED display, magnetic remote control, or the dedicated smartphone APP.

Figure 5.1: The 4-in-1 design supports various exercise modes.

Figure 5.2: The compact design allows for easy storage in small spaces.
6. Maintenance
Regular maintenance ensures the longevity and optimal performance of your treadmill.
6.1 Cleaning
- Wipe down the treadmill surfaces with a damp cloth after each use to remove sweat and dust.
- Avoid using abrasive cleaners or solvents that could damage the finish.
6.2 Lubrication
The running belt requires periodic lubrication to reduce friction and extend its lifespan. Use the provided lubricant oil.
- Turn off and unplug the treadmill.
- Loosen the running belt by turning the rear roller bolts counter-clockwise.
- Apply a small amount of lubricant evenly under the center of the running belt.
- Tighten the running belt bolts until the belt is snug but not overly tight.
- Run the treadmill at a low speed for a few minutes to distribute the lubricant.
6.3 Running Belt Adjustment
Refer to Section 3.5 for detailed instructions on adjusting the running belt tension and alignment.
7. Troubleshooting
If you encounter any issues, please refer to the following common solutions. For more complex problems, contact customer support.
| Problem | Possible Cause | Solution |
|---|---|---|
| Treadmill does not power on. | Power cord not plugged in, power switch off, safety key not in place. | Check power connection, ensure power switch is ON, insert safety key. |
| Running belt stops unexpectedly. | Safety key removed, motor overload. | Re-attach safety key. Reduce load or speed. |
| Running belt slips or is off-center. | Belt tension too loose, belt misalignment. | Adjust running belt tension and alignment as per Section 3.5. |
| Unusual noise during operation. | Lack of lubrication, loose components. | Lubricate the running belt (Section 6.2). Check for and tighten any loose screws. |
8. Specifications
| Feature | Detail |
|---|---|
| Brand | Trisomy |
| Model Number | HSM-T12C1 |
| Color | Charcoal Gray |
| Product Dimensions (D x W x H) | 42.5" x 22.4" x 4.4" (folded) |
| Item Weight | 48 Pounds |
| Material | Alloy Steel |
| Maximum Speed | 6.0 Miles per Hour |
| Maximum Horsepower | 3.5 HP |
| Maximum Incline Percentage | 12% (3 manual levels: 0%, 6%, 12%) |
| Display Type | LED |
| Running Belt Area | 36" x 15" |
| Weight Capacity | 350 lbs |
| Noise Level | <40dB |
9. Warranty and Support
The Trisomy Walking Pad Treadmill HSM-T12C1 comes with a 2-year warranty. For technical assistance, product inquiries, or warranty claims, please contact Trisomy customer support. We offer lifetime technical support and 24/7 online assistance.
Refer to the included "User Manual" for detailed contact information and further support resources.

Figure 9.1: Locate support information within your user manual.


