1. Introduction
This manual provides essential information for the safe assembly, operation, maintenance, and troubleshooting of your Prostormer 10-Inch Double Bevel Sliding Compound Miter Saw, Model MS002D. Please read and understand all instructions before using the tool. Keep this manual for future reference.
2. General Safety Instructions
Always follow basic safety precautions to reduce the risk of fire, electric shock, and personal injury.
- Work Area Safety: Keep the work area clean and well-lit. Cluttered or dark areas invite accidents. Do not operate power tools in explosive atmospheres, such as in the presence of flammable liquids, gases, or dust.
- Electrical Safety: Power tool plugs must match the outlet. Never modify the plug in any way. Avoid body contact with earthed or grounded surfaces such as pipes, radiators, ranges, and refrigerators.
- Personal Safety: Always wear eye protection, hearing protection, and a dust mask. Dress properly; avoid loose clothing or jewelry. Keep hair, clothing, and gloves away from moving parts.
- Tool Use and Care: Do not force the power tool. Use the correct power tool for your application. Disconnect the plug from the power source before making any adjustments, changing accessories, or storing power tools.
- Specific Miter Saw Safety: Ensure the blade guard is always in place and functioning correctly. Never reach into the blade area when the saw is connected to power. Secure the workpiece firmly with the clamp before cutting.
3. Package Contents
Verify that all items are present upon unpacking:
- Prostormer 10-Inch Double Bevel Sliding Compound Miter Saw
- 1 x 100T TCT Blade (pre-installed)
- 2 x Side Support Bars
- 1 x Allen Key
- 1 x Workpiece Clamp
- 1 x Dust Bag
- 1 x User Manual (this document)
4. Product Components
Familiarize yourself with the parts of your miter saw:
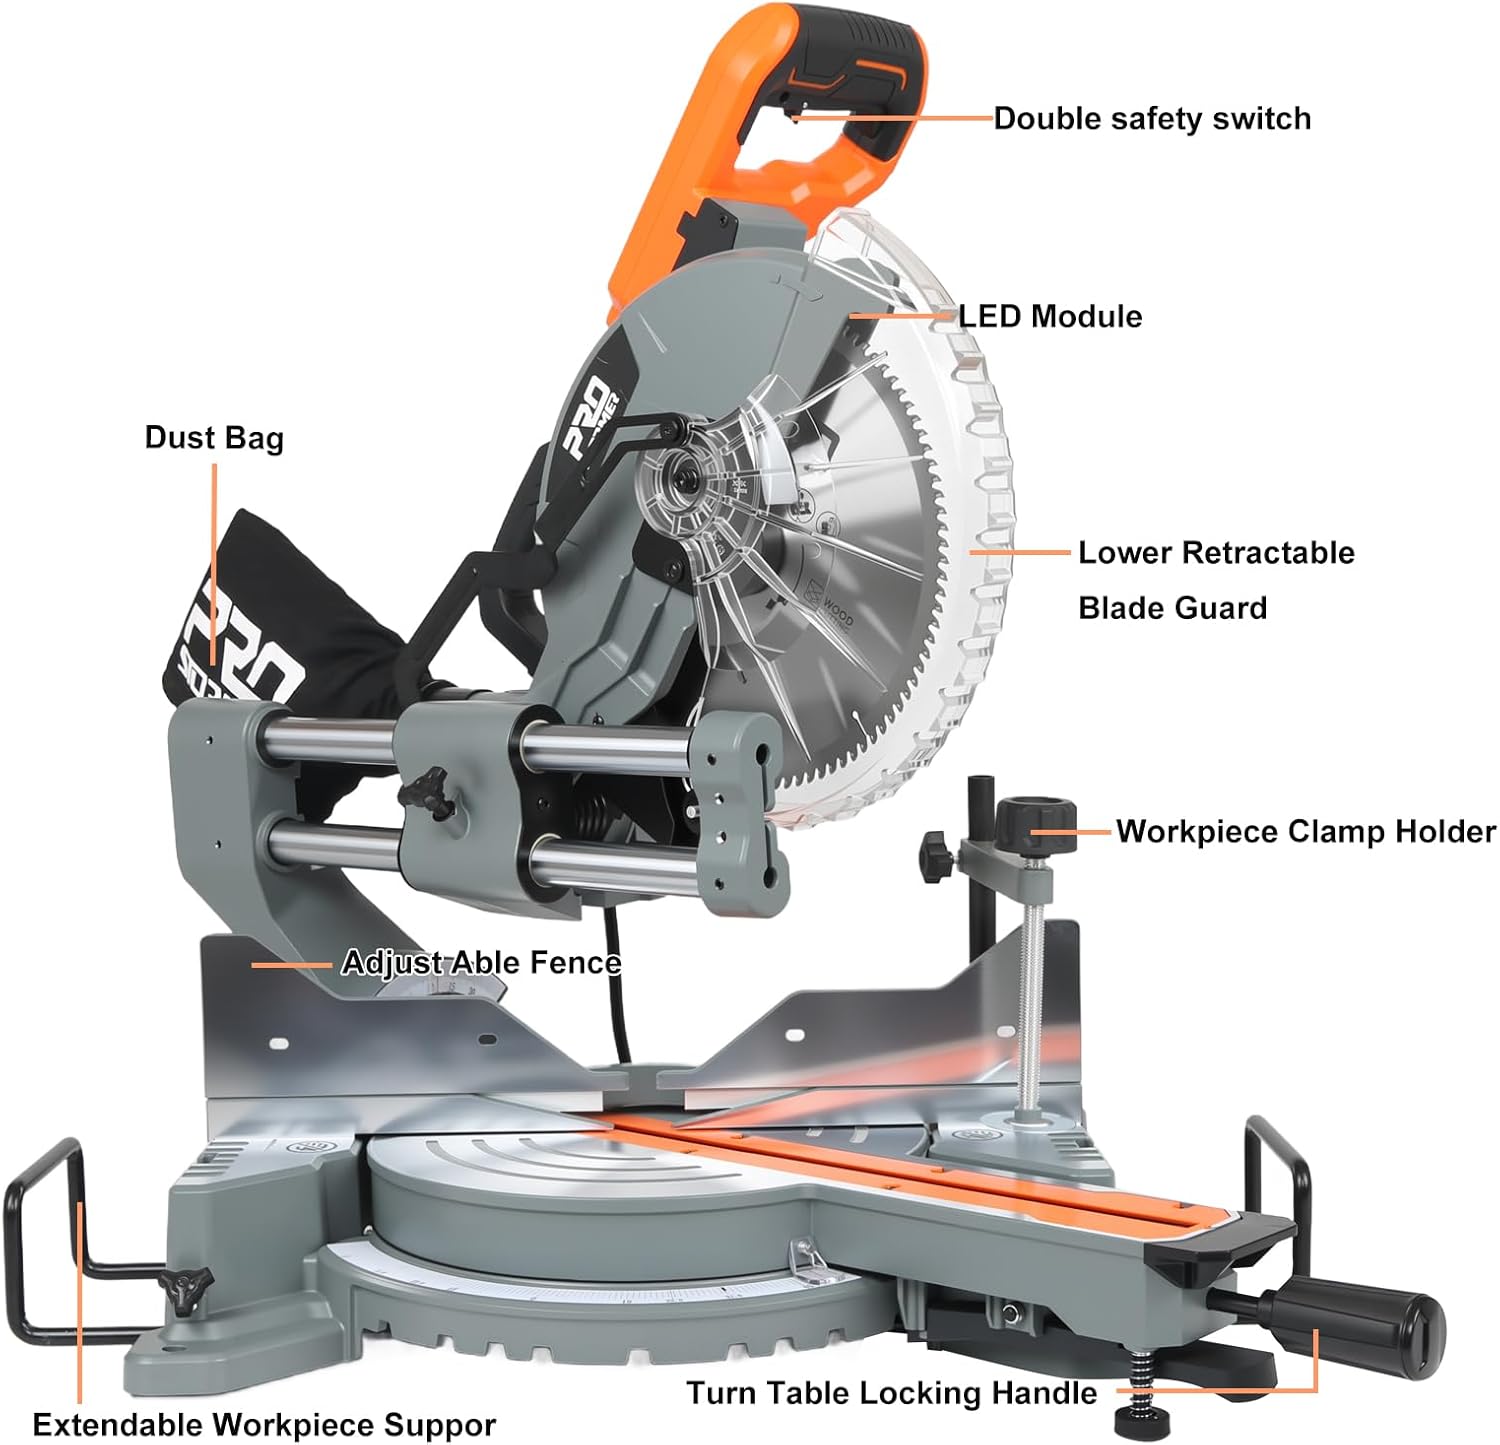
Image 1: Overview of the Prostormer 10-Inch Miter Saw with key components labeled, including the Double Safety Switch, LED Module, Lower Retractable Blade Guard, Workpiece Clamp Holder, Adjustable Fence, Extendable Workpiece Support, Dust Bag, and Turntable Locking Handle.
- Double Safety Switch: Ensures accidental startup is prevented.
- LED Module: Illuminates the cutting line for improved accuracy.
- Lower Retractable Blade Guard: Automatically covers the blade when not in use, retracting during a cut.
- Workpiece Clamp Holder: Secures material to prevent movement during cutting.
- Adjustable Fence: Provides support for the workpiece and guides the cut.
- Extendable Workpiece Support: Offers additional support for longer materials.
- Dust Bag: Collects sawdust and debris for a cleaner workspace.
- Turntable Locking Handle: Secures the miter table at desired angles.
5. Specifications
Technical details of the Prostormer 10-Inch Double Bevel Sliding Compound Miter Saw:

Image 2: Visual representation of the miter saw's dimensions and a table summarizing its key electrical and operational specifications.
| Specification | Value |
|---|---|
| Model Number | MS002D |
| Power Source | Corded Electric |
| Voltage | 120V~, 60Hz |
| Current | 15 Amp |
| No-load Speed | 5000 RPM |
| Blade Diameter | 10 Inches (255mm) |
| Number of Teeth | 100T (TCT blade) |
| Miter Angles | 0°-45° Left/Right |
| Bevel Angles | 0°-45° Left/Right (Double Bevel) |
| Product Dimensions (L x W x H) | 30.3" x 20.9" x 27.6" |
| Item Weight | 40 Pounds |
| Material | Steel, Aluminum, Plastic |
| Special Feature | Double Bevel, LED Alignment, Axial Sliding |
6. Setup
6.1 Unpacking and Inspection
- Carefully remove all components from the packaging.
- Inspect the saw for any damage that may have occurred during shipping. Do not operate if damaged.
- Ensure all listed package contents are present.
6.2 Mounting the Miter Saw
- For stability and safety, permanently mount the miter saw to a workbench or a miter saw stand using appropriate bolts and nuts (not included).
- Ensure the mounting surface is level and capable of supporting the saw's weight and cutting forces.
6.3 Attaching Accessories
- Dust Bag: Slide the dust bag onto the dust port located at the rear of the blade guard assembly. Ensure it is securely attached to collect debris.
- Side Support Bars: Insert the two side support bars into the designated slots on either side of the saw base. Tighten the locking knobs to secure them. These provide additional support for longer workpieces.
- Workpiece Clamp: Insert the workpiece clamp into the hole on the saw base. Adjust its position and tighten it to firmly hold the material during cuts.
7. Operating Instructions
7.1 Powering On/Off
- To start the saw, depress the double safety switch and then squeeze the trigger switch.
- To stop the saw, release the trigger switch. The blade will coast to a stop. Always wait for the blade to stop completely before moving the workpiece or making adjustments.
7.2 Adjusting Miter Angles
The miter saw allows for angle adjustments from 0° to 45° left or right.

Image 3: Demonstrates the precise angle adjustment capabilities of the miter saw, highlighting the locking handle for securing desired cutting positions.
- Loosen the turntable locking handle.
- Rotate the miter table to the desired angle, indicated on the miter scale.
- Tighten the turntable locking handle firmly to secure the angle before cutting.
7.3 Adjusting Bevel Angles (Double Bevel)
This saw features a double bevel function, allowing cuts from 0° to 45° on both the left and right sides.

Image 4: Illustrates the dual-bevel cutting capability, showing the saw head tilting 45 degrees to both the left and right for versatile angled cuts.
- Locate the bevel lock lever/knob (refer to Image 1 for general location).
- Loosen the bevel lock.
- Tilt the saw head to the desired left or right bevel angle, as indicated on the bevel scale.
- Securely tighten the bevel lock before making a cut.
7.4 Using the Axial Sliding System
The axial sliding system allows for wider crosscuts and easy alignment.

Image 5: Depicts the axial sliding mechanism, allowing the saw head to move forward and backward for extended cutting capacity, indicated by a 13-inch slide.
- For wider materials, pull the saw head forward along the sliding rails before starting the cut.
- Engage the motor and slowly push the saw head through the workpiece.
- Ensure the sliding mechanism is clean and free of debris for smooth operation.
7.5 Cutting Operation

Image 6: Shows the miter saw actively cutting a wooden board, demonstrating proper workpiece placement and clamping during operation.
- Place the workpiece firmly against the fence and on the saw table.
- Use the workpiece clamp to secure the material.
- Lower the blade slowly until it just touches the workpiece. The LED light will help align the cut.
- Engage the double safety switch and trigger. Allow the blade to reach full speed before cutting.
- Slowly and steadily lower the blade through the workpiece. Do not force the cut.
- Once the cut is complete, release the trigger and allow the blade to stop completely before raising the saw head and removing the workpiece.
7.6 Material Compatibility
The included 100T TCT blade is suitable for cutting various materials.

Image 7: Illustrates the versatility of the miter saw, capable of cutting plastic, soft metals (like aluminum), and timber with the appropriate blade.
- Wood: All types of wood and wood composites.
- Plastic: Various plastic materials.
- Soft Metals: Such as aluminum. Ensure to use appropriate cutting techniques and safety measures for metal.
8. Maintenance
Regular maintenance ensures optimal performance and extends the life of your tool.
- Cleaning: After each use, disconnect the saw from power and clean off sawdust and debris. Empty the dust bag regularly. Use compressed air to clear dust from vents and moving parts.
- Blade Inspection: Regularly inspect the blade for sharpness, cracks, or missing teeth. Replace dull or damaged blades immediately.
- Blade Replacement: When replacing the blade, ensure the saw is unplugged. Use the provided Allen key to loosen the blade retaining bolt. Follow the instructions in the saw's manual for specific blade change procedures. Always use a 10-inch blade with a 5/8-inch arbor hole.
- Moving Parts: Keep all moving parts, especially the sliding rails, clean and lightly lubricated if necessary.
- Fasteners: Periodically check all nuts, bolts, and screws for tightness. Tighten any loose fasteners.
9. Troubleshooting
Refer to this table for common issues and their solutions:
| Problem | Possible Cause | Solution |
|---|---|---|
| Saw does not start | No power, safety switch not engaged, faulty switch | Check power connection, ensure double safety switch is pressed, inspect power cord and switch. |
| Blade not cutting smoothly or burning wood | Dull blade, incorrect blade for material, forcing the cut | Replace blade, ensure correct blade type, reduce feed rate. |
| Inaccurate cuts | Miter/bevel angle not locked, fence not square, loose blade | Ensure all locks are tightened, check fence alignment, inspect blade for wobble. |
| Excessive vibration | Loose blade, damaged blade, loose mounting bolts | Check blade for damage and tightness, ensure saw is securely mounted. |
| Dust bag not collecting effectively | Dust bag full, dust port clogged, dust bag not properly attached | Empty dust bag, clear dust port, reattach dust bag securely. |
10. Warranty and Support
Prostormer products are manufactured to high-quality standards. For warranty information, technical support, or service inquiries, please refer to the warranty card included with your purchase or contact Prostormer customer service directly. Keep your purchase receipt as proof of purchase.
For further assistance, please visit the official Prostormer website or contact their customer support channels.